Advertisement
Available languages
Available languages
Quick Links
INdac007_UK_FR_ES_DE_IT
D00-142
:
EN_IMPORTANT THE TRAILER IS DESIGNED ONLY TO CARRY THE PETS.
THE RIDERS SHOULD ALWAYS WEAR PROPERLY FITTING AND APPROVED CYCLING
HELMETS
:
FR_IMPORTANT LA REMORQUE EST CONÇUE UNIQUEMENT POUR TRANSPORTER
LES ANIMAUX DOMESTIQUES.
LES UTILISATEURS DOIVENT TOUJOURS PORTER UN CASQUE DE CYCLISTE
ADAPTÉ ET APPROUVÉ.
:
ES_IMPORTANTE ESTE REMOLQUE ESTÁ DISEÑADO ÚNICAMENTE PARA LLEVAR
LAS MASCOTAS.
LOS CONDUCTORES SIEMPRE DEBEN USAR EL CASCO DE CICLISMO APROBADO Y
ADECUADO.
DE_WICHTIG: DER ANHÄNGER IST NUR FÜR DEN TRANSPORT VON HAUSTIEREN
BESTIMMT
DIE FAHRER SOLLTEN IMMER EINEN GUT SITZENDEN UND ZUGELASSENEN
FAHRRADHELM TRAGEN
:
IT_
IMPORTANTE
IL RIMORCHIO È PROGETTATO SOLO PER TRASPORTARE GLI
ANIMALI DOMESTICI.
L'UTENTE DEVE INDOSSARE SEMPRE UN CASCO DA CICLISMO ADEGUATO E
OMOLOGATO.
IMPORTANT, RETAIN FOR FUTURE REFERENCE: READ CAREFULLY
ASSEMBLY & INSTRUCTION MANUAL
Advertisement

Related Manuals for PawHut D00-142


Summary of Contents for PawHut D00-142
- Page 1 INdac007_UK_FR_ES_DE_IT D00-142 : EN_IMPORTANT THE TRAILER IS DESIGNED ONLY TO CARRY THE PETS. THE RIDERS SHOULD ALWAYS WEAR PROPERLY FITTING AND APPROVED CYCLING HELMETS : FR_IMPORTANT LA REMORQUE EST CONÇUE UNIQUEMENT POUR TRANSPORTER LES ANIMAUX DOMESTIQUES. LES UTILISATEURS DOIVENT TOUJOURS PORTER UN CASQUE DE CYCLISTE ADAPTÉ...
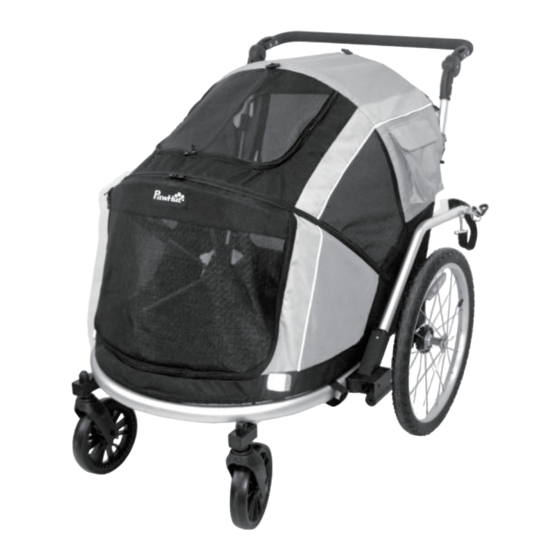
- Page 2 USER INSTRUCTIONS WARNING WARNING Maximum total weight: 60 kg Maximum weight capacity for pet is 45kg Pet trailer suitable for 20”–28” bicycle not for use with children. Never leave the pets unattended. Do not exceed 16Km/H (10MPH) maximum speed. n Do not make any modifications to the trailer. n Ensure that all the locking devices are engaged before use.
- Page 3 MAIN FRAME ASSEMBLY Remove the trailer and all components from carton. While the trailer is still in folded position, lift the handle bar to an upright position. Check the pin is locked. ASSEMBLE FRAME 2 SIDE PLASTIC SEAT Left side Right side Insert the left and right plastic parts as shown INSTALLING AND REMOVING FRONT WHEELS (AS STROLLER - 1)
- Page 4 INSTALLING AND REMOVING REAR WHEELS (AS STROLLER - 2) Insert the rear axle into the plastic hole shown and check that the axle is locked. Pull up red LOCK pin meanwhile pull out the rear wheel. PLACE AND REMOVE THE TOWBAR (AS STROLLER - 3) Insert the tow bar to square groove.
- Page 5 INSTALLING THE TOWBAR (AS TRAILER - 1) Remove the front wheel (in reverse assembling step), insert the drag bar into the left square slot of the frame, and secure as shown PLACE 2 FRONT WHEELS ON EACH SIDE OF THE FRAME (AS TRAILER - 2) ATTACHING TRAILER TO REAR AXLE (AS TRAILER - 3) Fix hitch arm onto rear axle of your bike.
- Page 6 FLAG (AS TRAILER - 4) Insert the flagpole into the flagpole pocket at the left rear corner of the side panel. MAKE SURE TO ALWAYS USE THE SAFETY FLAG TO MAXIMIZE YOUR VISIBILITY TO OTHER VEHICLES SHARING THE ROAD OR PATH. Secure your pet with a safety leash .
- Page 7 How to habituate your dog to the trailer Please take enough time and choose a quiet place So that you can train your dog without any disturbances, which might get him distracted or alarmed. Furthermore, it is important to choose an even surface, like an asphalted surface. The dog should wear a harness.
-
Page 8: Instructions D'utilisation
INSTRUCTIONS D'UTILISATION AVERTISSEMENT AVERTISSEMENT Poids total maximum : 60 kg Capacité de charge maximale pour l'animal de compagnie : 45kg À ne pas utiliser avec des enfants. Ne jamais laisser les animaux domestiques sans surveillance. Ne pas excéder la vitesse maximale de 16Km/H (10MPH). Ne pas apporter de modifications à... - Page 9 ASSEMBLAGE DU CADRE PRINCIPAL Retirez la remorque et toutes les pièces du carton. La remorque étant toujours en position repliée, soulevez le guidon pour le mettre en position verticale. Vérifiez que la goupille est verrouillée. ASSEMBLAGE DES 2 SIÈGES LATÉRAUX EN PLASTIQUE Côté...
- Page 10 INSTALLATION ET DÉMONTAGE DES ROUES ARRIÈRE (POUSSETTE - 2) Insérez l'essieu arrière dans le trou en plastique indiqué et vérifiez que l'essieu est verrouillé. Tirez vers le haut la goupille rouge de VERROUILLAGE et sortez la roue arrière INSTALLATION ET DÉMONTAGE DE LA BARRE D'ATTELAGE (POUSSETTE - 3) Insérez la barre de remorquage dans la rainure carrée.
- Page 11 INSTALLATION DE LA BARRE D'ATTELAGE (REMORQUE - 1) Retirez la roue avant (en procédant à l'étape de montage inverse), insérez la barre d'attelage dans la fente carrée gauche du châssis, et fixez-la comme illustré. MONTAGE DES ROUES AVANT DE CHAQUE CÔTÉ DU CADRE (REMORQUE - 2) FIXATION DE LA REMORQUE À...
- Page 12 DRAPEAU (REMORQUE - 4) Insérez la hampe du drapeau dans la pochette située dans le coin arrière gauche du panneau latéral. VEILLEZ À TOUJOURS UTILISER LE DRAPEAU DE SÉCURITÉ AFIN DE MAXIMISER VOTRE VISIBILITÉ AUPRÈS DES AUTRES VÉHICULES AVEC QUI VOUS PARTAGEZ LA ROUTE OU LE SENTIER.
- Page 13 Habituer votre chien à la remorque Prenez suffisamment de temps et choisissez un endroit calme afin de pouvoir entraîner votre chien sans être dérangé par quoi que ce soit qui pourrait le distraire ou l'alarmer. En outre, il est important de choisir une surface plane, comme une surface asphaltée.
-
Page 14: Instrucciones Para El Usuario
INSTRUCCIONES PARA EL USUARIO ADVERTENCIA ADVERTENCIA Carga de peso total máximo: 60 kg La capacidad de carga de peso máximo de la mascota es de 45kg. El remolque para mascotas es apto para las bicicletas de 20”a 28” k ç = ë É = é ì É Ç É = ì í á ä á ò ~ ê = é ~ ê ~ = ä ä É î ~ ê = ~ = ä ç ë = å á ³ ç ë K Nunca deje a las mascotas desatendidas. - Page 15 CONJUNTO DEL MARCO PRINCIPAL Saque el remolque y todas las piezas de la caja. Mientras el remolque aú n está plegada, levante la barra del manillar a la posición vertical. Verifique si el pasador esté bloqueado bien. MONTAR LOS ASIENTOS DE PLÁSTICO DE 2 LADOS DEL MARCO Lado izquierdo Lado derecho Inserte las piezas de plástico izquierda y derecha como lo que se muestra en la imagen.
- Page 16 INSTALACIÓN Y EXTRACCIÓN DE LAS RUEDAS TRASERAS (COMO UN CARRITO - 2) Inserte el eje trasero en el orificio de plástico como lo que se muestra en la imagen, y verifique si el eje esté= Ä ä ç è ì É ~ Ç ç = Ä á É å K Tire el pasador de BLOQUEO rojo hacia arriba mientras saca la rueda trasera.
- Page 17 INSTALACIÓN DE LA BARRA DE REMOLQUE (COMO UN REMOLQUE - 1) Retire la rueda frontal (realizar el paso de montaje de manera inversa), inserte la barra de remolque en la ranura cuadrada izquierda del marco y fíjela como lo que se muestra en la imagen.
- Page 18 BANDERA (COMO UN REMOLQUE - 4) Inserte el asta de bandera en el bolsillo del asta que está ubicado en la esquina trasera izquierda del panel lateral. SIEMPRE ASEGÚRESE DE UTILIZAR LA BANDERA DE SEGURIDAD PARA MAXIMIZAR SU VISIBILIDAD PARA OTROS VEHÍCULOS QUE COMPARTEN LA CARRETERA O EL CAMINO. Fije a su mascota con la correa de seguridad.
- Page 19 Cómo acostumbrar a su perro al remolque Tó mese el tiempo suficiente y encuentre un lugar tranquilo para entrenar a su perro sin molestias que puedan distraerlo o alertarlo. Ademá s, es muy importante encontrar una superficie uniforme, por ejemplo, una superficie asfaltada. Debe utilizar un arnés para el perro.
- Page 20 BENUTZERHINWEISEWARNUNG WARNUNG Maximales Gesamtgewicht: 60 kg Maximale Gewichtskapazität für Haustiere ist 45 kg Haustieranhänger geeignet für 20 Zoll bis 28 Zoll Fahrrad nicht zur Verwendung mit Kindern geeignet. Lassen Sie die Haustiere niemals unbeaufsichtigt. Überschreiten Sie nicht die Höchstgeschwindigkeit von 16 km/h (10 mph). n Nehmen Sie keine Veränderungen am Anhänger vor.
- Page 21 MONTAGE DES HAUPTRAHMENS Nehmen Sie den Anhänger und alle Komponenten aus dem Karton. Heben Sie die Deichsel in eine aufrechte Position, während der Anhänger noch zusammengeklappt ist. Prüfen Sie, ob der Stift verriegelt ist. RAHMEN MONTIEREN 2 SEITEN KUNSTSTOFFSITZ Linke Seite Rechte Seite Setzen Sie die linken und rechten Kunststoffteile wie abgebildet ein.
- Page 22 EIN- UND AUSBAU DER HINTERRÄDER (WIE KINDERWAGEN - 2) Stecken Sie die Hinterachse in die abgebildete Kunststofföffnung und prüfen Sie, ob die Achse verriegelt ist. Ziehen Sie den roten SPERR-Stift hoch und ziehen Sie das Hinterrad heraus. ANBRINGEN UND ENTFERNEN DER DEICHSEL (WIE KINDERWAGEN - 3) Führen Sie die Deichsel in die viereckige Nut ein.
- Page 23 MONTAGE DER DEICHSEL (ALS ANHÄNGER - 1) Entfernen Sie das Vorderrad (in umgekehrter Reihenfolge), stecken Sie die Deichsel in den linken Vierkantschlitz des Rahmens und befestigen Sie sie wie abgebildet 2 VORDERRÄDER AUF JEDER SEITE DES RAHMENS ANBRINGEN (WIE ANHÄNGER - 2) A N H Ä...
- Page 24 FLAGGE (ALS ANHÄNGER - 4) Stecken Sie den Fahnenmast in die Fahnenmasttasche an der linken hinteren Ecke der Seitenwand. ACHTEN SIE DARAUF, IMMER DIE SICHERHEITSFAHNE ZU VERWENDEN, UM IHRE SICHTBARKEIT FÜR ANDERE FAHRZEUGE, DIE DIE STRASSE ODER DEN WEG TEILEN, ZU MAXIMIEREN.
- Page 25 So gewöhnen Sie Ihren Hund an den Anhänger Bitte nehmen Sie sich ausreichend Zeit und wählen Sie einen ruhigen Ort, damit Sie Ihren Hund ohne Störungen trainieren können, die ihn ablenken oder aufschrecken könnten Außerdem ist es wichtig, einen ebenen Untergrund zu wählen, z. B. eine asphaltierte Fläche Der Hund sollte ein Geschirr tragen Die hintere Tür sollte geöffnet und die vordere Tür geschlossen sein Nehmen Sie nach Möglichkeit eine Hilfsperson zur Unterstützung mit.
- Page 26 ISTRUZIONI D'USO AVVERTENZE AVVERTENZE Peso totale Massimo consentito: 60 kg. La capacità di peso massima dell'animale domestico è di 45 kg. Rimorchio per animali domestici adatto per biciclette da 20"-28". Non adatto per l'uso con bambini. Non lasciare mai gli animali incustoditi all'interno. Non superare la velocità...
- Page 27 ASSEMBLAGGIO DEL TELAIO PRINCIPALE Rimuovere il rimorchio e tutti i componenti dalla confezione. Mentre il rimorchio è ancora piegato, sollevare il manubrio in posizione verticale. Controllare che il perno sia bloccato. ASSEMBLARE I 2 LATI DEL SEDILE DI PLASTICA SUL TELAIO Lato sinistro Lato destro Inserire le parti in plastica sinistra e destra come mostrato...
- Page 28 INSTALLARE E RIMUOVERE LE RUOTE POSTERIORE (PER PASSEGGINO - 2) Inserire l'asse posteriore nel foro di plastica mostrato in figura e controllare che sia bloccato in posizione. Tirare verso l'alto il perno di BLOCCO rosso e nel frattempo estrarre la ruota posteriore.
- Page 29 INSTALLARE LA BARRA DI TRAINO (PER PASSEGGINO - 1) Rimuovere la ruota anteriore (in fase di montaggio al contrario), inserire la barra di traino nella scanalatura quadrata sinistra del telaio e fissarla come mostrato in figura. INSTALLARE 2 RUOTE FRONTALI SU OGNI LATO DEL TELAIO (PER RIMORCHIO- 2) F I S S A R E I L R I M O R C H I O A L L ' A S S E P O S T E R I O R E ( P E R...
- Page 30 BANDIERINA (PER RIMORCHIO - 4) Inserire l'asta della bandierina nella tasca dell'asta nell'angolo posteriore sinistro del pannello laterale. ASSICURARSI DI UTILIZZARE SEMPRE LA BANDIERA DI SICUREZZA PER M A S S I M I Z Z A R E L A V I S I B I L I T À V E R S O G L I A LT R I V E I C O L I C H E CONDIVIDONO LA STRADA O IL PERCORSO.
- Page 31 Come far abituare il cane al rimorchio Si prega di prendersi abbastanza tempo e di scegliere un luogo tranquillo in modo da poter addestrare il cane senza alcun disturbo, che potrebbe distrarlo o allarmarlo. Inoltre, è importante scegliere una superficie piana, ad esempio una superficie asfaltata.
Need help?
Do you have a question about the D00-142 and is the answer not in the manual?
Questions and answers