
Subscribe to Our Youtube Channel
Related Manuals for PawHut D00-141


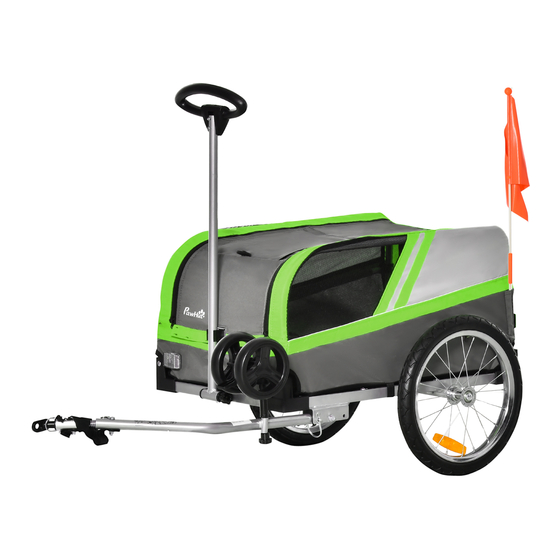
Summary of Contents for PawHut D00-141
- Page 1 INdac006_UK_FR_ES_DE_IT INdac006_UK_FR_ES_DE_IT_D00-141 IMPORTANT, RETAIN FOR FUTURE REFERENCE: READ CAREFULLY ASSEMBLY & INSTRUCTION MANUAL...
-
Page 2: Pre-Ride Safety Check
IMPORTANT:THE TRAILER IS DESIGNED ONLY TO CARRY THE PETS. THE RIDERS SHOULD ALWAYS WEAR PROPERLY FITTING AND APPROVED CYCLING HELMETS USER INSTRUCTIONSWARNING WARNING Total weight: 60 kg Maximum weight capacity for pet is 45kg Pet trailer suitable for 20”–28” bicycle not for use with children. - Page 3 PET TRAILER PARTS INCLUDED IN THE BOX A. trailer body with tow bar ×1 B. flag ×1 C. front wheel ×1 D. cross bar ×1 E. draw bar ×1 rear wheel ×2 MAIN FRAME AND SIDE PANEL ASSEMBLY Remove the trailer and all components from carton. While the trailer is still in folded position, lift both side panels to an upright position.
- Page 4 FLAG Insert the flagpole into the flagpole pocket at the left rear corner of the side panel. MAKE SURE TO ALWAYS USE THE SAFETY FLAG TO MAXIMIZE YOUR VISIBILITY TO OTHER VEHICLES SHARING THE ROAD OR PATH. Secure your pet with a safety leash .
-
Page 5: Hitch Arm Assembly
HITCH ARM ASSEMBLY Release the safety latch,rotate the tow bar to the front and lock the safety latch. As a trailer,as shown in the figure below, install the front wheel on the tow bar and tighten the knob. ATTACHING TRAILER TO REAR AXLE Fix hitch arm onto rear axle of your bike. -
Page 6: Installing Front Wheel
INSTALLING FRONT WHEEL Insert the front wheel into the front casing with the screw. How to habituate your dog to the trailer Please take enough time and choose a quiet place So that you can train your dog without any disturbances, which might get him distracted or alarmed. Furthermore, it is important to choose an even surface, like an asphalted surface. - Page 7 I M P O R TA N T: L A R E M O R Q U E E S T C O N Ç U E U N I Q U E M E N T P O U R TRANSPORTER LES ANIMAUX.
- Page 8 PIÈCES DE LA REMORQUE INCLUSES DANS LA BOÎTE A. Corps de la remorque avec barre de remorquage ×1 B. Drapeau ×1 C. Roue avant ×1 D. Barre transversale ×1 E. Barre de traction ×1 F. Roue arrière ×2 ASSEMBLAGE DU CADRE PRINCIPAL ET DES PANNEAUX LATÉRAUX Retirez la remorque et tous les composants du carton.
- Page 9 DRAPEAU Insérez la mât porte-drapeau dans la pochette située dans le coin arrière gauche du panneau latéral. VEILLEZ À TOUJOURS UTILISER LE DRAPEAU DE SÉCURITÉ AFIN DE MAXIMISER VOTRE VISIBILITÉ POUR LES AUTRES VÉHICULES QUI PARTAGENT LA ROUTE OU LE CHEMIN. Attachez votre animal de compagnie avec une laisse de sécurité.
- Page 10 ASSEMBLAGE DU BRAS D'ATTELAGE Relâchez le loquet de sécurité, faites pivoter la barre de remorquage vers l'avant et verrouillez le loquet de sécurité. Comme une remorque, comme le montre la figure ci-dessous, installez la roue avant sur la barre de remorquage et serrez le bouton. FIXATION DE LA REMORQUE A L'ESSIEU ARRIÈRE Fixez le bras d'attelage sur l'essieu arrière de votre vélo.
- Page 11 INSTALLATION DE LA ROUE AVANT Insérez la roue avant dans le boîtier avant à l'aide de la vis. Comment habituer votre chien à la remorque Prenez suffisamment de temps et choisissez un endroit calme afin de pouvoir entraîner votre chien sans aucune perturbation, ce qui pourrait le distraire ou l'alarmer. En outre, il est important de choisir une surface plane, comme une surface asphaltée.
- Page 12 I M P O RTA N T E:E L R E M O L Q U E E S T Á D I S E Ñ A D O Ú N I C A M E N T E PA R A LLEVAR LAS MASCOTAS.
- Page 13 PIEZAS DEL REMOLQUE PARA MASCOTAS INCLUIDAS EN LA CAJA Cuerpo de remolque con barra tiradora ×1 Bandera ×1 Rueda frontal ×1 Barra transversal ×1 Barra de tracción ×1 Rueda trasera ×2 CONJUNTO DE MARCO PRINCIPAL Y PANEL LATERAL Retire el remolque y todos los componentes de la caja de cartón. Cuando el remolque todavía está...
- Page 14 BANDERA Inserte el asta de la bandera en el bolsillo del asta que está ubicado en la esquina trasera izquierda del panel lateral. ASEGÚRESE DE SIEMPRE UTILIZAR LA BANDERA DE SEGURIDAD CON EL FIN DE MAXIMIZAR SU VISIBILIDAD PARA OTROS VEHÍCULOS EN LA MISMA CARRETERA O EL MISMO CAMINO.
- Page 15 CONJUNTO DEL BRAZO DE ENGANCHE Suelte el pestillo de seguridad, gire la barra tiradora hacia el frente, luego bloquee el pestillo de seguridad Si se utiliza como un remolque, instale la rueda frontal en la barra tiradora y apriete la perilla como lo que se muestra en la figura a continuación.
- Page 16 INSTALAR LA RUEDA FRONTAL Inserte la rueda frontal en la carcasa frontal y fíjela con el tornillo. Cómo acostumbrar a su perro al remolque Tómese el tiempo suficiente y encuentre un lugar tranquilo para que pueda entrenar a su perro sin molestias que puedan distraerlo o asustarlo.
- Page 17 WICHTIG: DER ANHÄNGER IST FÜR DEN TRANSPORT DER HAUSTIERE VORGESEHEN. DIE FAHRER SOLLTEN IMMER EINEN GUT SITZENDEN UND ZUGELASSENEN FAHRRADHELM TRAGEN BENUTZERHINWEISEWARNUNG WARNUNG Gesamtgewicht: 60 kg Maximale Gewichtskapazität für Haustiere ist 45 kg Haustieranhänger geeignet für 20 Zoll bis 28 Zoll Fahrrad Nicht zur Verwendung mit Kindern geeignet.
- Page 18 IM KARTON ENTHALTENE TEILE DES ANHÄNGERS FÜR HAUSTIERE Anhängerkörper mit Deichsel ×1 Fahne ×1 Vorderrad ×1 Querstange ×1 Zugdeichsel ×1 F. Hinterrad ×2 HAUPTRAHMEN UND SEITENWANDMONTAGE Nehmen Sie den Anhänger und alle Komponenten aus dem Karton. Heben Sie die beiden Seitenteile im zusammengeklappten Zustand des Anhängers in eine aufrechte Position.
- Page 19 FAHNE Stecken Sie den Fahnenmast in die Fahnenmasttasche an der linken hinteren Ecke der Seitenwand. ACHTEN SIE DARAUF, IMMER DIE SICHERHEITSFAHNE ZU VERWENDEN, UM IHRE SICHTBARKEIT FÜR ANDERE FAHRZEUGE, DIE DIE STRASSE ODER DEN WEG TEILEN, ZU MAXIMIEREN. Sichern Sie Ihr Haustier mit einer Sicherheitsleine. Sicherheitsleine...
- Page 20 MONTAGE DER DEICHSEL Lösen Sie den Federclip, drehen Sie die Deichsel nach vorne und verriegeln Sie die Sicherheitsverriegelung. Montieren Sie als Anhänger, wie in der Abbildung unten gezeigt, das Vorderrad an der Deichsel und ziehen Sie den Knopf fest. ANHÄNGER AN DER HINTERACHSE BEFESTIGEN Befestigen Sie die Deichsel an der Hinterachse Ihres Fahrrads.
- Page 21 VORDERRAD MONTIEREN Setzen Sie das Vorderrad mit der Schraube in das vordere Gehäuse ein. So gewöhnen Sie Ihren Hund an den Anhänger Bitte nehmen Sie sich ausreichend Zeit und wählen Sie einen ruhigen Ort, damit Sie Ihren Hund ohne Störungen trainieren können, die ihn ablenken oder erschrecken könnten. Außerdem ist es wichtig, eine ebene Fläche zu wählen, z.
- Page 22 IMPORTANTE:IL RIMORCHIO È PROGETTATO SOLO PER TRASPORTARE GLI ANIMALI. I GUIDATORI DEVONO SEMPRE INDOSSARE I INDUMENTI CORRETTI E CASCHI DA CICLISMO OMOLOGATI INSTRUZIONI D'UTENTEAVVERTIMENTO AVVERTIMENTO n Peso totale: 60 kg La capacità massima di peso dell'animale domestico è di 45 kg n Rimorchio per animali domestici adatto per biciclette da 20”–28”...
- Page 23 PARTI INCLUSI NELLA CONFEZIONE DEL RIMORCHIO PER ANIMALI DOMESTICI Corpo del rimorchio con barra di traino ×1 Bandiera ×1 Ruota anteriore ×1 Barra trasversale ×1 Maniglia ×1 F. Ruota posteriore ×2 MONTAGGIO DEL TELAIO PRINCIPALE E DEI PANNELLI LATERALI Rimuovere il rimorchio e tutti i componenti dalla confezione. Mentre il rimorchio è ancora in posizione ripiegata, sollevare entrambi i pannelli laterali in posizione verticale.
- Page 24 BANDIERA Inserire l'asta della bandiera nella tasca dell'asta nell'angolo posteriore sinistro del pannello laterale. A S S I C U R A R S I D I U S A R E S E M P R E L A B A N D I E R A D I S I C U R E Z Z A P E R MASSIMIZZARE LA TUA VISIBILITÀ...
- Page 25 MONTAGGIO BRACCIO DI SOLLEVAMENTO Rilasciare il bullone di sicurezza, ruotare la barra di traino in avanti e blocca il bullone di sicurezza. Per un rimorchio come mostrato nella figura sottostante, installare la ruota anteriore sulla barra di traino e serrare il manopola. ATTACCARE IL RIMORCHIO ALL'ASSE POSTERIORE Fissare il braccio di sollevamento sull'asse posteriore della tua bici.
- Page 26 INSTALLARE LE RUOTE ANTERIORI Inserire la Ruota anteriore nell'involucro anteriore con la vite. Come rendere il tuo cane abituato al rimorchio Si prega di prendere abbastanza tempo e sceglere un posto tranquillo in modo da poter addestrare il tuo cane senza alcun disturbo che potrebbe distrarlo o allarmarlo. Inoltre, è importante scegliere una superficie piana, come una superficie asfaltata.
Need help?
Do you have a question about the D00-141 and is the answer not in the manual?
Questions and answers