Table of Contents
Advertisement
Quick Links
Advertisement
Table of Contents
Troubleshooting

Related Manuals for Omron CK3W-GC 00 Series


Summary of Contents for Omron CK3W-GC 00 Series
- Page 1 CK3M-series Programmable Multi-Axis Controller Hardware User’s Manual CK3M-CPU11 CK3W-PD048 CK3W-AX1313/-AX1414/-AX1515/-AX2323 CK3W-MD710 CK3W-AD100 CK3W-ECS300 CK3W-GC00 CK3W-EXM01/-EXS02 Programmable Multi-Axis Controller O036-E1-08...
- Page 2 Moreover, because OMRON is constantly striving to improve its high-quality products, the information contained in this manual is subject to change without notice. 3. Every precaution has been taken in the preparation of this manual. Nevertheless, OMRON assumes no responsi- bility for errors or omissions.
-
Page 3: Intended Audience
Introduction Introduction Thank you for purchasing the CK3M-series Programmable Multi-Axis Controller (hereinafter, it may be abbreviated as “Motion Controller”). This manual contains information necessary for using the CK3M-series Programmable Multi-Axis Con- troller. Please read this manual and make sure you understand the functionality and performance of the product before you attempt to use it in a control system. -
Page 4: Manual Structure
Manual Structure Manual Structure Page Structure The following page structure is used in this manual. Level 1 heading 4 Installation and Wiring Level 2 heading Level 3 heading Mounting Units Level 2 heading Gives the current Level 3 heading headings. 4-3-1 Connecting Controller Components The Units that make up an NJ-series Controller can be connected simply by pressing the Units together... -
Page 5: Special Information
Manual Structure Special Information Special information in this manual is classified as follows: Precautions for Safe Use Precautions on what to do and what not to do to ensure safe usage of the product. Precautions for Correct Use Precautions on what to do and what not to do to ensure correct operation and performance. Additional Information Additional information to read as required. - Page 6 Manual Structure CK3M-series Programmable Multi-Axis Controller User's Manual Hardware (O036)
-
Page 7: Sections In This Manual
Sections in this Manual Sections in this Manual Introduction to Motion Controllers System Configuration Configuration Units Installation Wiring Troubleshooting Inspection and Maintenance Appendices Index CK3M-series Programmable Multi-Axis Controller User's Manual Hardware (O036) -
Page 8: Table Of Contents
CONTENTS CONTENTS Introduction ......................1 Intended Audience............................1 Applicable Products ............................1 Manual Structure...................... 2 Page Structure..............................2 Special Information ............................3 Sections in this Manual ................... 5 Terms and Conditions Agreement................ 11 Warranty, Limitations of Liability ........................11 Application Considerations ..........................12 Disclaimers ..............................12 Statement of Security Responsibilities for Assumed Use Cases and Against Threats .........13 Safety Precautions.................... - Page 9 CONTENTS Section 2 System Configuration Basic Configuration.......................2-2 2-1-1 CK3W Unit Configuration ......................2-2 2-1-2 EtherCAT Network Configuration ....................2-3 Connecting to the Power PMAC IDE ..................2-5 Ethernet Network Configuration...................2-6 Section 3 Configuration Units CPU Unit ..........................3-3 3-1-1 Models and Specifications ......................3-3 3-1-2 Part Names and Functions......................3-5 3-1-3 Operation Status Indicators......................3-6...
- Page 10 CONTENTS 3-7-2 Part Names and Functions......................3-70 3-7-3 Operation Indicators ........................3-71 3-7-4 Address Switch Setting ......................3-71 3-7-5 Terminal Arrangement .......................3-72 3-7-6 XY2-100 Interface ........................3-72 3-7-7 SL2-100 Interface........................3-76 3-7-8 PWM Output Function .......................3-80 3-7-9 TCR Output Function ........................3-82 3-7-10 Software Settings ........................3-84 Expansion Master Unit and Expansion Slave Unit ............3-87 3-8-1 Models and Specifications ......................3-87...
- Page 11 Expansion Master Unit and Expansion Slave Unit ..............A-8 A-2-7 End Cover ..........................A-9 Restrictions on Using the NX-series EtherCAT Coupler Unit......... A-10 OMRON Servo Drive Connection Example............... A-11 Version Information ......................A-12 How to Read the Lot Number..................... A-13 CK3M-series Programmable Multi-Axis Controller User's Manual Hardware (O036)
- Page 12 CONTENTS Supported CIP Objects....................... A-14 A-7-1 Identity Object (Class ID: 01 Hex) .................... A-14 A-7-2 Assembly Object (Class ID: 04 Hex) ..................A-15 A-7-3 TCP/IP Interface Object (Class ID: F5 Hex)................A-16 A-7-4 Ethernet Link Object (Class ID: F6 Hex) .................. A-17 Software Reference of Encoder Input Unit...............
-
Page 13: Terms And Conditions Agreement
Omron’s exclusive warranty is that the Products will be free from defects in materials and work- manship for a period of twelve months from the date of sale by Omron (or such other period ex- pressed in writing by Omron). Omron disclaims all other warranties, express or implied. -
Page 14: Application Considerations
WAY CONNECTED WITH THE PRODUCTS, WHETHER SUCH CLAIM IS BASED IN CONTRACT, WARRANTY, NEGLIGENCE OR STRICT LIABILITY. Further, in no event shall liability of Omron Companies exceed the individual price of the Product on which liability is asserted. Application Considerations... -
Page 15: Statement Of Security Responsibilities For Assumed Use Cases And Against Threats
Product. Errors and Omissions Information presented by Omron Companies has been checked and is believed to be accurate; how- ever, no responsibility is assumed for clerical, typographical or proofreading errors or omissions. Statement of Security Responsibilities for Assumed Use Cases and... -
Page 16: Safety Precautions
Safety Precautions Safety Precautions Definition of Precautionary Information In this manual, precautions are shown with the following indications and symbols to ensure the safe use of the CK3M-series Programmable Multi-Axis Controller. The safety precautions that are provided are extremely important for safety. Always read and heed the information provided in all safety precautions. -
Page 17: Warning
Safety Precautions WARNING WARNING Wiring Connect this Controller correctly to the servo amplifier, encoder, limit sensors, Galvo Scanner, and laser according to the instructions in this manual. Not doing so may cause the motor to run away, etc., resulting in serious accidents. For the Power Supply Unit or any other power supply connected to peripheral devices, connect the 0-V side to ground, or do not ground them at all. - Page 18 Safety Precautions The UPS used enables normal operation to continue for a certain period of time if a momentary power interruption occurs. This means that the CK3M-series Controller may receive incorrect signals from external devices that are also affected by the power interruption.
-
Page 19: Cautions
Safety Precautions Test Run Before you start a Test Run, make sure that the operation parameters are set correctly. Actual Operation Check the user program, servo algorithm, data, and parameter settings for proper exe- cution before you use them for actual operation. Cautions Caution Design... -
Page 20: Precautions For Safe Use
Precautions for Safe Use Precautions for Safe Use Transporting • Do not drop any Unit or subject it to abnormal vibration or shock. Doing so may result in Unit mal- function or burning. Mounting • Be sure that the terminal blocks, connectors, and other items with locking devices are correctly locked into place before use. - Page 21 Precautions for Safe Use When cross-wiring terminals, the total current for all the terminals will flow in the wire. When wiring cross-overs, make sure that the current capacity of each of the wires is not exceeded. • Do not allow wire clippings, shavings, or other foreign material to enter the Controller. Otherwise, Controller burning, failure, or malfunctions may occur.
- Page 22 Precautions for Safe Use Turning OFF the Power Supply • Do not turn OFF the power supply or remove the USB memory device while the Controller is ac- cessing the USB memory device. Data may become corrupted, and the Controller will not operate correctly if it uses corrupted data.
- Page 23 Precautions for Safe Use • EtherCAT communications are not always established immediately after the power supply is turned ON. Use the system-defined variables and the EtherCAT Coupler Unit device variables in the user program to confirm that I/O data communications are established before attempting control opera- tions.
- Page 24 Precautions for Safe Use Motion Control • The motor is stopped if communications are interrupted between the Power PMAC IDE and the Controller during a Test Run. Connect the communications cable securely and confirm that the sys- tem will not be adversely affected before you perform a Test Run. •...
-
Page 25: Precautions For Correct Use
Precautions for Correct Use Precautions for Correct Use Storage and Installation • Follow the instructions in this manual to correctly perform installation. • Do not operate or store the Controller in the following locations. Doing so may result in burning, in operation stopping, or in malfunction. - Page 26 Precautions for Correct Use EtherCAT Communications • Set the Servo Drives to stop operation if an error occurs in EtherCAT communications between the Controller and a Servo Drive. • Always use the specified EtherCAT slave cables. If you use any other cable, the EtherCAT master or the EtherCAT slaves may detect an error and one of the following may occur.
-
Page 27: Regulations And Standards
Concepts EMC Directives OMRON devices that comply with EU Directives also conform to the related EMC standards so that they can be more easily built into other devices or the overall machine. The actual products have been checked for conformity to EMC standards.*1 Whether the products conform to the standards in the system used by the customer, however, must be checked by the customer. -
Page 28: Conformance To Ul And Csa Standards
Regulations and Standards Unit type Overall accuracy Analog Input Unit +6%/-6% To connect an Analog Input Unit, use 2-core twisted-pair shielded wire. Note that compliance was con- firmed with the shielded wire grounded at both ends. Conformance to UL and CSA Standards The CK3M-series Controller conforms to UL and CSA standards. -
Page 29: Versions
Versions Versions PMAC firmware revisions are used to manage the motion control firmware in CK3M-series CPU Units. The PMAC firmware revision is updated each time there is a change in motion control firmware. Even when two CPU Units have the same model number, they will have functional or performance differen- ces if they have different PMAC firmware revisions. -
Page 30: Related Manuals
Related Manuals Related Manuals The following manuals are related. Use these manuals for reference. Contact your OMRON represen- tative for information on how to procure these manuals. Manual name Cat. No. Application Description CK3M-series Programma- O036 Learning the basic An introduction to the entire CK3M-series system... -
Page 31: Terminology
Terminology Terminology Term Description PMAC The acronym for Programmable Multi-Axis Controller. Motion control Motion control can achieve intended operation by providing a target value to the axis to be control- led, or by controlling state transitions. Axis A functional unit within the Motion Control Function Module. An axis is assigned to the drive mecha- nism in an external Servo Drive, etc. -
Page 32: Revision History
Revision History Revision History A manual revision code appears as a suffix to the catalog number on the front and back covers of the manual. O036-E1-08 Revision code Revision Date Revised content code July 2018 Original production • July 2019 Made changes accompanying the addition of CK3W-AX1313£/-AX2323£/- MD71£0/-AD£100/-EXM01/-EXS02 Units. -
Page 33: Introduction To Motion Controllers
Introduction to Motion Controllers This section describes the features, system configuration, and usage procedure of the CK3M-series Programmable Multi-Axis Controller. Features and System Configuration ............1-2 1-1-1 Motion Controller Features................1-2 1-1-2 Introduction to the System Configurations ............1-2 1-1-3 Support Software..................... -
Page 34: Features And System Configuration
1 Introduction to Motion Controllers Features and System Configuration This section describes the features of the CK3M-series Programmable Multi-Axis Controller, an over- view of the system configuration, and support software. 1-1-1 Motion Controller Features Fast Multi-Axis Control The Motion Controller uses the Programmable Multi Axis Controller, developed by Delta Tau Data Sys- tems, Inc. -
Page 35: Support Software
1 Introduction to Motion Controllers Basic Configuration Encoder (Digital quadrature encoder, serial encoder) Support Software GC2001 Laser Laser Galvo Scanner Industrial Servo drives (analog input Ethernet type) or Stepper motors switch Programmable terminal EtherCAT network EtherNet/IP Modbus-TCP Ethernet network Servo drive/ General- Slave... -
Page 36: Ethercat Network Configuration
NX Units. However, when OMRON NX-series EtherCAT Coupler Units are used for the EtherCAT Slave Ter- minal, there are restrictions on the models and unit versions of EtherCAT Coupler Units that can be connected. - Page 37 1 Introduction to Motion Controllers Operating Procedure This section describes the procedure to construct a motion control system by using the Motion Con- troller. Step Description Reference Preparation for Check for specifi- Check compatibility with specifications A-1 General Specifications on work cation compatibili- of each Unit.
- Page 38 1 Introduction to Motion Controllers Step Description Reference Construction of Settings of the Configure the originator device settings. For details, refer to the manual for the EtherNet/IP originator device the originator device. Refer to the NJ/NX-series CPU network Unit Built-in EtherNet/IP Port User’s Manual (Cat.
- Page 39 System Configuration This section describes the system configuration of the CK3M-series Programmable Multi-Axis Controller. Basic Configuration ..................2-2 2-1-1 CK3W Unit Configuration ................2-2 2-1-2 EtherCAT Network Configuration ..............2-3 Connecting to the Power PMAC IDE ............2-5 Ethernet Network Configuration ..............2-6 CK3M-series Programmable Multi-Axis Controller User's Manual Hardware (O036)
-
Page 40: Basic Configuration
2 System Configuration Basic Configuration A Motion Controller supports the following two types of configurations. • Basic Configuration The basic configurations include the CPU Unit and the Configuration Units that are controlled direct- ly by the CPU Unit. There are two basic configurations. a) CK3W Unit Configuration b) EtherCAT network configuration •... - Page 41 2 System Configuration E, F, G, H E, F, G, H Power supply Letter Configuration Remarks Power Supply Unit Input the 24 V power source. Always wire the CPU Rack and Expansion Rack to the same power supply. CK3M-series CPU Unit This is the Unit at the center of the motion control, which executes the motion program.
- Page 42 2 System Configuration EtherCAT slaves General- Servo drive/ Slave terminal purpose Encoder input slaves slaves EtherCAT is synchronized with the servo cycle of the CK3M-series CPU Unit. This enables acquisition of the I/O data of slave terminals that are synchronized with the servo cycle. Refer to A-3 Restrictions on Using the NX-series EtherCAT Coupler Unit on page A-10 for information on using the NX-series EtherCAT Coupler Unit.
-
Page 43: Connecting To The Power Pmac Ide
2 System Configuration Connecting to the Power PMAC IDE Connect the CK3M-series CPU Unit and the Power PMAC IDE through Ethernet. Power PMAC IDE Ethernet Ethernet Ethernet switch CK3M-series Power Supply Unit CPU Unit Built-in Ethernet port Precautions for Correct Use Use Power PMAC IDE Ver.4 or a higher version. -
Page 44: Ethernet Network Configuration
2 System Configuration Ethernet Network Configuration The Ethernet communications port on the CK3M-series CPU Unit supports the EtherNet/IP protocol and the Modbus-TCP protocol. It can be connected to devices such as PLCs and programmable terminals that support the EtherNet/IP protocol or the Modbus-TCP protocol. EtherNet/IP communications support targets only, so originators are required for the communications. - Page 45 Configuration Units This section describes the configuration units of the CK3M-series Programmable Mul- ti-Axis Controller. CPU Unit......................3-3 3-1-1 Models and Specifications................3-3 3-1-2 Part Names and Functions................3-5 3-1-3 Operation Status Indicators................3-6 3-1-4 Watchdog Output Terminal Block ..............3-7 3-1-5 USB Memory Device ..................
- Page 46 3 Configuration Units 3-5-6 Analog Input Data..................3-58 3-5-7 Input Filter ..................... 3-59 Encoder Input Unit ..................3-61 3-6-1 Models and Specifications................3-61 3-6-2 Part Names and Functions................3-63 3-6-3 Operation Indicators ..................3-63 3-6-4 Address Switch Setting ................. 3-63 3-6-5 Terminal Arrangement ...................
-
Page 47: Cpu Unit
3 Configuration Units CPU Unit This section describes the models and major specifications of the CK3M-series CPU Units. 3-1-1 Models and Specifications Models and Outline of Specifications The models and outline of specifications are given below. Maximum number of con- Unit type Model Memory capacity... - Page 48 3 Configuration Units Item CK3M-CPU101 CK3M-CPU111 CK3M-CPU121 Communications protocol None EtherCAT protocol Baud rate 100 Mbps Physical layer 100BASE-TX (IEEE 802.3) Line, daisy chain, branching, and Topology ring EtherCAT com- Twisted-pair cable of category 5 or munications Transmission media higher (double-shielded cable with specifications aluminum tape and braiding) Distance between nodes: 100 m or...
-
Page 49: Part Names And Functions
3 Configuration Units Item CK3M-CPU101 CK3M-CPU111 CK3M-CPU121 Weight (including End Cover) 220 g max. 230 g max. A ring topology is available for CPU Units with PMAC firmware revision version 2.7.0 or later. Be sure to use a shielded cable for EtherNet/IP communications. EtherNet/IP is available only for targets and not available for originators. -
Page 50: Operation Status Indicators
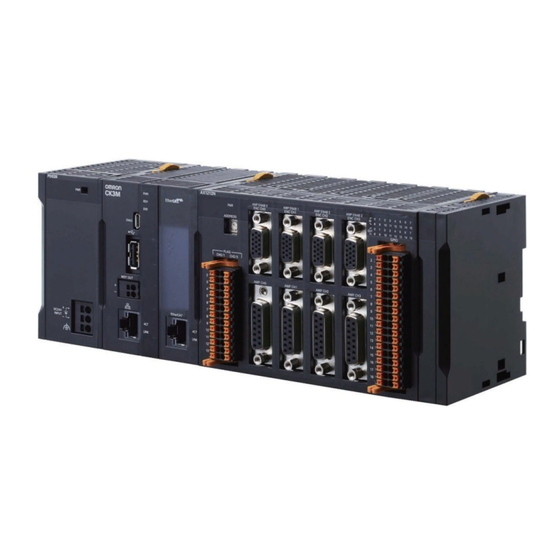
3 Configuration Units Letter Name Function Slider Holds the Units together. CPU Unit operation indicators Shows the operation status of the CPU Unit using multiple in- dicators. EtherCAT communications connector Connects to an EtherCAT network communications cable. EtherCAT communications port opera- Shows the operation status of EtherCAT. -
Page 51: Watchdog Output Terminal Block
3 Configuration Units CPU Unit Status Indicators The operating statuses corresponding to the colors and statuses of the indicators are shown below. Indicator name Color Status Description Green Lit. Power is supplied to the Unit. Not lit. Power is not supplied to the Unit. Green Lit. - Page 52 3 Configuration Units Terminal Arrangement Terminal block Abbreviation Signal name WDTOUT+ WDTOUT- Output Status In normal operation, it is ON, and at other times it is OFF. Status Output When unit power is OFF During normal operation When hardware watchdog error occurs OFF When software watchdog error occurs Output Specifications Item...
-
Page 53: Usb Memory Device
You can use a USB memory device for the following applications. • Saving relevant data • Initializing the CPU Unit The following shows details of the recommended USB memory devices. OMRON is not responsible for the operation of any other USB memory devices. Recommended USB memories Description FZ-MEM2G... -
Page 54: Power Supply Unit
3 Configuration Units Power Supply Unit This section describes the model and major specifications of the Power Supply Unit. 3-2-1 Models and Specifications Models and Outline of Specifications The models and outline of specifications are given below. Unit type Model Specification Power Supply Unit CK3W-PD048 Rated output voltage: 5 VDC/24 VDC Maximum output power: 5 VDC 23 W, 24 VDC 55 W... -
Page 55: Part Names And Functions
3 Configuration Units • Has double or reinforced insulation between the input and output. Recommended Power Supplies: S8VK-S series (manufactured by OMRON) 3-2-2 Part Names and Functions Letter Name Function Power supply connection terminal Connects the power supply. block Power supply status indicator Lights when 5 V is output from the Power Supply Unit. -
Page 56: Axis Interface Unit
Phases A, B, and C: 10 MHz encoder in- sponse fre- quency Serial en- Supported Contact your OMRON representative for information on the support protocols. coder input protocol Digital Hall sensor 4 points/channel (U, V, W, T) OUTFlagB output 1 point/channel... - Page 57 Maximum re- Phases A, B, and C: 10 MHz coder input sponse fre- quency Serial en- Supported Contact your OMRON representative for information on the support protocols. coder input protocol Sinusoidal Input signal 1-Vpp SIN/COS signal encoder in- Maximum in-...
-
Page 58: Part Names And Functions
3 Configuration Units Specification (CK3W-) Item AX1313N AX1313P AX2323N AX2323P General dig- Number of 16 inputs, 16 outputs ital I/O points Internal com- Power consumption 5 VDC: 3.4 W max. 5 VDC: 3.0 W max. 24 VDC: 12.5 W max. 24 VDC: 13.1 W max. -
Page 59: Operation Status Indicators
3 Configuration Units CK3W-AX1313£/-AX2323£ 10 11 12 13 14 15 10 11 12 13 14 15 Letter Name Function Slider Holds the Units together. Power supply status indicator Shows the power supply status. Amp enable status indicator Shows the Amp enable status. Encoder connector Connects the encoder. -
Page 60: Address Switch Setting
3 Configuration Units 3-3-4 Address Switch Setting This Unit is equipped with an IC that has the same interface as a PMAC3 style DSPGate3 IC. Refer to the Power PMAC User's Manual (Cat. No. O014) for the PMAC3 style DSPGate3 IC. The address switch settings are used to set the Gate3 Index. - Page 61 3 Configuration Units For the connector arrangement of the encoder connector, refer to 5-3-1 Encoder Connector Wiring on page 5-18. Isolation method Not isolated (between internal circuit and encoder circuit) Encoder Rated output voltage 5 VDC power sup- Output voltage range 4.9 to 5.25 VDC (5 VDC +5%/-2%) ply output Maximum output current...
- Page 62 With single-ended input, use twisted-pair wire to improve noise resistance, and pair the respective signals of encoder A+, B+, C+ with GND. Serial encod- Supported protocol Contact your OMRON representative for information on the er input support protocols. Clock output EIA standard RS-422A line driver levels...
- Page 63 3 Configuration Units Circuit configuration +5 V Serial encoder CLK+ Serial encoder CLK- Hall sensor U Hall sensor V +5 V Serial Internal encoder circuit Ω DAT+ Serial encoder DAT- Hall sensor W Hall sensor T Connect or shell 3-19 CK3M-series Programmable Multi-Axis Controller User's Manual Hardware (O036)
- Page 64 3 Configuration Units Sinusoidal Input form Line receiver input + AD conversion encoder in- Number of inputs 2 points/channel (SIN signal, COS signal) Maximum rated input voltage 0 to Encoder Power Supply (+5 V) Encoder Power Supply as GND reference Allowable differential input 0.6 to 1.35 Vpp voltage range...
- Page 65 3 Configuration Units Circuit configuration Hall sensor U Hall sensor V Internal circuit Hall sensor W Hall sensor T Serial encoder CLK+ Serial encoder CLK- Connector shell Serial encoder DAT+ Serial encoder DAT- Terminal connection diagram Hall sensor Hall sensor U Hall sensor V Hall sensor W Hall sensor T...
-
Page 66: Encoder Loss Detection
3 Configuration Units Connection diagram OutFlagB Connector shell For the GND, use an encoder power source (GND). This function is available with the CK3W-AX1313£/-AX1414£/-AX1515£ Units. With single-ended input, only a voltage output type encoder can be connected. Open collector type encod- ers cannot be connected. -
Page 67: Pulse Input Timing Specifications For Digital Quadrature Encoder
3 Configuration Units Encoder A+/B+ Encoder A-/B- Encoder loss detection Normal Normal Detects loss Detects loss If loss is detected, the value of Gate3[i].Chan[j].LossStatus becomes 1. Motor[x].EncLossCount adds 1 to the count when encoder loss is detected, and subtracts 1 when en- coder loss is not detected. - Page 68 3 Configuration Units With Differential Input Encoder input (Phases A & B) Input pulse duty = 50% Encoder input (Phase C) Vol- C(+) Vol- tage Ter- A/B(+) tage Ter- minal minal Input Voltage Input C(-) Vol- A/B(-) tage Relationship between Phase A and Phase B for Phase Differential Pulse Inputs Voltage A(+) Voltage...
-
Page 69: Input Specifications For Sinusoidal Encoder
3 Configuration Units Single-Ended Input Encoder input (Phases A & B) Input pulse duty = 50% Encoder input (Phase C) Ter- Ter- Phase A/ Vol- Phase C minal Vol- minal tage tage Phase B Input Input Voltage Voltage Relationship between Phase A and Phase B for Phase Differential Pulse Inputs Phase A Voltage Voltage... - Page 70 3 Configuration Units SIN+ 4.0 V Typical: 1 Vpp 0.5 Vpp Differential Allowable differential input voltage range: Approx. 2.5 V signal 0.6 to 1.35 Vpp (SIN+) - (SIN-) Allowable input voltage range: 0 to 4.0 V (GND reference) SIN- 4.0 V 0.5 Vpp Approx.
-
Page 71: Outflag Function
Applications Use this function as a signal to connect with the SEN signal that is necessary to acquire the abso- lute encoder value when connecting with the OMRON G5-series Servo Drives with General-pur- pose Pulse Train or Analog Inputs. -
Page 72: Amplifier Connector Specifications
OutFlagD Function Applications When connecting with the OMRON G5-series Servo Drives with General-purpose Pulse Train or Analog Inputs, the encoder A+/- terminal and the serial encoder DAT+/- terminal are short circuited and used to enable obtaining the absolute encoder value sent from the Servo Drive. - Page 73 B- Analog Connector shell DirectPWM out- Communications Controller-Servo Drive interface unique to Delta Tau method Connectable am- Contact your OMRON representative. plifier Output form Line driver output Input form Line driver input Isolation method Not isolated from internal circuit Cables For connection with an amplifier, be sure to use the following cables.
- Page 74 3 Configuration Units Output signal Output: 2 points/channel Pulse output Pulse output Pulse output + directional output, or phase difference output method Pulse output Line driver output form Output voltage EIA standard RS-422A line driver levels Maximum output 10 MHz frequency Cable length 10 m max.
-
Page 75: Output Method
3 Configuration Units Minimum switch- 5 VDC, 1 mA ing capacity Relay service life 100,000 operations ON/OFF re- 10 ms max./10 ms max. sponse time Isolation method Isolation by Relay (between amp enable output and internal circuit) Circuit configura- tion Amp enable NO Internal Amp enable common... -
Page 76: Directpwm Output Method
3 Configuration Units • TrueDAC This section describes each of the methods. FilteredPWM This is a method for creating analog output by smoothing the PWM pulse. The relationship between the set value and output voltage is shown below. Voltage between analog output + Voltage between analog output + Set value and analog output -... -
Page 77: Flag Connection Terminal Block Specifications
3 Configuration Units Contact your OMRON representative for information on DirectPWM-compatible Servo Drives. DirectPWM allows the Motion Controller to directly send motor current commands to Servo Drives and monitor the actual motor current. Because the Motion Controller directly sends motor current commands and monitors the motor cur- rent, high-speed precision motion control is enabled. - Page 78 3 Configuration Units Signal No. Signal (4ch type) EQU0 EQU2 EQU1 EQU3 COM_EQU COM_EQU HOME0 HOME2 PLIM0 PLIM2 NLIM0 NLIM2 USER0 USER2 V_FLAG0 V_FLAG2 HOME1 HOME3 PLIM1 PLIM3 NLIM1 NLIM3 USER1 USER3 V_FLAG1 V_FLAG3 Signal Signal name EQUn Position comparison output Output COM_EQU Position comparison output (Common) Common HOMEn...
- Page 79 3 Configuration Units Signal No. Signal (4ch type) EQU0 EQU2 EQU1 EQU3 COM_EQU COM_EQU HOME0 HOME2 PLIM0 PLIM2 NLIM0 NLIM2 USER0 USER2 G_FLAG0 G_FLAG2 HOME1 HOME3 PLIM1 PLIM3 NLIM1 NLIM3 USER1 USER3 G_FLAG1 G_FLAG3 Signal Signal name EQUn Position comparison output Output COM_EQU Position comparison output (Common) Common HOMEn...
- Page 80 3 Configuration Units Circuit configuration NPN type Current control HOME 0 to 3 circuit Current control PLIM 0 to 3 circuit Internal circuit Current control NLIM 0 to 3 circuit Current control USER 0 to 3 circuit V_FLAG 0 to 3 PNP type HOME 0 to 3 Current...
- Page 81 3 Configuration Units Connection diagram NPN type V_FLAG 0 to 3 HOME 0 to 3 PLIM 0 to 3 NLIM 0 to 3 USER 0 to 3 5 to 24 VDC PNP type HOME 0 to 3 PLIM 0 to 3 NLIM 0 to 3 USER 0 to 3 G_FLAG 0 to 3...
-
Page 82: General Digital I/O Connection Terminal Block Specifications
3 Configuration Units Connection diagram EQUn COM_EQU Since the OFF current is small, connection to the two-wire sensor may not be successful. Refer to Precau- tions When Connecting a Two-wire DC Sensor on page 5-29 for information on using the two-wire sensor. For high-speed output, we recommend the use of shielded wiring. - Page 83 3 Configuration Units Signal Signal IN00 IN08 IN01 IN09 IN02 IN10 IN03 IN11 IN04 IN12 IN05 IN13 IN06 IN14 IN07 IN15 OUT00 OUT08 OUT01 OUT09 OUT02 OUT10 OUT03 OUT11 OUT04 OUT12 OUT05 OUT13 OUT06 OUT14 OUT07 OUT15 PNP Type 3-39 CK3M-series Programmable Multi-Axis Controller User's Manual Hardware (O036)
- Page 84 3 Configuration Units Signal Signal IN00 IN08 IN01 IN09 IN02 IN10 IN03 IN11 IN04 IN12 IN05 IN13 IN06 IN14 IN07 IN15 OUT00 OUT08 OUT01 OUT09 OUT02 OUT10 OUT03 OUT11 OUT04 OUT12 OUT05 OUT13 OUT06 OUT14 OUT07 OUT15 Electrical Specifications of General Digital I/O Connection Terminal Block General digital Number of inputs...
- Page 85 3 Configuration Units Circuit configuration NPN type Current IN00 control circuit Current IN01 control circuit Internal circuit Current IN15 control circuit PNP type IN00 Current control circuit IN01 Internal circuit Current control circuit IN15 Current control circuit 3-41 CK3M-series Programmable Multi-Axis Controller User's Manual Hardware (O036)
- Page 86 3 Configuration Units Connection diagram NPN type IN00 IN01 IN15 24 VDC PNP type IN00 IN01 IN15 24 VDC General digital Internal common output (NPN) Rated voltage 12 to 24 VDC Current consumption 40 mA max. Operating load voltage 10.2 to 26.4 VDC range Maximum load current 0.5 A/point, 2 A/Unit...
- Page 87 3 Configuration Units Circuit configuration OUT00 OUT01 Internal circuit OUT15 Connection diagram NPN type OUT00 OUT01 OUT15 12 to 24 VDC General digital Internal common output (PNP) Rated voltage 12 to 24 VDC Current consumption 80 mA max. Operating load voltage 10.2 to 26.4 VDC range Maximum load current...
- Page 88 3 Configuration Units Circuit configuration OUT00 Internal OUT01 circuit OUT15 Connection diagram PNP type OUT00 OUT01 OUT15 12 to 24 VDC 3-44 CK3M-series Programmable Multi-Axis Controller User's Manual Hardware (O036)
-
Page 89: Digital I/O Unit
3 Configuration Units Digital I/O Unit This section describes the Digital I/O Unit. 3-4-1 Models and Specifications Models and Outline of Specifications The models and outline of specifications are given below. Unit type Model Number of inputs Number of outputs I/O type Digital I/O Unit CK3W-MD7110 16 points 16 points CK3W-MD7120 16 points... - Page 90 3 Configuration Units PNP type IN00 Current control circuit IN01 Internal circuit Current control circuit IN15 Current control circuit Connection diagram NPN type IN00 IN01 IN15 24 VDC 3-46 CK3M-series Programmable Multi-Axis Controller User's Manual Hardware (O036)
- Page 91 3 Configuration Units PNP type IN00 IN01 IN15 24 VDC Digital output Internal common (NPN) Rated voltage 12 to 24 VDC Current consumption 40 mA max. Operating load voltage 10.2 to 26.4 VDC range Maximum load current 0.5 A/point, 2 A/Unit Maximum inrush current 4.0 A/point, 10 ms max.
- Page 92 3 Configuration Units Connection diagram OUT00 OUT01 OUT15 12 to 24 VDC Digital output Internal common (PNP) Rated voltage 12 to 24 VDC Current consumption 80 mA max. Operating load voltage 10.2 to 26.4 VDC range Maximum load current 0.5 A/point, 2 A/Unit Maximum inrush current 4.0 A/point, 10 ms max.
-
Page 93: Part Names And Functions
3 Configuration Units Connection diagram OUT00 OUT01 OUT15 12 to 24 VDC Power consumption 5 V: 1.0 W max. Dimensions (height × depth × width) 90(H)/80(D)/31.6(W) Weight 150 g max. 3-4-2 Part Names and Functions Letter Name Function Slider Holds the Units together. Power supply status indicator Shows the power supply status. -
Page 94: Operation Indicators
3 Configuration Units 3-4-3 Operation Indicators The LED indicators show the unit operating status of the Digital I/O Unit. The operating statuses corresponding to the colors and statuses of the indicators are shown below. Indicator name Color Status Description Green Power is supplied. -
Page 95: Terminal Arrangement
3 Configuration Units One CK3W Unit in the system supplies servo clock and phase clock signals to all the other Units. The supply-source CK3W Unit must be installed to the CPU Rack. Connect the Unit with the smallest address value to the CPU Rack because, by default, it is the supply source of clock signals. -
Page 96: I/O Data
3 Configuration Units CK3W-MD7120 Signal Signal IN00 IN08 IN01 IN09 IN02 IN10 IN03 IN11 IN04 IN12 IN05 IN13 IN06 IN14 IN07 IN15 OUT00 OUT08 OUT01 OUT09 OUT02 OUT10 OUT03 OUT11 OUT04 OUT12 OUT05 OUT13 OUT06 OUT14 OUT07 OUT15 3-4-6 I/O Data The CPU Unit can access I/O data via the Gate3[i].GpioData[0] register. - Page 97 3 Configuration Units Input Register Gate3[i].GpioData[0].7 Gate3[i].GpioData[0].8 Gate3[i].GpioData[0].9 IN10 Gate3[i].GpioData[0].10 IN11 Gate3[i].GpioData[0].11 IN12 Gate3[i].GpioData[0].12 IN13 Gate3[i].GpioData[0].13 IN14 Gate3[i].GpioData[0].14 IN15 Gate3[i].GpioData[0].15 Output data is stored in each bit of the register as shown below. Output Register OUT0 Gate3[i].GpioData[0].16 OUT1 Gate3[i].GpioData[0].17 OUT2 Gate3[i].GpioData[0].18 OUT3 Gate3[i].GpioData[0].19...
-
Page 98: Analog Input Unit
3 Configuration Units Analog Input Unit This section describes the Analog Input Unit. 3-5-1 Models and Specifications Models and Outline of Specifications The models and outline of specifications are given below. Unit type Model Number of inputs Input range Analog Input Unit CK3W-AD2100 4 points -10 to 10 V CK3W-AD3100 8 points -10 to 10 V... -
Page 99: Part Names And Functions
3 Configuration Units For single-ended input Input 0+ to 7+ Input 0- to 7- AGND • If any of Input 0- to Input 7- is single ended input, apply a short-circuit between the input and AGND. • Use a shielded cable and ground at both ends of the ca- ble. -
Page 100: Operation Indicators
3 Configuration Units 3-5-3 Operation Indicators The LED indicator shows the unit operating status of the Analog Input Unit. The operating statuses corresponding to the colors and statuses of the indicators are shown below. Indicator name Color Status Description Green Power is supplied. -
Page 101: Terminal Arrangement
3 Configuration Units Connect the Unit with the smallest address value to the CPU Rack because, by default, it is the supply source of clock signals. You may specify the Unit with a desired address as the clock supply source by setting the register. If the Unit that serves as the clock supply source is connected to the Expansion Rack, an error occurs because the CPU Unit cannot recognize clock signals. -
Page 102: Analog Input Data
3 Configuration Units No. Signal No. Signal AIN0+ AIN0- AIN1+ AIN1- AIN2+ AIN2- AIN3+ AIN3- AGND AGND AIN4+ AIN4- AIN5+ AIN5- AIN6+ AIN6- AIN7+ AIN7- AGND AGND 3-5-6 Analog Input Data This section describes the correspondence between input analog signals and analog input data. The graph shows that a voltage between -10 to 10 V is converted to data between 80D2 and 7F2E hex (-32,558 to 32,558). -
Page 103: Input Filter
3 Configuration Units Note that the conversion timing of AIN0, AIN1, AIN4, AIN5 and that of AIN2, AIN3, AIN6, AIN7 are not the same. To capture analog input data correctly, the following register settings are required. These register settings are the default. Gate3[i].AdcAmpClockDiv = 5 or 4 (5 by default) Gate3[i].AdcAmpCtrl = $FFFFFC01 Gate3[i].AdcAmpDelay = 0... - Page 104 3 Configuration Units Input Input filter cut-off frequency (kHz) Setting AIN6 3.2 (Default) Gate3[i].GpioData[0].12=0, Gate3[i].GpioData[0].13=0 Gate3[i].GpioData[0].12=1, Gate3[i].GpioData[0].13=0 12.2 Gate3[i].GpioData[0].12=0, Gate3[i].GpioData[0].13=1 24.5 Gate3[i].GpioData[0].12=1, Gate3[i].GpioData[0].13=1 AIN7 3.2 (Default) Gate3[i].GpioData[0].14=0, Gate3[i].GpioData[0].15=0 Gate3[i].GpioData[0].14=1, Gate3[i].GpioData[0].15=0 12.2 Gate3[i].GpioData[0].14=0, Gate3[i].GpioData[0].15=1 24.5 Gate3[i].GpioData[0].14=1, Gate3[i].GpioData[0].15=1 3-60 CK3M-series Programmable Multi-Axis Controller User's Manual Hardware (O036)
-
Page 105: Encoder Input Unit
3 Configuration Units Encoder Input Unit This section describes the Serial Encoder Input Unit. 3-6-1 Models and Specifications Models and Outline of Specifications The models and outline of specifications are given below. Unit type Model Encoder type Number of channels Encoder Input Unit CK3W-ECS300 Serial encoder 4 channels Specifications Encoder power... - Page 106 3 Configuration Units Terminal connection dia- BiSS-C gram Encoder Serial Encoder CLK+ Serial Encoder CLK- SLO+ Serial Encoder DAT+ SLO- Serial Encoder DAT- Encoder Power Supply (+5 VDC) +5 V Encoder Power Supply (GND) Connector shell Endat2.2 Encoder CLOCK Serial Encoder CLK+ CLOCK Serial Encoder CLK- DATA...
-
Page 107: Part Names And Functions
3 Configuration Units 3-6-2 Part Names and Functions ECS300 ADDRESS Letter Name Function Slider Holds the Units together. Address switch Sets the Gate3 Index. Power supply status indicator Shows the power supply status. Encoder connector Connects the encoder. Unit connector Connector that connects to the Unit. -
Page 108: Terminal Arrangement
3 Configuration Units Power PMAC Address switch setting “Gate3” Index For example, if the address switch setting is 0, the Gate3 Index becomes 0. In this case, this Unit is accessed with a Gate3[0] data structure. Make sure that the address switch settings of Units do not overlap. If they overlap, the Sys.Status register CK3WConfigErr becomes 7. - Page 109 3 Configuration Units The register settings here are different from the definitions descried in the Power PMAC Software Reference Manual (Cat. No. O015). Refer to A-8 Software Reference of Encoder Input Unit on page A-21 for detailed specifications. Power PMAC Saved Data Structure Elements Gate3[i].SerialEncCtrl Serial encoder control register Gate3[i].Chan[0].SerialEncEna...
-
Page 110: Laser Interface Unit
3 Configuration Units Laser Interface Unit This section describes the Laser Interface Unit. 3-7-1 Models and Specifications Models and Outline of Specifications The models and outline of specifications are given below. Unit type Model Communications method Laser output Laser Interface Unit CK3W-GC1100 XY2-100 PWM output CK3W-GC1200 PWM output, TCR output... - Page 111 3 Configuration Units Circuit configuration XY-CLOCK+ XY-CLOCK- XY-SYNC+ XY-SYNC- CHX+ CHX- CHY+ CHY- XY-STATUS+ XY-STATUS- Internal circuit Connector shell Z-CLOCK+ Z-CLOCK- Z-SYNC+ Z-SYNC- CHZ+ CHZ- Z-STATUS+ Z-STATUS- Connector shell 3-67 CK3M-series Programmable Multi-Axis Controller User's Manual Hardware (O036)
- Page 112 3 Configuration Units Terminal connection dia- Galvo Scanner gram XY-CLOCK+ XY-CLOCK- XY-SYNC+ XY-SYNC- CHX+ CHX- CHY+ CHY- XY-STATUS+ XY-STATUS- Connector shell Galvo Scanner Z-CLOCK+ Z-CLOCK- Z-SYNC+ Z-SYNC- CHZ+ CHZ- Z-STATUS+ Z-STATUS- Connector shell SL2-100 Inter- Data length 20 bits face Maximum transmission 25 m distance...
- Page 113 3 Configuration Units Terminal connection dia- Galvo Scanner gram XY-IN+ DATA OUT+ XY-IN- DATA OUT- XY-OUT+ DATA IN+ XY-OUT- DATA IN- Connector shell Galvo Scanner Z-IN+ DATA OUT+ Z-IN- DATA OUT- Z-OUT+ DATA IN+ Z-OUT- DATA IN- Connector shell Laser output Number of points CK3W-GC□100: 1 point (OUT0: PWM output) CK3W-GC□200: 2 points (OUT0: PWM output, OUT1: TCR...
-
Page 114: Part Names And Functions
3 Configuration Units Terminal connection dia- Laser gram OUT0 OUT_COM0 OUT1 OUT_COM1 Connector shell Power consumption CK3W-GC1£00: 5 V 0.6 W max., 24 V 1.9 W max. CK3W-GC2£00: 5 V 0.6 W max., 24 V 1.0 W max. Dimensions (height × depth × width) 90(H)/80(D)/63.2(W) Weight 190 g max. -
Page 115: Operation Indicators
3 Configuration Units 3-7-3 Operation Indicators The LED indicators show the unit operating status of the Laser Interface Unit. The operating statuses corresponding to the colors and statuses of the indicators are shown below. Indicator name Color Status Description Green Power is supplied. -
Page 116: Terminal Arrangement
3 Configuration Units Connect the Unit with the smallest address value to the CPU Rack because, by default, it is the supply source of clock signals. You may specify the Unit with a desired address as the clock supply source by setting the register. If the Unit that serves as the clock supply source is connected to the Expansion Rack, an error occurs because the CPU Unit cannot recognize clock signals. - Page 117 3 Configuration Units ModeSel = 00 (16-Bit Data) Command position (integer part) 16 bits Command position (fractional part) 8 bits tion ModeSel = 01 (18-Bit Data) Command position (integer part) 18 bits Command position (frac- tional part) 6 bits tion ...
- Page 118 3 Configuration Units The CK3W-GC Unit captures a command position at the falling edge of an interpolation clock, and sends that command position in an XY2-100 transmission cycle at the rising edge of the interpolation clock after next. As the XY2-100 data between interpolation clocks, the value calculated by linear interpolation is sent.
- Page 119 3 Configuration Units Command position captured by CK3W-GC XY2-100 transmission Interpolation clock XY2-100 data *1. ClockSel = 0: Servo clock ClockSel = 1: Phase clock *2. Command position writing from CPU Unit *3. Command position capturing by CK3W-GC Unit *4. The command position captured by the CK3W-GC Unit becomes the XY2-100 transmission data at the falling edge of the next interpolation clock.
-
Page 120: Sl2-100 Interface
3 Configuration Units ModeSel = 01 (18-Bit Data) Compensation value (integer part) 18 bits Compensation value (frac- tional part) 6 bits tion ModeSel = 10 (20-Bit Data) Compensation value (integer part) 20 bits Compensation value (fractional part) 4 bits tion Status Data When you send a command position to the Galvo Scanner, the status data will be sent from the Galvo... - Page 121 3 Configuration Units Data Format of Command Position A command position is 24-bit data. To set the command position, use Gate3[i].Chan[j].DAC[0] [31:08] when Control Bit (Gate3[i].Serial- EncCtrl [15:13]) is 001. Data format is as follows. The data range is from -2 to 2 Data to be sent to the Galvo Scanner is limited to the command position (integer part).
- Page 122 3 Configuration Units Command position captured by CK3W-GC SL2-100 transmission data Servo or phase cycle Interpolation clock SL2-100 data *1. ClockSel = 0: Servo clock ClockSel = 1: Phase clock *2. Command position writing from CPU Unit *3. Command position capturing by CK3W-GC Unit EdgeSel = 0: Falling edge EdgeSel = 1: Rising edge *4.
- Page 123 3 Configuration Units Command position captured by CK3W-GC SL2-100 transmission data Servo or phase cycle Interpolation clock SL2-100 data *1. ClockSel = 0: Servo clock ClockSel = 1: Phase clock *2. Command position writing from CPU Unit *3. Command position capturing by CK3W-GC Unit EdgeSel = 0: Falling edge EdgeSel = 1: Rising edge *4.
-
Page 124: Pwm Output Function
3 Configuration Units Sending Command to Galvo Scanner You can send a command to the Galvo Scanner by setting Control Bit (Gate3[i].SerialEncCtrl [15:13]) ® = 111. The command only supports iDRIVE compatible Galvo Scanner of SCANLAB GmbH. The command has two parameters: CodeH and CodeL. For details on the command, refer to the manual for the Galvo Scanner. - Page 125 3 Configuration Units The setting range of PWMPeriod is from 2 to 4095, and the frequency can be set in the range from 1,526 Hz to 3.125 MHz. The following shows examples of settings. PWMPeriod PWM Frequency (kHz) 3125 ($C35) 2 1250 ($4E2) 5 625 ($271) 312 ($138)
-
Page 126: Tcr Output Function
3 Configuration Units If you set DelayUnit and Delay before the previously set pulse output is completed, the expected puls- es may not be output. In the delay time, jitter of ±[(DelayUnits + 2) × 10 + 30] (ns) occurs. When you set DelayUnit, take the jitter into consideration. - Page 127 3 Configuration Units When you set the command distance, make sure that it does not decrease if CompareEnable (Gate3[i].Chan[2].CompB[31]) is 1. If it decreases, a linear interpolation will not be made correctly. When you decrease the command distance, set CompareEnable to 0. Setting of Comparison Table Gate3[i].Chan[1].CompB, TableWritePointer(Gate3[i].Chan[3].CompB[23:12]), and Table- Clear(Gate3[i].Chan[2].CompB[30]) are used to set the comparison table.
-
Page 128: Software Settings
3 Configuration Units ComparePointer shows the buffer number where a comparison is made now. When all the comparison is complete and the next buffer is empty, the last comparison output will be retained. You can determine whether the comparison is complete by checking that ComparePointer is the same as TableWritePointer. - Page 129 3 Configuration Units The register settings here are different from the definitions descried in the Power PMAC Software Reference Manual (Cat. No. O015). Refer to A-9 Software Reference of Laser Interface Unit on page A-33 for detailed specifications. XY2-100 Interface Power PMAC Saved Data Structure Elements Gate3[i].SerialEncCtrl Control register...
- Page 130 3 Configuration Units Gate3[i].Chan[1].CompB Comparison table setting Gate3[i].Chan[2].CompB Control register Gate3[i].Chan[3].CompB Status register Internal memory error detection Power PMAC Status Data Structure Elements Gate3[i].Chan[0].Status Internal memory error detection Precautions for Correct Use • Make sure that the following settings of the CK3W-GC Unit are the same as those of the sup- ply-source Unit of servo clocks and phase clocks.
-
Page 131: Expansion Master Unit And Expansion Slave Unit
3 Configuration Units Expansion Master Unit and Expan- sion Slave Unit This section describes the Expansion Master Unit and the Expansion Slave Unit. 3-8-1 Models and Specifications Models and Outline of Specifications The models and outline of specifications are given below. Unit type Model Expansion Master Unit CK3W-EXM01... -
Page 132: Part Names And Functions
3 Configuration Units 3-8-2 Part Names and Functions CK3W-EXM01 Letter Name Function Slider Holds the Units together. Power supply status indicator Shows the power supply status. Expansion connector (OUT) Connector that connects to the expansion connector (IN) on the Expan- sion Slave Unit. -
Page 133: Operation Indicators
3 Configuration Units CK3W-EXS02 Letter Name Function Slider Holds the Units together. Power supply status indicator Shows the power supply status. Expansion connector (IN) Connector that connects to the expansion connector (OUT) on the Ex- pansion Master Unit or the Expansion Slave Unit. Unit connector Connector that connects to the Unit. - Page 134 3 Configuration Units Letter Name Model Expansion Master Unit CK3W-EXM01 Expansion cable CK3W-CAX003A Expansion Slave Unit CK3W-EXS02 3-90 CK3M-series Programmable Multi-Axis Controller User's Manual Hardware (O036)
- Page 135 Installation This section describes precautions for installation and installation location of the CK3M-series Programmable Multi-Axis Controller. Processing at Power ON and Power OFF ............ 4-2 4-1-1 Power ON Operation ..................4-2 4-1-2 Power OFF Operation ..................4-2 Fail-safe Circuits .................... 4-4 Unit Installation ....................
-
Page 136: Processing At Power On And Power Off
4 Installation Processing at Power ON and Power 4-1-1 Power ON Operation Once the power supply to the Power Supply Unit starts, the Motion Controller enters the program op- eration ready status after the following time elapses. In addition, when the Unit is in the operation-ready status, the RDY LED lights up. ... - Page 137 4 Installation Establish an SSH connection, and execute the sync command from the terminal that you con- nected to. Wait for at least 5 seconds and turn OFF the power supply. Procedure to Download to the Built-in Flash Memory (Version 2.5 or Later) For PMAC firmware revision version 2.5 or later, you can also use the following procedure to store the user program into the built-in flash memory.
-
Page 138: Fail-Safe Circuits
4 Installation Fail-safe Circuits WARNING Provide safety measures in external circuits to ensure safety in the system if an ab- normality occurs due to malfunction of the system due to other external factors affect- ing operation. Not doing so may result in serious accidents due to incorrect operation. •... - Page 139 4 Installation Power-on Order If the power to the external device is turned ON before the start of the Controller is completed, DA output or pulse output may be output momentarily during the startup of the Controller, and the external device may malfunction.
-
Page 140: Unit Installation
4 Installation Unit Installation This section describes the installation of the CK3M-series Unit. Precautions for Safe Use Always turn OFF the power supply to the Controller before attempting any of the following. • Mounting or removing CK3W-AX Units or Motion Controllers •... - Page 141 4 Installation Control panel Motion Controller Louver Accessibility for Operation and Maintenance • To ensure safe access for operation and maintenance, separate the Controller as much as possi- ble from high-voltage equipment and power machinery. • It will be easy to operate the Controller if it is mounted at a height of 1.0 to 1.6 m above the floor. ...
- Page 142 4 Installation Mounting with the DIN Track on the Bottom Mounting with the DIN Track on the Top DIN Track DIN Track Mounting with the DIN Track Installed Vertically Mounting with the Rack Upside Down Additional Information A Controller must be mounted on a DIN Track. It cannot be mounted with screws. ...
- Page 143 4 Installation Wiring Duct Example 83.6 to 102.8 mm Rack 30mm 30mm Mounting bracket 40mm Duct Routing Wiring Ducts Install the wiring ducts at least 20 mm away from the tops of the Rack and any other objects (e.g., ceiling, wiring ducts, structural supports, devices, etc.) to provide enough space for air circulation and replacement of Units.
-
Page 144: Connection Between Units
4 Installation 4-3-2 Connection Between Units The Units that make up a CK3M-series Controller can be connected simply by pressing the Units to- gether and locking the sliders by moving them toward the back of the Units. The End Cover is con- nected in the same way to the Unit on the far right side of the Controller. -
Page 145: Mounting To Din Track
4 Installation CPU Rack Power Supply CPU Unit Expansion Configuration Units End Cover Unit Master Unit (4 max.) (included with CPU Unit) Expansion Expansion cable Rack Power Supply Expansion Configuration Units End Cover Unit Slave Unit (4 max.) (included with Expansion Slave Unit) Precautions for Correct Use •... - Page 146 4 Installation DIN Track Lock all the DIN Track mounting hooks. DIN Track mounting hook Install a DIN Track End Plate on each end of the Controller. To mount an End Plate, hook from the underside (1), hook to the upper side, and then pull downward (2).
-
Page 147: Din Track And Accessories
4 Installation Additional Information To remove Units, perform the steps above in reverse order. 4-3-4 DIN Track and Accessories Mount the CK3M-series Controller on the DIN Track. Secure each DIN Track inside a control panel with at least three screws. DIN Tracks Secure the DIN Track to the control panel using M4 screws separated by 210 mm (3 holes) or less and using at least 3 screws. -
Page 148: Assembled Appearance And Dimensions
4 Installation 4-3-5 Assembled Appearance and Dimensions The figure below shows the CK3M-series Units connected to each other. An End Cover is connected to the right end. Dimensions Power Supply Unit Model Unit width (mm) CK3W-PD048 CPU Unit Model Unit width (mm) CK3M-CPU101... - Page 149 4 Installation Digital I/O Unit, Analog Input Unit, Expansion Master Unit, and Expansion Slave Unit Model Unit width (mm) CK3W-MD7110 31.6 CK3W-MD7120 CK3W-AD2100 CK3W-AD3100 CK3W-EXM01 CK3W-EXS02 Encoder Input Unit and Laser Interface Unit Model Unit width (mm) CK3W-ECS300 63.2 CK3W-GC1100 CK3W-GC1200...
- Page 150 4 Installation Installation Dimensions CPU Rack 27.5 27.5 (Unit mm) DIN Track A (mm) PFP-100N2 PFP-100N PFP-50N Installation Height The mounting height of the CK3M-series Controller is 80.0 mm. When cables are connected (such as a connecting cable to Support Software, an encoder connection cable, or an amplifier connection cable, etc.), however, even greater height is required.
- Page 151 4 Installation CK3W-AX Unit 185mm 80mm CK3W-MD Unit 120 mm 80 mm CK3W-AD Unit 120 mm 80 mm 4-17 CK3M-series Programmable Multi-Axis Controller User's Manual Hardware (O036)
- Page 152 4 Installation CK3W-ECS Unit 185mm 80mm CK3W-GC Unit 185mm 80mm CK3W-EXM01 and CK3W-EXS02 155 mm 80 mm 4-18 CK3M-series Programmable Multi-Axis Controller User's Manual Hardware (O036)
-
Page 153: Control Panel Installation
4 Installation Control Panel Installation To ensure system reliability and safety, the system must be designed and configured according to the installation environment (temperature, humidity, vibration, shock, corrosive gases, overcurrent, noise, etc.). 4-4-1 Temperature Panels have been reduced in size due to space-saving and miniaturization in devices and systems, and the temperature inside the panel may be at least 10 to 15°C higher than outside the panel. -
Page 154: Humidity
4 Installation Forced Ventilation (by Fan at Top of Panel) Controller Controller Air filter Forced Ventilation Method Forced Air Circulation (by Fan in Closed Panel) Controller Controller Forced Air Circulation Room Cooling (Cooling the Entire Room Where the Control Panel Is Lo- cated) Cooler Control panel... -
Page 155: Vibration And Shock
4 Installation Control panel Moisture absorber Controller Power ON Heater Examples of Measures against Condensation 4-4-3 Vibration and Shock The Controller is tested for conformity with the sine wave vibration test method (IEC 60068-2-6) and the shock test method (IEC 60068-2-27) of the Environmental Testing for Electrotechnical Products. It is designed so that malfunctioning will not occur within the specifications for vibration and shock. - Page 156 4 Installation Example of Recommended Equipment Arrangement Controller Control panel Control panel High-voltage power panel Example of Poor Equipment Arrangement Controller Control panel Control panel High-voltage power panel Examples of Equipment Arrangement in Panel with High-voltage Devices Arrangement of Controller and Units The coils and contacts in electromagnetic contacts and relays in an external circuit are sources of noise.
- Page 157 4 Installation • Use an isolating transformer to significantly reduce noise between the Controller and the ground. In- stall the isolating transformer between the Controller power supply and the noise filter, and do not ground the secondary coil of the transformer. •...
- Page 158 4 Installation • If the signal lines and power lines cannot be routed in separate ducts, use shielded cable. Connect the shield to the ground terminal at the Controller, and leave it unconnected at the input device. • Wire the lines so that common impedance does not occur. Such wiring will increase the number of wires, so use common return circuits.
- Page 159 4 Installation Partition Power Signal Signal Signal supply cables cables cables cables (group A) (group B) (group C) Signal cables Signal cables Signal cables Power supply cables Power supply cables Partitioning Methods for Signal and Power Supply Cables • To avoid overheating the conduits when using conduits for wiring, do not place wires for a single circuit in separate conduits.
-
Page 160: Grounding
4 Installation High-voltage power panel Metal tubing Power lines Power lines 200 mm Controller Controller Ground to 100 Ω or less 200 mm Example: Separating Controller from Power Lines Other Precautions • Digital I/O Units have both plus and minus commons, so pay attention to the polarity when wir- ing. - Page 161 4 Installation Equipotential Bonding System Equipotential bonding is an earthing method in which steel frames and building structures, metal ducts and pipes, and metal structures in floors are connected together and make connections to the earth trunk line to achieve a uniform potential everywhere across the entire building. We recom- mend this earthing method.
- Page 162 4 Installation NX-series CPU Unit CK3M-series Programmable Multi-Axis Controller A device that could Control panel Other device be a noise source 10 m min. b. Installation by connecting devices and noise sources to a common earth electrode This is an earthing method to connect the device that is connected with a communications ca- ble, other devices, and a device that could be a noise source, to a common earth electrode.
- Page 163 4 Installation NX-series CPU Unit CK3M-series Programmable Multi-Axis Controller A device that could Control panel Other device be a noise source Precautions for Grounding General Precautions • To prevent electrical shock, do not connect devices to ground poles (or steel frames) with non- equalized potential to which multiple devices are connected.
- Page 164 4 Installation Controller Ground Terminals The Controller has the following ground terminal. Grounding Symbol Connection type Functional Ground this terminal when power supply noise causes malfunc- Grounding tioning. When the functional ground terminal is correctly grounded, it is generally effective in suppressing power supply common noise.
-
Page 165: Wiring
Wiring This section describes the wiring method for the CK3M-series Programmable Multi- Axis Controller. Power Supply Wiring ..................5-2 5-1-1 Power Supply Unit CK3W-PD048 ..............5-2 5-1-2 Power Supply Used..................5-2 5-1-3 Applicable Wires....................5-2 5-1-4 Grounding......................5-3 5-1-5 Required Tools ....................5-4 5-1-6 Connecting Ferrules .................. -
Page 166: Power Supply Wiring
We recommend the following power supply. Recommended Power Manufacturer Supply S8VK-S series OMRON Precautions for Correct Use Always wire the CPU Rack and Expansion Rack to the same power supply. 5-1-3 Applicable Wires The wires that you can connect to the terminal block are twisted wires, solid wires, and ferrules that are attached to the twisted wires. -
Page 167: Grounding
5 Wiring Using Ferrules If you use ferrules, attach the twisted wires to them. Observe the application instructions for your ferrules for the wire stripping length when attaching fer- rules. Always use plated one-pin ferrules. Do not use unplated ferrules or two-pin ferrules. The applicable ferrules, wires, and crimping tools are listed in the following table. -
Page 168: Required Tools
5 Wiring 5-1-5 Required Tools Use a flat-blade screwdriver to remove wires. The recommended screw driver is as follows. Model Manufacturer SZF 0-0,4X2,5 Phoenix Contact 5-1-6 Connecting Ferrules Insert the ferrule straight into the terminal hole. It is not necessary to press a flat-blade screwdriver into the release hole. Ferrule After you make a connection, make sure that the ferrule is securely connected to the terminal block. -
Page 169: Removing Wires
5 Wiring Remove the flat-blade screwdriver from the release hole. After you make a connection, make sure that the twisted wire or the solid wire is securely connected to the terminal block. Precautions for Safe Use • Make sure that all wiring is correct. •... - Page 170 5 Wiring Precautions for Safe Use • Make sure that all wiring is correct. • Do not bend the cable forcibly. Doing so may break the cable. CK3M-series Programmable Multi-Axis Controller User's Manual Hardware (O036)
-
Page 171: Cpu Unit Wiring
5 Wiring CPU Unit Wiring 5-2-1 Laying the EtherCAT Network This section describes how to install EtherCAT networks. Supported Network Topologies The EtherCAT port of the Motion Controller enables daisy chain connection without branching and branching using Junction Slaves. In addition, the ring wiring using Junction Slaves is available for CPU Units with PMAC firmware revision version 2.7.0 or later. - Page 172 5 Wiring Branching EtherCAT Master Junction Slave Junction Slave Remote I/O Slave Junction Slave Remote I/O Slave Remote I/O Slave Servo Drive Slave Servo Drive Slave Remote I/O Slave Servo Servo Servo Drive Remote I/O Drive Drive Slave Slave : Output port Slave Slave...
- Page 173 Cable Manufac- Contact informa- length (m) Product name Model turer tion Cable with Connectors on OMRON XS6W-6LSZH8SS30CM- OMRON Customer Both Ends Corpora- Service Center (RJ45/RJ45) tion XS6W-6LSZH8SS50CM- Standard RJ45 connector type XS6W-6LSZH8SS100C XS6W-6LSZH8SS1000C For the latest list of the Cables, refer to the Industrial Ethernet Connectors Catalog (Cat. No. G019).
- Page 174 5 Wiring Cable Manufac- Contact informa- length (m) Product name Model turer tion Cable with Connectors on OMRON XS5W-T421-AMD-K OMRON Customer Both Ends Corpora- Service Center XS5W-T421-BMD-K (RJ45/RJ45) tion XS5W-T421-CMD-K Rugged RJ45 connector type XS5W-T421-DMD-K XS5W-T421-GMD-K XS5W-T421-JMD-K Cable with Plugs on Both...
- Page 175 JMACS Japan Co., Ltd. JMACS Japan Co., Ltd. PNET/B RJ45 Assembly Connec- OMRON Corporation OMRON Customer Serv- XS6G-T421-1 tors ice Center We recommend that you use combinations of the above cables and connectors. Attaching the Connectors to the Cable and Pin Assignments Use straight wiring to attach the connectors to the communications cable, as shown below.
-
Page 176: Laying The Ethernet Network
The following products are recommended as devices to be used to configure an Ethernet network. Ethernet Switches Manufacturer Model Description OMRON W4S1-03B Packet priority control (QoS): EtherNet/IP control data priority Failure detection: Broadcast storm, LSI error detection, 100Basae-TX/ W4S1-05B... - Page 177 JMACS Japan Co., Ltd. PNET/B AWG22 × RJ45 Assembly OMRON XS6G-T421-1 Connectors We recommend that you use cables and connectors in above combinations. Attaching the Connectors to the Cable and Pin Assignments Use straight wiring to attach the connectors to the communications cable, as shown below.
-
Page 178: Watchdog Timer Output Wiring
5 Wiring Note 1. Connect the cable shield to the connector hood at both ends of the cable. Note 2. There are two connection methods for Ethernet: T568A and T568B. The T568A connection method is shown above, but the T568B connection method can also be used. The connector specifications are as follows. - Page 179 5 Wiring Applicable wire Manufactur- Crimping Tool Ferrule model (applicable wire size given in parentheses) (AWG)) Phoenix Con- AI0,25-8 0.25 (#24) Phoenix Contact tact AI0,5-8 0.5 (#20) CRIMPFOX 6 (0.25 to 6 mm , AWG24 to 10) AI0,75-8 0.75 (#18) Weidmüller H0.25/12 0.25 (#24)
- Page 180 5 Wiring Release hole Flat-blade screwdriver Leave the flat-blade screwdriver pressed into the release hole and insert the twisted wire or the solid wire into the terminal hole. Insert the twisted wire or the solid wire until the stripped portion is no longer visible to prevent shorting.
-
Page 181: Usb Memory Device Connection
5 Wiring Wire Flat-blade screwdriver Leave the flat-blade screwdriver pressed into the release hole and pull out the wire. Remove the flat-blade screwdriver from the release hole. Precautions for Safe Use • Make sure that all wiring is correct. • Do not bend the cable forcibly. Doing so may break the cable. 5-2-4 USB Memory Device Connection Connect a USB memory device to the USB host port (Type A) on the CPU Unit to save relevant data. -
Page 182: Axis Interface Unit Wiring
5 Wiring Axis Interface Unit Wiring 5-3-1 Encoder Connector Wiring Connector Arrangement for Digital Quadrature Encoder This section describes the connector arrangement for the CK3W-AX1313£/-AX1414£/-AX1515£ Units. The Unit side connector is a high-density D-sub 15-pin female connector (MIL-C-24308 compliant, lock screw #4-40 UNC). Digital Quadrature En- Digital Quadrature Encoder Symbol... - Page 183 5 Wiring Digital Quadrature En- Digital Quadrature Encoder Symbol coder Serial Encoder + Serial Encoder + UVW signal OutFlagB Output OutFlagB Output OutFlagB Output OutFlagB Shell SHELL Shield Shield Shield The OutFlagB output function is not available with the CK3W-AX1313£ Units. Connector Arrangement for Sinusoidal Encoder This section describes the connector arrangement for the CK3W-AX2323£...
- Page 184 5 Wiring Precautions for Correct Use Do not connect a digital quadrature encoder to a CK3W-AX2323£ Unit. If you connect a digital quadrature encoder, the Unit may be damaged. Dedicated Cable The dedicated cables for wiring to the encoder connector are provided as an option. The encoder connection side has discrete wires.
- Page 185 Black OutFlagB Gray In order to make a connection with the OMRON G5-series Servo Drive R88D-KT£££, Pin 1 and Pin 5, and Pin 6 and Pin 10 are short-circuited inside the connector. You can also connect a normal digital quadrature encoder which does not use serial encoder DAT by disabling the serial encoder.
- Page 186 5 Wiring For Serial Encoder 3000 24AWG x 3 Pairs Shield Type Pin No. Cable color Mark Signal Pair 1 Blue Black Encoder Power Supply (+5 VDC) Blue Encoder Power Supply (GND) Pair 2 Pink Black Encoder CLK+ Pink Encoder CLK- Pair 3 Green...
- Page 187 5 Wiring Signal Type Pin No. Cable color Mark U, V, W Serial Encoder Pair 2 Pink Black Hall sensor U Serial Encoder CLK+ Pink Hall sensor V Serial Encoder CLK- Pair 3 Green Black Hall sensor W Serial Encoder DAT+ Green Hall sensor T Serial Encoder DAT-...
-
Page 188: Amplifier Connector Wiring
5 Wiring Signal Type Pin No. Cable color U, V, W Serial Encoder Pair 1 Blue Encoder Power Supply (+5 VDC) White Encoder Power Supply (GND) Pair 2 Black Hall sensor U Serial Encoder CLK+ Green Hall sensor V Serial Encoder CLK- Pair 3 Yellow Hall sensor W Serial Encoder DAT+... - Page 189 5 Wiring Dedicated Cable For FilteredPWM/TrueDAC type This section describes the cable used for the CK3W-AX1414£/-AX1515£ Units. The dedicated cable for wiring to the FilteredPWM/TrueDAC type amplifier connector is provided as an option. The amplifier connection side has discrete wires. Wire in accordance with the Servo Drive specifi- cations.
-
Page 190: Flag Terminal Block/General I/O Terminal Block Wiring
5 Wiring For DirectPWM type This section describes cables used for the CK3W-AX1313£/-AX2323£ Units. Be sure to use the following cables for the DirectPWM type amplifier connector. Type Model Length (L) For DirectPWM type CK3W-CAAD009A 0.9 m CK3W-CAAD018A 1.8 m CK3W-CAAD036A 3.6 m 5-3-3 Flag Terminal Block/General I/O Terminal Block Wiring... - Page 191 5 Wiring Using Twisted or Solid Wires Conductor length Wire type Conductor cross-sectional area (stripping length) Solid wire 10 mm 0.14 to 1.5 mm Twisted wire Required Tools Use a flat-blade screwdriver to remove wires. The recommended screw driver is as follows. Model Manufacturer SZF 0-0,4X2,5 Phoenix Contact...
- Page 192 5 Wiring Twisted wire/Solid wire Release hole Pull the flat-blade screwdriver away from the release button. After you make a connection, make sure that the twisted wire or the solid wire is securely connect- ed to the terminal block. Precautions for Safe Use •...
- Page 193 5 Wiring Pull the flat-blade screwdriver away from the release button. Precautions for Safe Use • Make sure that all wiring is correct. • Do not bend the cable forcibly. Doing so may break the cables. Installing a Terminal Block Insert the terminal block into the main body, and press hard to click the terminal block into place on the Unit.
- Page 194 5 Wiring Failure to meet these conditions may result in operating errors. Relation between ON voltage of the general digital input / flag input and sensor residual voltage ≤ V : ON voltage of general digital input and flag input : Input voltage of general digital input and flag input : Output residual voltage of sensor ...
- Page 195 5 Wiring General digital input Two-wire sensor and flag input : Power supply voltage : Output residual voltage of sensor : ON voltage of general digital input and flag input : Sensor control output (load current) : OFF voltage of general digital input and flag input I : Sensor leakage current leak : ON current of general digital input and flag input...
- Page 196 5 Wiring NPN type PNP type Transistor Output Transistor Output Unit Unit Countermeasure 2 Mount a limiting resistor. NPN type PNP type Transistor Output Transistor Output Unit Unit 5-32 CK3M-series Programmable Multi-Axis Controller User's Manual Hardware (O036)
-
Page 197: Digital I/O Unit Wiring
5 Wiring Digital I/O Unit Wiring This section describes the wiring for the digital I/O connection terminal block. 5-4-1 Wiring the Terminals Applicable Wires The wires that you can connect to the terminal block are twisted wires, solid wires, and ferrules that are attached to the twisted wires. - Page 198 5 Wiring Connecting Ferrules Insert the ferrule straight into the terminal hole. It is not necessary to press a flat-blade screwdriver against the release button. Ferrule After you make a connection, make sure that the ferrule is securely connected to the terminal block. Connecting Twisted Wires/Solid Wires Use the following procedure to connect the twisted wires or solid wires to the terminal block.
- Page 199 5 Wiring After you make a connection, make sure that the twisted wire or the solid wire is securely connected to the terminal block. Precautions for Safe Use • Make sure that all wiring is correct. • Do not bend the cable forcibly. Doing so may break the cables. Removing Wires Use the following procedure to remove the wires from the terminal block.
-
Page 200: Precautions When Connecting A Two-Wire Dc Sensor
5 Wiring Installing a Terminal Block Insert the terminal block into the main body, and press hard to click the terminal block into place on the Unit. After you mount the terminal block, make sure that it is fixed to the Unit. Removing a Terminal Block Drop the lock levers on both sides of the terminal block at the same time to remove the terminal block. - Page 201 5 Wiring Relation between Input Current to the Digital Input and Sensor Control Output (Load Current) (min) ≤ I ≤ I (max) Precautions for Correct Use The digital input is constant current type input. For constant current type input, the input current does not increase linearly with the input volt- age.
-
Page 202: Precautions When Connecting To Digital Output
5 Wiring : ON voltage of digital input : Sensor control output (load current) : OFF voltage of digital input I : Sensor leakage current leak : ON current of digital input R: Bleeder resistor : OFF current of digital input Precautions for Sensor Inrush Current An incorrect input may occur due to sensor inrush current if a sensor is turned ON after the Unit has started up to the point where inputs are possible. - Page 203 5 Wiring Countermeasure 2 Mount a limiting resistor. NPN type PNP type Transistor Output Transistor Output Unit Unit 5-39 CK3M-series Programmable Multi-Axis Controller User's Manual Hardware (O036)
-
Page 204: Analog Input Unit Wiring
5 Wiring Analog Input Unit Wiring This section describes the wiring for the analog input connection terminal block. 5-5-1 Wiring the Terminals Applicable Wires The wires that you can connect to the terminal block are twisted wires, solid wires, and ferrules that are attached to the twisted wires. - Page 205 5 Wiring Connecting Ferrules Insert the ferrule straight into the terminal hole. It is not necessary to press a flat-blade screwdriver against the release button. Ferrule After you make a connection, make sure that the ferrule is securely connected to the terminal block. Connecting Twisted Wires/Solid Wires Use the following procedure to connect the twisted wires or solid wires to the terminal block.
- Page 206 5 Wiring After you make a connection, make sure that the twisted wire or the solid wire is securely connected to the terminal block. Precautions for Safe Use • Make sure that all wiring is correct. • Do not bend the cable forcibly. Doing so may break the cables. Removing Wires Use the following procedure to remove the wires from the terminal block.
- Page 207 5 Wiring Installing a Terminal Block Insert the terminal block into the main body, and press hard to click the terminal block into place on the Unit. After you mount the terminal block, make sure that it is fixed to the Unit. Removing a Terminal Block Drop the lock levers on both sides of the terminal block at the same time to remove the terminal block.
-
Page 208: Encoder Input Unit
5 Wiring Encoder Input Unit This section describes the wiring for the Serial Encoder Input Unit. 5-6-1 Encoder Connector Wiring The Unit side connector is a high-density D-sub 15-pin female connector (MIL-C-24308 compliant, lock screw #4-40 UNC). Pin No. Symbol Serial Encoder Not wired Not wired... - Page 209 5 Wiring Additional Information You may use a self-made cable. When you create a self-made cable, use a shielded twisted-pair cable to block the effects of noise. For Serial Encoder 3000 24AWG x 3 Pairs Shield Type Pin No. Cable color Mark Signal Pair 1 Blue...
-
Page 210: Laser Interface Unit
5 Wiring Laser Interface Unit This section describes the wiring for the Laser Interface Unit. 5-7-1 Galvo Scanner Connector Wiring The XY2-100 Interface connector wiring, SL2-100 Interface connector wiring, and dedicated cables are described below. XY2-100 Interface Wiring The Unit side connector is a high-density D-sub 15-pin female connector (MIL-C-24308 compliant, lock screw #4-40 UNC). - Page 211 5 Wiring Pin No. Signal Input/Output Signal Input/Output XY-IN+ Input Z-IN+ Input XY-OUT+ Output Z-OUT+ Output XY-IN- Input Z-IN- Input XY-OUT- Output Z-OUT- Output Shell Shield Shield Dedicated Cable The dedicated cable for wiring to the Galvo Scanner connector is provided as an option. The Galvo Scanner connection side has discrete wires.
-
Page 212: Laser Connector Wiring
5 Wiring Signal Type Pin No. Cable color Tag XY2-100 SL2-100 Pair 1 13 Blue Not wired Not wired White Not wired Not wired Pair 2 1 Yellow CHX+ CHZ+ XY-IN+ Z-IN+ White CHX- CHZ- XY-IN- Z-IN- Pair 3 2 Green CHY+ Not wired... - Page 213 5 Wiring Pin No. Signal Input/Output Output *1 *2 OUT_COM1 Shell Shield OUT0 is PWM output, and OUT1 is TCR output. OUT1 is available with the CK3W-GC£200 Units only. Dedicated Cable The dedicated cable for wiring to the laser connector is provided as an option. The laser connection side has discrete wires.
-
Page 214: Expansion Master Unit And Expansion Slave Unit Wiring
5 Wiring Expansion Master Unit and Expan- sion Slave Unit Wiring For connection between the Expansion Master Unit and the Expansion Slave Unit, be sure to use the following expansion cable. Type Model Length Expansion cable CK3W-CAX003A 0.3 m 5-50 CK3M-series Programmable Multi-Axis Controller User's Manual Hardware (O036) -
Page 215: Troubleshooting
Troubleshooting This section describes the procedures for checking errors that may occur during oper- ation of the CK3M-series Programmable Multi-Axis Controller and taking corrective ac- tions for the errors. Types of Errors ....................6-2 Using the Indicators to Check Errors............6-3 6-2-1 Indicator Types .................... -
Page 216: Types Of Errors
6 Troubleshooting Types of Errors The errors in the Motion Controller are classified into the following two major categories. • Fatal errors in the CPU Unit Errors that occurred as the result of the CPU Unit operation stopping. • Non-fatal errors in the CPU Unit Errors that can be detected and managed by the CPU Unit itself that is still operating. -
Page 217: Using The Indicators To Check Errors
6 Troubleshooting Using the Indicators to Check Errors 6-2-1 Indicator Types TheMotion Controllerindicators used for error checks and their functions are as shown below. Unit Indicator name Description Power Supply Unit PWR Shows that power is being supplied to the Unit. CPU Unit Shows the CPU Unit internal power status. - Page 218 6 Troubleshooting Non-fatal errors in the CPU Unit ECAT LINK EtherCAT physical layer link not (orange) established Ethernet physical layer link not Ethernet LINK established (orange) Interrupted communications between Power PMAC IDE and Programmable Multi-Axis Controller DA output, DirectPWM output and encoder power supply from CK3W-AX Unit not output Analog values from CK3W-AD...
-
Page 219: Troubleshooting For Errors
6 Troubleshooting Troubleshooting for Errors 6-3-1 Fatal Errors in the CPU Unit For fatal errors in the CPU Unit, take the following corrective actions depending on the nature of the error. Description Cause Corrective action Power Supply Unit Power is not supplied Check the following items and adequately supply power to the power supply error to the Power Supply... -
Page 220: Non-Fatal Errors In The Cpu Unit
6 Troubleshooting Description Cause Corrective action Hardware watchdog Unit disconnection Make sure that the Units are connected correctly. timer error during operations Illegal user program Refer to 6-3-3 Initialization of CPU Unit Using USB Memory on page 6-9, and execute re-initialization. Ingress of conductive If there is conductive material nearby, blow air through the CPU object... - Page 221 6 Troubleshooting Description Cause Corrective action Ethernet physical layer The Ethernet cable used for If the Ethernet cable is broken or if the specified link not established Ethernet communications is cable is not being used, replace the cable. broken or the specified cable is not being used.
- Page 222 6 Troubleshooting Description Cause Corrective action DA output, DirectPWM Power Supply Unit other than Check the Power Supply Unit model. output and encoder pow- CK3W-PD048 is being used. er supply fromCK3W-AX CK3W-AX Unit failure Replace the CK3W-AX Unit. Unitnot output Internal 24 V power is not be- Replace the Unit to the left of this Unit.
-
Page 223: Initialization Of Cpu Unit Using Usb Memory
6 Troubleshooting Description Cause Corrective action An internal memory error has When Gate3[i].Chan[0].Status[26] is 1, this is a occurred. temporary error in the internal memory. Cycle the power supply. CK3W-GC Unit failure Replace the CK3W-GC Unit. Internal 24 V power is not be- Replace the Unit to the left of this Unit. -
Page 224: Sys.status Register
6 Troubleshooting Sys.Status Register 6-4-1 Sys.Status Register List If an error cannot be identified with indicators, confirm the error status in the Sys.Status register. If an error occurs during operation, check the Sys.Status register with the user program and take suit- able action to avoid dangerous operation. -
Page 225: Details Of Flags
6 Troubleshooting 6-4-2 Details of Flags CK3WHWChange Register name Sys.CK3WHWChange Description The CK3W hardware configuration was changed during operation. Range 0 to 1 Details Checks if there were any changes in the configurations of the connected CK3W Unit and End Cover during operation. 0: No changes in hardware configurations during operation 1: Changes in hardware configurations during operation Detection timing... - Page 226 6 Troubleshooting CK3WConfigErr Register name Sys.CK3WConfigErr Description There is an error in the CK3W hardware configuration. Range 0 to 7 Details Checks that there are no errors in the configurations of the connected CK3W Unit and End Cover. 0: No hardware configuration error 1: No End Cover 2: Five or more CK3W Units are installed to the CPU Rack or Expansion Rack, except for the Expansion Master Unit and Expansion Slave Unit.
- Page 227 6 Troubleshooting Noise If the error occurs even af- Implement noise counter- • ter making the above cor- measures. Data corruption in bus signals rection, check noise entry • paths such as the FG and Malfunction of bus inter- face circuit the power supply lines and implement noise counter- measures as required.
- Page 228 6 Troubleshooting AbortAll Register name Sys.AbortAll Description Stop by Abort all input Range 0 to 1 Details 0: No stop by Abort all input 1: Stopped by Abort all input, or stopped in the past by Abort all input. Detection timing With Abort all input Recovery...
- Page 229 6 Troubleshooting Default Register name Sys.Default Description Initialized to the factory default setting. Range 0 to 1 Details 0: No error 1: Cases below • In the factory default state, or initialized to the factory default state by a re-initializa- tion command ($$$***).
- Page 230 6 Troubleshooting HWChangeErr Register name Sys.HWChangeErr Description After the save, the hardware configuration was changed. Range 0 to 1 Details 0: No change in hardware configuration. 1: After the save, the hardware configuration was changed. Detection timing When power is turned ON or the Controller is reset. Recovery Cycle the power supply, or issue reset command ($$$) Effects...
- Page 231 6 Troubleshooting ConfigLoadErr Register name Sys.ConfigLoadErr Description Read error in saved settings Range 0 to 1 Details 0: No error 1: System file setting error Detection timing When power is turned ON or the Controller is reset. Recovery Cycle the power supply, or issue reset command ($$$) Effects Operate with default settings.
- Page 232 6 Troubleshooting ProjectLoadErr Register name Sys.ProjectLoadErr Description User Project File Read Error Range 0 to 1 Details 0: No error 1: User Project File Read Error Detection timing When power is turned ON or the Controller is reset. Recovery Cycle the power supply, issue reset command ($$$), or download the project Effects Operate with default settings.
- Page 233 6 Troubleshooting WDTFault Register name Sys.WDTFault Description Software Watchdog Timer ErrorStatus Range 0 to 3 Details Sys.WDTFault shows the software watchdog timer operation status with 2-bit data. Bit0: Background software watchdog timer error 0: No background watchdog timer error has occurred. 1: Background watchdog timer error has occurred.
-
Page 234: Ethernet/Ip Connection Status Codes And Troubleshooting
6 Troubleshooting EtherNet/IP Connection Status Codes and Troubleshooting This section describes how to identify the cause of an error by the connection status of the tag data link and how to troubleshoot the error when the originator is an NJ/NX-series CPU Unit. The connec- tion status can be monitored by the device monitor function of the Network Configurator. - Page 235 6 Troubleshooting Connection sta- Gener- Addi- Error cause Corrective action example al Sta- tional Status (hex) (hex) 0203 Error code gener- The connection timed out. Timeout of tag data link communication from ated by originator the target occurred. Check the power supply to and cable wiring of the devices on the path in- cluding the target and switch.
- Page 236 6 Troubleshooting 6-22 CK3M-series Programmable Multi-Axis Controller User's Manual Hardware (O036)
-
Page 237: Inspection And Maintenance
Inspection and Maintenance This section describes the procedures for the cleaning, inspection, and maintenance of the CK3M-series Programmable Multi-Axis Controller. Cleaning and Inspection................7-2 7-1-1 Cleaning ......................7-2 7-1-2 Periodic Inspections ..................7-2 Maintenance Procedures................7-4 7-2-1 Unit Replacement Precautions................ 7-4 7-2-2 Backup ...................... -
Page 238: Cleaning And Inspection
7 Inspection and Maintenance Cleaning and Inspection This section describes daily maintenance and the cleaning and inspection methods. In order to use the functions of the Motion Controller in the best condition, please perform daily or reg- ular inspections. 7-1-1 Cleaning Perform the following cleaning procedures periodically to ensure the Motion Controller is maintained in the best operating condition. - Page 239 7 Inspection and Maintenance Inspec- Inspection details Criteria Correction tion item Check for accumulation of No accumulation Clean and protect the Controller if necessa- dirt, dust, salt, metal powder, etc. Check for water, oil, or chem- No spray Clean and protect the Controller if necessa- ical sprays hitting the Con- troller.
-
Page 240: Maintenance Procedures
7 Inspection and Maintenance Maintenance Procedures This section describes the procedures to back up the data in the CPU Unit and to replace the Unit. Use Power PMAC IDE Ver.4.0 or a higher version. 7-2-1 Unit Replacement Precautions If you find any faulty Units during inspection, replace the Unit according to the following points. •... - Page 241 7 Inspection and Maintenance Step Description Reference Write the project Right-click the project name, click Build and Download All file Programs, and write the project file to the CPU Unit. Execute save In the terminal window, input the save command, and save the pro- gram in the built-in flash memory.
- Page 242 7 Inspection and Maintenance CK3M-series Programmable Multi-Axis Controller User's Manual Hardware (O036)
-
Page 243: Appendices
Appendices The appendices provide the general specifications, the Unit dimensions, and restric- tions on using the OMRON EtherCAT Coupler Unit. General Specifications ................. A-3 Dimensions ....................A-4 A-2-1 CPU Unit ......................A-4 A-2-2 Power Supply Unit................... A-5 A-2-3 Axis Interface Unit ................... A-5 A-2-4 CK3W-MD and CK3W-AD Units.............. - Page 244 Appendices A-9-6 Gate3[i].Chan[0].CompA (PWM Output Setting) ........... A-37 A-9-7 Gate3[i].Chan[1].CompA (PWM Output Delay Setting)......... A-38 A-9-8 Gate3[i].Chan[2].CompA (PWM Output Pulse Count)........A-38 A-9-9 Gate3[i].Chan[0].CompB (TCR Output Command Distance Setting).... A-39 A-9-10 Gate3[i].Chan[1].CompB (TCR Output Comparison Table Setting) ....A-39 A-9-11 Gate3[i].Chan[2].CompB (TCR Output Control Register)......
-
Page 245: A-1 General Specifications
Appendices A-1 General Specifications This section describes the Motion Controller specifications. Item Specification Enclosure Mounted in a panel Grounding Method Ground to less than 100 Ω. Ambient Operating 0 to 55°C Temperature Ambient Operating Hu- 10% to 95% (with no condensation or icing) midity Atmosphere Must be free of corrosive gases. -
Page 246: A-2 Dimensions
Appendices A-2 Dimensions Dimensions are shown below. The unit of dimension is millimeters. A-2-1 CPU Unit 63.2 63.2 CK3M-series Programmable Multi-Axis Controller User's Manual Hardware (O036) -
Page 247: A-2-2 Power Supply Unit
Appendices A-2-2 Power Supply Unit A-2-3 Axis Interface Unit 9 10 11 12 13 14 15 9 10 11 12 13 14 15 CK3M-series Programmable Multi-Axis Controller User's Manual Hardware (O036) -
Page 248: A-2-4 Ck3W-Md And Ck3W-Ad Units
Appendices A-2-4 CK3W-MD and CK3W-AD Units CK3W-MD Unit 31.6 CK3W-AD Unit 31.6 CK3M-series Programmable Multi-Axis Controller User's Manual Hardware (O036) -
Page 249: A-2-5 Ck3W-Ecs And Ck3W-Gc Units
Appendices A-2-5 CK3W-ECS and CK3W-GC Units CK3W-ECS Unit 63.2 CK3W-GC Unit 63.2 CK3M-series Programmable Multi-Axis Controller User's Manual Hardware (O036) -
Page 250: A-2-6 Expansion Master Unit And Expansion Slave Unit
Appendices A-2-6 Expansion Master Unit and Expansion Slave Unit Expansion Master Unit 31.6 Expansion Slave Unit CK3W-EXS02 31.6 CK3M-series Programmable Multi-Axis Controller User's Manual Hardware (O036) -
Page 251: A-2-7 End Cover
Appendices A-2-7 End Cover 15.6 15.6 CK3M-series Programmable Multi-Axis Controller User's Manual Hardware (O036) -
Page 252: Restrictions On Using The Nx-Series Ethercat Coupler Unit
A-3 Restrictions on Using the NX-series EtherCAT Coupler Unit When OMRON NX-series EtherCAT Coupler Units are used as slaves with the CPU Unit as the Ether- CAT master, the following models and unit versions of EtherCAT Coupler Units can be connected. -
Page 253: Omron Servo Drive Connection Example
Appendices A-4 OMRON Servo Drive Connection Ex- ample This section shows an example of a connection between a CK3W-AX1414£ or CK3W-AX1515£ Unit and an OMRON G5-series Servo Drive R88D-KT£££. Main circuit power supply Main circuit contactor OFF ON Three-phase, 200 to 240 VAC,... -
Page 254: A-5 Version Information
Appendices A-5 Version Information This section provides version information that you need to know when connecting a CK3W Unit to a CPU Unit and Power PMAC IDE. The table below specifies the correspondence between each CK3W Unit and the versions of CPU Unit and Power PMAC IDE. -
Page 255: A-6 How To Read The Lot Number
Day of production: 1 to 31 Month of production: 1 to 9, X (October), Y (November), Z (December) Year of production: Last two digits of the year OMRON’s control number £ A-13 CK3M-series Programmable Multi-Axis Controller User's Manual Hardware (O036) -
Page 256: A-7 Supported Cip Objects
Appendices A-7 Supported CIP Objects The types of CIP objects supported in EtherNet/IP are as shown below. Object name Function Reference Identity object Retrieves the product information of A-7-1 Identity Object (Class ID: 01 Hex) on page the CK3M. A-14 Assembly object Joins the I/O data of the CK3M. -
Page 257: A-7-2 Assembly Object (Class Id: 04 Hex
Appendices Attribute ID (hex) Parameter name Description Attribute Data type Value (hex) Serial Number Serial number Read UDINT Set value Product Name Product name Read SHORT_STRING Set value Product code Model Product code (hex) CK3M-CPU101 0BE2 CK3M-CPU111 0BE3 CK3M-CPU121 0BE4 Status Status Value (hex) -
Page 258: Tcp/Ip Interface Object (Class Id: F5 Hex
Appendices Attribute ID for Output Assembly Attribute ID Parameter Description Attribute Data type Value (hex) (hex) name Data Output data Read and ARRAY of BYTE 0 to 504 byte data write Size Output data size Read UINT 0 to 1F8 ... -
Page 259: A-7-4 Ethernet Link Object (Class Id: F6 Hex
Appendices Attrib- Attrib- ute ID Parameter name Description Data type Value (hex) (hex) Physical Link Object Path to the physical link ob- Read Struct ject Path Size Path size Read UINT 0002 (always) Path Fixed path Read Padded 20F62401 (al- EPATH ways) Interface Configuration... - Page 260 Appendices ID Type Value (hex) Instance ID 01 Attribute ID The attribute IDs for instances are as shown below. trib- Attrib- Parameter name Description Data type Value (hex) (hex) Interface Speed Gives the baud rate for the interface. Read UDINT Current val- Interface Flags Gives the status of the interface.
- Page 261 Appendices trib- Attrib- Parameter name Description Data type Value (hex) (hex) SQE Test Errors Number of times a SQE test error mes- Read UDINT 0 (always) sage was generated. Deferred Transmis- The number of frames for which the first Read UDINT Current val- sions...
- Page 262 Appendices trib- Attrib- Parameter name Description Data type Value (hex) (hex) HC Media Counters High capacity media counters for commu- Read Struct nications ports HCStatsAlignmen- The number of frames received that were Read ULINT Current val- tErrors not octets in length. This counter is the 64-bit edition of Alignment Errors.
-
Page 263: Software Reference Of Encoder Input Unit
Appendices A-8 Software Reference of Encoder Input Unit This section describes register settings of the Encoder Input Unit. The register settings here are different from the definitions descried in the Power PMAC Software Reference Manual (Cat. No. O015). A-8-1 Gate3[i].SerialEncCtrl (Serial Encoder Control) Description Serial encoder control register Default $0F400000... - Page 264 Appendices The intermediate clock (SER_Clock) to be used in internal processing is also the same as the clock frequency. The following shows examples of the clock frequency settings to be used in BiSS-C. Clock frequency SerialClockMDiv SerialClockNDiv 2 MHz 49 ($31) 1 MHz 99 ($63) 500 kHz...
- Page 265 Appendices SER_Clock (MHz)= (M+1)×2 M = SerialClockMDiv N = SerialClockNDiv The following shows examples of the clock frequency settings to be used in Endat2.2. Clock frequency SerialClockMDiv SerialClockNDiv 2 MHz 1 ($01) 1 MHz 3 ($03) 500 kHz 7 ($07) 100 kHz 39 ($27) The following shows examples of general settings.
-
Page 266: A-8-2 Gate3[I].Chan[J].Serialencena (Serial Encoder Enable
Appendices A-8-2 Gate3[i].Chan[j].SerialEncEna (Serial Encoder Enable) Description Serial encoder enable Default This register is write-protected, so you cannot change it unless you write a key value in Gate3[i].WpKey. You can reset the write protection automatically in the script environment by writing the key value in Sys.WpKey. - Page 267 Appendices Name Function SerialEncTrigEna Serial trigger enable Set whether to sample the encoder. When SerialEncTrigMode is continuous sampling, it is sampled continuously dur- ing SerialEncTrigEna = 1. When SerialEncTrigMode is one-shot sampling, it is sampled only once at Serial- EncTrigEna = 1. When sampling is done, SerialEncTrigEna will be 0 automatically. 0: Serial encoder trigger disable 1: Serial encoder trigger enable Reserve...
- Page 268 Appendices Name Function 21 to Com- Set the Command Code to send to the Endat encoder. mand_Code This product supports the following four Command Codes. 000111 – Position data read 101010 – Encoder reset 111000 – Position data and additional data read 101101 –...
-
Page 269: A-8-4 Gate3[I].Chan[J].Serialencdataa (Serial Encoder Data A
Appendices For R88M-1L£/-1M£ Motor Built-in Encoder Name Function 31 to Command Set the Command Code to send to the encoder. Code This product supports the following four Command Codes. • $0000 – Position data read (multi-turn 16 bits, single-turn 23 bits) •... -
Page 270: A-8-5 Gate3[I].Chan[J].Serialencdatab (Serial Encoder Data B
Appendices Name Function 31 to 0 Position data Lower 32 bits of position data For Endat2.2 Gate3[i].Chan[j].SerialEncDataA is used to read lower 32 bits of position data. Name Function 31 to 0 Position data Lower 32 bits of position data For R88M-1L£/-1M£... - Page 271 Appendices For Command Code = 000111 or 101010 Name Function Timeout error Shows the status of the timeout error. 0: No error 1: Timeout error CRC error Shows the status of the CRC error. 0: No error 1: CRC error Error bit Shows the error bit sent from the encoder.
- Page 272 Appendices Name Function Timeout error Shows the status of the timeout error. 0: No error 1: Timeout error CRC error Shows the status of the CRC error. 0: No error 1: CRC error 29 to 24 Reserve 23 to 8 Additional data Data to be displayed varies with the Command Code.
-
Page 273: A-8-6 Gate3[I].Chan[0].Status (Internal Memory Error Detection
Appendices Name Function Cause Corrective action One-rotation The encoder detected a Excess noise has oc- Implement noise countermeasures. counter error one-rotation counter error. curred. If the error occurs even after the noise countermeasures are implemented, re- Failure due to vibra- place the motor because the Servomotor tion, shock, conden- failed. - Page 274 Appendices Each error is removed by cycling the power supply. Use a user program to monitor this register, and cycle the power supply when an error occurs. Name Function 31 to 28 Reserve Minor error Detects a minor error in the internal memory. 0: No minor error found in internal memory 1: A minor error found in internal memory Even if a minor error occurs, operation will continue.
-
Page 275: Software Reference Of Laser Interface Unit
Appendices A-9 Software Reference of Laser Interface Unit This section describes register settings of the Laser Interface Unit. These register settings are different from the definitions descried in the Power PMAC Software Reference Manual (Cat. No. O015). A-9-1 Gate3[i].SerialEncCtrl (Control Register) Description Control register Default $00000000... -
Page 276: A-9-2 Gate3[I].Chan[J].Dac[0] (Setting Of Command Position And Control Command
Appendices Name Function TxEnable SL2-100 data send enable 0: SL2-100 output stop 1: SL2-100 output enable Reserve Always set 0. ClockSel Set the clock to use for the linear interpolation of SL2-100 and the delay time of PWM output. 0: Servo clock 1: Phase clock Sync Set the synchronous or asynchronous mode for linear interpolation. -
Page 277: A-9-3 Gate3[I].Chan[J].Dac[1] (Setting Of Command Position Compensation Value
Appendices Name Function 07 to 00 Reserve Always set 0. For CK3W-GC2£00 Units (SL2-100) Name Function 31 to 08 Command position or control com- This data depends on the setting of Control Bit as follows. • Control Bit = 001: Command position mand •... -
Page 278: A-9-5 Gate3[I].Chan[J].Serialencdatab (Status Data
Appendices Default $00000000 Depending on the channel, this setting varies as follows. Register Description Gate3[i].Chan[0].SerialEncDataA X-axis setting Gate3[i].Chan[1].SerialEncDataA Y-axis setting Gate3[i].Chan[2].SerialEncDataA Z-axis setting Note Gate3[i].Chan[3].SerialEncDataA is not used. This register is read-only. Writing is disabled. The setting of this register depends on XY2-100 and SL2-100. For CK3W-GC1£00 Units (XY2-100) Name Function... -
Page 279: A-9-6 Gate3[I].Chan[0].Compa (Pwm Output Setting
Appendices Name Function 31 to 13 Status Stores the status data sent from the Galvo Scanner. For details on the status data, refer to the manual for the Galvo Scanner. Status Parity Stores the parity bits added to the status data. Use a user program to check that the parity is correct. -
Page 280: A-9-7 Gate3[I].Chan[1].Compa (Pwm Output Delay Setting
Appendices Default $00000000 Name Function 31 to 20 DutyCycle Set the duty in the H period of PWM output by the formula below. DutyCycle Duty (%) = × 100 4096 The setting range is from 0 to 4095. However, if you set DutyCycle = 4095, the duty will be 100%. 19 to 08 PWMPeriod Set the PWM frequency by the formula below. -
Page 281: Gate3[I].Chan[0].Compb (Tcr Output Command Distance Setting
Appendices Name Function 19 to 08 Pulse- Set the pulse count to output. Count When one pulse is output, a value of this register will be subtracted by one. Reading this register will return the number of the remaining PWM pulses to be output. When the value is 0, no PWM pulse will be sent. -
Page 282: A-9-12 Gate3[I].Chan[3].Compb (Tcr Output Status Register
Appendices Name Function CompClkSel Select an interpolation clock. 0: Servo clock 1: Phase clock To change this setting, be sure to set CompareEnable to 0 beforehand. Also, make sure that the interpolation clock period is 1 ms or less. Reserve Always set 0. - Page 283 Appendices Use a user program to monitor this register, and cycle the power supply when an error occurs. Name Function 31 to 28 Reserve Minor error Detects a minor error in the internal memory. 0: No minor error found in internal memory 1: A minor error found in internal memory Even if a minor error occurs, operation will continue.
- Page 284 Appendices A-42 CK3M-series Programmable Multi-Axis Controller User's Manual Hardware (O036)
- Page 285 Index CK3M-series Programmable Multi-Axis Controller User's Manual Hardware (O036)
- Page 286 Index Index Applicable Wires......5-2, 5-14, 5-26, 5-33, 5-40 network topology............... 5-7 Basic Configuration............ 1-3, 2-2 Operating Procedure............1-5 Output Specifications............3-8 Output Status..............3-8 Cleaning................7-2 CPU Rack................2-2 CPU Unit................3-3 Performance Specifications..........3-3 Crimping Tool........5-3, 5-15, 5-26, 5-33, 5-40 Power PMAC IDE.............. 1-4 Power PMAC-NC16 Runtime..........
- Page 288 The Netherlands Hoffman Estates, IL 60169 U.S.A. Tel: (31)2356-81-300/Fax: (31)2356-81-388 Tel: (1) 847-843-7900/Fax: (1) 847-843-7787 © OMRON Corporation 2018-2022 All Rights Reserved. OMRON (CHINA) CO., LTD. OMRON ASIA PACIFIC PTE. LTD. In the interest of product improvement, Room 2211, Bank of China Tower, 438B Alexandra Road, #08-01/02 Alexandra specifications are subject to change without notice.
Need help?
Do you have a question about the CK3W-GC 00 Series and is the answer not in the manual?
Questions and answers