Table of Contents
Advertisement
Available languages
Available languages
Quick Links
Advertisement
Chapters
Table of Contents

Related Manuals for Frico PLTB16R


Summary of Contents for Frico PLTB16R
- Page 1 MANUAL MANUAL HANDBUCH HANDMATIG INSTRUKCJA MANUALE...
- Page 3 Svenska ............2 English ............26 Deutsch ............50 Nederlands ..........74 Polski ............98 Italiano ............ 122...
- Page 4 För att garantin ska gälla måste produkten installeras och handhas enligt denna manual. Det är därför väldigt viktigt att du läser manualen. Det gäller både dig som ska installera termostaten och dig som ska använda den. Du hittar även information om felsökning samt teknisk data.
-
Page 5: Table Of Contents
Detta är din termostat ......4 I förpackningen ......... 5 Installera termostaten ......6 Komma igång ..........9 Så fungerar termostaten ...... 10 Displayens symboler ......16 Så ställer du in termostaten ....17 Energisparprogram ........ 21 Felsökning ..........23 Teknisk data .......... -
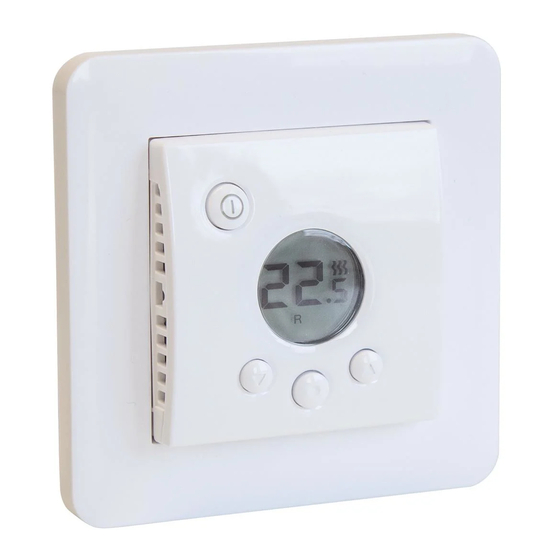
Page 6: Detta Är Din Termostat
Detta är din termostat Termostaten är mikroprocessorstyrd med LCD-display. Displayen har en dämpad bakgrundsbelysning tänds helt när du trycker på valfri knapp. Den lyser med full styrka i 30 sekunder efter senaste knapptryckning, för att sedan åter dämpas. Fronten är försedd med en av/på-knapp och tre manöver- knappar. -
Page 7: I Förpackningen
I förpackningen 1. Front till ELKO Plus/RS 2. Front till Schneider Exxact 3. Ram 4. Termostat 5. Golvgivare 6. Kopplingklämma Manual Snabbguide... -
Page 8: Installera Termostaten
Installera termostaten Termostaten får inte placeras så Viktigt den utsätts för följande: • direkt solljus och luftdrag. • stora temperaturväxlingar eller hög luftfuktighet. Golvgivaren monteras i en spiralslang förlagd i golvet. Slangänden ska tätas för att förenkla byte av golvgivare. Alla inkommande rör till apparatdosan måste tätas så... - Page 9 inkommande matning samt för värmekabel ansluts med en kopplings- klämma i dosan. Se kopplingsschema nedan. 4. För in termostaten i apparatdosan och skruva fast med befintliga skruvar. 5. Montera ram och front. 6. Om termostaten monteras i fler- facksram måste de invändiga hörnen i flerfacksramen avlägsnas.
-
Page 11: Komma Igång
Komma igång Efter installation, vänta 2-4 veckor med att starta golvvärmen. Exakt hur länge du behöver vänta beror på vilken typ av golv du har och föreskrifterna för golvspacklet. Öka sedan värmen gradvis. Detta gäller inte dig som lagt trä/laminatgolv över golvvärmen. Det finns en snabbguide för att du lätt ska komma igång med termostaten. -
Page 12: Så Fungerar Termostaten
Så fungerar termostaten Här beskrivs allt du behöver veta om hur termostaten fungerar. För att lära dig hur du gör inställningar efter dina egna behov, läs avsnittet Så ställer du in termostaten. Av/på-knapp Temp Vald reglering Valknapp Display LCD-displayens belysning tänds med full styrka när du trycker på... - Page 13 Om inget alls visas i displayen betyder det att termostaten är avstängd eller inte får någon spänning. När termo startas första gången visar displayen fabriksinställningarna som på bilden. Hur du gör personliga in- ställningar beskrivs i avsnittet Så ställer du in termostaten. En förklaring till displayens symboler finns i avsnittet Symboler.
- Page 14 Sätta på och stänga av termostaten För att nå stand by-läge, håll in av/ på-knappen en sekund. Återgå till normalläge genom att återigen hålla in knappen en sekund. I stand by-läge regleras inte värmen. Klockan går som vanligt, valt program och inställd temperaturer finns kvar i minnet.
- Page 15 termostaten är inställd på Golvtermo- stat. Annars visas istället aktuell tempe- ratur i rummet (R). Temperaturen visas i 30 sek efter senaste knapptryckningen. Tid och datum Tid ställs i 24-timmarsformat. Rätt veckodag räknas fram automatiskt. Kalendern ställer om vid skottår och anpassar sig till sommar-/vintertid.
- Page 16 Ventilationsläge Om rumstemperaturen sjunker mer än 3 °C under en minut, t.ex. vid vädring, aktiveras ventilationsläget. Då slutar termostaten att värma under 15 minu- ter för att sedan återgå till normalläge. Funktionen är alltid aktiv. Fördröjning mellan från- och tillslag För att undvika onödigt slitage på...
- Page 17 Hur du väljer funktion beskrivs i avsnit- tet Så ställer du in termostaten/Regle- ringsfunktioner. Golvtermostat - En givare i golvet mäter temperaturen och reglerar värmen där- efter. Om golvgivaren är inkopplad när termostaten slås på för första gången, väljs denna funktionen automatiskt. Förinställt värde är 22 °C.
-
Page 18: Displayens Symboler
Displayens symboler 1. Vald meny/LOCK för låst knappsats 2. Värmesymbol 3. Aktuell temp (ärvärde) /Inställd temp (börvärde) °C 4. Symbol för energisparprogram kontor 5. Vald reglering 6. Symbol för energisparprogram hem... -
Page 19: Så Ställer Du In Termostaten
Så ställer du in termostaten I detta avsnitt beskrivs hur du ställer in termostaten efter dina behov. Genom att göra dessa inställningar kan du anpassa golvvärmesystemet maximalt efter ditt eget värmebehov. Vill du veta mer om hur du navigerar i menyerna eller använder knappsatsen, läs avsnittet Så... - Page 20 Ljus och kontrast Ställ in displayens bakgrundsbelysning Displayen lyser alltid i 30 sek efter se- naste knapptryckning. Sedan dämpas belysningen. Du kan också ställa in så att den istället släcks helt. Tryck och bläddra fram till SET. Välj med . Bläddra fram till DISP och välj med .
- Page 21 Ställ först in timmar genom att bläddra fram till rätt tid och bekräfta . Ställ in minuter på samma sätt och bekräfta med . Ställ in dag och månad samt år på samma sätt. Bekräfta med . Veckodag visas inte i displayen, men systemet ställer in rätt veckodag automatiskt.
- Page 22 Regleringsfunktioner Dessa beskrivs utförligare i avsnittet Så fungerar termostaten/Regleringsfunk- tioner. Välj regleringsfunktion Tryck och bläddra fram till SET. Välj med . Bläddra fram till RNF och välj med . Ikonen för den aktuella funktionen (R, F eller R&F) blinkar. Bläddra mellan de olika alternativen, bekräfta med .
-
Page 23: Energisparprogram
Energisparprogram Ett smart sätt att spara energi är att an- passa uppvärmningen till ditt faktiska behov under dygnet och t. ex. sänka temperaturen när ingen är hemma. Det finns två förinställda programalternativ för temperatursänkning i termostaten: ett för hem- och ett för kontorsmiljö. Uppvärmningstiden är alltid inräknad i programmen tack vare den adaptiva funktionen. - Page 24 Stoppa ett program Tryck och bläddra fram till PROG. Välj med . Den aktuella programikonen blinkar. Bläddra tills ingen av ikonerna blinkar, bekräfta med . Olika programalternativ De två förinställda programmen är anpassade för de flesta hem- resp kontorsmiljöer. Program för hemmiljö Temperaturen sänks automatiskt med 5 °C under följande tider: Mån –...
-
Page 25: Felsökning
Felsökning Viktigt Golvvärmesystemet är en stark- strömsanläggning och därför ska eventuella fel åtgärdas av behörig elinstallatör. Felkoder När ett fel uppstår, stänger termostaten av värmen. Displayen blinkar och visar en blinkande felkod E1: Kortslutning rumssensor. E2: Avbrott rumssensor. E3: Kortslutning golvsensor. E4: Avbrott golvsensor. -
Page 26: Teknisk Data
Teknisk data Spänning 230 VAC-50 Hz Lufttemp.område 5-37 °C Golvtemp.område 5-37 °C Temp.begränsare 5-45 °C Brytförmåga 16 A/230 VAC/ 1-polig Anslutningskabel max 2,5 mm Belastning cos φ = 1 Kopplingsdifferens +- 0,3 °C Kapslingsklass IP21 Gångreserv Maxlängd givarkabel 50 m, 2x1,5mm Anpassad för Schneider Exxact och ELKO Plus/RS. - Page 28 For the guarantee to be valid, the product must be installed and operated as indicated in this manual. This means it is extremely important that you read the manual. This applies both to the person installing the thermostat and the person who is going to use it. You will also find troubleshooting details and technical specifications.
- Page 29 Introduction ..........28 In the package .......... 29 Installing the thermostat ...... 30 Getting started .......... 33 How the thermostat works ....34 Symbols on the display ......40 How to set the thermostat ....41 Energy saving programs ......45 Troubleshooting ........
-
Page 30: Introduction
Introduction This is a microprocessor-controlled thermostat with LCD display. The dis- play has dimmed background lighting which lights up fully by pressing any button. The display stays lit for 30 se- conds after the last button pressed. The front is fitted with an on/off button and three control buttons. -
Page 31: In The Package
In the package 1. Front for ELKO Plus/RS 2. Front for Schneider Exxact 3. Frame 4. Thermostat 5. Floor sensor 6. Connection clip Manual Quick guide... -
Page 32: Installing The Thermostat
Installing the thermostat Important the thermostat must not be installed where it may be exposed to the following: • direct sunlight and draughts. • extreme fluctuations in temperature or high air humidity. The floor sensor should be mounted in a spiral hose laid in the floor. - Page 33 incoming feed and for the heating cable are connected with a connection clip in the box. See wiring diagram below. 4. Insert the thermostat into the appliance box and screw tight with the existing screws. 5. Fit the frame and front. 6.
-
Page 35: Getting Started
Getting started After installation, wait 2-4 weeks before starting the underfloor heating. Precisely how long you wait depends on the type of floor you have and the instructions for the floor filler. Then increase the heat gradually. This does not apply to those who have laid a wooden/laminate floor on the floor heating. -
Page 36: How The Thermostat Works
How the thermostat works This section describes all you need to know about how the thermostat works. To learn how to enter settings to suit your own requirements, read the How to set the thermostat section. On/off button Temperature Selected control Selection button Display The light in the LCD display is fully... - Page 37 If the display is empty, it means that the thermostat is turned off or that it is not connected to the power supply. When the thermostat is started for the first time the display shows the factory settings as shown in the illustration. How to enter personal settings is des- cribed in the How to set the thermostat section.
- Page 38 Turning on and off Keep the on/off button pressed for one second to get to standby mode. Return to normal mode by once again pres- sing the button for a second. The heating cannot be controlled in standby mode. The clock runs as nor- mal, and selected programmes and set temperatures are stored in the memory.
- Page 39 Floor thermostat. Otherwise the actual temperature (R) in the room is display- ed. The temperature is shown for 30 seconds after the last button pressed. Time and date Time is set in 24-hour format. The correct day of the week is worked out automatically.
- Page 40 Ventilation mode If the room temperature falls by more than 3 °C in a single minute, e.g. when airing the room, the ventilation mode is activated. The thermostat will then stop heating for 15 minutes before returning to normal mode. This function is always active.
- Page 41 How you select the function you want is described in the How to set the ther- mostat/Control functions section. Floor thermostat - A sensor in the floor meas- ures the temperature and then regulates the heating accordingly. If the floor sensor is connected when the thermostat is turned on for the first time, this function is selected automatically.
-
Page 42: Symbols On The Display
Symbols on the display 1. Selected menu/LOCK for locked keypad 2. Heating symbol 3. Current temperature (actual value) /Set temperature (set point) °C 4. Symbol for energy saving programs, office 5. Selected control 6. Symbol for energy saving programs, home... -
Page 43: How To Set The Thermostat
How to set the thermostat This section describes how to set the thermostat to suit your requirements. By entering these settings you can fully utilise the underfloor heating system to meet your own heating require- ments. If you want to find out more on how to scroll the menus or use the keypad, read the How the thermostat works section. - Page 44 Light and contrast Set the display background lighting The display stays lit for 30 seconds after the last button pressed. The light then dims again. It is also possible to set the display to turn the light off entirely. Press and scroll to SET. Select with . Scroll to DISP and select with .
- Page 45 First set the hours by scrolling to the correct time and confirm with . Set the minutes in the same way and confirm with . Set the day, month and year in the same way. Confirm with . The week- day is not shown in the display, but the system set the correct weekday automatically.
- Page 46 Control functions These are described in more detail in the How the thermostat works/Control functions section. Select control function Press and scroll to SET. Select with . Scroll to RNF and select with . The symbol for the current function (R, F or R &...
-
Page 47: Energy Saving Programs
Energy saving programs A smart way to save energy is to adapt the heating to your actual daily requirements and, for example, lower the temperature when the house is empty. There are two preset program options for temperature reduction in the thermostat : one for home and one for office users. - Page 48 Stop a program Press and scroll to PROG. Select with The current program symbol flashes. Scroll until none of the symbols flash and confirm with . Different program options The two preset programs are suitable for most home and office environ- ments.
-
Page 49: Troubleshooting
Troubleshooting Important The underfloor heating system is an electrical power installation and any faults must therefore be rectified by a quali- fied electrician. Error codes When an error occurs, the thermostat will turn off the heating. The display flashes and shows a flashing error code. E1: Short circuit in room sensor. -
Page 50: Technical Specifications
Technical specifications Voltage 230 VAC-50 Hz Air temp. range 5-37 °C Floor temp. range 5-37 °C Temp. limiter 5-45 °C Breaking capacity 16A/230 VAC/ single-pole Connection cable max 2.5 mm Load cos φ = 1 Hysteresis +- 0.3 °C Protection class IP21 Run reserve Max. - Page 52 Zur Wahrung der Garantie muss das Produkt wie in diesem Handbuch beschrieben installiert und betrieben werden. Das heißt, dass das Lesen des Handbuchs sehr wichtig ist. Dies gilt für den Installateur des Thermostats sowie für den Anwender. Daneben finden Sie im Handbuch Informationen zur Fehlerbehebung und technische Spezifikationen.
- Page 53 Einführung ..........52 Im Paket enthalten ......... 53 Installation des Thermostats ....54 Erste Schritte ..........57 Arbeitsweise des Thermostats ... 58 Symbole auf dem Display ....64 Einstellung des Thermostats ....65 Energiesparprogramme ...... 69 Fehlerbehebung ........71 Technische Spezifikationen ....
-
Page 54: Einführung
Einführung Das Gerät ist ein mikroprozessor- gesteuerter Thermostat LCD- Display. Das Display hat eine gedimmte Hintergrundbeleuchtung. Es wird voll beleuchtet, sobald Sie eine beliebige Taste drücken. Das Display bleibt für 30 Sekunden nach dem letzten Tasten- druck beleuchtet. Auf der Vorderseite befinden sich eine Ein-/Ausschalttaste und drei Steuertasten. -
Page 55: Im Paket Enthalten
Im Paket enthalten 1. Vorderplatte für ELKO Plus/RS 2. Vorderplatte für Schneider Exxact 3. Rahmen 4. Thermostat 5. Fußbodenmessfühler 6. Verbindungsklemme Betriebsanleitung Kurzanleitung... -
Page 56: Installation Des Thermostats
Installation des Thermostats Wichtig Der Thermostat darf nicht an Orten installiert werden, an denen er folgenden Elementen ausgesetzt ist: • direktes Sonnenlicht und Luftzug • extreme Temperaturschwankungen oder hohe Luftfeuchtigkeit. Der Bodensensor muss in einem im Boden verlegten Spiralschlauch montiert werden. - Page 57 und Heizleitung sind mit einer Verbind- ungsklemme im Gehäuse angeschlossen. Siehe nachstehender Schaltplan. 4. Setzen Sie den Thermostat in das Gehäuse ein und fixieren Sie es mit den vorhandenen Schrauben. 5. Bringen Sie den Rahmen und die Vorder abdeckung an. 6.
-
Page 59: Erste Schritte
Erste Schritte Warten Sie nach der Installation 2 bis 4 Wochen, bevor Sie die Fußbodenheizung in Betrieb nehmen. Die Dauer der erforderlichen Wartezeit hängt vom Bodentyp und von den Anleitungen für die Fußboden- Spachtelmasse ab. Erhöhen Sie die Wärme anschließend schrittweise. Diese Anweisung gilt nicht, wenn ein Holz-/Laminatboden über der Fußbodenheizung verlegt wurde. -
Page 60: Arbeitsweise Des Thermostats
Arbeitsweise des Thermostats In diesem Abschnitt wird die Arbeits- weise des Thermostats eingehend beschrieben. Im Abschnitt Einstellung des Thermostats erfahren Sie, wie Sie die Einstellungen an Ihre Bedürfnisse anpassen können. Ein-/Ausschalttaste Temperatur Ausgewähltes Steuerelement Auswahltaste Display Durch Drücken einer beliebigen Taste wird das LCD-Display voll beleuchtet, und die Beleuchtung bleibt für 30 Sekunden nach dem letzten Tasten-... - Page 61 Wenn das Display leer ist, bedeutet dies, dass der Thermostat ausgeschal- tet oder nicht an den Strom ange- schlossen ist. Wenn Sie den Thermostat zum ersten Mal einschalten, zeigt das Display die werkseitigen Einstellungen an (siehe Abbildung). Das Eingeben persönlicher Einstellungen ist im Abschnitt Einstell- ung des Thermostats beschrieben.
- Page 62 Ein- und Ausschalten Halten Sie die Ein-/Ausschalttaste eine Sekunde lang gedrückt, um in den Standby-Modus zu gelangen. Drücken Sie die Taste erneut eine Sekunde lang, um in den normalen Modus zurück- zuwechseln. Im Standby-Modus kann die Heizung nicht gesteuert werden. Die Uhr läuft normal weiter, und ausgewählte Programme und eingestellte Tempera- turen sind gespeichert.
- Page 63 Temperatur des Bodens (F) wird ange- zeigt. Das ist der Fall, wenn der Ther- mostat auf Bodenthermostat eingestellt ist. Andernfalls wird die aktuelle Temperatur (R) im Raum angezeigt. Die Temperatur wird für 30 Sekunden nach dem letzten Tastendruck angezeigt. Uhrzeit und Datum Die Uhrzeit ist im 24-Stunden-Format eingestellt.
- Page 64 Belüftungsmodus Wenn die Raumtemperatur um mehr als 3 °C in einer Minute fällt, also z. B. beim Lüften des Zimmers, wird der Belüftungs- modus aktiviert. Der Thermostat stoppt dann die Heizung für 15 Minuten und schaltet anschließend in den normalen Modus zurück.
- Page 65 Die Auswahl der gewünschten Funktion ist im Abschnitt Einstellung des Thermostats/ Steuerfunktionen beschrieben. Bodenthermostat - Ein Sensor im Fuß- boden misst die Temperatur und regelt die Heizung entsprechend. Wenn der Fußbodensensor beim ersten Einschalten des Thermostats angeschlossen ist, wird diese Funktion automatisch ausgewählt. Der voreingestellte Wert ist 22 °C.
-
Page 66: Symbole Auf Dem Display
Symbole auf dem Display 1. Ausgewähltes Menü/LOCK für gesperrtes Tastenfeld 2. Heizungssymbol 3. Aktuelle Temperatur (tatsächlicher Wert) Temperatur einstellen (Einstellungs- punkt) °C 4. Symbol für Energiesparprogramme, Büro 5. Ausgewählte Steuerung 6. Symbol für Energiesparprogramme, Heim... -
Page 67: Einstellung Des Thermostats
Einstellung des Thermostats In diesem Abschnitt wird beschrie- ben, wie Sie den Thermostat für Ihren Bedarf einstellen können. Durch die Eingabe der Einstellungen können Sie die Funktionen des Fußboden- heizungssystems voll ausschöpfen, um Ihren persönlichen Heizungsbedürf- nisse nachzukommen. Weitere Informationen zum Scrollen durch die Menüs oder zur Verwendung des Tastenfelds finden Sie im Abschnitt Arbeitsweise des Thermostats. - Page 68 Licht und Kontrast Hintergrundbeleuchtung des Displays festlegen Nach dem letzten Tastendruck bleibt das Display für 30 Sekunden beleuchtet. Dann wird die Beleuchtung wieder ge- dimmt. Sie können das Display auch so einstellen, dass das Licht ganz aus- geschaltet wird. Drücken Sie die Taste , und scrollen Sie zu SET.
- Page 69 Legen Sie zunächst die Stunde auf die korrekte Uhrzeit fest, und bestätigen Sie mit . Wiederholen Sie den Vorgang für die Minuten, und bestätigen Sie mit . Legen Sie den Tag, den Monat und das Jahr auf die gleiche Weise fest. Bestätigen Sie die Auswahl mit .
- Page 70 Steuerfunktionen Diese Funktionen sind im Abschnitt Arbeitsweise des Thermostats/Steuer- funktionen genauer beschrieben. Steuerfunktion auswählen Drücken Sie die Taste , und scrollen Sie zu SET. Wählen Sie die Option mit aus. Scrollen Sie zu RNF, und wählen Sie die Option mit aus. Das Symbol für die aktuelle Funktion (R, F oder R &...
-
Page 71: Energiesparprogramme
Energiesparprogramme Intelligentes Energiesparen ist möglich, wenn Sie die Heizung an Ihre tatsäch- lichen täglichen Bedürfnisse anpassen und z. B. die Temperatur senken, wenn niemand zu Hause ist. Für den Thermo- stat sind zwei Programmoptionen zur Temperatursenkung voreingestellt: eine für Heim- und eine für Bürobenutzer. Dank der Anpassfunktion wird die Aufwärmzeit immer in die Programme einbezogen. - Page 72 Stoppen eines Programms Drücken Sie die Taste , und scrollen Sie zu PROG. Wählen Sie die Option mit aus. Das aktuelle Programmsymbol blinkt. Scrollen Sie so lange, bis kein Symbol mehr blinkt, und bestätigen Sie mit . Verschiedene Programmoptionen Die beiden voreingestellten Programme eignen sich für die meisten Heim- und Büroumgebungen.
-
Page 73: Fehlerbehebung
Fehlerbehebung Wichtig Das Fußbodenheizungssystem ist eine elektrische Installation und muss daher von einem qualifizierten Elektriker repariert werden. Fehlercodes Wenn ein Fehler auftritt, schaltet der Thermostat die Heizung aus. Das Dis- play blinkt und zeigt einen blinkenden Fehlercode an. E1: Kurzschluss im Raumsensor. E2: Raumsensor funktioniert nicht. -
Page 74: Technische Spezifikationen
Technische Spezifikationen Spannung 230 V AC-50 Hz Lufttemperatur- 5-37 °C bereich Bodentemperatur- 5-37 °C bereich Temperaturbegrenzer 5-45 °C Schaltleistung 16A/230 VAC/ einpolig Anschlusskabel max 2,5 mm Last cos φ = 1 Hysterese ± 0,3 °C Schutzart IP21 Laufzeitreserve 4 Std. Max. - Page 76 De garantie is uitsluitend geldig als het product wordt geïnstalleerd en bediend volgens de aanwijzingen in deze handleiding. Dat betekent dat het zeer belangrijk is dat u de handleiding leest. Dit geldt zowel voor degene die de thermostaat installeert als voor de gebruiker.
- Page 77 Inleiding ............76 In de verpakking ........77 De thermostaat installeren ....78 Ingebruikneming ........81 Hoe de thermostaat werkt ....82 Symbolen op de display ......88 De thermostaat instellen .......89 Energiebesparingsprogramma’s ..93 Problemen oplossen ....... 95 Technische specificaties ......96...
-
Page 78: Inleiding
Inleiding Dit is een microprocessor-gestuurde thermostaat met lcd-display. De display heeft gedimde achtergrondverlichting die volledig gaat branden als er op een knop wordt gedrukt. De display blijft 30 seconden branden nadat er voor het laatst op een knop is gedrukt. Op de voorkant bevinden zich een aan-/ uitknop en drie regelknoppen. -
Page 79: In De Verpakking
In de verpakking 1. Voorkant voor ELKO Plus/RS 2. Voorkant voor Schneider Exxact 3. Frame 4. Thermostaat 5. Vloersensor 6. Aansluitclip Handleiding Beknopte gids... -
Page 80: De Thermostaat Installeren
De thermostaat installeren Belangrijk De thermostaat mag niet worden aangebracht op een plek waar hij wordt blootgesteld aan: • direct zonlicht en tocht. • extreme temperatuurschommelingen of een hoge luchtvochtigheid. De vloersensor moet in een spiraalslang worden gemonteerd die in de vloer wordt aangebracht. - Page 81 verwarmingskabel worden met een aan- sluitclip in het kastje aangesloten. Zie het onderstaande bedradingsschema. 4. Breng de thermostaat aan in het kastje en schroef deze stevig vast met de bestaande schroeven. 5. Breng het frame en de voorkant aan. 6. Als de thermostaat in een frame met meerdere vakken wordt gemonteerd, moe- ten de binnenhoeken van dit frame worden verwijderd.
-
Page 83: Ingebruikneming
Ingebruikneming Wacht na de installatie 2-4 weken voor- dat u de vloerverwarming inschakelt. Hoe lang u precies moet wachten, hangt af van het vloertype en de gebruiksaanwijzing van de vulmid- del voor de vloer. Voer de warmte vervolgens geleidelijk op. Dit geldt niet wanneer er een houten/laminaat- vloer boven op de vloerverwarming is gelegd. -
Page 84: Hoe De Thermostaat Werkt
Hoe de thermostaat werkt In dit hoofdstuk vindt u alle benodigde informatie over de werking van de thermostaat. Hoe u instellingen invoert op basis van uw eigen behoeften, leest u in het hoofdstuk De thermostaat instellen. Aan-/uitknop Temperatuur Gekozen regeling Selectieknop Display Het lampje van de lcd-display brandt... - Page 85 Als de display blank is, is de ther- mostaat uitgeschakeld of niet op de voeding aangesloten. Als de thermostaat voor het eerst wordt ingeschakeld, worden de fabrieksinstellingen op de display weergegeven, zoals aangegeven in de afbeelding. Hoe u persoonlijke instel- lingen invoert, leest u in het hoofdstuk De thermostaat instellen.
- Page 86 In- en uitschakelen Houd de aan-/uitknop één seconde ingedrukt om de modus stand-by in te schakelen. Keer terug naar de normale modus door de knop opnieuw één seconde in te drukken. In de modus stand-by kan de ver- warming niet worden geregeld. De klok loopt gewoon door en de selecteerde programma’s en ingestelde temperaturen worden in het geheugen...
- Page 87 vloer (F) wordt aangegeven. Dat is het geval als de thermostaat is ingesteld op Vloerthermostaat. Anders wordt de werkelijke temperatuur (R) in de ruimte weergegeven. De temperatuur wordt weergegeven gedurende 30 seconden nadat er voor het laatst op een knop is gedrukt.
- Page 88 Ventilatiemodus Als de temperatuur in de ruimte binnen één minuut meer dan 3 °C daalt, bijvoorbeeld bij het luchten van de ruimte, wordt de ventila- tiemodus geactiveerd. De thermostaat stopt dan 15 minuten met verwarmen en keert vervolgens terug naar de normale modus. Deze functie is altijd actief.
- Page 89 Hoe u de gewenste functie selecteert, leest u in het hoofdstuk De thermostaat instellen/ Regelfuncties. Vloerthermostaat - Een sensor in de vloer meet de temperatuur en regelt de verwar- ming aan de hand daarvan. Als de vloersen- sor aangesloten is wanneer de thermostaat voor het eerst wordt ingeschakeld, wordt deze functie automatisch geselecteerd.
-
Page 90: Symbolen Op De Display
Symbolen op de display 1. Geselecteerd menu/LOCK voor vergrendelde knoppen 2. Verwarmingssymbool 3. Huidige temperatuur (werkelijke waarde)/ingestelde temperatuur (ingestelde waarde) °C 4. Symbool voor energiebesparings- programma’s, kantoor 5. Gekozen regeling 6. Symbool voor energiebesparings- programma’s, thuis... -
Page 91: De Thermostaat Instellen
De thermostaat instellen In dit hoofdstuk wordt beschreven hoe u de thermostaat op basis van uw behoeften kunt instellen. Als u deze in- stellingen invoert, kunt u het vloerver- warmingssysteem aan uw specifieke verwarmingsbehoeften aanpassen. Nadere informatie over het navigeren door de menu’s en het gebruik van het toetsenblok vindt u in het hoofdstuk Hoe de thermostaat werkt. - Page 92 Licht en contrast De achtergrondverlichting van de display instellen De display blijft 30 seconden branden nadat er voor het laatst op een knop is gedrukt. Het licht dimt daarna weer. U kunt de verlichting van de display ook volledig uitschakelen. Druk op en ga naar SET.
- Page 93 Stel eerst het uur in door naar de juiste tijd te navigeren en te bevestigen met . Stel de minuten op dezelfde manier in en bevestig met . Stel de dag, de maand en het jaar op dezelfde wijze in. Bevestig met . De dag van de week wordt niet op de dis- play weergegeven, maar het systeem stelt dat automatisch in.
- Page 94 Regelfuncties Deze worden uitgebreid omschreven in het hoofdstuk Hoe de thermostaat werkt/Regelfuncties. Regelfunctie selecteren Druk op en ga naar SET. Selecteer met . Navigeer naar RNF en selecteer met . Het symbool voor de huidige functie (R, F of R & F) knippert. Navigeer tussen de verschillende opties en bevestig met .
-
Page 95: Energiebesparingsprogramma's
Energiebesparings- programma’s Een slimme manier om energie te bespa- ren is door de verwarming aan te passen aan uw feitelijke behoeften in de loop van de dag en bijvoorbeeld de tempera- tuur te verlagen als er niemand thuis is. De thermostaat heeft twee programma- opties voor temperatuurverlaging: een voor thuis en een voor kantoor. - Page 96 Een programma stoppen Druk op en navigeer naar PROG. Selecteer met . Het symbool van het huidige pro- gramma knippert. Navigeer totdat er geen symbolen knipperen en bevestig met . Verschillende programmaopties De twee vooraf ingestelde program- ma’s zijn geschikt voor de meeste woningen en kantoren.
-
Page 97: Problemen Oplossen
Problemen oplossen Belangrijk Het vloerverwarmingssysteem is een elektrische installatie, dus moeten storingen worden opgelost door een be- voegde elektricien. Foutcodes Als zich een fout voordoet, schakelt de thermostaat de verwarming uit. De display knippert en geeft een knipperende foutcode weer. E1: Kortsluiting in ruimtesensor. -
Page 98: Technische Specificaties
Technische specificaties Spanning 230 VAC-50 Hz Bereik luchttemp. 5-37 °C Bereik vloertemp. 5-37 °C Temp.-begrenzer 5-45 °C 16 A/230 VAC/ Afschakelvermogen eenpolig Aansluitkabel max. 2,5 mm² Belasting cos φ = 1 Hysteresis +- 0,3 °C Beschermingsgraad IP21 Reserve uitvoeren Max. lengte sensor- 50 m, 2 x 1,5 mm²... - Page 100 Aby zachować ważność gwarancji, produkt musi być zamontowany i obsługiwany zgodnie ze wskazówkami zawartymi w niniejszej instrukcji. Oznacza to, że przeczytanie niniejszego podręcznika jest niezmiernie ważne. Dotyczy to zarówno osoby montującej termostat, jak i osoby, która będzie użytkować system. Znajdują się...
- Page 101 Wprowadzenie ........100 Zawartość opakowania ...... 101 Montaż termostatu ......102 Pierwsze kroki ........105 Jak działa termostat ......106 Symbole na wyświetlaczu ....112 Ustawianie termostatu ...... 113 Programy oszczędzające energię ... 117 Rozwiązywanie problemów ..... 119 Dane techniczne ........
-
Page 102: Wprowadzenie
Wprowadzenie Jest to sterowany mikroprocesorem ter- mostat wyposażony w wyświetlacz LCD. Wyświetlacz ma podświetlenie, które włącza się po naciśnięciu dowolnego przycisku. Wyświetlacz pozostaje pod- świetlony przez 30 sekund od ostatnie- go naciśnięcia przycisku. W części przed- niej znajduje się przycisk wł/wył i trzy przyciski sterujące. -
Page 103: Zawartość Opakowania
Zawartość opakowania 1. Nakładka dla ELKO Plus/RS 2. Nakładka dla Schneider Exxact 3. Ramka 4. Termostat 5. Czujnik podłogowy 6. Zacisk łączący Instrukcja Skrócona instrukcja... -
Page 104: Montaż Termostatu
Montaż termostatu Termostat nie może być umieszcza- Ważne ny w miejscach gdzie będzie narażony na: • bezpośrednie działanie promieni słonecznych i przeciągów. • duże wahania temperatury lub wyso- ką wilgotność powietrza. Czujnik podłogowy powinien być mon- towany w osłonie spiralnej ułożonej w podłodze. - Page 105 dla zasilania wchodzącego oraz dla kabla grzewczego połączone są za pomocą zacisku łączącego w puszce. Zobacz schemat obwodowy poniżej. 4. Umieścić termostat w puszce urządzenia i dokręcić szczelnie za pomocą wkrętów. 5. Zamocować ramkę i nakładkę. 6. Jeśli termostat montowany jest w ramce wielokomorowej wewnętrzne naroża tej ramki muszą...
-
Page 107: Pierwsze Kroki
Pierwsze kroki Po zamontowaniu, należy odczekać od 2 do 4 tygodni do momentu uruchomienia ogrzewania podłogowego. Dokładny okres oczekiwania zależy od rodzaju podłogi oraz instrukcji dla szpachlówki podłogi. Następnie, należy stopniowo zwiększać temperaturę. To nie dotyczy przypadków, w których na ogrzewaniu podłogowym ułożono podłogę... -
Page 108: Jak Działa Termostat
Jak działa termostat Niniejsza część opisuje wszystko, co musisz wiedzieć o działaniu termosta- tu. Aby dowiedzieć się jak wprowadzać ustawienia, aby dostosować urządzenie do własnych wymagań, należy przeczy- tać część Ustawianie termostatu. Przycisk wł/wył Temperatura Wybrany element sterowania Przycisk wyboru Wyświetlacz Podświetlenie wyświetlacza zaświeci się... - Page 109 Jeśli wyświetlacz jest pusty, oznacza to, że termostat jest wyłączony lub że nie jest przyłączony do źródła zasilania. Przy pierwszym uruchomieniu termostatu wyświetlacz pokazuje ustawienia fabrycz- ne, jak pokazano na ilustracji. Sposób wprowadzania ustawień osobistych opi- sany jest w części Ustawianie termostatu. Wyjaśnienie symboli widocznych na wy- świetlaczu znajduje się...
- Page 110 Włączanie i wyłączanie termostatu Przytrzymaj przycisk wł/wył przez jedną sekundę, aby przejść do trybu gotowości. Aby powrócić do trybu normalnego, ponownie przytrzymaj ten przycisk przez sekundę. W trybie gotowości ogrzewanie nie jest regulowane. Zegar pracuje normalnie, a wybrane programy i ustawione tem- peratury są...
- Page 111 termostat jest ustawiony na Termostat podłogowy. W przeciwnym razie zosta- nie wyświetlona bieżąca temperatura pokoju (R). Temperatura jest wyświe- tlana przez 30 sekund od ostatniego naciśnięcia przycisku. Data i godzina Czas jest ustawiony w formacie 24-go- dzinnym. Właściwy dzień tygodnia usta- wiany jest automatycznie.
- Page 112 Tryb wentylacji Jeśli temperatura w pomieszczeniu spadnie o więcej niż 3 °C w ciągu jednej minuty, np. podczas wietrzenia pomieszczenia, włącza się tryb wentylacji. Termostat zatrzymuje wtedy ogrzewania na 15 minut, po czym powraca do trybu normalnego. Ta funkcja jest zawsze aktywna.
- Page 113 Sposób wyboru żądanej funkcji opisany jest w części Ustawienia termostatu/Funkcje regulacji. Termostat podłogowy - Czujnik w podłodze mierzy temperaturę a następnie reguluje sto- sownie ogrzewanie. Jeśli czujnik podłogowy podłączony jest przy pierwszym uruchomie- niu termostatu, ta funkcja wybierana jest automatycznie. Wartością predefiniowaną jest 22 °C.
-
Page 114: Symbole Na Wyświetlaczu
Symbole na wyświetlaczu 1. Wybrane menu/BLOKADA przycisków 2. Symbol ogrzewania 3. Bieżąca temperatura (wartość aktualna)/Ustawiona temp (nastawa) °C 4. Symbol dla programów oszczędzających energię, biuro 5. Wybrane sterowanie 6. Symbol dla programów oszczędzających energię, dom... -
Page 115: Ustawianie Termostatu
Ustawianie termostatu Niniejsza część opisuje sposób ustawia- nia termostatu tak, aby dostosować go do własnych wymagań. Wprowadzając te ustawienia, można w pełni dostoso- wać instalację ogrzewania podłogowe- go do własnych potrzeb. Jeśli chcesz dowiedzieć się więcej na temat sposobów nawigacji menu lub użycia klawiatury przeczytaj część... - Page 116 Światło i kontrast Ustaw podświetlenie wyświetlacza Wyświetlacz pozostaje podświetlony przez 30 sekund od ostatniego naciśnięcia przycisku. Po tym czasie podświetlenie ściemni się ponownie. Możliwe jest rów- nież całkowite wyłączenie wyświetlacza. Naciśnij i przejdź do SET. Wybierz za pomocą . Przejdź do RST i wybierz za pomocą...
- Page 117 Najpierw ustaw godziny przewijając do właściwego czasu i potwierdź za pomocą . W ten sam sposób ustaw minuty i potwierdź za pomocą . W ten sam sposób ustaw dzień, miesiąc i rok. Potwierdź za pomocą . Dzień ty- godnia nie jest wyświetlany, ale system automatycznie ustawia właściwy dzień...
- Page 118 Funkcje regulacji Opisane są bardziej szczegółowo w części Jak działa termostat/Funkcje regulacji. Wybierz funkcję regulacji Naciśnij i przejdź do SET. Wybierz za pomocą . Przewiń do RNF i wybierz za pomocą . Miga symbol bieżącej funkcji (R, F lub R i F). Przewijaj różne opcje i potwierdź za pomocą...
-
Page 119: Programy Oszczędzające Energię
Programy oszczędzające energię Mądrym sposobem oszczędzania ener- gii jest przystosowanie ogrzewania do swoich aktualnych dziennych wyma- gań i, na przykład, obniżenie tempe- ratury kiedy dom jest pusty. Termostat posiada dwie opcje programowe dla obniżania temperatury: jedną dla domu i jedną dla biura. Czas podgrzewania jest zawsze uwzględniany w programach, dzięki funkcji adaptacji. - Page 120 Zatrzymanie programu Naciśnij i przejdź do PROG. Wybierz za pomocą . Miga symbol bieżącego programu. Przewijaj do momentu kiedy nie będą migać żadne symbole i potwierdź za pomocą . Różne opcje programowe Dwa predefiniowane programy odpo- wiednie są dla większości środowisk domowych i biurowych.
-
Page 121: Rozwiązywanie Problemów
Rozwiązywanie problemów System ogrzewania podłogowe- Ważne go jest instalacją elektryczną i dlatego wszelkie usterki muszą być naprawiane przez wykwalifikowanego elektryka. Kody błędów Kiedy wystąpi błąd termostat wyłączy ogrzewanie. Wyświetlacz miga i poka- zuje kod błędu. E1: Zwarcie w obwodzie czujnika pokojowego. -
Page 122: Dane Techniczne
Dane Techniczne Napięcie 230 VAC-50 Hz Zakres temp. powie- 5-37 °C trza Zakres temp. podłogi 5-37 °C Ogranicznik temp. 5-45 °C 16A/230 VAC/ Zdolność rozłączania jednobiegunowy Kabel łączący maks. 2,5 mm Obciążenie cos φ = 1 Histereza +- 0.3 °C Stopień... - Page 124 Perché la garanzia sia valida, installare e utilizzare il prodotto secondo le istruzioni contenute presente manuale. È perciò di fondamentale importanza leggere il manuale, sia per l’installatore del termostato sia per l’utente finale. Sono inoltre presenti informazioni relative alla risoluzione dei problemi e specifiche tecniche.
- Page 125 Introduzione ..........124 Contenuto della confezione ....125 Installazione del termostato ....126 Procedura di avvio ........ 129 Funzionamento del termostato ..130 Simboli sul display ........ 136 Impostazione del termostato ... 137 Programmi di risparmio energetico ... 141 Risoluzione dei problemi ....
-
Page 126: Introduzione
Introduzione Si tratta di un termostato regolato da un microprocessore con display LCD. Il di- splay ha una debole retroilluminazione che diventa più intensa alla pressione di un qualsiasi tasto. Il display rimane acceso per 30 secondi dopo che è stato premuto l’ultimo pulsante. -
Page 127: Contenuto Della Confezione
Contenuto della confezione 1. Parte anteriore per ELKO Plus/RS 2. Parte anteriore per Schneider Exxact 3. Cornice 4. Termostato 5. Sensore pavimento 6. Clip di collegamento Manuale Guida rapida... -
Page 128: Installazione Del Termostato
Installazione del termostato Importante Non installare il termosta- to in ambienti dove potrebbe essere esposto alle seguenti condizioni: • luce solare diretta e correnti d’aria; • notevoli oscillazioni della temperatura o elevata umidità dell’aria. Montare il sensore pavimento in un tubo a spirale posato sul pavimento. - Page 129 tensione. I conduttori di protezione per l’alimentazione in ingresso e per il cavo di riscaldamento sono collegati tramite una clip di collegamento nella scatola. Vedere lo schema elettrico che segue. 4. Inserire il termostato nella scatola e serrare saldamente le viti presenti. 5.
-
Page 131: Procedura Di Avvio
Procedura di avvio Dopo l’installazione attendere 2-4 setti- mane prima di avviare il riscaldamento a pavimento. Più precisamente, il tempo di attesa dipende dal tipo di pavi mento e dalle istruzioni relative allo stucco del pavimento. Quindi aumentare gradualmente il calore. Ciò non si applica nel caso di un pavimento in legno o laminato posto sopra l’im- pianto di riscaldamento. -
Page 132: Funzionamento Del Termostato
Funzionamento del termostato La presente sezione contiene tutte le informazioni necessarie relative al funzionamento del termostato. Per maggiori informazioni su come inserire le impostazioni più adatte alle proprie esigenze, consultare la sezione Impo- stazione del termostato. Pulsante ON/OFF Temperatura Controllo selezionato Pulsante di selezione Display... - Page 133 Se il display è vuoto significa che il termostato è spento o che non è colle- gato all’alimentazione. Quando il termostato viene avviato per la prima volta, il display mostra le im- postazioni di fabbrica come illustrato in figura. Informazioni sulle modalità di inserimento delle impostazioni per- sonalizzate sono fornite nella sezione Impostazione del termostato.
- Page 134 Accensione e spegnimento Tenere premuto il pulsante ON/OFF per un secondo per accedere alla moda- lità standby. Ritornare alla modalità standard premendo nuovamente il pulsante per un secondo. Non è possibile regolare il riscalda- mento in modalità standby. L’orologio funziona normalmente, i programmi selezionati e le temperature impostate sono salvate nella memoria.
- Page 135 visualizzata la temperatura corrente nel pavimento (F). Questo accade se il termostato è impostato su Termostato pavimento. Altrimenti è mostrata la temperatura attuale (R) dell’ambiente. La temperatura viene mostrata per 30 secondi dopo che è stato premuto l’ultimo pulsante. Data e ora L’ora è...
- Page 136 Modalità ventilazione Se la temperatura ambiente scende di oltre 3 °C in un minuto, ad es. quando si fa arieggiare la stanza, viene attivata la modalità ventilazione. Il termostato interrompe quindi il riscaldamento per 15 minuti prima di ritornare alla modalità standard.
- Page 137 Le modalità di selezione della funzione desiderata sono descritte nella sezione Impostazione del termostato/Funzioni di controllo. Termostato pavimento - Un sensore nel pavimento misura la temperatura e rego- la il riscaldamento di conseguenza. Se il sensore è collegato quando è il termo- stato viene acceso per la prima volta, tale funzione viene selezionata automatica- mente.
-
Page 138: Simboli Sul Display
Simboli sul display 1. Menu selezionato/LOCK per tastiera bloccata 2. Simbolo riscaldamento 3. Temperatura corrente (valore attuale)/ Temperatura impostata (valore pre- fissato) °C 4. Simbolo per programmi di risparmio energetico, ufficio 5. Controllo selezionato 6. Simbolo per programmi di risparmio energetico, abitazione... -
Page 139: Impostazione Del Termostato
Impostazione del termostato La presente sezione descrive come impostare il termostato in base alle proprie esigenze. Inserendo le seguenti impostazioni è possibile usufruire pienamente dell’impianto di riscalda- mento a pavimento per soddisfare le proprie esigenze di riscaldamento. Per ulteriori informazioni sulle modalità di navigazione dei menu o sull’utilizzo della tastiera, leggere la sezione Funzio- namento del termostato. - Page 140 Illuminazione e contrasto Impostazione della retroilluminazione del display Il display rimane acceso per 30 secondi dopo che è stato premuto l’ultimo pulsante. Quindi, la luce si affievolisce nuovamente. È inoltre possibile impo- stare il display in modo da spegnere completamente l’illuminazione. Premere e scorrere fino a SET.
- Page 141 Selezionare con . Scorrere fino a CLK e selezionare con . Impostare per prima cosa l’ora scorren- do fino all’ora corretta e confermare con . Impostare i minuti nello stesso modo e confermare con . Impostare nella stessa maniera giorno, mese e anno.
- Page 142 Funzioni di controllo Tali funzioni sono descritte più detta- gliatamente nella sezione Funzionamen- to del termostato/Funzioni di controllo. Selezione funzione di controllo Premere e scorrere fino a SET. Sele- zionare con . Scorrere fino a RNF e selezionare con . Il simbolo della funzione corrente (R, F oppure R &...
-
Page 143: Programmi Di Risparmio Energetico
Programmi di risparmio energetico Un modo intelligente per risparmiare energia consiste nel regolare il riscal- damento in base alla reali necessità giornaliere, ad esempio abbassare la temperatura quando l’abitazione è vuota. Sono presenti due opzioni pre- definite di programmazione per ridurre la temperatura nel termostato: una per abitazioni e una per uffici. - Page 144 Interruzione di un programma Premere e scorrere fino a PROG. Selezionare con . Il simbolo del programma corrente lampeggia. Scorrere fino a quando nessuno dei simboli lampeggia e con- fermare con . Altre opzioni di programmazione I due programmi preimpostati sono indicati per la maggior parte delle abitazioni e degli uffici.
-
Page 145: Risoluzione Dei Problemi
Risoluzione dei problemi Importante L’impianto di riscaldamento a pavimento è un’installazione elettrica ed eventuali guasti devono pertanto essere riparati da un elettricista qualificato. Codici di errore In caso di errore, il termostato spegne il riscaldamento. Il display lampeggia e mostra un codice di errore lampeg- giante. -
Page 146: Specifiche Tecniche
Specifiche tecniche Tensione 230 Vca-50 Hz Intervallo temp. aria 5-37 °C Intervallo temp. 5-37 °C pavimento Limiti temp. 5-45 °C 16 A/230 Vca/polo Portata singolo Cavo di max 2,5 mm collegamento Carico cos φ = 1 Isteresi +- 0,3 °C Grado di protezione IP21 Autonomia...
Need help?
Do you have a question about the PLTB16R and is the answer not in the manual?
Questions and answers