Table of Contents
Advertisement
Available languages
Available languages
Quick Links
Advertisement
Table of Contents

Subscribe to Our Youtube Channel
Related Manuals for Faber INCA PRO PLUS INPL3019SSNB-B


Summary of Contents for Faber INCA PRO PLUS INPL3019SSNB-B
- Page 1 INCA PRO PLUS Installation Instructions Use and Care Information Instructions d'installation Utilisez et d'entretien INPL3019SSNB-B INPL3619SSNB-B INPL3622SSNB-B INPL4219SSNB-B INPL4819SSNB-B INPL4822SSNB-B...
- Page 2 READ AND SAVE THESE INSTRUCTIONS BEFORE YOU START INSTALLING THIS RANGEHOOD WARNING: - TO REDUCE THE RISK OF A RANGE TOP GREASE FIRE: a) Never leave surface units unattended at high settings. Boilovers cause smoking and greasy spillovers that may ignite. Heat oils slowly on low or medium setting. b) Always turn hood ON when cooking at high heat or when flambeing food (i.e.
-
Page 3: Venting Requirements
When cutting or drilling into wall or ceiling, do not damage electrical wiring and other hidden utilities. Ducted fans must always be vented to the outdoors. ALL WALL AND FLOOR OPENINGS WHERE THE RANGEHOOD IS INSTALLED MUST BE SEALED. This rangehood requires at least 24" of clearance between the bottom of the rangehood and the cooking surface or countertop. -
Page 4: Electrical Requirements
ELECTRICAL REQUIREMENTS A 120 volt, 60 Hz AC-only electrical supply is required on a separate 15 amp fused circuit. A time-delay fuse or circuit breaker is recommended. The fuse must be sized per local codes in accordance with the electrical rating of this unit as specified on the serial/rating plate located inside the unit near the field wiring compartment. -
Page 5: Rangehood Dimensions
RANGEHOOD DIMENSIONS -1/4" (A1) - -1/2" (A2) -9/16" (A3) - -9/16" (A4) -5/16" -11/16" -13/16" -15/16" 11" -1/8" 1/2" -11/16" -1/2" (A1) - -1/2" (A2) -11/16" -9/16" (A3) - -9/16" (A4) 1/2" -1/2" (A1) - -1/2" (A2) -9/16" (A3) - -9/16"... -
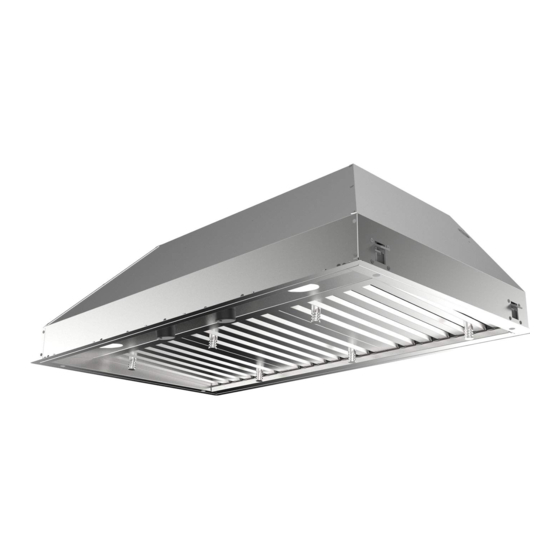
Page 6: Main Parts
MAIN PARTS Available Components Accessories Ref. Qty. Product Components Hood Body, complete with: Activated Charcoal Controls, Light, Filters, Blower. Filter sku #; FILTER1 Front / back trim Activated Charcoal Left/right trim Filter sku #; FILTER1LL 2 Grease filters (30") 3 Grease filters (36"- 42") Internal 300 cfm Blower sku #; IB300 4 Grease filters (48") 4... -
Page 7: Installation
INLBKIT CAUTION - To reduce risk of fire and electric shock, install this rangehood only with: Remote blower manufacturer by Faber models RB900 and RB1200 or Integral blower manufactured by Faber models IB300 or IB600 or IB1200 or with INLBKIT and generic in-line blower rated max 4.2 A suitable for use with solid state variable speed control... - Page 8 RECIRCULATING INSTALLATIONS IT IS HIGHLY RECOMMENDED THAT PROFESSIONAL STYLE COOKING ALWAYS BE VENTED TO THE OUTSIDE. For recirculating installations (Figure 1), Charcoal Filters are necessary. Remove all grease filters and set aside. Attach one charcoal filter to each end of the blower. Each charcoal filter RECIRCULATING INSTALLATIONS attaches to the grid on the side of the blower.
- Page 9 3. Install the motor kit into the back of the hood 5. Connect the ductwork to the damper and seal all using the 2 screws supplied with the motor kit connections with duct tape. (Figure 4). 6. Before installing the hood, put the damper A (which is located inside of Kit Internal 300 cfm Blower sku #;...
- Page 10 INSTALLATION WITH IB1200 INTERNAL 4. Install the 2 motor kits into the sides of the BLOWER (1200 cfm) blower bracket using the 4 screws supplied with INSTALLATION WITH IB1200 INTERNAL BLOWER (1200 cfm) 1. Install the Duct Plate B (Figure 7) which came the motor kit (Figure 10).
- Page 11 INSTALLATION WITH REMOTE BLOWER (RB900 / RB1200) OR IN-LINE BLOWER (INLBKIT) NOTE: FOLLOW THE INSTRUCTIONS INCLUDED WITH THE REMOTE BLOWER TO INSTALL THE BLOWER ON THE OUTSIDE OF YOUR HOME. INSTALLATION WITH REMOTE BLOWER (RB900 / RB1200) OR IN-LINE BLOWER (INLBKIT) NOTE: FOLLOW THE INSTRUCTIONS INCLUDED WITH THE 1.
-
Page 12: Installation Instructions
Installation Instructions SECURING INSERT HOOD WITH SIDE MOUNT CLIPS Cut out the opening in the underside of the cabinet as shown in Figure 1a. Outside Model # Hood Dimension 30" x 19" INPL3019SSNB-B -5/8" -7/8" 36" x 19" INPL3619SSNB-B -3/4" -7/8"... - Page 13 Installation Instructions SECURING INSERT HOOD WITHOUT SIDE MOUNT CLIPS Cut out the opening in the underside of the cabinet as shown in Figure 2a. Outside Model # Hood Dimension 30" x 19" INPL3019SSNB-B -5/8" -7/8" 36" x 19" INPL3619SSNB-B -3/4" -7/8"...
- Page 14 Secure the Insert Hood with six screws (9d) on the front side as shown above in figure A. Place the six Stopper (10) on the front side as shown above in figure B. Installation of wiring connection Remove the wiring electrical knockout using a flat-blade screwdriver.
-
Page 15: Baffle Filter
For Non-Ducted Recirculation Option Attach each charcoal filter to the black grid on each side of the blower. Press the charcoal filter tightly to the black grid on the Hook the Grease rail (8) positioning it inside blower side the hood. Is possible wash and reposition and rotate inside the hood. -
Page 16: Lighting Unit
9a. screws, 4 screws total. lamp. Press and twist the lamp to remove. Then remove the lamp and replace with a new lamp. Rangehood Control Panel Install the grease rail into the back of the hood, The control panel is located in the center of the into the slots on the inside floor of the rear of the hood bottom. -
Page 17: Wiring Diagram
Wiring Diagram... - Page 18 To obtain warranty service, contact the dealer from whom you purchased the range hood, or the local Faber distributor. If you cannot identify a local Faber distributor, contact us at (508) 358-5353 for the name of a distributor in your area.
- Page 19 VEUILLEZ LIRE ET CONSERVER LA PRÉSENTE NOTICE AVANT DE COMMEN- CER L'INSTALLATION DE LA HOTTE DE CUISINE AVERTISSEMENT:-POUR RÉDUIRE LE RISQUE D'UN FEU DE GRAISSE SUR LA TABLE DE CUISSON : a) Ne laissez jamais sans surveillance les éléments de la surface de cuisson à température élevée. Les bouillonnements excessifs peuvent provoquer de la fumée et les débordements de graisse peuvent s'enflammer.
- Page 20 et la American Society for Heating, Refrigeration and Air Conditioning Engineers (ASHRAE) aux États-Unis, ainsi que les codes en vigueur dans votre région. Lorsque vous faites une ouverture ou percez dans un mur ou le plafond, veillez à ne pas endom- mager les fils électriques ou d'autres dispositifs cachés.
- Page 21 AVERTISSEMENT • Le système de ventilation DOIT déboucher à l'extérieur. • NE FAITES PAS déboucher les conduits dans un grenier ou un autre endroit fermé. • N'UTILISEZ PAS un clapet de sécheuse mural de 4 po. • Il n'est pas recommandé d'utiliser des conduits flexibles. •...
- Page 22 AVERTISSEMENT • Une mise à la terre électrique est requise pour cette hotte. • N'UTILISEZ PAS un tuyau d'eau froide pour la mise à la terre si celui-ci est branché par des joints en plastique, par des rondelles non métalliques ou d'autres matériaux. •...
- Page 23 DIMENSIONS DE LA HOTTE -1/4" (A1) - -1/2" (A2) -9/16" (A3) - -9/16" (A4) -5/16" -11/16" -13/16" -15/16" 11" -1/8" 1/2" -11/16" -1/2" (A1) - -1/2" (A2) -11/16" -9/16" (A3) - -9/16" (A4) 1/2" -1/2" (A1) - -1/2" (A2) -9/16" (A3) - -9/16"...
-
Page 24: Pièces Principales
PIÈCES PRINCIPALES Accessoires disponibles Composants Filtre à charbon actif, n° Réf. Qté Product Components d'article FILTER1 Bâti de la hotte avec : Commandes, Éclairage, Filtres, Ventilateur. Filtre à charbon actif, n° Garniture avant/arrière d'article FILTER1LL Garniture gauche/droite Ventilateur interne 300 PCM, n° 2 Filtres à graisse (30") d'article IB300... - Page 25 INLBKIT CAUTION - To reduce risk of fire and electric shock, install this rangehood only with: Remote blower manufacturer by Faber models RB900 and RB1200 or Integral blower manufactured by Faber models IB300 or IB600 or IB1200 or with INLBKIT and generic in-line blower rated max 4.2 A suitable for use with solid state variable speed control...
- Page 26 INSTALLATIONS AVEC RECIRCULATION LA VENTILATION ASSOCIÉE À UNE CUISINE DE TYPE PROFESSIONNEL DEVRAIT TOUJOURS ÊTRE ÉVACUÉE À L’EXTÉRIEUR. Pour les installations avec recirculation (Figure 1), il est nécessaire d'installer des filtres à charbon. Retirez tous les filtres à graisse et mettez-les à part. Posez un filtre à charbon à...
- Page 27 3. Installez la trousse du moteur dans la hotte en 5. Raccordez le conduit au registre et scellez utilisant les 2 vis fournies avec la trousse dans l’ar- toutes les connexions à l'aide de ruban. rière de la hotte (Figure 4). 6.
- Page 28 INSTALLATION AVEC LE VENTILATEUR IB1200 4. Installez les 2 kits de moteur sur les côtés de la INTERNE (cfm 1200) parenthèse de ventilateur utilisant les 4 vis four- 1. Installez la plaque de canalisation B (Figure 7) nies avec le kit de moteur (Figure 10). INSTALLATION WITH IB1200 INTERNAL BLOWER (1200 cfm) INSTALLATION WITH IB1200 INTERNAL BLOWER (1200 cfm) fournie dans la trousse du ventilateur, sur le haut...
- Page 29 INSTALLATION AVEC LE VENTILATEUR À DISTANCE (RB900 / RB1200 OU VENTILATEUR INTÉGRÉ (INLBKIT) NOTE : SUIVEZ LES INSTRUCTIONS INCLUSES AVEC LE VENTILATEUR À DISTANCE INSTALLATION WITH REMOTE BLOWER (RB900 / RB1200) POUR INSTALLER LE VENTILATEUR SUR L'EXTÉRIEUR DE VOTRE MAISON. OR IN-LINE BLOWER (INLBKIT) 1.
- Page 30 Notice d'installation INSTALLATION DE LA HOTTE ENCASTRABLE AVEC LES FIXATIONS LATÉRALES DE MONTAGE Pratiquez l'ouverture sur la face inférieure de l'armoire, comme illustré à la Figure 1. Dimension Modèle # extérieure de hotte 30" x 19" INPL3019SSNB-B -5/8" -7/8" 36" x 19" INPL3619SSNB-B -3/4"...
- Page 31 Notice d'installation INSTALLATION DE LA HOTTE ENCASTRABLE SANS FIXATIONS LATÉRALES DE MONTAGE Pratiquez l'ouverture sur la face inférieure de l'armoire, comme illustré à la Figure 2a. Dimension Modèle # extérieure de hotte 30" x 19" INPL3019SSNB-B -5/8" -7/8" 36" x 19" INPL3619SSNB-B -3/4"...
- Page 32 Fixez la hotte encastrable à l’aide de six vis (9d) sur l’avant, comme illustré sur la Figure A. Placez les six obturateurs (10) sur l’avant, comme illustré sur la Figure B. Réalisation des branchements Défoncez l'entrée électrique à l'aide d'un tournevis plat.
- Page 33 Pour option non canalisée avec recirculation d'air Fixez les filtres à charbon à la grille noire de chaque côté du ventilateur. Pressez fermement le filtre à charbon Engagez la gouttière (8) à l’intérieur de la contre la hotte. Il est possible de le laver et de le grille noire replacer à...
- Page 34 line the inside hood wall with stainless, 2 and 3 in FIGURE 26 with burn extremely hot and serious injury could result from touching a hot 9a. screws, 4 screws total. lamp. Press and twist the lamp to remove. Then remove the lamp and replace with a new lamp.
-
Page 35: Schéma De Câblage
Schéma de câblage... - Page 36 état de marche. Pour bénéficier de services prévus par la garantie, veuillez communiquer avec le détaillant auprès duquel vous avez acheté la hotte de cuisine, ou encore avec le distributeur Faber de votre région. Si vous n'êtes pas en mesure de localiser un distributeur Faber dans votre région, veuillez communiquer avec nous au 508-358-5353 pour connaître le nom d'un distributeur à...
- Page 40 991.0463.718_09 - 190711 D00003712_08...
Need help?
Do you have a question about the INCA PRO PLUS INPL3019SSNB-B and is the answer not in the manual?
Questions and answers
How do I get the burned out bulbs out of the Faber Inca Pro Plus Range Hood to replace them?
The manual does not provide specific instructions for replacing burned-out bulbs in the Faber Inca Pro Plus INPL3019SSNB-B range hood. However, it states that replacing range hood light bulbs is not covered under Faber's warranty. It is recommended to refer to the product's installation or user manual for detailed bulb replacement instructions.
This answer is automatically generated