ZyXEL Communications P-870HW-51a v2 User Manual
802.11bg wireless vdsl2 4-port gateway
Hide thumbs
Also See for P-870HW-51a v2:
- User manual (276 pages) ,
- Quick start manual (12 pages) ,
- Specifications (2 pages)

Related Manuals for ZyXEL Communications P-870HW-51a v2

Summary of Contents for ZyXEL Communications P-870HW-51a v2
- Page 1 P-870HW-51a v2 802.11bg Wireless VDSL2 4-Port Gateway User’s Guide Version 1.00 11/2008 Edition 1 www.zyxel.com...
-
Page 3: About This User's Guide
Help us help you. Send all User Guide-related comments, questions or suggestions for improvement to the following address, or use e-mail instead. Thank you! The Technical Writing Team, ZyXEL Communications Corp., 6 Innovation Road II, Science-Based Industrial Park, Hsinchu, 300, Taiwan. E-mail: techwriters@zyxel.com.tw P-870HW-51a v2 User’s Guide... -
Page 4: Document Conventions
“k” for kilo may denote “1000” or “1024”, “M” for mega may denote “1000000” or “1048576” and so on. • “e.g.,” is a shorthand for “for instance”, and “i.e.,” means “that is” or “in other words”. P-870HW-51a v2 User’s Guide... - Page 5 Icons Used in Figures Figures in this User’s Guide may use the following generic icons. The ZyXEL Device icon is not an exact representation of your device. ZyXEL Device Computer Notebook computer Server DSLAM Firewall Telephone Switch Router P-870HW-51a v2 User’s Guide...
-
Page 6: Safety Warnings
• Antenna Warning! This device meets ETSI and FCC certification requirements when using the included antenna(s). Only use the included antenna(s). • If you wall mount your device, make sure that no electrical lines, gas or water pipes will be damaged. P-870HW-51a v2 User’s Guide... - Page 7 Safety Warnings This product is recyclable. Dispose of it properly. P-870HW-51a v2 User’s Guide...
- Page 8 Safety Warnings P-870HW-51a v2 User’s Guide...
-
Page 9: Table Of Contents
Universal Plug-and-Play (UPnP) ..................... 131 Maintenance, Troubleshooting and Specifications ............141 System Settings ........................143 Logs ............................147 Tools ............................149 Diagnostic ..........................155 Troubleshooting ........................159 Product Specifications ......................165 Appendices and Index ......................171 P-870HW-51a v2 User’s Guide... - Page 10 Contents Overview P-870HW-51a v2 User’s Guide...
-
Page 11: Table Of Contents
2.1 How to Set up a Wireless Network ..................31 2.1.1 Example Parameters ....................31 2.1.2 Configuring the AP ..................... 31 2.1.3 Configuring the Wireless Client .................. 33 Chapter 3 Introducing the Web Configurator ..................39 P-870HW-51a v2 User’s Guide... - Page 12 6.1.1 What You Can Do in this Chapter ................67 6.2 What You Need To Know ..................... 67 6.3 Before You Begin ......................... 68 6.4 The LAN IP Screen ......................68 6.5 The Client List Screen ......................70 6.6 The IP Alias Screen ......................70 P-870HW-51a v2 User’s Guide...
- Page 13 Part III: Security..................105 Chapter 9 IP Filter........................... 107 9.1 Overview ........................... 107 9.1.1 What You Can Do in this Chapter ................107 9.2 What You Need to Know ....................107 9.3 The Incoming IP Filtering Screen ..................108 P-870HW-51a v2 User’s Guide...
- Page 14 13.1.1 What You Can Do in this Chapter ................129 13.2 The TR-069 Screen ......................129 Chapter 14 Universal Plug-and-Play (UPnP)..................131 14.1 Overview ......................... 131 14.1.1 What You Can Do in this Chapter ................131 14.2 What You Need to Know ....................131 P-870HW-51a v2 User’s Guide...
- Page 15 18.2 What You Need to Know ....................155 18.3 The 802.1ag Screen ......................156 Chapter 19 Troubleshooting........................159 19.1 Power, Hardware Connections, and LEDs ..............159 19.2 ZyXEL Device Access and Login ..................160 19.3 Internet Access ........................ 161 P-870HW-51a v2 User’s Guide...
- Page 16 Appendix B Pop-up Windows, JavaScripts and Java Permissions ........197 Appendix C IP Addresses and Subnetting ................205 Appendix D Wireless LANs ....................215 Appendix E Common Services..................... 229 Appendix F Legal Information ....................233 Appendix G Customer Support .................... 237 Index............................243 P-870HW-51a v2 User’s Guide...
-
Page 17: List Of Figures
Figure 35 LAN > Client List ........................70 Figure 36 Physical Network & Partitioned Logical Networks ..............71 Figure 37 Network > LAN > IP Alias ....................... 71 Figure 38 LAN and WAN IP Addresses ....................72 P-870HW-51a v2 User’s Guide... - Page 18 Figure 77 Internet Connection Properties: Advanced Settings ............. 137 Figure 78 Internet Connection Properties: Advanced Settings: Add ............ 137 Figure 79 System Tray Icon ........................138 Figure 80 Internet Connection Status ....................138 Figure 81 Network Connections ......................139 P-870HW-51a v2 User’s Guide...
- Page 19 Figure 121 Mac OS X 10.5: Network Utility ..................186 Figure 122 Ubuntu 8: System > Administration Menu ................187 Figure 123 Ubuntu 8: Network Settings > Connections ................ 187 Figure 124 Ubuntu 8: Administrator Account Authentication ..............188 P-870HW-51a v2 User’s Guide...
- Page 20 Figure 153 Peer-to-Peer Communication in an Ad-hoc Network ............215 Figure 154 Basic Service Set ....................... 216 Figure 155 Infrastructure WLAN ......................217 Figure 156 RTS/CTS ........................... 218 Figure 157 WPA(2) with RADIUS Application Example ............... 225 Figure 158 WPA(2)-PSK Authentication ....................226 P-870HW-51a v2 User’s Guide...
-
Page 21: List Of Tables
Table 33 Incoming IP Filtering ......................108 Table 34 Incoming IP Filtering: Add ..................... 109 Table 35 Advanced > Static Route ......................114 Table 36 Static Route: Add ........................115 Table 37 QoS ............................118 Table 38 QoS Queue Setup ........................119 P-870HW-51a v2 User’s Guide... - Page 22 Table 68 IEEE 802.11g ........................219 Table 69 Wireless Security Levels ....................... 220 Table 70 Comparison of EAP Authentication Types ................223 Table 71 Wireless Security Relational Matrix ..................226 Table 72 Commonly Used Services ..................... 229 P-870HW-51a v2 User’s Guide...
-
Page 23: Introduction
Introduction Introducing the ZyXEL Device (25) Tutorials (31) Introducing the Web Configurator (39) Status Screens (43) -
Page 25: Introducing The Zyxel Device
ZyXEL Device. 1.1 Overview The P-870HW-51a v2 is a VDSL2 gateway that allows super-fast, secure Internet access over analog (POTS) telephone lines. you can use Quality of Service (QoS) to efficiently manage traffic on your network by giving priority to certain types of traffic and/or to particular computers. -
Page 26: Applications For The Zyxel Device
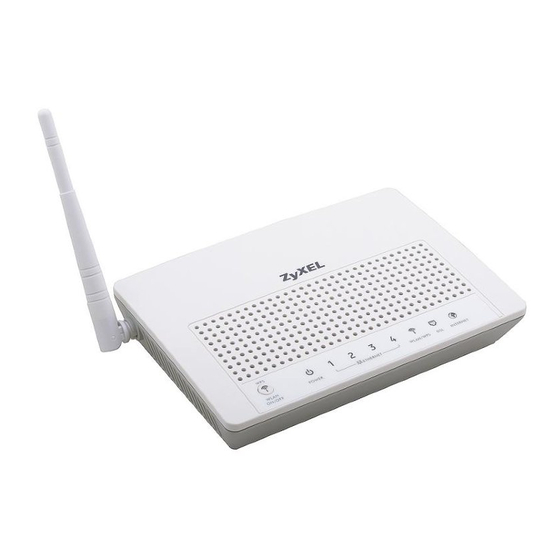
This means that probes from the outside to your network are not allowed, but you can safely browse the Internet and download files. 1.5 LEDs (Lights) The following graphic displays the labels of the LEDs. P-870HW-51a v2 User’s Guide... -
Page 27: Figure 2 Leds On The Top Of The Device
Blinking The ZyXEL Device is setting up a WPS connection. The wireless network is not activated. Green The DSL line is up. Blinking The ZyXEL Device is initializing the DSL line. The DSL line is down. P-870HW-51a v2 User’s Guide... -
Page 28: The Reset Button
1 Make sure the POWER LED is on (not blinking). Press the WPS WLAN ON/OFF button for more than five seconds and release it. Press the WPS button on another WPS -enabled device within range of the ZyXEL Device. P-870HW-51a v2 User’s Guide... - Page 29 The WLAN/WPS LED should flash while the ZyXEL Device sets up a WPS connection with the wireless device. You must activate WPS in the ZyXEL Device and in another wireless device within two minutes of each other. See Section 7.9.4 on page 92 for more information. P-870HW-51a v2 User’s Guide...
- Page 30 Chapter 1 Introducing the ZyXEL Device P-870HW-51a v2 User’s Guide...
-
Page 31: Tutorials
We use the ZyXEL Device web screens and M-302 utility screens as an example. The screens may vary slightly for different models. 2.1.2 Configuring the AP Follow the steps below to configure the wireless settings on your AP. 1 Open the Network > Wireless LAN screen in the AP’s web configurator. P-870HW-51a v2 User’s Guide... -
Page 32: Figure 3 Ap: Wireless Lan
Mode field. Click Apply. Figure 4 AP: Wireless LAN > Advanced Setup 6 Open the Status screen.Verify your wireless and wireless security settings under Device Information and check if the WLAN connection is up under Interface Status. P-870HW-51a v2 User’s Guide... -
Page 33: Configuring The Wireless Client
7 Click the WLAN Station List hyperlink in the AP’s Status screen. You can see if any wireless client has connected to the AP. Figure 6 AP: Status: WLAN Station List 2.1.3 Configuring the Wireless Client This section describes how to connect the wireless client to a network. P-870HW-51a v2 User’s Guide... -
Page 34: Figure 7 Zyxel Utility: Site Survey
3 When you try to connect to an AP with security configured, a window will pop up prompting you to specify the security settings. Enter the pre-shared key and leave the encryption type at the default setting. P-870HW-51a v2 User’s Guide... -
Page 35: Figure 8 Zyxel Utility: Security Settings
Check the network information in the Link Info screen to verify that you have successfully connected to the selected network. If the wireless client is not connected to a network, the fields in this screen remain blank. Figure 10 ZyXEL Utility: Link Info P-870HW-51a v2 User’s Guide... -
Page 36: Figure 11 Zyxel Utility: Profile
Scan Info box. Click on Scan if you want to search again. You can also configure your profile for a wireless network that is not in the list. Figure 12 ZyXEL Utility: Add New Profile P-870HW-51a v2 User’s Guide... -
Page 37: Figure 13 Zyxel Utility: Profile Security
Figure 14 ZyXEL Utility: Profile Encryption 6 In the next screen, leave both boxes checked. Figure 15 Profile: Wireless Protocol Settings. 7 Verify the profile settings in the read-only screen. Click Save to save and go to the next screen. P-870HW-51a v2 User’s Guide... -
Page 38: Figure 16 Profile: Confirm Save
11 If you cannot access the Internet go back to the Profile screen, select the profile you are using and click Edit. Check the details you entered previously. Also, refer to the Troubleshooting section of this User's Guide or contact your network administrator if necessary. P-870HW-51a v2 User’s Guide... -
Page 39: Introducing The Web Configurator
Enter the default user name 1234 and default password 1234.The password displays in non-readable characters. If you have changed the password, enter your password and click Login. Click Cancel to revert to the default password in the password field. P-870HW-51a v2 User’s Guide... -
Page 40: Web Configurator Main Screen
• B - navigation panel • C - main window • D - status bar 3.2.1 Title Bar The title bar allows you to change the language and provides an icon in the upper right corner. P-870HW-51a v2 User’s Guide... -
Page 41: Navigation Panel
Use this screen to enable QoS. Queue Setup Use this screen to configure QoS queues. Class Setup Use this screen to define a classifier. Dynamic DNS This screen allows you to use a static hostname alias for a dynamic IP address. P-870HW-51a v2 User’s Guide... -
Page 42: Main Window
Right after you log in, the Status screen is displayed. See Chapter 4 on page 43 for more information about the Status screen. 3.2.4 Status Bar Check the status bar when you click Apply or OK to verify that the configuration has been updated. P-870HW-51a v2 User’s Guide... -
Page 43: Status Screens
Each field is described in the following table. Table 4 Status Screen LABEL DESCRIPTION Refresh Interval Enter how often you want the ZyXEL Device to update this screen. Apply Click this to update this screen immediately. Device Information P-870HW-51a v2 User’s Guide... - Page 44 If you want some applications to have more throughput, you should turn off other applications (for example, using QoS; see Chapter 11 on page 117). P-870HW-51a v2 User’s Guide...
- Page 45 LAN Statistics Click this link to view packet specific statistics on the LAN and WLAN interfaces. Section 4.1.4 on page Client List Click this link to view current DHCP client information. See Section 4.1.5 on page P-870HW-51a v2 User’s Guide...
-
Page 46: Wan Service Statistics
Refresh Interval Enter the time interval for refreshing statistics in this field. Set Interval Click this button to apply the new poll interval you entered in the Refresh Interval field. Stop Click Stop to stop refreshing statistics. P-870HW-51a v2 User’s Guide... -
Page 47: Route Info
This indicates the name of the interface through which the route is forwarded. 4.1.3 WLAN Station List Click Status > WLAN Station List to access this screen. Use this screen to view the wireless stations that are currently associated to the ZyXEL Device. P-870HW-51a v2 User’s Guide... -
Page 48: Lan Statistics
Click this button to apply the new poll interval you entered in the Refresh Interval field. Stop Click Stop to stop refreshing statistics. 4.1.4 LAN Statistics Click Status > LAN Statistics to access this screen. Use this screen to view the LAN statistics. P-870HW-51a v2 User’s Guide... -
Page 49: Figure 24 Status > Lan Statistics
Refresh Interval Enter the time interval for refreshing statistics in this field. Set Interval Click this button to apply the new poll interval you entered in the Refresh Interval field. Stop Click Stop to stop refreshing statistics. P-870HW-51a v2 User’s Guide... -
Page 50: Client List
MAC address is assigned at the factory and consists of six pairs of hexadecimal characters, for example, 00:A0:C5:00:00:02. This indicates the MAC address of the client computer. IP Address This indicates the IP address assigned to this client computer. P-870HW-51a v2 User’s Guide... -
Page 51: Network
Network WAN Setup (53) LAN Setup (67) Wireless LAN (75) Network Address Translation (NAT) (99) -
Page 53: Wan Setup
• The Internet Connection screen lets you configure the WAN settings on the ZyXEL Device for Internet access (Section 5.4 on page 54). • The More Connections screen lets you set up additional Internet access connections (Section 5.5 on page 58). P-870HW-51a v2 User’s Guide... -
Page 54: What You Need To Know
Get this information from your ISP. 5.4 The Internet Connection Screen Use this screen to change your ZyXEL Device’s WAN settings. Click Network > WAN > Internet Connection. The screen differs by the mode you select. P-870HW-51a v2 User’s Guide... -
Page 55: Figure 27 Wan > Internet Connection (Pppoe)
(PPPoE encapsulation only) Enter the user name exactly as your ISP assigned. If assigned a name in the form user@domain where domain identifies a service name, then enter both components exactly as given. Password (PPPoE encapsulation only) Enter the password associated with the user name above. P-870HW-51a v2 User’s Guide... -
Page 56: Advanced Internet Connection Setup
WAN setup. 5.4.1 Advanced Internet Connection Setup Use this screen to edit your ZyXEL Device's advanced WAN settings. Click the Advanced Setup button in the Internet Connection screen. The screen appears as shown. P-870HW-51a v2 User’s Guide... -
Page 57: Figure 28 Wan > Internet Connection: Advanced Setup
PPPoE client software on their computers to connect to the ISP. IP Filter This section is not available when you configure the ZyXEL Device to be in bridge mode. IP Filter Select this option to enable IP filtering on this connection. Active VLAN P-870HW-51a v2 User’s Guide... -
Page 58: The More Connections Screen
VLAN ID/Priority This field shows the VLAN ID number and priority configured for this WAN connection when VLAN multiplexing is enabled. Otherwise, it shows disable. Encapsulation This field indicates the encapsulation method of the Internet connection. P-870HW-51a v2 User’s Guide... -
Page 59: More Connections Edit
Figure 30 WAN > More Connections: Edit The following table describes the labels in this screen. Table 13 WAN > More Connections: Edit LABEL DESCRIPTION General Active Select the check box to activate or clear the check box to deactivate this connection. P-870HW-51a v2 User’s Guide... - Page 60 First DNS Server If you select Static IP, enter the DNS server's IP address in the field to the right. Second DNS Server Back Click this to return to the More Connections screen with saving your changes. P-870HW-51a v2 User’s Guide...
-
Page 61: Configuring More Connections Advanced Setup
This field is available only when you select ENET ENCAP. Select the RIP version from RIPv1, RIPv2 and RIPv1v2. This field is available only when you select ENET ENCAP. Operation Select Active to enable RIP. Otherwise, select Disable. P-870HW-51a v2 User’s Guide... -
Page 62: Technical Reference
Encapsulation Be sure to use the encapsulation method required by your ISP. The ZyXEL Device can work in bridge mode or routing mode. When the ZyXEL Device is in routing mode, it supports the following methods. P-870HW-51a v2 User’s Guide... - Page 63 IP address 1 and port A to IP address 2 and port B on the external network. The ZyXEL Device also performs NAT on all incoming packets sent to IP address 2 and port B and forwards them to IP address 1, port A. P-870HW-51a v2 User’s Guide...
-
Page 64: Figure 32 Full Cone Nat Example
Devices on a logical network belong to one group. A device can belong to more than one group. With VLAN, a device cannot directly talk to or hear from devices that are not in the same group(s); the traffic must first go through a router. P-870HW-51a v2 User’s Guide... - Page 65 (including gateways). All hosts must join the 224.0.0.1 group in order to participate in IGMP. The address 224.0.0.2 is assigned to the multicast routers group. At start up, the ZyXEL Device queries all directly connected networks to gather group membership. After that, the ZyXEL Device periodically updates this information. P-870HW-51a v2 User’s Guide...
- Page 66 DNS server fields. 2 If your ISP dynamically assigns the DNS server IP addresses (along with the ZyXEL Device’s WAN IP address), set the DNS server fields to get the DNS server address from the ISP. P-870HW-51a v2 User’s Guide...
-
Page 67: Lan Setup
6.2 What You Need To Know IP Address Similar to the way houses on a street share a common street name, so too do computers on a LAN share one common network number. This is known as an Internet Protocol address. P-870HW-51a v2 User’s Guide... -
Page 68: Before You Begin
Follow these steps to configure your LAN settings. 1 Enter an IP address into the IP Address field. The IP address must be in dotted decimal notation. This will become the IP address of your ZyXEL Device. P-870HW-51a v2 User’s Guide... -
Page 69: Figure 34 Lan > Ip
This field specifies the size, or count of the IP address pool. IGMP Snooping Active IGMP Select this option to enable IGMP snooping. This allows the ZyXEL Device to Snooping passively learn multicast group. Apply Click Apply to save your changes back to the ZyXEL Device. P-870HW-51a v2 User’s Guide... -
Page 70: The Client List Screen
Ethernet interface with the ZyXEL Device itself as the gateway for each LAN network. When you use IP alias, you can also configure firewall rules to control access between the LAN's logical networks (subnets). P-870HW-51a v2 User’s Guide... -
Page 71: Configuring The Lan Ip Alias Screen
Enter the IP address of your ZyXEL Device in dotted decimal notation. IP Subnet Mask Type the subnet mask of your network in dotted decimal notation, for example 255.255.255.0 (factory default). Apply Click this to save your changes back to the ZyXEL Device. P-870HW-51a v2 User’s Guide... -
Page 72: Technical Reference
Where you obtain your network number depends on your particular situation. If the ISP or your network administrator assigns you a block of registered IP addresses, follow their instructions in selecting the IP addresses and the subnet mask. P-870HW-51a v2 User’s Guide... - Page 73 Traditionally, IP packets are transmitted in one of either two ways - Unicast (1 sender - 1 recipient) or Broadcast (1 sender - everybody on the network). Multicast delivers IP packets to a group of hosts on the network - not everybody and not just 1. P-870HW-51a v2 User’s Guide...
- Page 74 After that, the ZyXEL Device periodically updates this information. IP multicasting can be enabled/disabled on the ZyXEL Device LAN and/or WAN interfaces in the web configurator (LAN; WAN). Select None to disable IP multicasting on these interfaces. P-870HW-51a v2 User’s Guide...
-
Page 75: Wireless Lan
You don’t necessarily need to use all these screens to set up your wireless connection. For example, you may just want to set up a network name, a wireless radio channel and some security in the General screen. P-870HW-51a v2 User’s Guide... -
Page 76: What You Need To Know
When you create a network, you must select a channel to use. Since the available unlicensed spectrum varies from one country to another, the number of available channels also varies. P-870HW-51a v2 User’s Guide... -
Page 77: Before You Begin
7.3 Before You Begin Before you start using these screens, ask yourself the following questions. See Section 7.2 on page 76 if some of the terms used here do not make sense to you. P-870HW-51a v2 User’s Guide... -
Page 78: The General Screen
Apply to confirm. You must then change the wireless settings of your computer to match the ZyXEL Device’s new settings. Click Network > Wireless LAN to open the General screen. Figure 39 Network > Wireless LAN > General P-870HW-51a v2 User’s Guide... -
Page 79: No Security
Select No Security to allow wireless devices to communicate with the access points without any data encryption or authentication. If you do not enable any wireless security on your ZyXEL Device, your network is accessible to any wireless networking device that is within range. P-870HW-51a v2 User’s Guide... -
Page 80: Wep Encryption
Choose No Security from the drop-down list box. 7.4.2 WEP Encryption In order to configure and enable WEP encryption; click Network > Wireless LAN to display the General screen. Select WEP from the Security Mode list. P-870HW-51a v2 User’s Guide... -
Page 81: Wpa(2)-Psk
WEP key for data transmission. 7.4.3 WPA(2)-PSK In order to configure and enable WPA(2)-PSK authentication; click Network > Wireless LAN to display the General screen. Select WPA-PSK or WPA2-PSK from the Security Mode list. P-870HW-51a v2 User’s Guide... -
Page 82: Wpa(2) Authentication
Select the encryption type (TKIP or AES) for data encryption. 7.4.4 WPA(2) Authentication Use this screen to configure and enable WPA or WPA2 authentication; click the Wireless LAN link under Network to display the General screen. Select WPA or WPA2 from the Security Mode list. P-870HW-51a v2 User’s Guide... -
Page 83: Figure 43 Wireless Lan > General: Wpa(2)
The ZyXEL Device automatically disconnects a wireless station from the wired network after a period of inactivity. The wireless station needs to enter the username and password again before access to the wired network is allowed. The default time interval is 3600 seconds (or 1 hour). P-870HW-51a v2 User’s Guide... -
Page 84: The Wps Screen
WPS allows you to quickly set up a wireless network with strong security, without having to configure security settings manually. Set up each WPS connection between two devices. Both devices must support WPS. Click Network > Wireless LAN >WPS. The following screen displays. Figure 44 Network > Wireless LAN > WPS P-870HW-51a v2 User’s Guide... -
Page 85: The Wps Station Screen
Use this screen to set up a WPS wireless network using either Push Button Configuration (PBC) or PIN Configuration. Click Network > Wireless LAN > WPS Station. The following screen displays. Figure 45 Network > Wireless LAN > WPS Station P-870HW-51a v2 User’s Guide... -
Page 86: The Mac Filter Screen
00:A0:C5:00:00:02. You need to know the MAC addresses of the devices to configure this screen. Use this screen to change your ZyXEL Device’s MAC filter settings.Click Network > Wireless LAN > MAC Filter. The following screen displays. Figure 46 Wireless LAN > MAC Filter P-870HW-51a v2 User’s Guide... -
Page 87: The Advanced Setup Screen
Click this to delete the selected entry(ies). 7.8 The Advanced Setup Screen To configure advanced wireless settings, click Network > Wireless LAN > Advanced Setup. The screen appears as shown. Figure 47 Wireless LAN > Advanced Setup P-870HW-51a v2 User’s Guide... -
Page 88: Technical Reference
Click this to reload the previous configuration for this screen. 7.9 Technical Reference This section discusses wireless LANs in depth. For more information, see the appendix. 7.9.1 Wireless Network Overview The following figure provides an example of a wireless network. P-870HW-51a v2 User’s Guide... -
Page 89: Figure 48 Example Of A Wireless Network
• Every device in the same wireless network must use security compatible with the AP. Security stops unauthorized devices from using the wireless network. It can also protect the information that is sent in the wireless network. P-870HW-51a v2 User’s Guide... -
Page 90: Additional Wireless Terms
Some wireless devices, such as scanners, can detect wireless networks but cannot use wireless networks. These kinds of wireless devices might not have MAC addresses. Hexadecimal characters are 0, 1, 2, 3, 4, 5, 6, 7, 8, 9, A, B, C, D, E, and F. P-870HW-51a v2 User’s Guide... -
Page 91: Table 28 Types Of Encryption For Each Type Of Authentication
It is recommended that wireless networks use WPA-PSK, WPA, or stronger encryption. The other types of encryption are better than none at all, but it is still possible for unauthorized wireless devices to figure out the original information pretty quickly. P-870HW-51a v2 User’s Guide... -
Page 92: Wifi Protected Setup
Each WPS-enabled device has its own PIN (Personal Identification Number). This may either be static (it cannot be changed) or dynamic (in some devices you can generate a new PIN by clicking on a button in the configuration interface). P-870HW-51a v2 User’s Guide... - Page 93 If you see the wireless client in the list, WPS was successful. The following figure shows a WPS-enabled wireless client (installed in a notebook computer) connecting to the WPS-enabled AP via the PIN method. P-870HW-51a v2 User’s Guide...
-
Page 94: Figure 49 Example Wps Process: Pin Method
If not, it generates the SSID and WPA(2)-PSK randomly. The following figure shows a WPS-enabled client (installed in a notebook computer) connecting to a WPS-enabled access point. P-870HW-51a v2 User’s Guide... -
Page 95: Figure 50 How Wps Works
When WPS is activated on both, they perform the handshake. In this example, AP1 is the registrar, and Client 1 is the enrollee. The registrar randomly generates the security information to set up the network, since it is unconfigured and has no existing information. P-870HW-51a v2 User’s Guide... -
Page 96: Figure 51 Wps: Example Network Step 1
In step 3, you add another access point (AP2) to your network. AP2 is out of range of AP1, so you cannot use AP1 for the WPS handshake with the new access point. However, you know that Client 2 supports the registrar function, so you use it to perform the WPS handshake instead. P-870HW-51a v2 User’s Guide... -
Page 97: Figure 53 Wps: Example Network Step 3
WPS-enabled device could join the network. This is because the registrar has no way of identifying the “correct” enrollee, and cannot differentiate between your enrollee and a rogue device. This is a possible way for a hacker to gain access to a network. P-870HW-51a v2 User’s Guide... - Page 98 Check the MAC addresses of your wireless clients (usually printed on a label on the bottom of the device). If there is an unknown MAC address you can remove it or reset the AP. P-870HW-51a v2 User’s Guide...
-
Page 99: Network Address Translation (Nat)
8.3 The Port Forwarding Screen This summary screen provides a summary of all port forwarding rules and their configuration. In addition, this screen allows you to create new port forwarding rules and delete existing rules. P-870HW-51a v2 User’s Guide... -
Page 100: Figure 54 Nat Port Forwarding
To forward a series of ports, enter the last port number in a series that begins with the port number in the External Port Start field above. P-870HW-51a v2 User’s Guide... -
Page 101: The Port Forwarding Edit Screen
8.3.1 The Port Forwarding Edit Screen This screen lets you create or edit a port forwarding rule. Select User Define in the Service Name field or click the rule’s edit icon in the Port Forwarding screen to open the following screen. P-870HW-51a v2 User’s Guide... -
Page 102: Figure 55 Port Forwarding Edit
Select the protocol supported by this virtual server. Choices are TCP, UDP, or TCP/ UDP. Back Click Back to return to the previous screen. Apply Click Apply to save your changes back to the ZyXEL Device. Cancel Click Cancel to begin configuring this screen afresh. P-870HW-51a v2 User’s Guide... -
Page 103: Technical Reference
192.168.1.35 to a third (C in the example). You assign the LAN IP addresses and the ISP assigns the WAN IP address. The NAT network appears as a single host on the Internet. Figure 56 Multiple Servers Behind NAT Example P-870HW-51a v2 User’s Guide... - Page 104 Chapter 8 Network Address Translation (NAT) P-870HW-51a v2 User’s Guide...
-
Page 105: Security
Security IP Filter (107) -
Page 107: Ip Filter
Some of the most common IP ports are: Table 32 Common IP Ports Telnet HTTP SMTP POP3 Default Filtering Policies Filtering rules are grouped based on the direction of travel of packets to which they apply. P-870HW-51a v2 User’s Guide... -
Page 108: The Incoming Ip Filtering Screen
Source Address / This displays the source IP addresses and subnet mask to which this rule applies. Mask Please note that a blank source address is equivalent to Any. Source Port This is the source port number. P-870HW-51a v2 User’s Guide... -
Page 109: Creating Incoming Filtering Rules
Select the WAN interface to which this rule applies. Protocol Select the IP protocol (TCP/UDP, TCP, UDP or ICMP) and enter the protocol (service type) number in the port field. Source IP Address Enter the source IP address in dotted decimal notation. P-870HW-51a v2 User’s Guide... - Page 110 Enter the destination subnet mask. Mask Destination Port Enter the port number of the destination. Back Click Back to return to the previous screen. Apply Click Apply to save your customized settings and exit this screen. P-870HW-51a v2 User’s Guide...
-
Page 111: Advanced
Advanced Static Route (113) Quality of Service (QoS) (117) Dynamic DNS Setup (127) Remote Management (129) Universal Plug-and-Play (UPnP) (131) -
Page 113: Static Route
Figure 59 Example of Static Routing Topology Internet 10.1.1 What You Can Do in this Chapter The Static Route screens let you view and configure IP static routes on the ZyXEL Device (Section 10.2 on page 114). P-870HW-51a v2 User’s Guide... -
Page 114: The Static Route Screen
Apply Click this to apply your changes to the ZyXEL Device. 10.2.1 Static Route Edit Click the Add button in the Static Route screen. Use this screen to configure the required information for a static route. P-870HW-51a v2 User’s Guide... -
Page 115: Figure 61 Static Route: Add
Back Click Back to return to the previous screen without saving. Apply Click Apply to save your changes back to the ZyXEL Device. Cancel Click Cancel to begin configuring this screen afresh. P-870HW-51a v2 User’s Guide... - Page 116 Chapter 10 Static Route P-870HW-51a v2 User’s Guide...
-
Page 117: Quality Of Service (Qos)
• The Queue Setup screen lets you lets you configure QoS queue assignment (Section 11.4 on page 119). • The Class Setup screen lets you add, edit or delete QoS classifiers (Section 11.5 on page 120). P-870HW-51a v2 User’s Guide... -
Page 118: What You Need To Know
If you enable QoS and incoming traffic does not match a class configured in the Class Setup screen, the ZyXEL Device sets the DSCP field in the packets with the value you select here. If you select No Change, the ZyXEL Device keeps the DSCP fields in the packets. P-870HW-51a v2 User’s Guide... -
Page 119: The Queue Setup Screen
Click the edit icon to go to the screen where you can edit the queue. Click the remove icon to delete an existing queue. Note that subsequent rules move up by one when you take this action. Apply Click Apply to save your changes back to the ZyXEL Device. P-870HW-51a v2 User’s Guide... -
Page 120: Adding A Qos Queue
WAN interface. Give high priority to voice and video to make them run more smoothly. Similarly, give low priority to many large file downloads so that they do not reduce the quality of other applications. Click QoS > Class Setup to open the following screen. P-870HW-51a v2 User’s Guide... -
Page 121: Figure 65 Qos Class Setup
This is the IEEE 802.1p priority level assigned to traffic of this classifier. VlanID Tag This is the VLAN ID number assigned to traffic of this classifier. Rate Control Active Select the check box to enable this classifier. P-870HW-51a v2 User’s Guide... -
Page 122: Qos Class Edit
Click Apply to save your changes back to the ZyXEL Device. 11.5.1 QoS Class Edit Click the Add button or the edit icon in the Class Setup screen to configure a classifier. Figure 66 QoS Class Setup: Add P-870HW-51a v2 User’s Guide... -
Page 123: Table 41 Qos Class Configuration
MAC address to 00:13:49:00:00:00 and the mask to ff:ff:ff:00:00:00, a packet with a MAC address of 00:13:49:12:34:56 matches this criteria. Destination Address Enter the destination IP address in dotted decimal notation. Subnet Mask Enter the destination subnet mask. P-870HW-51a v2 User’s Guide... -
Page 124: Technical Reference
Typically used for network control traffic such as router configuration messages. Level 6 Typically used for voice traffic that is especially sensitive to jitter (jitter is the variations in delay). Level 5 Typically used for video that consumes high bandwidth and is sensitive to jitter. P-870HW-51a v2 User’s Guide... - Page 125 DiffServ network. Based on the marking rule, different kinds of traffic can be marked for different kinds of forwarding. Resources can then be allocated according to the DSCP values and the configured policies. P-870HW-51a v2 User’s Guide...
- Page 126 Chapter 11 Quality of Service (QoS) P-870HW-51a v2 User’s Guide...
-
Page 127: Dynamic Dns Setup
If you have a private WAN IP address, then you cannot use Dynamic DNS. 12.3 The Dynamic DNS Screen To change your ZyXEL Device’s DDNS, click Advanced > Dynamic DNS. The screen appears as shown. P-870HW-51a v2 User’s Guide... -
Page 128: Figure 67 Advanced > Dynamic Dns
If you select TZO in the Service Provider field, enter the password you used to register for this service. Apply Click Apply to save your changes back to the ZyXEL Device. Cancel Click Cancel to begin configuring this screen afresh. P-870HW-51a v2 User’s Guide... -
Page 129: Remote Management
ACS and specify the ACS IP address or domain name and username and password. Click Advanced > Remote MGMT to open the following screen. Use this screen to configure your P-870HA to be managed by an ACS. P-870HW-51a v2 User’s Guide... -
Page 130: Figure 68 Tr-069
The ACS can use this URL to make a connection request to the ZyXEL Device. Apply/Save Click this button to save your changes back to the ZyXEL Device. Cancel Click Cancel to begin configuring this screen afresh. P-870HW-51a v2 User’s Guide... -
Page 131: Universal Plug-And-Play (Upnp)
The automated nature of NAT traversal applications in establishing their own services and opening firewall ports may present network security issues. Network information and configuration may also be obtained and modified by users in some network environments. P-870HW-51a v2 User’s Guide... -
Page 132: The Upnp Screen
This section shows how to install UPnP in Windows Me and Windows XP. Installing UPnP in Windows Me Follow the steps below to install the UPnP in Windows Me. 1 Click Start and Control Panel. Double-click Add/Remove Programs. P-870HW-51a v2 User’s Guide... -
Page 133: Figure 70 Add/Remove Programs: Windows Setup: Communication
3 In the Communications window, select the Universal Plug and Play check box in the Components selection box. Figure 71 Add/Remove Programs: Windows Setup: Communication: Components 4 Click OK to go back to the Add/Remove Programs Properties window and click Next. P-870HW-51a v2 User’s Guide... -
Page 134: Figure 72 Network Connections
4 The Windows Optional Networking Components Wizard window displays. Select Networking Service in the Components selection box and click Details. Figure 73 Windows Optional Networking Components Wizard 5 In the Networking Services window, select the Universal Plug and Play check box. P-870HW-51a v2 User’s Guide... -
Page 135: Using Upnp In Windows Xp Example
Make sure the computer is connected to a LAN port of the ZyXEL Device. Turn on your computer and the ZyXEL Device. Auto-discover Your UPnP-enabled Network Device 1 Click Start and Control Panel. Double-click Network Connections. An icon displays under Internet Gateway. 2 Right-click the icon and select Properties. P-870HW-51a v2 User’s Guide... -
Page 136: Figure 75 Network Connections
Chapter 14 Universal Plug-and-Play (UPnP) Figure 75 Network Connections 3 In the Internet Connection Properties window, click Settings to see the port mappings there were automatically created. Figure 76 Internet Connection Properties P-870HW-51a v2 User’s Guide... -
Page 137: Figure 77 Internet Connection Properties: Advanced Settings
5 When the UPnP-enabled device is disconnected from your computer, all port mappings will be deleted automatically. 6 Select Show icon in notification area when connected option and click OK. An icon displays in the system tray. P-870HW-51a v2 User’s Guide... -
Page 138: Figure 79 System Tray Icon
IP address of the ZyXEL Device first. This comes helpful if you do not know the IP address of the ZyXEL Device. Follow the steps below to access the web configurator. 1 Click Start and then Control Panel. 2 Double-click Network Connections. 3 Select My Network Places under Other Places. P-870HW-51a v2 User’s Guide... -
Page 139: Figure 81 Network Connections
Figure 81 Network Connections 4 An icon with the description for each UPnP-enabled device displays under Local Network. 5 Right-click on the icon for your ZyXEL Device and select Invoke. The web configurator login screen displays. P-870HW-51a v2 User’s Guide... - Page 140 Figure 82 Network Connections: My Network Places 6 Right-click on the icon for your ZyXEL Device and select Properties. A properties window displays with basic information about the ZyXEL Device. Figure 83 Network Connections: My Network Places: Properties: Example P-870HW-51a v2 User’s Guide...
-
Page 141: Maintenance, Troubleshooting And Specifications
Maintenance, Troubleshooting and Specifications System Settings (143) Logs (147) Tools (149) Diagnostic (155) Product Specifications (165) Troubleshooting (159) -
Page 143: System Settings
Internet access, printers etc. 15.2 The General Screen Use the General screen to configure system settings such as the system password. Click Maintenance > System to open the General screen. P-870HW-51a v2 User’s Guide... -
Page 144: The Time Setting Screen
15.3 The Time Setting Screen To change your ZyXEL Device’s time and date, click Maintenance > System > Time Setting. The screen appears as shown. Use this screen to configure the ZyXEL Device’s time based on your local time zone. P-870HW-51a v2 User’s Guide... -
Page 145: Table 47 Maintenance > System > Time Setting
Choose the time zone of your location. This will set the time difference between your time zone and Greenwich Mean Time (GMT). Apply Click Apply to save your changes back to the ZyXEL Device. Cancel Click Cancel to begin configuring this screen afresh. P-870HW-51a v2 User’s Guide... - Page 146 Chapter 15 System Settings P-870HW-51a v2 User’s Guide...
-
Page 147: Logs
Log Settings screen (see Section 16.3 on page 148). The log wraps around and deletes the old entries after it fills. Figure 86 Maintenance > Logs > View Log P-870HW-51a v2 User’s Guide... -
Page 148: The Log Settings Screen
The ZyXEL Device records the logs with the severity level equal to or higher than what you selected. Apply Click Apply to save your customized settings and exit this screen. Cancel Click Cancel to return to the previously saved settings. P-870HW-51a v2 User’s Guide... -
Page 149: Tools
• The Configuration screen lets you backup and restore device configurations (Section 17.3 on page 151). You can also reset your device settings back to the factory default. • The Restart screen lets you restart your ZyXEL Device (Section 17.4 on page 154). P-870HW-51a v2 User’s Guide... -
Page 150: The Firmware Upgrade Screen
(.zip) files before you can upload them. Upload Click Upload to begin the upload process. This process may take up to two minutes. After you see the Firmware Upload in Progress screen, wait two minutes before logging into the ZyXEL Device again. P-870HW-51a v2 User’s Guide...