
Subscribe to Our Youtube Channel
Related Manuals for Proluxe DEL TACO SL1266DTA


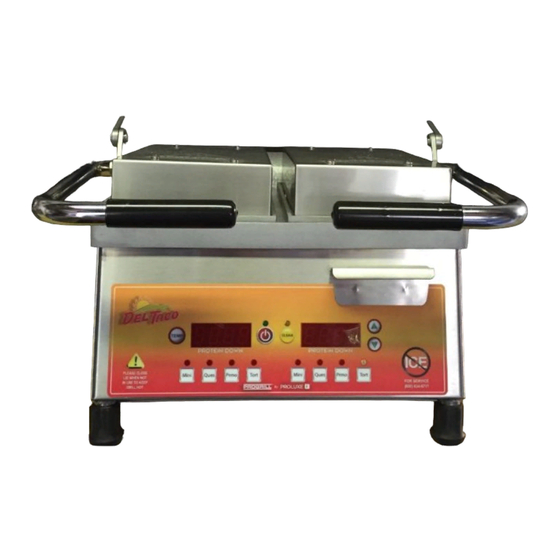
Summary of Contents for Proluxe DEL TACO SL1266DTA
- Page 1 Operations Manual Model: SL1266DTA Digitally Controlled Split Lid Clam Shell Grill See Start Up Instructions on pages 2-4 formerly DOUGHPRO. New Name. Same Quality. Superior Service. proluxe.com rev RD 030818...
- Page 2 PROLUXE SL1266 SPLIT LID CLAMSHELL Initial Setup Instructions: Before using the clamshells for the first time, follow the Procedures below: Start Up 1. Clean the Grill Platens with mild soap using paper towels. Clean off all soap with clean damp paper towels. Wipe with damp sanitizer towel.
- Page 3 Safety Notes: Grid surface extremely hot! Do not clean grid surface until it has cooled. Description The Proluxe Split Lid clamshell grill heats quesadillas, corn tortillas, and flat bread only. The clamshell grill is electrically powered and produces two heated grill surfaces used to cook quesadillas.
-
Page 4: Troubleshooting Guide
What Will Proluxe Do? Proluxe will repair or replace the defective SL1266 on normal warranty one year parts and labor. The heating elements on the upper and lower platen only will be replaced by next day air service under the normal one year warranty. -
Page 5: Cleaning Instructions
Operation Instructions Please read carefully before attempting to use this appliance. Step 1. Carefully unpack and clean grill plates with mild soap then sponge clean with cold water. Step. 2. Place in location where it will be used allowing for clearances per the dimensions indicated. -
Page 6: Clean Cycle
Clean Cycle 275°F is the factory default temp for the CLEAN cycle. To change the CLEAN cycle temp, simultaneously hold down the TEMP and CLEAN buttons for 15 seconds. The current temp setting will display on the right digital display only. Using the up or down arrows to adjust to the desired temp. To start a clean cycle, push CLEAN button once so the CLEAN LED light is turned on. - Page 7 SL1266 Operating Instructions: 1. Press desired time to start the time cycle. After the cycle is finished, press it again to reset the time cycle HOW TO FIND TEMPERATURE 1. To find the temperature of the UPPER PLATENS: Press the TEMPERATURE button and the ARROW UP button at the same time. 2.
- Page 8 Instruction’s for Adjusting the Temperature PRESS and hold the TEMP and ARROW up buttons simultaneously for 15 seconds. The current temperature setting will display on the right digital display only. Using the ARROW buttons, you may now adjust the temperature to your desired setting.
- Page 9 DOUGHPRO SL1266 Split Lid Grill Trouble Shooting Guide Symptom Probable Cause Action to be Taken Parts List Ref. # Power Button on Control face is Power Cord is not plugged in. Plug power cord into wall 's depressed but doesn’t turn on. receptacle and depress power button on controller Circuit Breaker is tripped off in the...
- Page 10 DOUGHPRO SL1266 Split Lid Grill Trouble Shooting Guide Symptom Probable Cause Action to be Taken Parts List Ref. # Either Heater Platen is not Heating If the Mechanical Relay (s) on the coil Replace Mechanical Relay. # 15 but the Digital Controller is on and side are receiving 12vdc indicates the appears to be functioning.
- Page 11 SL1266DTA 2X 18 2X 71 2X 69 2X 70 LEFT UPPER PLATEN ASSY REFERENCE SHEET 3 2X 63 LOWER PLATEN ASSY REFERENCE SHEET 2 2X 13 2X 26 6X 46 4X 42 6X 50 4X 47 2X 74 RIGHT UPPER PLATEN ASSY REFERENCE SHEET 3 EXPSL1266DTA RJ 100419 CUSTOMER MANUAL SHEET 1 OF 3...
- Page 12 66 4X 49 4X 10X 56 48 12X 2X 35 DETAIL A 3X 36 DETAIL B EXPSL1266DTA RJ 100419 CUSTOMER MANUAL SHEET 2 OF 3...
- Page 13 52 4X 52 4X 61 3X 47 3X 45 3X 68 2X 61 3X 47 3X 45 3X EXPSL1266DTA RJ 100419 CUSTOMER MANUAL SHEET 3 OF 3...
- Page 14 PARTS LIST FOR SL1266DTA ITEM SL1266DTA DESCRIPTION QTY. 120V UPPER PLATEN, INSULATION 11018344074C1 LOWER PLATEN, INSULATION 11018344019 HANDLE SPRING ADJUSTING COLLAR 110115528 SPRING TORSION LH 1101023154L SPRING TORSION RH 1101023154R BASE FRAME ASSEMBLY 11018344038 LOWER PLATEN INSULATION COVER 11018344018 COVER, BOTTOM ASSY 11018344022 TUBING-PAD 110115531 SHROUD, LEFT...
- Page 15 PARTS LIST FOR SL1266DTA WASHER, HI-TEMP COMPRESS, NON-ABESTOS C4401 SCREW, PAN HEAD PHILLIPS 8-32X 3/8 SS SP83238S SCREW, SET 3/8-16 X 1-1/2 SST3816112 SCREW, SET 3/8-16 X 1/2 SST381612 SCREW, PHILLIPS PAN 2-56x1/4 SP25614 SCREW, PAN HEAD PHILLIPS 8-32 X 1/2 SP83212 SCREW, PHILLIPS PAN HEAD 8-32 X 1/4 SP83214 SCREW, PAN HEAD 8-32 X 1 SP8321...
- Page 17 Such repair or replacement will be at the expense of Proluxe on under the normal one year warranty.
-
Page 18: Warranty And Return Policy
Exclusions: 1. WOOD / GAS FIRED OVENS: PROLUXE warranty applies to the main body of the oven being steel / refractory and insulation shall be free from defects in materials and workmanship for a period of four years from the date of purchase. The gas equipment shall be free from defects in materials and workmanship for a period of one (1) year from the date of purchase.
Need help?
Do you have a question about the DEL TACO SL1266DTA and is the answer not in the manual?
Questions and answers