Table of Contents
Advertisement
Available languages
Available languages
Quick Links
ENG
Instruction for use
Mode d'emploi
Instructivo de operación
F
Groupe SEB USA - 2121 Eden Road
Millville, NJ 08332, USA - Tel: 1-800-769-3682
Groupe SEB Canada Inc, 345 Passmore Avenue
Scarborough, Ontario, M1V 3N8
G.S.E.B Mexicana, S.A. de C.V. Goldsmith 38-401, Piso 4, Polanco Chapultepec,
Miguel Hidalgo C.P. 11560 México D.F. Tel: 018001128325
www.rowenta.com
E
Advertisement
Table of Contents

Related Manuals for Rowenta Steamium DW9070U5


Summary of Contents for Rowenta Steamium DW9070U5
- Page 1 Groupe SEB USA - 2121 Eden Road Millville, NJ 08332, USA - Tel: 1-800-769-3682 Groupe SEB Canada Inc, 345 Passmore Avenue Scarborough, Ontario, M1V 3N8 G.S.E.B Mexicana, S.A. de C.V. Goldsmith 38-401, Piso 4, Polanco Chapultepec, Miguel Hidalgo C.P. 11560 México D.F. Tel: 018001128325 www.rowenta.com...
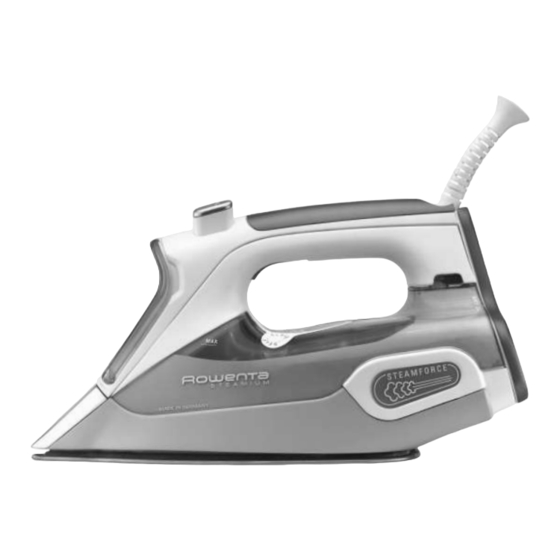
- Page 2 DESCRIPTION Spray button Water tank Shot of steam button Spray Cord High precision tip Handle Soleplate Auto Steam trigger Filling inlet Thermostat indicator Temperature control dial Rear Cover Auto off* Self clean button * depending on model...
-
Page 3: Important Safeguards
IMPORTANT SAFEGUARDS Read all instructions before using the iron When using your iron, basic safety precautions should always be follo- wed, including the following: • Use iron only for its intended use. • To protect against a risk of electric shock, do not immerse the iron or the base of the iron in water or other liquids. -
Page 4: Special Instructions
• If the electrical cord becomes damaged, it must be immediately re- placed by an approved Service Center to avoid any danger. • The appliance should not be used if it has fallen, if it has obvious da- mage, if it leaks or has functional irregularities. Never dismantle your appliance;... -
Page 5: What Water May Be Used
WHAT WATER MAY BE USED ? Your iron has been designed to operate using untreated tap water. If in doubt, check with your local water authority. However, if your water is very hard, you can mix 50% untreated tap water with 50% distilled or demineralised water. -
Page 6: Dry Ironing
TIP Always spray starch onto the reverse side of the fabric to be ironed. THERMOSTAT IRONING FABRIC THERMOSTAT INDICATION LABEL Nylon (Synthetic fibres, e.g. viscose, NYLON polyester) silk SILK wool WOOL cotton COTTON linen LINEN 3 • Dry ironing • Set the temperature to suit the type of material without pushing the autosteam trigger or burst of steam button. -
Page 7: After Use
6 • Vertical burst of steam (from temperature setting (••) upwards) • Hold the iron vertically and press the burst of steam button to remove creases from suits, jackets, skirts, hanging curtains etc. IMPORTANT Never direct the steam at persons or animals! TIP Hold the iron 4 to 8 inches away from the garment to avoid burning delicate fabrics. -
Page 8: Maintenance And Cleaning
MAINTENANCE AND CLEANING IMPORTANT Unplug and allow the iron to fully cool down before maintenance and cleaning. 12 • Anti-scale system • Your iron contains an anti-scale cartridge to reduce scale deposits. • This considerably prolongs the operational life of your iron. •... - Page 9 PROBLEMS? Problem Cause Solution The iron is plugged Power from the outlet Check that the power plug is properly in- in, but the soleplate serted or try plugging the iron into a diffe- of the iron remains rent socket. cold. Temperature control set too low.
-
Page 10: Limited Warranty
In the interest of improving products, Rowenta reserves the right to change specifications wi- thout prior notice. LIMITED WARRANTY This Rowenta product is warranted against defects in material and workmanship for one year from the initial purchase date. During this period any Rowenta product owned by the original... - Page 11 If in warranty, Rowenta will repair or replace the product at their discretion. If the product is out of warranty, you will be advised of the cost of repair before any work begins.
- Page 13 Instruction for use Mode d'emploi Instructivo de operación Groupe SEB USA - 2121 Eden Road Millville, NJ 08332, USA - Tel: 1-800-769-3682 Groupe SEB Canada Inc, 345 Passmore Avenue Scarborough, Ontario, M1V 3N8 G.S.E.B Mexicana, S.A. de C.V. Goldsmith 38-401, Piso 4, Polanco Chapultepec, Miguel Hidalgo C.P.
- Page 14 DESCRIPTION Commande du spray Réservoir d’eau Commande du jet de vapeur Spray Cordon d’alimentation Pointe haute précision Poignée Semelle Gachette de vapeur Orifice de remplissage Voyant de contrôle de la température Thermostat Arrêt automatique * Talon Commande d’auto-nettoyage * selon le modèle...
-
Page 15: Précautions Importantes
PRÉCAUTIONS IMPORTANTES Lisez entièrement le mode d’emploi avant d’utiliser le fer. Lorsque vous utilisez votre fer à repasser, veillez à prendre quelques précautions élé- mentaires, les suivantes, en particulier : • N’utilisez le fer que pour l’usage pour lequel il a été conçu. •... -
Page 16: Avant La Première Utilisation
• Votre appareil émet de la vapeur, ce qui peut causer des brûlures, surtout si vous vous tenez sur un coin de votre planche à repasser. Ne dirigez jamais la vapeur sur quelqu’un ou sur un animal. • Votre fer doit être utilisé et posé sur une surface stable. Lorsque vous posez votre fer sur son talon d'appui, assurez-vous que la surface sur laquelle vous le posez est stable. - Page 17 • Réglez le • Ouvrez l’ori- thermostat à fice de rem- la position plissage. minimale • Remplissez (min). le réservoir jusqu’au ni- veau maxi- mal (Max.). • Refermez l’orifice de remplissage et replacez le fer en position horizon- tale. • Vous pouvez maintenant brancher votre fer . 2 •...
-
Page 18: Repassage Sans Vapeur
IMPORTANT Le temps de refroidissement du fer est plus long que le temps de chauffe. Nous vous recommandons de commencer votre repassage par les tissus délicats à la température minimale. Pour des vêtements composés de différentes matières, choisissez la température adaptée au tissu le plus délicat. CONSEILS Vaporisez toujours l’amidon sur l’envers du tissu à... -
Page 19: Après Le Repassage
8 • Système anti-gouttes * • Il empêche les fuites de gouttes d’eau par la semelle, si la température sélectionnée est trop basse. 9 • Fonction Auto Off * (arrêt automatique) • Pour votre sécurité, le système électronique coupe l’alimentation et le voyant autostop clignote lorsque : - le fer demeure immobile sur son talon pendant plus de 8 minutes. - Page 20 En cas d’une eau fortement calcaire, faites un nettoyage hebdomadaire. Si vous n’arrivez pas à déterminer la cause d’un défaut, vous pouvez vous adresser à un ser- vice après-vente officiel agréé ROWENTA. Vous trouverez les adresses dans la liste du ser- vice après-vente jointe.
- Page 21 PROBLÈMES POSSIBLES Problème Cause Solution Le fer est branché, Pas d’alimentation de courant. Contrôlez si la fiche est bien insérée mais la semelle dans la prise ou essayez de brancher reste froide ou ne l’appareil sur une autre prise. chauffe pas. Réglage de la température trop Placez le thermostat sur la position basse.
- Page 22 * selon le modèle...
- Page 23 Instruction for use Mode d'emploi Instructivo de operación Groupe SEB USA - 2121 Eden Road Millville, NJ 08332, USA - Tel: 1-800-769-3682 Groupe SEB Canada Inc, 345 Passmore Avenue Scarborough, Ontario, M1V 3N8 G.S.E.B Mexicana, S.A. de C.V. Goldsmith 38-401, Piso 4, Polanco Chapultepec, Miguel Hidalgo C.P.
-
Page 24: Descripción Del Aparato
DESCRIPCIÓN DEL APARATO Botón de pulverizado Depósito de agua Botón para chorros de vapor Pulverizador Cable Punta de alta precisión Suela Gatillo de vapor automático Boca de llenado Indicador del termostato Selector de temperatura Desconexión automática * Tapa posterior Botón de Auto-limpieza * según el modelo... -
Page 25: Instrucciones Importantes De Seguridad
INSTRUCCIONES IMPORTANTES DE SEGURIDAD La seguridad de este aparato es conforme a las reglas técnicas y a las normas en vigor (Compatibilidad Electromagnética, Baja Tensión,Medio Ambiente). • Lea detenidamente este manual de instrucciones y guárdelo. • Este aparato no está previsto para que lo utilicen personas (incluso niños) cuya capaci- dad física, sensorial o mental esté... -
Page 26: Antes Del Primer Uso
ANTES DEL PRIMER USO IMPORTANTE : ¡Retire primero la protección de la suela ! ¡Atención! Antes de utilizar la plancha por primera vez en posición vapor, le aconsejamos que la haga funcionar algunos momentos en posición horizontal y sin ropa debajo. En estas mismas condiciones, accione varias veces el mando Superpressing. -
Page 27: Ajustar La Temperatura
2 • Ajustar la temperatura • Su plancha está equipada con la función Autosteam, que ajusta au- tomáticamente la cantidad y temperatura del vapor según el tejido seleccionado, proporcionando unos resultados de planchado ópti- mos. • Seleccione el tejido que va a planchar en el selector del termostato. Para conseguir unos resultados perfectos, hay predefinida una posi- ción óptima para cada tipo de tejido. -
Page 28: Planchado Con Vapor
4 • Planchado con vapor (Autosteam & Steamforce) • Su plancha está equipada con la función Autosteam. La cantidad y tempera- tura del vapor se ajustan automáticamente al tipo de tejido seleccionado. Para aplicar vapor de forma constante, presione el gatillo de vapor automático. •... -
Page 29: Después De Planchar
DESPUÉS DE PLANCHAR 10 • Vaciar el depósito • Desenchufe la plancha. • Vacíe el agua sobrante • Ajuste el selector de tempera- tura a la posición MÍN. 11 • Guardar la plancha • A continuación, dejar enfriar la plancha y guardar la plancha colocada vertical- mente sobre su talón. - Page 30 POSIBLES PROBLEMAS Problema Posible causa Corrección La suela de la plancha No hay alimentación eléctrica. Asegúrese de que el enchufe esté conectado correc- está fría o no se calienta tamente, o pruebe el aparato en otra caja de en- aunque la plancha está chufe.
- Page 31 Para mejorar los productos, Rowenta se reserva el derecho a cambiar las es- pecificaciones sin previo aviso. GARANTÍA LIMITADA Este producto Rowenta esta garantizado contra defectos de materiales y mano de obra durante los 12 meses posteriore a la fecha de compra.
- Page 32 Asegúrese de poner su nombre en el exterior del embalaje (no ponga apartado de correos, por favor). Si el producto está en garantía, Rowenta reparará o sustituirá el producto según su criterio. Si el producto no está en garantía, se le comunicará el coste de la reparación antes de iniciar cualquier trabajo.
-
Page 33: Certificado De Garantía
CERTIFICADO DE GARANTÍA Nombre del comprador: ----------------------------------------------------------------------------------------------------------------------------------------------------------------------------------------------------------------------- Marca del aparato: Marca del aparato: ------------------------------------------------------------------------------- ------------------------------------------------------------------------------------------------- Fecha de entrega: Nombre de la tienda: ---------------------------------------------------------------------------------- ----------------------------------------------------------------------------------------- CONDICIONES QUE REGULAN LA GARANTÍA 1. Para hacer efectiva la garantía totalmente gratuita, ofrecida en los productos comercializados le- galmente por G.S.E.B.MEXICANA,S.A. - Page 34 1103906369 - 37/09...
Need help?
Do you have a question about the Steamium DW9070U5 and is the answer not in the manual?
Questions and answers