Table of Contents
Advertisement
Available languages
Available languages
Quick Links
ENG
Instruction for use
Mode d'emploi
Instructivo de operación
F
Groupe SEB USA - 2121 Eden Road
Millville, NJ 08332, USA - Tel: 1-800-769-3682
Groupe SEB Canada Inc, 345 Passmore Avenue
Scarborough, Ontario, M1V 3N8
Tel: 1-800-418-3325
G.S.E.B Mexicana, S.A. de C.V. Goldsmith 38-401, Piso 4, Polanco Chapultepec,
Miguel Hidalgo C.P. 11560 México D.F. Tel: 018001128325
www.rowenta.com
E
Advertisement
Table of Contents

Subscribe to Our Youtube Channel
Related Manuals for Rowenta Master DW9055U1


Summary of Contents for Rowenta Master DW9055U1
- Page 1 Millville, NJ 08332, USA - Tel: 1-800-769-3682 Groupe SEB Canada Inc, 345 Passmore Avenue Scarborough, Ontario, M1V 3N8 Tel: 1-800-418-3325 G.S.E.B Mexicana, S.A. de C.V. Goldsmith 38-401, Piso 4, Polanco Chapultepec, Miguel Hidalgo C.P. 11560 México D.F. Tel: 018001128325 www.rowenta.com...
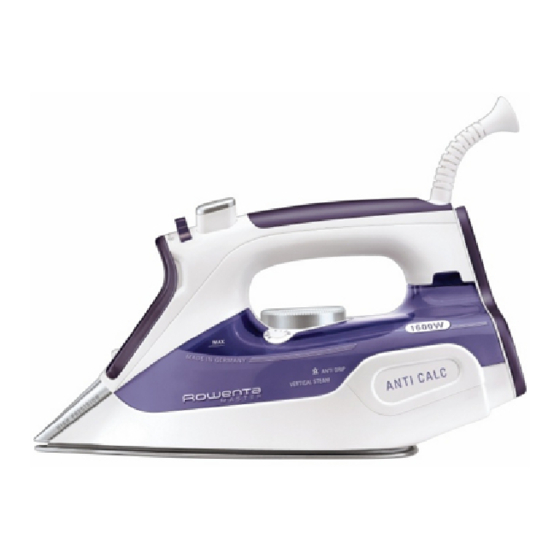
- Page 2 DESCRIPTION Spray nozzle Burst of steam button Filling inlet Auto-off indicator light* Self clean Cord Temperature control dial Handle Variable steam control Thermostat control light Dry ironing Water tank Steam max. position Maximum water level indicator Spray button Soleplate * depending on model...
-
Page 3: Important Safeguards
IMPORTANT SAFEGUARDS Read all instructions before using the iron When using your iron, basic safety precautions should always be follo- wed, including the following: • Use iron only for its intended use. • To protect against a risk of electric shock, do not immerse the iron or the base of the iron in water or other liquids. -
Page 4: Special Instructions
• If the electrical cord becomes damaged, it must be immediately re- placed by an approved Service Center to avoid any danger. • The appliance should not be used if it has fallen, if it has obvious da- mage, if it leaks or has functional irregularities. Never dismantle your appliance;... - Page 5 1 • What water may be used ? Your iron has been designed to operate using untreated tap water. If in doubt, check with your local water authority. However, if your water is very hard, you can mix 50% untreated tap water with 50% distilled or demineralised water.
- Page 6 4 • Dry ironing Set the variable steam control to and set the temperature to suit the type of material (care points •, ••, •••). 5 • Steam ironing You can steam iron from temperature setting •• upwards. Steam function* : The steam level can be set between • (minimum steam quantity) and (maximum steam quantity).
-
Page 7: After Use
10 • Automatic electronic 3-position auto-off* If, although switched on, the appliance is not moved, it will automatically switch off and the auto off light will blink after the following intervals: - After 30 sec., if the iron is left resting on the soleplate or lying on its side. - After 8 mins., if the iron is left resting on its heel. - Page 8 15 • Cleaning the iron When the appliance has cooled down, wipe it down with a damp cloth or sponge, as required. Remove the dirt from the soleplate with a damp cloth or sponge. IMPORTANT Do not use sharp or abrasive cleaning agents or objects to clean soleplate and other parts of the iron.
-
Page 9: Limited Warranty
In the interest of improving products, Rowenta reserves the right to change specifications wi- thout prior notice. LIMITED WARRANTY This Rowenta product is warranted against defects in material and workmanship for one year from the initial purchase date. During this period any Rowenta product owned by the original... -
Page 10: Service Center Information
If in warranty, Rowenta will repair or replace the product at their discretion. If the product is out of warranty, you will be advised of the cost of repair before any work begins. - Page 11 Instruction for use Mode d'emploi Instructivo de operación Groupe SEB USA - 2121 Eden Road Millville, NJ 08332, USA - Tel: 1-800-769-3682 Groupe SEB Canada Inc, 345 Passmore Avenue Scarborough, Ontario, M1V 3N8 Tel: 1-800-418-3325 G.S.E.B Mexicana, S.A. de C.V. Goldsmith 38-401, Piso 4, Polanco Chapultepec, Miguel Hidalgo C.P.
- Page 12 DESCRIPTION Vaporisateur Voyant d’arrêt automatique* Orifice de remplissage Cordon Autonettoyage Poignée Cadran du thermostat Voyant de contrôle de la température* Commande de réglage de la vapeur Réservoir d’eau Sans vapeur Indication du niveau de remplissage Vapeur maximale maximal Bouton de vaporisation Semelle Bouton du jet de vapeur * selon le modèle...
-
Page 13: Précautions Importantes
PRÉCAUTIONS IMPORTANTES Lisez entièrement le mode d’emploi avant d’utiliser le fer. Lorsque vous utilisez votre fer à repasser, veillez à prendre quelques précautions élé- mentaires, les suivantes, en particulier : • N’utilisez le fer que pour l’usage pour lequel il a été conçu. •... -
Page 14: Avant La Première Utilisation
• Votre appareil émet de la vapeur, ce qui peut causer des brûlures, surtout si vous vous tenez sur un coin de votre planche à repasser. Ne dirigez jamais la vapeur sur quelqu’un ou sur un animal. • Votre fer doit être utilisé et posé sur une surface stable. Lorsque vous posez votre fer sur son talon d'appui, assurez-vous que la surface sur laquelle vous le posez est stable. - Page 15 Tenez le fer à repasser en position oblique. Ouvrez l’orifice de remplissage. Versez de l’eau jusqu’au repère max. Fermez l’orifice de remplissage. Vous pou- vez mettre le fer de nouveau à l’horizon- tal. 3 • Réglage de la température de repassage Réglez la température de repassage à...
-
Page 16: Après Le Repassage
6 • Jet de vapeur (à partir du réglage de température ••) Appuyez sur le bouton pour produire un jet de vapeur puissant. Attendez quelques secondes entre deux appuis. 7 • Jet de vapeur vertical (à partir du réglage de température ••) CONSEIL Pour éviter de brûler les tissus délicats, tenez le fer à... -
Page 17: Entretien Et Nettoyage
12 • Rangement de votre fer Laissez refroidir le fer avant de le ranger en position verticale sur le socle. IMPORTANT N’enroulez pas le cordon autour de la semelle chaude et ne rangez jamais votre fer à plat sur sa semelle. ENTRETIEN ET NETTOYAGE IMPORTANT Débranchez et laissez toujours refroidir le fer avant l’entretien ou le net- toyage. - Page 18 PROBLÈMES POSSIBLES Problème Cause Solution Le fer est branché, Pas d’alimentation de courant. Assurez-vous que la fiche est bien insérée mais la semelle dans la prise ou essayez de brancher l’appa- reste froide ou ne reil sur une autre prise. chauffe pas.
- Page 19 Instruction for use Mode d'emploi Instructivo de operación Groupe SEB USA - 2121 Eden Road Millville, NJ 08332, USA - Tel: 1-800-769-3682 Groupe SEB Canada Inc, 345 Passmore Avenue Scarborough, Ontario, M1V 3N8 Tel: 1-800-418-3325 G.S.E.B Mexicana, S.A. de C.V. Goldsmith 38-401, Piso 4, Polanco Chapultepec, Miguel Hidalgo C.P.
-
Page 20: Descripción Del Aparato
DESCRIPCIÓN DEL APARATO Rociador Indicador luminoso de autoapagado* Orificio de llenado con tapa deslizante Cable de alimentación Self Clean Regulador de temperatura Luz piloto* Depósito de agua Regulador de salida de vapor Sin vapor Indicador del nivel máximo de agua Vapor máximo Suela Botón rociador... -
Page 21: Instrucciones Importantes De Seguridad
INSTRUCCIONES IMPORTANTES DE SEGURIDAD La seguridad de este aparato es conforme a las reglas técnicas y a las normas en vigor (Compatibilidad Electromagnética, Baja Tensión,Medio Ambiente). • Lea detenidamente este manual de instrucciones y guárdelo. • Este aparato no está previsto para que lo utilicen personas (incluso niños) cuya capa- cidad física, sensorial o mental esté... -
Page 22: Antes Del Primer Uso
ANTES DEL PRIMER USO ¡ATENCIÓN ! Retire las posibles etiquetas de la suela antes de ca- lentar la plancha (según el modelo). ¡ATENCIÓN ! Antes de utilizar la plancha por primera vez en posición vapor, le aconsejamos que la haga funcionar algunos momentos en posición horizontal y sin ropa debajo. - Page 23 IMPORTANTE Debido a que la plancha tarda más en enfriarse que en calentarse, reco- mendamos comenzar primero por el planchado de tejidos sensibles con el ajuste de tem- peratura más bajo. Para prendas de ropa compuestas por diferentes materiales, seleccione la temperatura adecuada al tejido más delicado.
-
Page 24: Después De Planchar
9 • Sistema Antigoteo* Este sistema sirve para evitar que salga agua por la suela si la temperatura es demasiado baja. 10 • Desconexión automática electrónica en 3 posiciones* Una vez conectada, si la plancha no se mueve, se desconecta auto-máticamente al cabo de los siguientes intervalos de tiempo: - Al cabo de 30 seg. - Page 25 Presione el botón de Auto-limpieza durante 1 minuto: el vapor empezará a acumularse. Transcurridos unos segundos, el agua empezará a salir por la suela, arrastrando las partículas de cascarilla y suciedad de la cámara de vapor. Enchufe la plancha y déjela calentar de nuevo. Espere hasta que el agua sobrante se haya evaporado.
-
Page 26: Garantía Limitada
Para mejorar los productos, Rowenta se reserva el derecho a cambiar las es- pecificaciones sin previo aviso. GARANTÍA LIMITADA Este producto Rowenta esta garantizado contra defectos de materiales y mano de obra durante los 12 meses posteriore a la fecha de compra. - Page 27 Asegúrese de poner su nombre en el exterior del embalaje (no ponga apartado de correos, por favor). Si el producto está en garantía, Rowenta reparará o sustituirá el producto según su criterio. Si el producto no está en garantía, se le comunicará el coste de la reparación antes de iniciar cualquier trabajo.
-
Page 28: Certificado De Garantía
CERTIFICADO DE GARANTÍA Nombre del comprador: ------------------------------------------------------------------------------------------------------------------------------------------------------------- Marca del aparato: Modelo: --------------------------------------------------------------- -------------------------------------------------------------------------------------- Fecha de entrega: Nombre de la tienda: ----------------------------------------------------------------- ------------------------------------------------------- CONDICIONES QUE REGULAN LA GARANTÍA 1. Para hacer efectiva la garantía totalmente gratuita, ofrecida en los productos comercializados legalmente por G.S.E.B Mexicana S.A. de C.V. es indispensable presentar el producto junto con el certificado de garantía, debidamente sellada y llenada por la tienda.
Need help?
Do you have a question about the Master DW9055U1 and is the answer not in the manual?
Questions and answers