Table of Contents
Advertisement
Quick Links
pH/mV
SD card real time data logger
pH METER
Model : PCE-228
OPERATION MANUAL
Your purchase of this
pH
METER
CARD
DATA
marks a step forward for
you into the field of
precision measurement.
Although this meter a
complex
and
instrument, its durable
structure
will
many years of use if
p r o p e r
o p e r a t i n g
t e c h n i q u e s
developed. Please read
t h e
f o l l o w i n g
instructions
and always keep this
manual
within
reach.
with
SD
LOGGER
delicate
allow
a r e
carefully
easy
Advertisement
Table of Contents

Related Manuals for Lutron Electronics PCE-228


Summary of Contents for Lutron Electronics PCE-228
- Page 1 SD card real time data logger pH METER Model : PCE-228 Your purchase of this METER with CARD DATA LOGGER marks a step forward for you into the field of precision measurement. Although this meter a complex delicate instrument, its durable...
-
Page 2: Table Of Contents
TABLE OF CONTENTS 1. FEATURES................2. SPECIFICATIONS................ 2-1 General Specifications..............2-2 Electrical Specifications.........4 3. FRONT PANEL DESCRIPTION............. 4. pH/mV MEASURING and CALIBRATION PROCEDURE..............4-1 pH measurement ( manual Temp. compensation )...... 4-2 pH measurement ( ATC , automatic Temperature )....4-3 mV Measurement.............. -
Page 3: Features
1. FEATURES * pH : 0 to 14.00 pH, mV ( ORP ) : ± 1999 mV. * pH measurement can select ATC or manual Temp. adj.. * Optional ATC probe for pH measurement. * pH measurement can make the auto calibration for pH 7, pH 4 and pH 10 or other value. -
Page 4: Specifications
2. SPECIFICATIONS 2-1 General Specifications Circuit Custom one-chip of microprocessor LSI circuit. Display LCD size : 52 mm x 38 mm LCD with green backlight ( ON/OFF ). Measurement Function ORP ( mV ) Datalogger Auto 1 sec to 8 hour 59 min. 59 sec. Sampling Time @ Sampling time can set to 1 second, Setting range... - Page 5 ℃ Operating 0 to 50 Temperature Operating Less than 85% R.H. Humidity * AC/DC power adapter is optional. Power Supply Alkaline or heavy duty DC 1.5 V battery ( UM3, AA ) x 6 PCs, or equivalent. * AC/DC power adapter is optional. DC 9V adapter input.
-
Page 6: Electrical Specifications
℃ 2-2 Electrical Specifications (23± 5 Optional, Electrode Any pH electrode with BNC connector. Measurement 0 to 14 pH -1999 mV to 1999 mV Input 10^12 ohm Impedance ℃ Temperature Manual 0 to 100 , be adjusted by Compensation push button on front panel. for pH Automatic With the optional temperature... -
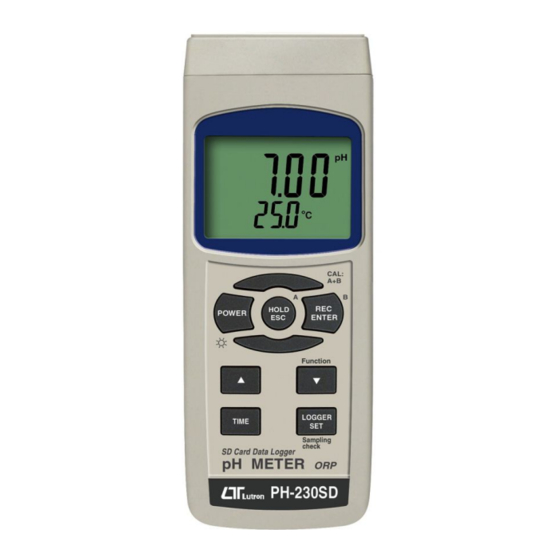
Page 7: Front Panel Description
3. FRONT PANEL DESCRIPTION... - Page 8 3-1 Display 3-2 Power Button ( Backlight Button ) 3-3 Hold Button ( ESC Button ) 3-4 REC Button ( Enter Button ) ▲ Button ▼ Button ( Function Button ) 3-7 Time Button 3-8 Logger Button ( SET Button, Sampling check ) 3-9 Stand 3-10 Battery Compartment/Cover 3-11 Battery Cover Screw...
-
Page 9: Ph/Mv Measuring And Calibration Procedure
4. pH/mV MEASURING and CALIBRATION PROCEDURE The meter default function are following : * The display unit is set to pH. ℃ * The temperature unit is set to * Manual ATC ( without connect the ATC probe ) * Auto power off. * The sampling time of data logger function is 2 seconds. -
Page 10: Ph Measurement ( Manual Temp. Compensation )
4-1 pH measurement ( manual Temp. compensation ) 1) Power on the meter by pressing " Power Button " ( 3-2, Fig. 1 ) once. 2) Prepare the pH Electrode ( optional ), install the " Probe Plug " ( 4-1, Fig. 2 ) into the " pH Socket/BNC Socket "... -
Page 11: Mv Measurement
When not use the Electrode, it should immerse the " Electrode sensing head " ( 4-3, Fig. 2 ) into the " Protection bottle " ( 4-4, Fig. 2 ) 4-3 mV Measurement The instrument build in mV ( millivolt ) measurement function, which enable you to make ion-selective, ORP (oxidation-reduction potential), and other precise mV measurements. - Page 12 Required Equipment for Calibration 1) pH ELECTRODE ( optional ). 2) pH buffer solutions ( optional ). Calibration Procedure 1) Prepare the pH Electrode ( optional ), install the " Probe Plug " ( 4-1, Fig. 2 ) into the " pH Socket/BNC Socket "...
- Page 13 5) Use the two fingers to press the " REC Button " ( 3-4, Fig 1 ) and " HOLD Button " ( 3-3, Fig. 1 ) at the same time. Until Display will show the following screen then release the both fingers. ▲...
- Page 14 * After the above a, b, c screen is selected, then cooperate the relative standard solution, for example the b screen should cooperate the pH 7.00 standard solution. a screen should cooperate the pH 4.00 standard solution. Press the " Enter Button " ( 3-4, Fig. 1 ) will save the calibration data and finish the calibration procedures.
-
Page 15: Other Function
5. OTHER FUNCTION 5-1 Data Hold During the measurement, press the " Hold Button " ( 3-3, Fig. 1 ) once will hold the measured value & the LCD will display a " HOLD " symbol. Press the " Hold Button " once again will release the data hold function. -
Page 16: Lcd Backlight On/Off
5-3 LCD Backlight ON/OFF After power ON, the " LCD Backlight " will light automatically. During the measurement, press the " Backlight Button " ( 3-2, Fig. 1 ) once will turn OFF the " LCD Backlight ". Press the " Backlight Button " once again will turn ON the "... -
Page 17: Auto Datalogger ( Set Sampling Time ≧ 1 Second )
≧ 6-2 Auto Datalogger ( Set sampling time 1 second ) a. Start the datalogger Press the " REC Button ( 3-4, Fig. 1 ) once , the LCD will show the text " REC ", then press the " Logger Button " ( 3-8, Fig. -
Page 18: Manual Datalogger ( Set Sampling Time = 0 Second )
6-3 Manual Datalogger ( Set sampling time = 0 second ) a. Set sampling time is to 0 second Press the " REC Button ( 3-4, Fig. 1 ) once , the LCD will show the text " REC ", then press the " Logger Button " ( 3-8, Fig. -
Page 19: Check Time Information
6-4 To check the time information During the normal measurement screen ( not execute the Datalogger ), 1) If press " Time Button " ( 3-7, Fig. 1 ) once , the lower LCD display will present the time information of Hour/Minute/Second ( h.m.s ) in the lower Display. - Page 20 2) If the first time to execute the Datalogger, under the route PHA01\, will generate a new file name PHA01001.XLS. After exist the Datalogger, then execute again, the data will save to the PHA01001.XLS until Data column reach to 30,000 columns, then will generate a new file, for example PHA01002.XLS 3) Under the folder PHA01\, if the total files more than 99 files, will generate anew route, such as...
-
Page 21: Saving Data From The Sd Card To The Computer
7. Saving data from the SD card to the computer ( EXCEL software ) 1) After execute the Data Logger function, take away the SD card out from the " SD card socket " ( 3-18, Fig. 1 ). 2) Plug in the SD card into the Computer's SD card slot ( if your computer build in this installation ) or insert the SD card into the "... - Page 22 EXCEL data screen ( for example 2) EXCEL data screen ( for example 3, graphic )
-
Page 23: Advanced Setting
8. ADVANCED SETTING Under do not execute the Datalogger function, press the " SET Button " ( 3-8, Fig. 1 ) continuously at least two seconds will enter the " Advanced Setting " mode. then press the " SET Button " ( 3-8, Fig. 1 ) once a while in sequence to select the eight main function, the display will show : Sd F.. - Page 24 yES - Intend to format the SD memory card no - Not execute the SD memory card format 2) If select the upper to " yES ", press the " Enter Button " ( 3-4, Fig. 1 ) once again, the Display will show text "...
- Page 25 8-3 Set sampling time ( Hour/Minute/Second ) When the upper display show " SP-t " ▲ ▼ 1) Use the " Button " ( 3-5, Fig. 1 ) or " Button " ( 3-6, Fig. 1 ) to adjust the value ( Setting start from Hour value ).
- Page 26 8-5 Set beeper sound ON/OFF When the lower display show " bEEP " ▲ ▼ 1) Use the " Button " ( 3-5, Fig. 1 ) or " Button " ( 3-6, Fig. 1 ) to select the upper value to " yES " or "...
- Page 27 ℃ ℉ 8-7 Select the Temp. unit to When the lower display show " t-CF " ▲ ▼ 1) Use the " Button " ( 3-5, Fig. 1 ) or " Button " ( 3-6, Fig. 1 ) to select the upper Display text to " C " or "...
-
Page 28: Power Supply From Dc Adapter
Remark : During execute the " Advanced Setting " function, if press " ESC Button " ( 3-3, Fig. 1 ) will exit the " Advanced Setting " function, the LCD will return to normal screen. 9. POWER SUPPLY from DC ADAPTER The meter also can supply the power supply from the DC 9V Power Adapter ( optional ). -
Page 29: System Reset
11. SYSTEM RESET If the meter happen the troubles such as : CPU system is hold ( for example, the key button can not be operated... ). Then make the system RESET will fix the problem. The system RESET procedures will be either following method : During the power on, use a pin to press the "... -
Page 30: Optional Accessories
The 16 digits data stream will be displayed in the following format : D15 D14 D13 D12 D11 D10 D9 D8 D7 D6 D5 D4 D3 D2 D1 D0 Each digit indicates the following status : Start Word When send the upper display data = 1 When send the lower display data = 2 D12, D11 Annunciator for Display PH = 05... - Page 31 Data * The SW-U801-WIN is a multi acquisition displays ( 1/2/4/6/8 displays ) software powerful application software, SW-U801-WIN provides the functions of data logging system, text display, angular display, chart display, data recorder high/low limit, data query, text report, chart report.. .xxx.mdb data file can be retrieved for EXCEL, ACESS.., wide intelligent applications.
-
Page 32: Patent
18. PATENT The meter ( SD card structure ) already patent pending in following countries : Germany Nr. 20 2008 016 337.4 JAPAN 3151214 TAIWAN M 358970 M 359043 CHINA ZL 2008 2 0189918.5 ZL 2008 2 0189917.0 Patent pending 0908-PCE-228...
Need help?
Do you have a question about the PCE-228 and is the answer not in the manual?
Questions and answers