Table of Contents
Advertisement
Advertisement
Table of Contents

Subscribe to Our Youtube Channel
Related Manuals for Equinox Systems Kaleido XP


Summary of Contents for Equinox Systems Kaleido XP
- Page 1 Kaleido XP User Manual Order code: EQLED086...
-
Page 2: Safety Advice
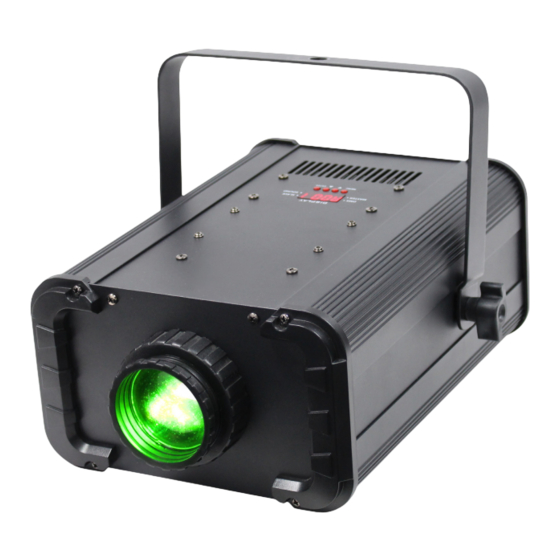
NO USER SERVICEABLE PARTS. pulling the power-cable. • This lighting fixture is for professional use only - it is • Make sure that the available mains supply voltage is not designed for or suitable for household use. The between 100~240V AC, 50/60Hz. product must be installed by a qualified technician in accordance with local territory regulations. The safety of • Make sure that the power cable is never crimped or the installation is the responsibility of the installer. The damaged. Check the equipment and the power cable fixture presents risks of severe injury or death due to fire periodically. hazards, electric shock and falls. • If the equipment is dropped or damaged, disconnect the • Warning! Risk Group 2 LED product according to mains power supply immediately and have a qualified EN 62471. Do not view the light output with optical engineer inspect the equipment before operating again. instruments or any device that may concentrate the beam. • This unit is not intended for fixed installation. • WARRANTY: One year from date of purchase. OPERATING DETERMINATIONS If this equipment is operated in any other way, than those described in this manual, the product may suffer damage and the warranty becomes void. Incorrect operation may lead to danger e.g: short-circuit, burns and electric shocks etc. Do not endanger your own safety and the safety of others! Incorrect installation or use can cause serious damage to people and/or property. www.prolight.co.uk Kaleido XP User Manual... - Page 3 Product overview & technical specifications Kaleido XP The Kaleido XP is a constantly changing decorative effect that projects a varying display of psychedelic patterns. Using a high power 100W LED its bright output and razor sharp images add a unique element to any show, venue or party. • 1 x 100W white LED • 3 facet rotating prism • DMX channels: 4 • Manual, sound active and master/slave modes • 0-100% dimming and variable strobe • 4 push button menu with LED display • IEC input/output • 3-pin XLR input/output • Fan cooled • Supplied with hanging bracket Specifications Power consumption 133W Power supply 100~240V, 50/60Hz Fuse F3A 250V Dimensions 230 x 275 x 340mm Weight 4.2kg Order code EQLED086 275mm 340mm www.prolight.co.uk Kaleido XP User Manual...
-
Page 4: Technical Specifications
G. 0 0 0 Pattern change speed G 2 5 5 S P 1 S P. 1 Rotation speed S P 9 S U 0 0 S U 0 0 Sound active mode/sensitivity S U 9 9 www.prolight.co.uk Kaleido XP User Manual... -
Page 5: Master/Slave Mode
Outside-inside effect (fast-slow) SP. 1 SP. 9 (Rotation speed). 190-193 Effect stop To exit out of any of the above options, press the 195-255 Inside-outside effect (slow-fast) “MENU” button. Sound active mode: SU. 0 0 To access the sound active mode, press the “MENU” button on the top of the unit to show on the LED display. Now press the “ENTER” button and use the “UP” and “DOWN” buttons to select the SU 0 SU99 strobe speed between To exit out of any of the above options, press the “MENU” button. Master/slave mode: To set the master unit, press the “MENU” button on the top of the master unit to select your desired program (sound active or manual). SLaU To set the other units in slave mode, press the “MENU” button on the top of the unit to show on the LED display and press the “ENTER” button to confirm the setting. The units will now run in sequence with the master unit. To exit out of any of the above options, press the “MENU” button. www.prolight.co.uk Kaleido XP User Manual... -
Page 6: Dmx Setup
DATA cable (DMX cable) requirements (for DMX operation): This fixture can be controlled via DMX-512 protocol. The DMX address is set on the back of the unit. Your unit and your DMX controller require a standard 3-pin XLR connector for data input/output, see image below. Further DMX cables can be purchased from all good sound and lighting suppliers or Pro Light Concepts dealers. Please quote: CABL10 – 2m CABL11 – 5m CABL12 – 10m Also remember that DMX cable must be daisy chained and cannot be split. www.prolight.co.uk Kaleido XP User Manual... -
Page 7: Line Termination
5-pin XLR (socket) 3-pin XLR (socket) Pin 1: GND (screen) Pin 1: GND (screen) Pin 2: Signal (-) Pin 2: Signal (-) Pin 3: Signal (+) Pin 3: Signal (+) Pin 4: N/C Pin 5: N/C www.prolight.co.uk Kaleido XP User Manual... -
Page 8: Weee Notice
WEEE notice Correct Disposal of this Product (Waste Electrical & Electronic Equipment) (Applicable in the European Union and other European countries with separate collection systems) This marking shown on the product or its literature, indicates that it should not be disposed of with other household wastes at the end of its working life. To prevent possible harm to the environment or human health from uncontrolled waste disposal, please separate this from other types of wastes and recycle it responsibly to promote the sustainable reuse of material resources. Household users should contact either the retailer where they purchased this product, or their local government office, for details of where and how they can take this item for environmentally safe recycling. Business users should contact their supplier and check the terms and conditions of the purchase contract. This product should not be mixed with other commercial wastes for disposal. www.prolight.co.uk Kaleido XP User Manual...
Need help?
Do you have a question about the Kaleido XP and is the answer not in the manual?
Questions and answers