Table of Contents
Advertisement
Quick Links
Advertisement
Table of Contents

Subscribe to Our Youtube Channel
Related Manuals for Lorex LZV1722B


Summary of Contents for Lorex LZV1722B
- Page 1 Instruction Manual LZV1722 HD PTZ Camera...
- Page 3 Instruction Manual LZV1722 HD PTZ Camera #LX400025; r. 1.0/16122/16128; en-US...
- Page 4 Thank you for purchasing this product. Lorex is committed to providing our customers with a high quality, reliable security solution. This manual refers to the following models: LVZ1722 For the latest online manual, downloads and product updates, and to learn about our complete line of accessory products, please visit our website at: www.lorextechnology.com...
-
Page 5: Table Of Contents
Table of contents Safety Instructions ..............1 LZV1722 Features ...............2 Getting Started ..............3 Connecting the Camera ............4 Installation .................5 Installation Tips and Warnings ........5 Extension Cables ............5 5.2.1 Connection Diagram for Extending the Cables Beyond 100ft (30m) ......... 6 Installation (Indoor/Outdoor).......... -
Page 7: Safety Instructions
Safety Instructions • Read this guide carefully and keep it for future reference. • Follow all instructions for safe use of the product and handle with care. • Use the camera within given temperature, humidity, and voltage levels noted in the Technical Specifications. •... -
Page 8: Lzv1722 Features
• Wall mount & 100ft extension cable included for installation flexibility. Note Compatible with Lorex LHV1000 Series only. This camera features an ultra-low light sensitive image sensor and therefore does not feature Infra-Red LEDs. The camera requires ambient lighting (for example, street/ building lighting, star or moon light) to render a night time image. -
Page 9: Getting Started
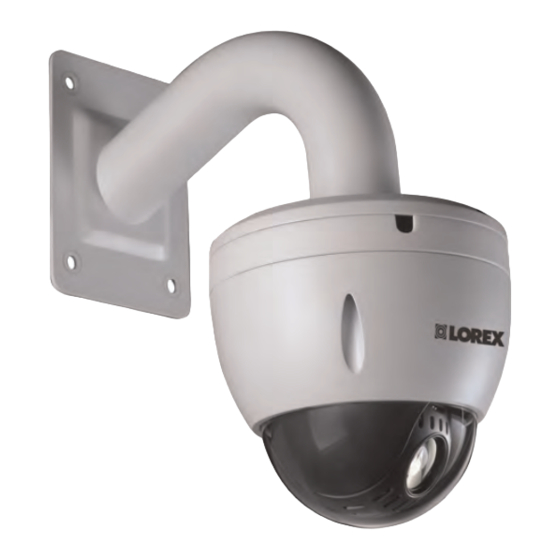
Getting Started The system comes with the following components: Pendant Cap PTZ Camera Wall Mount 100ft BNC / Power 4x Mounting Screws Power Adapter Extension Cable & Anchors Allen Key 4x O-Rings 4x Allen Bolts Mounting Template Instruction Manual #LX400025; r. 1.0/16122/16128; en-US... -
Page 10: Connecting The Camera
Connecting the Camera Note • It is recommended to connect the camera to your DVR and test the PTZ controls be- fore permanent installation. For instructions on how to setup PTZ controls, see 6 Con- trolling the PTZ Camera with your DVR, page 15. •... -
Page 11: Installation
Installation 5.1 Installation Tips and Warnings WARNING Make sure to install the camera in a location that can support the camera weight. If mount- ing the camera on a drywall surface, you must drill at least 2 of the mounting screws through a wooden stud. -
Page 12: Connection Diagram For Extending The Cables Beyond 100Ft (30M)
Installation cable. It is recommended to use a video cable with the following specifica- tion: RG59U 95% Braid 20AWG or better. Note RG59 coaxial cable should be available from your local building supply store. 5.2.1 Connection Diagram for Extending the Cables Beyond 100ft (30m) 1. - Page 13 Installation 5.3 Installation (Indoor/Outdoor) CAUTION Make sure to disconnect the power adapter before installing the camera. Camera will be- gin moving immediately when power adapter is connected. To install the camera on a wall: 1. Mark holes for the mounting screws (x4) and cables through the wall mount bracket.
- Page 14 Installation 3. Pull the cables through the wall mount bracket. Firmly attach the wall mount bracket to the wall using the included mounting screws (x4) and the included anchors (x4) if needed. WARNING Make sure to install the wall mount bracket in a location that can support the camera’s weight.
- Page 15 Installation 4. Remove plastic film from the screw holes on the bottom of the camera. 5. Use the included Allen key to loosen the dome cover screws (x3). Remove the dome cover. 6. Remove the foam ring* around the camera module. #LX400025;...
- Page 16 Installation 7. Pull the camera cables through the hole in the pendant cap. Use the in- cluded Allen bolts (x4) to attach the PTZ camera base firmly to the pend- ant cap. Tighten using the included Allen key. 8. Re-attach the dome cover, ensuring that the rubber O-ring around the camera base is in place and the alignment arrow* on the dome cover lines up with the camera base.
- Page 17 Installation 10. Loosen the security screw* on the wall mount bracket. 11. Connect the camera cables to the cable from the DVR. See 4 Connecting the Camera, page 4 for full connection instructions. 12. Twist the pendant cap onto the wall mount bracket. Tighten the security screw* on the wall mount bracket.
- Page 18 Installation To install the camera on a ceiling: 1. Remove plastic film from the screw holes on the bottom of the camera. 2. Use the included mounting template to mark holes for the mounting screws and cables if needed. Drill where marked. Note If you run the cables along the mounting surface, you must run the cable through the cable notch on the base of the camera.
- Page 19 Installation 4. Remove the foam ring* around the camera module. 5. Push one of the included O-rings (x4) onto each of the included mounting screws (x4). Attach the PTZ camera firmly to the ceiling using the included mounting screws until the O-rings are flush against the camera base. Use the included anchors if needed.
- Page 20 Installation 6. Re-attach the dome cover, ensuring that the rubber O-ring around the camera base is in place and the alignment arrow* on the dome cover lines up with the camera base. 7. Tighten the dome cover screws (x3) using the included Allen key. 8.
-
Page 21: Controlling The Ptz Camera With Your Dvr
Controlling the PTZ Camera with your DVR You can connect the PTZ camera to a DVR to control the camera’s movement. The camera can accept PTZ commands directly through the video cable, so there is no need to run special wiring (for example, RS-485). Note For the latest list of compatible DVRs, please visit www.lorextechnology.com/support. -
Page 22: Advanced Ptz Controls
Controlling the PTZ Camera with your DVR 3. Use the on-screen PTZ controls to control the camera. PTZ Controls Direction keys: Click to pan and tilt the camera. Click SIT to stop the current action. Mouse PTZ: Click to activate mouse PTZ mode. In mouse PTZ mode: •... -
Page 23: Presets
Controlling the PTZ Camera with your DVR Advanced PTZ controls overview: 1. No.: Select the number of the action you want to perform. 2. Not supported. 3. PTZ camera menu: Click to open the camera’s OSD menu. This menu is for advanced users only. -
Page 24: Tours
Controlling the PTZ Camera with your DVR 2. Click the Preset tab. 3. Enter the number of the preset you want to create under Preset. 4. Move the camera to the desired position and click Set. To go to a preset: •... -
Page 25: Pattern
Controlling the PTZ Camera with your DVR 6. Repeat steps 4 and 5 to add additional presets to the tour. Note Click Del Tour to clear all presets from a tour. To run a tour: • Under No., select the number of the tour you would like to go to and click 6.2.3 Pattern Patterns automatically cycle the camera between two positions. - Page 26 Controlling the PTZ Camera with your DVR 1. Click to open the aux menu. 2. Click the Border tab. 3. Move the camera into the desired left position and click Left. 4. Move the camera into the desired right position and click Right. To run an auto scan: •...
-
Page 27: Technical Specifications
Operating Humidity Range Within 90%RH Indoor/Outdoor Both (IP66) Weight (Camera & Wall Mount) 2.9lbs / 1.3kg 1. Compatible with Lorex HD DVR LHV1000 Series only. 2. Not intended for submersion in water. Installation in a sheltered location recommended. #LX400025; r. 1.0/16122/16128; en-US... -
Page 28: Dimensions
Technical Specifications 7.1 Dimensions 11.3“ / 287mm 6 .7 “ / 1 7 0 mm 12.8“ / 325mm 6 .1 “ / 155mm #LX400025; r. 1.0/16122/16128; en-US... -
Page 29: Troubleshooting
Troubleshooting There is no picture at night. • Camera is capable of seeing in extremely low light conditions (0.1 Lux), but it cannot see in total darkness. It is recommended to install the camera where there is some ambient light (for example: street lighting, starlight, moonlight, etc.) or leave a light on in the area where the camera is installed. - Page 30 Troubleshooting looking for changes between frames (images) in the video. If the camera is moving, the DVR will detect this as motion. #LX400025; r. 1.0/16122/16128; en-US...
- Page 32 Legal disclaimer As our product is subject to continuous improvement, Lorex Corporation & subsidiaries reserve the right to modify product design, specifications & prices without notice and without incurring any obligation.E&OE.
Need help?
Do you have a question about the LZV1722B and is the answer not in the manual?
Questions and answers