Table of Contents
Advertisement
Quick Links
http://au.lge.com (Australia)
http://nz.lge.com (New Zealand)
Freestanding Cooker
Installation and Operating Instructions
To avoid the risk of accidents or damage to the Cooker,
it is essential to read these operating instructions
before it is installed or used for the first time.
And please keep this manual for later reference.
LF67105SS
P/No.: MFL62060305
Advertisement
Table of Contents

Related Manuals for LG LF67105SS


Summary of Contents for LG LF67105SS
- Page 1 (Australia) http://nz.lge.com (New Zealand) Freestanding Cooker Installation and Operating Instructions LF67105SS To avoid the risk of accidents or damage to the Cooker, it is essential to read these operating instructions before it is installed or used for the first time.
-
Page 2: Table Of Contents
Contents Introduction ................. 3 1. Instructions for safe and proper use ........3 Instructions for the installer ............5 2. Installation of the appliance ............ 5 Instructions for the user ............8 3. Description of controls ............8 4. Use of the cooking hob ............10 5. -
Page 3: Introduction
Introduction 1. Instructions for safe and proper use This manual is an integral part of the appliance and therefore must be kept in its entirety and in an accessible place for the whole working life of the cooker. We advise reading this manual and all the instructions therein before using the cooker. - Page 4 Introduction Never put inflammable objects in the oven: They could accidentally catch fire and burn or cause an explosion. The I.D. Rating. plate with technical data, serial number and brand name is positioned visibly in the storage compartment. The plate must not be removed. Do not put pans without perfectly smooth and flat bottoms on the hob.
-
Page 5: Instructions For The Installer
Instructions for the installer 2. Installation of the appliance It is the law that all appliances are installed by qualified technicians. This appliance may be installed next to a wall which is higher than the appliance, with a minimum distance of 50 mm from the side of the appliance, as shown in the diagram showing the correct installation conditions. - Page 6 Instructions for the installer The connection terminals are located at the rear of the appliance. For electrical connections see following diagram. To access, remove the rear cover. For operation on 380-415V3N~: use an H05RR-F / H05RN-F / H05V2V2-F type five-core cable (5 x 1.5 mm For operation on 380-415V2N~: use an H05RR-F / H05RN-F / H05V2V2-F type five-core...
- Page 7 2.2 Instruction for Wall fixing 1. Fasten the two wall brackets to the wall taking care to comply withe the centre distances and measurements indicated in the images below. The dimensions are given in mm. Cooker dimensions(cm) 220.5 2. Attach the chain to the cooker. 3.
-
Page 8: Instructions For The User
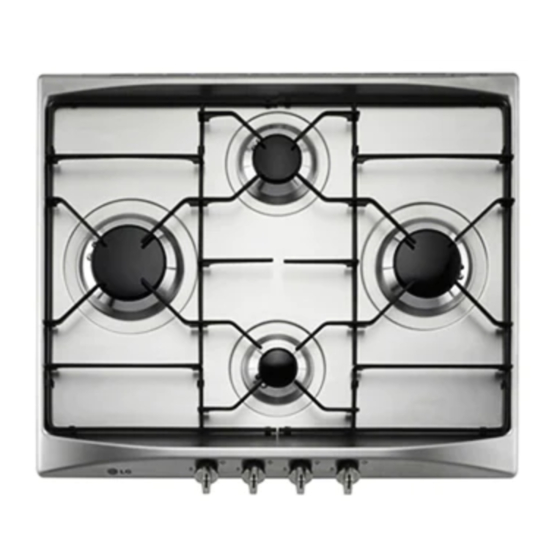
Instructions for the user 3. Description of controls All the cooker controls and commands are on the front panel. FRONT RIGHT-HAND OVEN THERMOSTAT COOKING ZONE REAR RIGHT-HAND OVEN FUNCTIONS COOKING ZONE REAR LEFT-HAND VARIABLE GRILL COOKING ZONE FRONT LEFT-HAND COOKING ZONE Before using the oven check that the electronic programmer is showing the symbol ;... - Page 9 inner cooking zone only, set the knob back to and then turn to the desired position. To switch off, return knob to . Note: It is a normal function of the radiant burners to turn on and off to achieve and sustain a desired heating level. Electric oven thermostat knob Selection of cooking temperature is carried out by turning the knob clockwise to the required...
-
Page 10: Use Of The Cooking Hob
Instructions for the user Thermostat indicator light (orange) When this light comes on, the oven is heating up. When this light goes out, the preset heating temperature has been reached. When the light turns on and off in close occurances, it means, the temperature inside the oven is steady at the set temperature. - Page 11 When using for the first time, it is advisable to heat up the cooking hob to its maximum temperature for enough time so as to burn off any possible oily manufacturing residues, the smell of which could otherwise be absorbed by the food. For best results and energy saving, only use receptacles suitable for electric cooking: •...
-
Page 12: Use Of The Oven
Instructions for the user 5. Use of the oven For those models with electronic programmer, before using the oven make sure that the display shows the symbol 5.1 Warnings and general advice Before using the oven for the first time, pre-heat it to maximum temperature (250°C) long enough to burn any manufacturing oily residues which could give the food a bad taste. - Page 13 5.2 Use of the electric grill For short cooking times, for example for browning already-cooked meat, select the static grill function ; set the thermostat knob to maximum temperature (260°C) and adjust grill intensity by means of the variable grill knob without exceeding stroke as shown in the figure.
-
Page 14: Electronic Programmer (Only On Equipped Models)
Instructions for the user 5.3 Storage compartment A storage compartment, accessible by pulling on the top edge of the door, is located beneath the oven. Never store flammable materials such as rags, paper or the like. The compartment is intended only for holding the metal accessories of the range. - Page 15 Before setting the programmer activate the desired function and temperature. 6.2 Semiautomatic cooking Use this setting for automatic oven switch-off at the end of cooking time. By pressing key , the display lights up, showing keep the key pressed and at the same time, press keys set the cooking time.
- Page 16 Instructions for the user 6.4 End of cooking When cooking is over, the oven will automatically switch off and, at the same time, an intermittent alarm will sound. After switching off the alarm, the display will once again show the right time together with the symbol , indicating that the oven has returned to manual operation mode.
-
Page 17: Cleaning And Maintenance
6.8 Cancellation of set data Once the programme has been set, keep the key of the function to be cancelled pressed, while at the same time is reached by means of variation keys . Time cancellation will be considered as end-of-cooking time by the programmer. 6.9 Changing the set data The cooking data entered can be changed at any time by keeping the function key pressed and at the same time adjusting the keys... - Page 18 Insructions for the user The cooking hob should be regularly cleaned; best after every use, once the residual heat signal lamps have gone off. Smudges from aluminium-bottom pans can be easily cleaned off with a cloth dampened in white vinegar. Remove any burnt residues after cooking with the scraper provided;...
-
Page 19: Extraordinary Maintenance
8. Extraordinary maintenance The oven may require extraordinary maintenance or replacement of parts subject to wear such as seals, bulbs, and so on. The following instructions describe how to carry out these minor maintenance operations. Before any intervention, disconnect the power supply of the device from the isolation switch or th circuit breaker. - Page 20 Insructions for the user 8.4 Oven door seal To permit thorough cleaning of the oven, the seal may be removed. Before removing the seal, take off the door as described above. Once the door has been taken off, lift the tabs at the corners as shown in the figure.
- Page 21 FOR WARRANTY SERVICE PLEASE CONTACT LG Service on 1300 LG CARE (1300 54 2273) AUSTRALIA or 0800 LG CARE (0800 54 2273) NEW ZEALAND LG Electronics Australia 2 Wonderland Drive Eastern Creek NSW 2766 (ABN : 98 064 531 264)
Need help?
Do you have a question about the LF67105SS and is the answer not in the manual?
Questions and answers