Table of Contents
Advertisement
Quick Links
Advertisement
Table of Contents

Related Manuals for Dukane 220E


Summary of Contents for Dukane 220E
-
Page 1: Document Camera
Camera 220E Document Camera User’s Guide #401-220E-01... -
Page 3: Table Of Contents
Table of Contents TABLE OF CONTENTS ... 1 COPYRIGHT INFORMATION ... 2 CHAPTER 1 PRECAUTIONS ... 3 CHAPTER 2 PACKAGE CONTENT ...4 CHAPTER 3 PRODUCT OVERVIEW ...5 PRODUCT INTRODUCTION...5 I/O CONNECTION ...6 DIP SWITCH ...6 3.4 & 3.5 INFRARED REMOTE CONTROL ...7 CHAPTER 4 HOW TO USE IT ...9 GETTING STARTED ...9 4.1.1 TURN ON THE DIGITAL PRESENTER...9... -
Page 4: Copyright Information
Chapter 1 Precautions Always follow these safety instructions when setting up and using the Digital Presenter: 1. Do not place the Digital Presenter on an unstable trolley, stand or table. 2. Do not use the Digital Presenter near water or source of heat. 3. - Page 5 Safety Precautions Warning: To reduce the risk of fire or electric shock, do not expose this appliance to rain or moisture. This Digital Presenter has a 2 wires AC line Plug. This is a safety feature to ensure that the plug will fit into the power outlet.
-
Page 6: Chapter 2 Package Content
Chapter 2 Package Content Please make sure the package comes with the following items when you unpack: User’s Manual Camera 220C Power Cable USB Cable C-Video Cable VGA Cable Remote Controller DVI Adapter... -
Page 7: Chapter 3 Product Overview
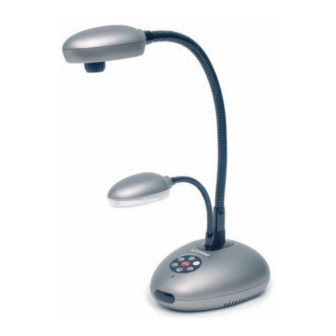
Chapter 3 Product Overview Product Introduction Lens Power / Control Button I/O Port Lamp DIP Switch... -
Page 8: I/O Connection
I/O Connection 3.3 DIP Switch Auto C-Video Exposure AE ON Video ON AE OFF Video OFF (Default Setting) Video Signal Output Output NTSC IR Control Input IR Control Input Diagram Resolution SVGA 3.5 mm Mini... -
Page 9: Infrared Remote Control
3.4 Infrared Remote Control 1. Power: Turn on/ off. 2. Capture: Capture the image. 3. Freeze: Freeze the image. 4. Arrows: You may press the 4 hot keys of Up/Down/Right/Left to go to the desired function item then press the Enter key to take effect. - Page 10 3.5 IR Remote Control via 3.5 mm Mini Connector The IR commands from a protocol converter can be sent directly to an IR emitter located behind the dark window on the front of the camera. This permits the camera to be controlled as part of a system without the neces- sity of attaching external IR emitters.
-
Page 11: Chapter 4 How To Use It
Turn the lens to optimize the focus 4.1.3 Zoom in / Out Press the control button 4.1.4 Switch source Press That signal is sent to the projector. button. button of remote controller. to Choose signal source between Camera 220E or PC. -
Page 12: Photo/Text
4.1.5 Photo/Text: Press to Select the text or photo mode. 4.1.6 Enter AWB (Auto White Balance) press to set the auto white balance. 4.1.7 Capture Image & Review of captured images How to capture an image Method 1:Press would like to save. Method 2:Follow the steps using the pad buttons on the Camera. - Page 13 1.1 First, press 1.2 Second, press ^ v to select the "storage" 1.3 You can press Then press Method 2: Using the Remote Control: Method 2: Using the Remote Control: 2.1 First please press the see all thumbnail images that you had captured. Then, press which you want to enlarge and press become full screen.
-
Page 14: Showing The Osd Menu
3.2 Press ^ v to select the "Storage" press Then select “Playback”, and press see all captured thumbnail images on the screen. 3.3 Then, press which you want to magnify and press will show full screen. Showing the OSD (On Screen Display) Menu Option 1: Press Option 2: Press Select function:... -
Page 15: Osd Menu Introduction
OSD Menu Introduction The Main Menu containing five icons and detail functions will be explained in The Main Menu contains five icons, The functions are shown in the following table. next page. Setting Display Source Storage Exit VGA Mode (Computer Image) Layer 1 Layer 2 Lamp... - Page 16 Brightness Zoom Display Gamma Image Flip Freeze Exit Presenter VGA In Source Capture Playback Delete Storage Delete All Format Exit 0-46 (for PAL) 0-40 ( for NTSC) Digital Zoom (100% to 1600%) Photo / Text Normal / Gray / Film On/Off On/Off Delete All...
- Page 17 VIDEO Mode (For NTSC, lower resolution) Layer 1 Layer 2 Brightness Display Gamma Image Freeze Exit Lamp Advance Language Setting Factory Reset Exit Camera as Switch The DVI Adapter connects the DVI output to an input for a computer (VGA). When this input is used, the “SOURCE”...
-
Page 18: Chapter 5 Usb Software Instructions
Chapter 5 Using the Camera USB with a Computer Installation 1. Insert the software CD in your computer’s CD-ROM. Connect the Camera and PC with USB Cable . Follow instructions for driver download. Before you install MR2004, please be sure your system meets these requirements. •... - Page 19 3. The installation wizard is shown, please press Next to go next. 4. While the License Agreement picture is shown, select 『I accept the terms in the license agreement 』and press Next to go next.
- Page 20 5. Click Next to install from the default folder or click Change to specify a difference. 6. Please press Install to begin installation. 7. The installation is processing, if you would like to cancel, please press Cancel to stop installation.
- Page 21 8. Please press Finish to complete the installation.
- Page 22 9. After installation, the MR2004 is launched automatically or you may This chapter will introduce all functions of MR2004, the user interface of MR2004 as below. The basic window with the functional areas indicated follows: Tool bar Work and display area Preview area go to the PC “Start”, and look at “All Programs”...
- Page 23 The Tool Bar Functions are described. 1. File New:Open new project(file format-- *.mr2) Open:Open old project in stored file Save:Save present edited project Save As:Save to be a new project or given file Save Image:Save reedited JPG image Import From Device:Import an image from memory device Export to PPT:...
-
Page 24: Edit Mode
3. Edit mode Functions in this mode are File, Paint tool and Full screen. The Freeze and capture are not available in edit mode. The lower Preview window tool bar appears for the Edit mode. 4. Freeze The image can be frozen in real time mode. (*This function is only available in real time mode) 5. - Page 25 In the "Edit Mode" the lower Preview Area images can be selected using the "Page Up" or The picture can be change on the screen with “Page up“or”Page Down” button. "Page Down" button. 8.Import from device ( This function does not operate with the Camera. Please ignor. One image can be captured in the MR2004 via CPT-I connection device of MH400 that is more efficiency then “capture”...
- Page 26 Choose Language: FILE Language , there are 3 language for selection:English & Traditional-Chinese and Simplify-Chinese, please choose 「English」. Display image: 2.1 Real Time Operation:Import a line image from Camera. 2.2 Import From Device,:Import images from Camera. May not always be operative. 2.3 Edit model open old file,:Use preview tool(...
- Page 27 Edit image: 3.1 Marking:Click any tool in the paint tool menu to modiy the image. <Please refer to Chapter 3>...
- Page 28 3.2 Edited and save:After editing pictures, click the small picture icon in the preview area, and then save the picture. Click the small picture Save: After 4.1 Save MR2004 file:Save as “*.m2” file format to C:\Program Files\MR2004 4.2 Export to PPT format:After editing and arranging images, the function can export to power point file.
-
Page 29: Chapter 5 Troubleshooting
Problem 3: Image is too bright or dark. Can not see desired part of the image because it is too bright or dark. Solution – Adjust the BRT + /- Control Button on the remote control. * The updated information will be regularly released on the Dukane web site, please visit our web site http://www.dukcorp.com/av. - Page 30 2900 Dukane Drive Toll-free: 800-676-2487 St. Charles, Illinois 60174 Fax: 630-584-5156 www.dukcorp.com/av e-mail: avsales@dukcorp.com Audio Visual Products #401-220E-01...
Need help?
Do you have a question about the 220E and is the answer not in the manual?
Questions and answers