Table of Contents
Advertisement
Quick Links
Doc 430-DVP507-00
[Important]
Information in this Guide may change due to product improvements. To
obtain the latest manuals, literature, and software please visit the Dukane
web site at
SUPPORT or
DUKANE AV DIVISION
DVP507
Visual Presenter
User Manual
www.dukane.com/av
DOWNLOADS section.
and look at the specific model
5-20-10
0
Advertisement
Table of Contents

Subscribe to Our Youtube Channel
Related Manuals for Dukane DVP507


Summary of Contents for Dukane DVP507
-
Page 1: User Manual
User Manual Doc 430-DVP507-00 5-20-10 [Important] Information in this Guide may change due to product improvements. To obtain the latest manuals, literature, and software please visit the Dukane web site at www.dukane.com/av and look at the specific model SUPPORT or DOWNLOADS section. -
Page 2: Table Of Contents
I would like to automatically adjust the image to have best brightness and focusing performance ............................24 I would like to capture images ....................25 8.10 I would like to view captured images ..................25 8.11 I would like to delete captured images ..................26 DUKANE AV DIVISION... - Page 3 8.21 I would like to adjust the volume ....................32 8.22 I would like to control projector ....................32 8.23 Computer-related functions ....................... 32 Chapter 9 Connecting to Microscope ....................38 Chapter 10 Packing the Machine ......................40 Chapter 11 Troubleshooting ........................41 DUKANE AV DIVISION...
-
Page 4: Copyright Information
Dukane Corporation unless copying this file is for the purpose of backup after purchasing this product. In order to keep improving the product, Dukane Corp. hereby reserves the right to make changes to product specifications without prior notice. The information in this file is subject to change without prior notice. -
Page 5: Chapter 1 Precautions
If liquid is spilled into it or the visual presenter has been exposed to rain or water. <Note>: Using an incorrect battery type in the remote control may result in breakdown. Follow your country’s instructions on how to dispose of used batteries. DUKANE AV DIVISION... - Page 6 This is a Class A product. In a domestic environment it may cause radio interference, in which case the user may be required to take adequate measures. The typical use is in a conference room, meeting room or auditorium. DUKANE AV DIVISION...
-
Page 7: Chapter 2 Package Content
Chapter 2 Package Content DVP507 Guide Extender Adapter Warranty Card Remote Control C-Video Cable VGA Cable USB Cable Audio cable Power Cord Microscope Adapter Backlight (Optional) DUKANE AV DIVISION... -
Page 8: Chapter 3 Product Overview
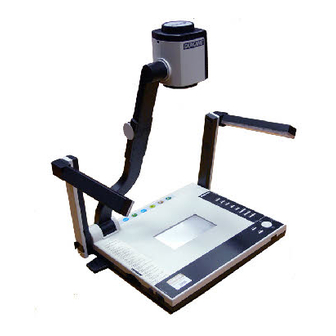
Chapter 3 Product Overview Lens Camera arm Auxiliary floodlight and Backlight lamp arm Remote control slot DIP Switch Settings SD card slot Lampstand latch Control Panel & Mic 10. Function keys instructions 11. Remote sensor 12. Input/output port DUKANE AV DIVISION... -
Page 9: Chapter 4 Installation And Connections
Chapter 4 Installation and Connections 4.1 System Diagram Speaker (Or connect to an additional Monitor amplifier before connecting to the speaker) Projector or monitor Television LCD TV DUKANE AV DIVISION... -
Page 10: Connecting To A Projector Or Monitor
Connecting to a Projector or Monitor VGA Cable Power Cord Projector or monitor Power Outlet 4.3 Connecting to a Computer with Dukane software USB Cable Power Cord Projector VGA Cable Power Outlet Computer DUKANE AV DIVISION... -
Page 11: Connecting To An Interactive Whiteboard (Iwb)
Power Cord VGA Cable USB Cable Power Outlet Computer Drivers and software can be downloaded from the Dukane website. 4.5 Connecting to a Projector, 2 PCs, and a Monitor at the Same Time Power Cord VGA Cable VGA Cable... -
Page 12: Connecting To A Tv
You must re-start for DIP switching configuration to take effective. <Note>: It doesn’t support both C-Video and VGA simultaneously. Once C-Video is on, VGA OUT is not supported. 4.7 Connecting to an HDTV HDMI Cable Power Cord HDTV Power Outlet DUKANE AV DIVISION... -
Page 13: Connecting To A Computer With Rs232
Power Cord Power Outlet Computer 4.9 Connecting to Audio Input and Output Power Cord Audio Cable Audio Cable Power Outlet Speaker Computer (1) Computer (2) <Remark>: Or connect to an additional amplifier before connecting to the speaker. DUKANE AV DIVISION... -
Page 14: Installing Application Software
Control the DVP507. Capture and record images. Annotate the image, highlight important details and save it. Support the full screen function. <Note>: Please refer to B-Works software user manual for installation steps and software operation. DUKANE AV DIVISION... -
Page 15: Chapter 5 Start Using
When using the remote control, aim at the receptor on the DVP507, and press the power button. Once DVP507 is turned on, the LED on the control panel will flash a few times and stay lit. Please contact your distributor if the LED is not on. DUKANE AV DIVISION... -
Page 16: Chapter 6 Dip Switch Settings
<Note>: You must re-start DVP507 for DIP switching configuration to take effective. 6.1 Connecting to a projector or monitor 6.1.1 SXGA 60Hz output (default values): 6.1.2 XGA 60Hz output 6.1.3 Special mode 6.1.4 HDTV 720P 60Hz output DUKANE AV DIVISION... -
Page 17: Connecting To A Tv
6.2 Connecting to a TV 6.2.1 NTSC: America, Taiwan, Panama, Philippines, Canada, Chile, Japan, and Mexico. 6.2.2 PAL: Countries/regions not listed above. <Remark> It doesn’t support C-VIDEO and VGA simultaneously. Once C-VIDEO is on, VGA output is not possible. DUKANE AV DIVISION... -
Page 18: Chapter 7 Control Panel/Remote Control And Setting Menu
Freeze the current image to temporarily stay on Remote control / Control panel the screen. Press again to defreeze. LAMP Control panel Turn on / off the lamp. MENU Activate the setting menu function/exit menu. Remote control / Control panel DUKANE AV DIVISION... - Page 19 2. SD card (priority) or internal memory. 3. PC. Remote control / Switch image sources from PC 1 or PC 2. Control panel VOL +/- Adjust volume. Remote control ZOOM +/- Remote control / Increase or decrease the image size. Control panel DUKANE AV DIVISION...
-
Page 20: Setting Menu
Select manual mode to switch 4. 10 Sec images manually. 5. Manual 1. High Use the left and right arrow keys 2. Medium to select the image quality for the Image Quality 3. Low captured images and recorded videos. DUKANE AV DIVISION... - Page 21 Press [Enter] to activate. Use the left and right arrow keys Projector Type DLP/LCD to turn on/off the noise reduction function. Use the left and right arrow keys Volume 0~Max to adjust the volume. DUKANE AV DIVISION...
- Page 22 Read the value of the current image mode. Use the left and Preset Load Yes/No right arrow keys to select, and then press [ENTER] to confirm. DUKANE AV DIVISION...
- Page 23 Use the left and Preset Save Yes/No right arrow keys to select, and then press [ENTER] to confirm. Use the left and right arrow keys to select, and then immediately Factory Reset Yes/No press [ENTER]to activate the factory reset. DUKANE AV DIVISION...
-
Page 24: Chapter 8 Descriptions Of Major Functions
2. Press [] or [] to select [Display]. 3. Press [] to select [Photo/Text]. 4. Press [] or [] to select [Photo/Text/Grey] (Refer to the previous section to make the most appropriate selection). 5. Press [MENU] to exit. DUKANE AV DIVISION... -
Page 25: I Would Like To Zoom In /Out Of Images
1. Press [MENU] on the remote control or control panel to enter the setting menu. 2. Press [] or [] to the [Display] menu. 3. Press [] to [Auto Adjust]. 4. Press [ENTER] to activate. 5. Press [MENU] to exit. DUKANE AV DIVISION... -
Page 26: I Would Like To Capture Images
2. Press [] or [] or [] or [] to select the thumbnail you want your view. 3. Press [ENTER] for the full-screen display of the image. 4. Press [] or [] to turn to the previous/next image. 5. Press [SOURCE] to exit. DUKANE AV DIVISION... -
Page 27: I Would Like To Delete Captured Images
1. Insert a SD card and press [RECORD] on the remote control or the control panel to start recording images. 2. Press [RECORD] again to stop recording. <Note> Record sounds with the built-in microphone on the control panel. DUKANE AV DIVISION... -
Page 28: I Would Like To Switch A Part Of The Live Image (Pan)
2. Press [] or [] to the [Storage] menu. 3. Press [] to find [Delay]. 4. Press [] or [] to select image switch mode between [1 Sec / 3 Sec / 5 Sec / 10 Sec / Manual]. 5. Press [MENU] to exit. DUKANE AV DIVISION... -
Page 29: I Would Like To Compare Images (Compare Live Images With Captured Images) (Pbp, Picture By Picture)
2. Press [] or [] to the [Display] menu. 3. Press [] to the [PBP]. 4. Press [ENTER] to enter the PBP (Picture by Picture) photo selection screen. 5. Press [] or [] or [] or [] to select the files to be compared. DUKANE AV DIVISION... -
Page 30: I Would Like To Resume The Factory Default Setting (Factory Reset)
1. Press [MENU] on the remote control or control panel to enter the setting menu. 2. Press [] or [] to the [Setting] menu. 3. Press [] to find [Projector Type]. 4. Press [] or [] to select [ON]. DUKANE AV DIVISION... -
Page 31: I Would Like To Set / Change The Password (Lock Down)
1. Press [MENU] on the control panel to enter the setting menu. 2. Press [] or [] to the [Advanced] menu. 3. Press [] to [Lock Down]. 4. Press [] or [] to select [Off] and deactivate the password setting function. DUKANE AV DIVISION... -
Page 32: Using A Sd Card
8.20.2.2 The screen will display as follow, once you insert an unformatted SD card: Format SD Card Press [] or [] on the control panel to select. <Note> The data previously saved on the SD card will be erased when it is formatting. DUKANE AV DIVISION... -
Page 33: I Would Like To Adjust The Volume
Ensure that the USB cable is connected and the drivers are installed before using the computer-related functions. Refer to Connecting to a Computer and Use Dukane Software 8.23.1 I would like to insert a photo in MS-Paint 1. Click [File/From Scanner or Camera] in MS-Paint shown as the bottom left figure. - Page 34 8.23.2 I would like to insert a photo in MS-Word 1. Click [Insert / Image / From Scanner or Camera] in MS-Word. 2. Select [Visual Presenter V2] and click [Custom Insert]. 3. Click [Get Picture]. It will capture the photo of live image. DUKANE AV DIVISION...
- Page 35 3. A window showing a live image (see below) will be displayed: 4. Press [Setting] To control the DVP507 via the Camera Settings interface. The operating procedure is the same with the remote control and control panel of the DVP507. Refer to pgs 17 and 18. DUKANE AV DIVISION...
- Page 36 2. Select [Video Settings] > [webcam] > [Visual Presenter V2] and check Start my video automatically when I am in a call, as shown below. Start calling your contact. When both sides are connected, Skype will display the video screen. DUKANE AV DIVISION...
- Page 37 6. A [Removable Disc] will be displayed. <Note> The Removable Disc will select SD card if a SD card has been inserted, but if a SD card has not been inserted, the Removable Disc is internal memory DUKANE AV DIVISION...
- Page 38 4. Press [] or [] to select [Camera]. 5. Press [MENU] to exit. 8.23.7 I would like to connect Interactive Whiteboard To connect an Interactive Whiteboard, please go to the SD card or Dukane website to download user manual for a specific product. DUKANE AV DIVISION...
-
Page 39: Chapter 9 Connecting To Microscope
If the eyepiece is Ø28mm or Ø31mm, If the eyepiece is Ø33mm or you need two microscope adapters. Ø34mm, only one Dukane (1. The Dukane microscope adapter. microscope adapter is needed. 2. The microscope adapter suitable for the eyepiece size Ø28mm or Ø31mm). - Page 40 1. Press [MENU] on the remote control or control panel to enter the setting menu. 2. Press [] or [] to the [Display]. 3. Press [] to select [Mode]. 4. Press [] or [] to the [Normal]. DUKANE AV DIVISION...
-
Page 41: Chapter 10 Packing The Machine
Pull down the lamp arm back to the latches. Bend the lamp arm inwards and adjust the lens to be parallel to the platform Finally, fold the machine as in the following figure. DUKANE AV DIVISION... -
Page 42: Chapter 11 Troubleshooting
Visual Presenter V2, B-Works and other applications V2, B-Works or cannot be executed simultaneously. Only one application other application can be executed at a time. Please close the currently cannot be running applications and then execute the application to be executed used. simultaneously DUKANE AV DIVISION... - Page 43 DUKANE CORP AV SERVICE DEPT 2900 Dukane Drive, St Charles, IL 60174 800-676-2487 630-762-4032 www.dukane.com/av DUKANE AV DIVISION...
- Page 44 DUKANE AV DIVISION...
Need help?
Do you have a question about the DVP507 and is the answer not in the manual?
Questions and answers