
Related Manuals for boytone TR-18CD


Summary of Contents for boytone TR-18CD
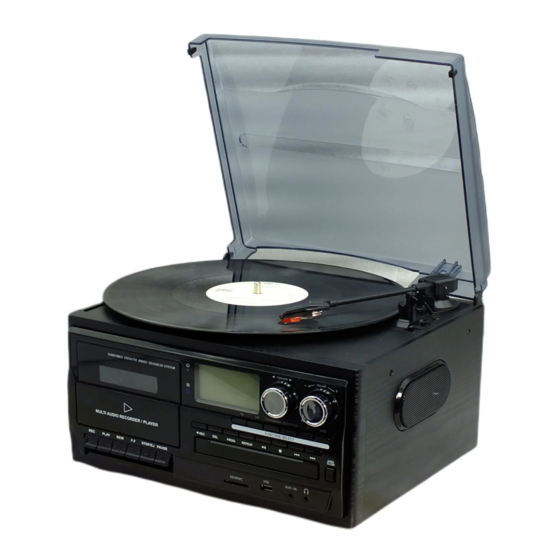
- Page 1 CLASSICAL TURNTABLE WITH AM/FM RADIO CD, BT,CASSETTE RECORDER & USB/SD SLOT MODEL: TR-18CD Operating Instruction Manual...
-
Page 2: Important Safety Instructions
TO PREVENT FIRE OR SHOCK HAZARD, DO NOT USE THIS PLUG WITH AN EXTENSION CORD, RECEPTACLE OR OTHER OUTLET UNLESS THE BLADES CAN BE FULLY INSERTED TO PREVENT BLADE EXPOSURE. TO PREVENT FIRE SHOCK HAZARD, DO EXPOSE THIS APPLIANCE TO RAIN OR MOISTURE. -
Page 3: Unpacking And Setup
Do not overload the wall power outlet. Use only power source as indicated - i.e. 230V AC mains. Avoid installing this unit in places exposed to direct sunlight or close to heat radiating appliances such as electric heaters, on top of other stereo equipment that radiates too much heat, places lacking ventilation or dusty areas, places subject to constant vibration and/or humid or moist areas. -
Page 4: Location Of Controls And Indicators
and such damage is not covered by your warranty. PROTECT YOUR FURNITURE This model is equipped with non-skid rubber 'feet' to prevent the product from moving when you operate the controls. These 'feet' are made from non-migrating rubber material specially formulated to avoid leaving any marks or stains on your furniture. However certain types of oil based furniture polishes, wood preservatives, or cleaning sprays may cause the rubber 'feet' to soften, and leave marks or a rubber residue on the furniture. -
Page 5: Back Panel
15) Auxiliary input 17) SD/MMC card slot 16) USB socket PHONOGRAPH 30) 45 rpm adaptor 33) Tone arm lock 31) Lift lever 34) Speed selector (33/45/78 rpm) 32) Auto stop control 35) Tone arm BACK PANEL 18) RCA Line out jack 19) FM wire antenna 20) AC power cord REMOTE CONTROL... -
Page 6: Listening To Radio
NOTE: All the buttons on the remote control just use for CD/USB/SD function. OPERATING INSTRUCTIONS Listening to radio Turn the volume knob in a clockwise direction to turn the equipment on. Use the function selector to select TUNER mode. Use the radio band selector to select the desired band (AM, FM or FM-Stereo). Turn and hold the tuning knob for a few seconds to tune into a radio station. -
Page 7: Phono Encoding
reached the end of the record. If the switch is set to OFF, the turntable will continue turning at the end of the record. 5. Place the record on the turntable (use the 45 rpm adaptor, if required). 6. Move the lift lever towards the back to raise the tone arm from the arm park, then slowly move the arm to the record, as illustrated on the right. -
Page 8: Cassette Operation
3. Press the record REC button. It will take about 3 - 4 seconds to read the memory device, then the USB or SD icon will be flashing on the LC display. 4. Press the skip up or skip down button to select the desired mode (USB or SD) for encoding, then press the record REC button again to confirm. - Page 9 a) Function Choose to “TAPE” mode---Push “EJECT” key under tape----Open cassette tape door-----put your tape into cassette dock----Manual close the tape door –Press “PLAYER” Key ------ To adjust the volume level for your preference, turn the volume knob to the right or left b) Press “PAUSE”...
- Page 10 Cassette encoding 1. Set the function button to TAPE/AUX mode and then insert a memory device (USB drive, SD or MMC card). 2. Press the record REC button, it will take 3 - 4 second to read the memory device, then the USB or SD icon will be flashing on the LC display.
- Page 11 3. Press the skip up or skip down button to select the desired mode (USB or SD) for encoding, then press the record REC button again to confirm. (You can skip this step if only a USB drive or an SD/MMC card is inserted.) 4.
-
Page 12: Playback Controls
display the total number of folders and MP3/WMA files. 4. The system will then start audio playback from the media storage device (USB or SD card) automatically. Playback controls PLAY/PAUSE Press this button once to stop playing, press it again to continue. STOP Press this button to stop audio playback, the display will then show the total number of MP3/WMA files. - Page 13 2. Press the program PROG button, MEM will be flashing on the LC display, and it will indicate the program number and digits for the track number to be programmed. 3. Press the SKIP UP or SKIP DOWN button to select a desired track. 4.
- Page 14 5. When the folder has been copied, the USB or SD icon will stop flashing on the display. Copying all files/tracks 1. Insert a USB storage device and SD card, then select USB/SD mode (as described previously). When the system has recognised the device, press the stop button.
- Page 15 SKIP UP or SKIP DOWN button to select “DIR” (directory) on the display. Press the delete DEL button again to confirm. 4. “DEL” will show on the display while the folder is being deleted until the deletion is complete. Deleting all files/tracks 1.
-
Page 16: Bluetooth Operation
device takes priority over cassette playback. NOTE:If you won't use the unit for a long time ,you had better take the CD out from the disk tray door . AUX IN encoding 1. Use the function selector to select PHONO/AUX mode and then insert a memory device (USB drive, SD or MMC card). -
Page 17: Troubleshooting Guide
2, Check and see if there are other bluetooth devices nearby interfering the signal and connection. Troubleshooting Guide If you are experiencing problems with your USB Turntable with Cassette Deck and Radio, check in the section below whether there are any quick and easy checks you can do that may help you solve the problem. - Page 18 (mono) band. Try moving your radio to an alternative location to see if the reception improves. Check that you do not have other electrical equipment too close to your radio, which may cause interference. Changes or modifications not expressly approved by the party responsible for compliance ...
- Page 19 may cause undesired operation. RF Exposure Statement To maintain compliance with FCC's RF Exposure guidelines, This equipment should be installed and operated with minimum distance of 20cm the radiator your body. This device and its antenna(s) must not be co-located or operation in conjunction with any other antenna or transmitter.
Need help?
Do you have a question about the TR-18CD and is the answer not in the manual?
Questions and answers