
Related Manuals for boytone BT-21DJB-C


Summary of Contents for boytone BT-21DJB-C
- Page 1 Turntable/Cassette Player/CD Player/Radio/USB/SD Audio System Model Number BT-21DJB-C INSTRUCTION MANUAL General Safety Instructions...
-
Page 2: Electrical Safety And Cord Handling
Read this manual thoroughly before first use and keep it in a safe place for future reference, along with the completed warranty card, purchase receipt and carton. The safety precautions enclosed herein reduce the risk of fire, electric shock and injury when correctly adhered to. Follow all instructions and take notice of all warnings to reduce the risk of fire or electric shock. -
Page 3: Usage Conditions And Restrictions
Installation • When installing the unit, make sure to place it: • Away from heat sources, radiators or other products that produce heat. • Away from areas with high temperatures, high humidity or direct sunlight. • Away from excess dirt and dust. •... -
Page 4: Parts List
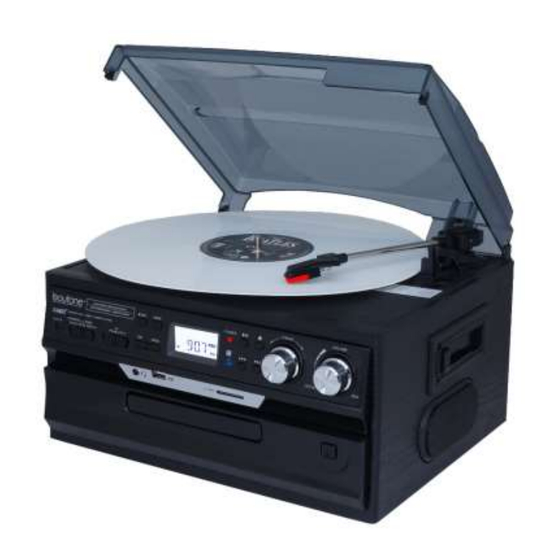
Parts List 1 Dust cover 2 Mode (USB/SD) 3 Record button 4 Radio band selector (AM/FM/FM-Stereo) 5 Function selector 6 Auxiliary input 7 Delete button 8 3.5mm headphone socket 9 Program button 10 USB port 11 LC display 12 Power LED indicator 13 Play/Pause button 14 Stop button 15 Volume knob... - Page 5 17 Skip up button 18 Skip down button 19 SD/MMC card slot...
-
Page 6: Getting Started
20 Right speaker 21 45 rpm adaptor 22 Lift lever 23 Auto stop control 24 Speed selector (33/45/78 rpm) 25 Tone arm 26 Line out sockets 27FM wire antenna 28 AC power cord Getting Started Before first use • Remove all packaging and protective materials from the appliance and dispose of them responsibly. Plastic wrapping can be a suffocation hazard for babies and young children, so ensure all packaging materials are out of their reach. -
Page 7: Installation
Installation • Do not connect the unit to the mains before checking the mains voltage and before all other connections have been made. • Do not cover any vents and make sure that there is a space of several centimeters around the unit for ventilation. -
Page 8: Listening To Radio
• USB/SD slot for MP3 playback • Copying files/tracks from USB to SD • Deleting files/tracks on USB and SD • Digital read-out analog AM/FM radio • 45 rpm adaptor included • LCD display with blue backlight • RCA line-out •... -
Page 9: The Record Player
• FM-Stereo mode: use the radio band selector to select FM-ST for receiving stereo programs. Once a stereo signal is received, the ST icon will light up on the display. The record player IMPORTANT! When using the turntable: • Make sure to remove the stylus protector, as illustrated on the right. (It should easily slide off the stylus assembly.) •... -
Page 10: Phono Encoding
8. To stop playback, move the lift lever towards the back to raise the tone arm. The turntable will still be rotating but the record will stop playing. To continue playback, move the lift lever towards the front. 9. To play a different piece on the record, move the lift lever towards the back, move the raised tone arm to the start of the piece and then move the lift lever towards the front to lower the tone arm and start playback. - Page 11 1. Set the function button to PHONO mode and then insert a memory device (USB drive, SD or MMC card). 2. Put your record onto the turntable and get it ready for playback. 3. Press the record REC button. It will take about 3 - 4 seconds to read the memory device, then the USB or SD icon will be flashing on the LC display.
- Page 12 3. Press the skip up or skip down button to select the desired mode (USB or SD) for encoding, then press the record REC button again to confirm.(You can skip this step if only a USB drive or an SD/MMC card is inserted.) 4.
-
Page 13: Important Notes
medium automatically after mode selection and will display the total number of folders and MP3/WMA files. 4. The system will then start audio playback from the media storage device (USB or SD card) automatically. Playback controls PLAY/PAUSE Press this button once to stop playing, press it again to continue. STOP Press this button to stop audio playback, the display will then show the total number of MP3/WMA files. - Page 14 1. Set the function selector to USB/SD mode, then press the stop button. 2. Press the program PROG button, MEM will be flashing on the LC display, and it will indicate the program number and digits for the track number to be programmed. 3.
- Page 15 When the system has recognized the device, press the stop button. 2. Press the record REC button: “ONE” will be flashing on the display. Press the SKIP UP or SKIP DOWN button to select “ALL” on the display. Press the record REC button again to confirm. 3.
- Page 16 NOTE: Pressing the delete DEL button will completely delete all files/tracks on the USB device or SD card. Removing the USB device / SD card • First move the function selector to another mode (tuner, phono,), then turn the volume knob counterclockwise to turn off the power.
- Page 17 • If FM reception is weak, try the following to improve reception:* completely unravel the wire aerial at the back of the cabinet.* slightly move the wire aerial for better reception.* If none of these measures improve stereo reception, try the same station on the FM (mono) band. •...
Need help?
Do you have a question about the BT-21DJB-C and is the answer not in the manual?
Questions and answers