Table of Contents
Advertisement
BOYTONE
®
Turntable with CD Player, Cassette, Analog Radio
MP3 Encoding to USB/MMC & CD Cloning
MODEL(S): BT29B | BT29W
------------------------------------------------------------------------------------
Operating Instructions Manual
Advertisement
Table of Contents

Related Manuals for boytone BT29B


Summary of Contents for boytone BT29B
- Page 1 BOYTONE ® Turntable with CD Player, Cassette, Analog Radio MP3 Encoding to USB/MMC & CD Cloning MODEL(S): BT29B | BT29W ------------------------------------------------------------------------------------ Operating Instructions Manual...
- Page 2 TO PREVENT FIRE OR SHOCK HAZARD, DO NOT USE THIS PLUG WITH AN EXTENSION CORD,RECEPTACLE OR OTHER UNLESS THE BLADES CAN BE FULLY INSERTED TO PREVENT BLADE EXPOSURE. TO PREVENT FIRE OR SHOCK HAZARD, DO NOT EXPOSE THIS APPLIANCE TO RAIN OR MOISTURE. IMPORTANT SAFETY INSTRUCTIONS 1)Please read these instructions and keep them for future reference.
- Page 3 apparatus, the apparatus has been exposed to rain or moisture, does not operate normally, or has been dropped. 12) This appliance should not be exposed to dripping or splashing water and no such as vases, should be placed on the apparatus. 13) Do not overload the wall power outlet.
- Page 4 This product is designed to operate on 100V 50∕60Hz AC Mains only. Attempting any other power source may cause damage to the system,and such damage is not covered by your warranty. NOTE: You will note that this system is equipped with domestic standard AC power plug.
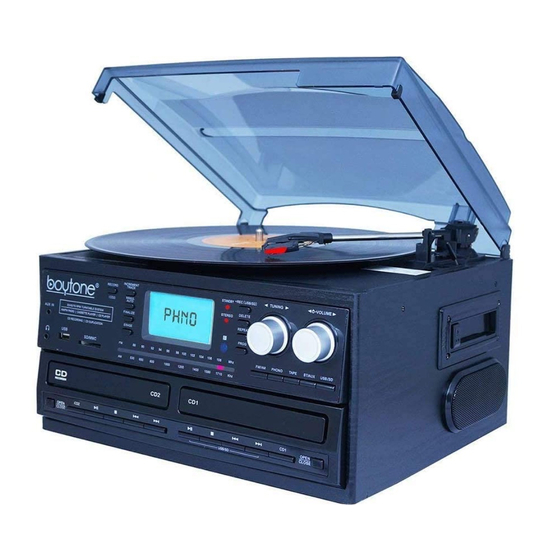
- Page 5 1)Dust cover 29) Aux in Function Button 2) 45RPM Adapter 30) USB/SD Function Button 3) Turntable 31) Power & Volune Knob 4) Increment Track Button 32) Tuning Knob 5) Manul Auto Button 33) Voice Button 6) Finalize Button 34) Repeat Button 7) CD2 Record Button 35) Delete Button 8) Erase Button...
- Page 6 44) Cassette EJ/FF Button (Eject/Fast Forward) 45) Speaker 46) Cassette Player Slot 47) RCA Line out jack 48) FM wire antenna 49) AC power cord 50) Microphone input 51) Mic. Volume REMOTE CONTROL 51) Power Button 52) Phono Function Button 53) FM/AM Radio Function Button...
- Page 7 54) Aux In Function Button 55) Tape Function Button 56) Volume Up Button 57) Programming Button 58) CD1/USB/SD Play/Pause Button 59) CD1/USB/SD Skip down Button 60) CD1/USB/SD Stop Button 61) Random Button 62) USB/SD Folder Down Button 63) USB/SD Folder Up Button 64) Repeat Button 65) CD1/UAB/SD Skip Up Button 66) Volume Down Button...
- Page 8 2. Press PHONO Function Butto, selector to select PHONO mode. 3. Open the dust cover. 4. Set the speed selector to the appropriate position: 33, 45 or 78, depending on the record to be played. 5. Set the auto stop control to ON if you want the turntable to stop turning when it has reached the end of the record.
- Page 9 NOTE: The recording speed is 1:1. Recording will take as long as playing the record. The recording format is preset at MP3 bit rate 128 kbps. 2. Record the content of Phono to CD-R/CD-RW: (1) Press "Open/Close Button"of CD2 when play Phono, put CD-R&CD-RW on Tray, then press "Open/Close Button"...
- Page 10 IMPORTANT! When using the cassette deck: ●Make sure to insert the cassette in the correct direction. ●To avoid damaging the cassette, we strongly recommend taking it out of the equipment after playing the cassette. Cassette encoding 1.Copy the content of Tape to USB/SD. (1) Please put USB/SD in a right direction to USB/SD Socket when you play tape.
- Page 11 (4) Manul Auto Copy: Press Manul AUTO Button →to select the recording the signal of the size level (-20,-30,-40dB) →Press RECORD(CD2) Button →press CD2 Function player button to confirm. Remark: (1)It will display REC icon and the type of copy disco( CD-R & CD-RW) when you copy. (2) It will display the time, TRACK, the size of the level and other info when you copy CD2.
- Page 12 (1)Press "Open/Close Button"of CD1 on lower right corner,put CD-R&CD-RW on Tray, then press "Open/Close Button" and close Tray and automatically identify the type of CD-R & CD- RW. (2) Press ''Open/Close Button" on lower left corner, put CD-R&CD-RW on Tray,then press ''Open/Close Button"...
- Page 13 Aux In 1. Aux In external input signal after amplification (1) Press "Power & Volune Knob" gently, and open Power Supply (2) Press "AUX Function Button", transfer to AUX status (3) CD, MP3, Music or other player signal through 3.5mm plug cord → insert into Aux In Socket of panel left→...
- Page 14 (7) Copy for INCREMENT TRACK: Press MANUEL AUTO Button→Select the recording the size of the signal level(-20,-30,-40dB) → Press RECORD (CD2) Button → Press INCREMENT TRACK Button to process manual operation TRACK →Press button for copy end. (8) MANUL AUTO COPY: Press MANUL AUTO button → to select the recording the signal of the level (-20, -30,-40dB) →...
- Page 15 will start reading the storage medium automatically after mode selection and will display the total number of folders and MP3/WMA files. 4. The system will then start audio playback from the media storage device (USB or SD card) automatically. Playback controls PLAY/PAUSE :Press this button once to stop playing, press it again to continue.
- Page 16 3. Press the SKIP UP or SKIP DOWN button to select a desired track. 4. Press the program PROG button to store the track into the memory. 5. Repeat steps 3 and 4 to enter additional tracks into the memory. 6.
- Page 17 4. When all files/tracks have been copied, the USB or SD icon will stop flashing on the display. NOTE: If you press the record REC button during playback in USB or SD mode, the file will copy from USB to SD or via device. Deleting files from the USB device / SD card The system is able to erase files stored on the USB drive or SD card.
- Page 18 First move the function selector to another mode (tuner, phono, tape), then off the power. To remove a USB device, pull it out of the USB port. To remove a memory card, press the memory card inwards and then release it. The card will be released (partially ejected) and you can remove it by hand.
- Page 19 NOTE:Make sure“NO TOC”and“ CD-R”(or CD-RW)indicators lights on the display,or the RECORD function will not work. Important tips after CD encoding Finalizing AS has been explained earlier,in order for A disc to become a standard CD , it must have s Table of Contents (TOC)written to it.This process is known as finalizing.
- Page 20 4.Erase ALL Select this to erase all the tracks.To cancel the erasing or unfinalizing process,press the STOP button. (1).Press and hold the “Erase”button till the display show “Erase All”. (2) Press play button to begin the erase. (3) Display will show 0000000 to confirm the disc is clear. The remaining time for the operation appears in the display.When the operation has been finished,the display returns to the track/time display.During erasing/unfinalizing,no buttons will work.Never turn the power off nor unplug the power cord.
- Page 21 - If AM reception is weak, rotate or reposition the equipment to improve reception. -If FM reception is weak, try the following to improve reception: -Completely unravel the wire aerial at the back of the cabinet. - Slightly move the wire aerial for better reception. -Try moving your radio to an alternative location to see if the reception improves.
- Page 22 Speeds 33.3,45,78 RPM Wow & Flutter Less than 0.35% (WTD) S/N Ratio More than 50 dB Cartridge Type Ceramic Stereo Cartridge SPEAKER SYSTEM section Type 1 way Impedance 4 ohms Input power GENERAL Power Requirements 230V~50Hz Power Consumpiton Dimensions(LxWx 330x300x205m Weight...
Need help?
Do you have a question about the BT29B and is the answer not in the manual?
Questions and answers