
Subscribe to Our Youtube Channel
Related Manuals for FireAngel FS1524W2-T


Summary of Contents for FireAngel FS1524W2-T
- Page 1 WTSL-SN-1 Alarm Control Unit with Smart RF Installation and User Guide For use with Smart RF Smoke, Heat and Carbon Monoxide Alarms TEST YOUR ALARM MONTHLY...
- Page 2 PLEASE READ THIS GUIDE IN FULL BEFORE USING YOUR WTSL-SN-1 ALARM CONTROL UNIT! Battery powered Alarm Control Unit with Test, Silence, Locate function Non-replaceable 3 V DC battery Smart RF operates on FireAngel’s Wi-Safe 2 networking protocol and is compatible with other Wi-Safe 2 products...
-
Page 3: Table Of Contents
INSTALLATION GUIDE USER GUIDE Features Testing the Alarm System Positioning Product Functionality Installation Reorganising a Network Wireless Interlink When an Alarm Sounds Making the Alarm Control Unit LED Indicators Tamper Proof Troubleshooting Maintenance Disposal Warranty This user guide is also available in large text and other formats Please call 0330 094 5830 for further information... -
Page 4: Installation Guide
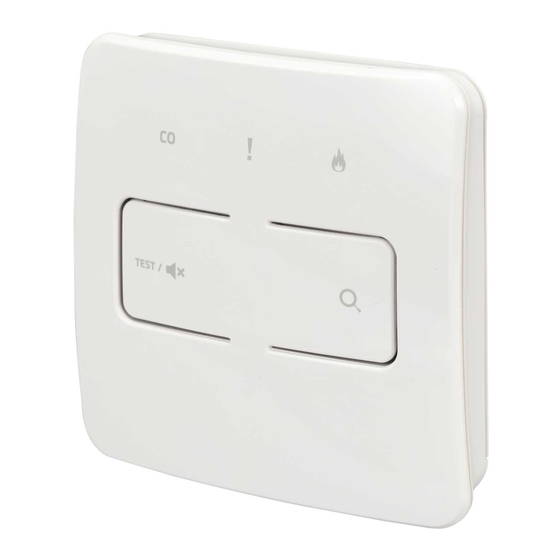
INSTALLATION GUIDE FEATURES • Smart RF technology, enabling wireless interlinking between other Smart RF products • Test / Silence ( ) button, allowing you to regularly test all wirelessly interlinked alarms on a network Pressing the silence button will reduce the sensitivity of alarms for up to 10 minutes, unless carbon monoxide has been detected, in which case you can use the 'Locate' function below to find the source alarm •... - Page 5 Fault indicator Carbon monoxide Smoke / Heat alarm indicator alarm indicator Test / Silence button Locate button...
-
Page 6: Positioning
POSITIONING This Alarm Control Unit is suitable for use in domestic premises only It should be installed at an accessible point on the wall, in a location where it will not be accidentally operated or knocked INSTALLATION • Ensure this Alarm Control Unit is installed by a competent person who feels able to install it according to the instructions •... - Page 7 ACTIVATING THE ALARM CONTROL UNIT The Alarm Control Unit has a sealed-in non- replaceable battery To activate the control unit remove the disabling tab Upon activating the control unit all three LED's should simultaneously flash twice, to indicate that they are working Once the alarm is activated it can then be learnt into a Smart RF network, before securing to the wall bracket...
-
Page 8: Wireless Interlink
WIRELESS INTERLINK The Alarm Control Unit is designed to be used as a remote interface on a network of up to 49 products within the Smart RF range The Alarm Control Unit can be used to test, silence or locate any alarms on the Smart RF network It is not designed to communicate with wireless alarms from other ranges or manufacturers The control unit needs to be ‘learned-in’... - Page 9 HOW TO ‘LEARN-IN’ THE ALARM CONTROL UNIT TO A SMART RF NETWORK: 1 Using a ballpoint pen, briefly push and release the 'learn button' on the back of the Learn button control unit The red LED next to the learn button will flash briefly then light up for approximately 5 seconds 2 During these 5 seconds you need to briefly...
-
Page 10: Making The Alarm Control Unit Tamper Proof
4 To complete the installation simply slide the control unit onto the bracket The control unit is now part of the whole network The method above assumes you have already installed your alarm network, prior to installing your Alarm Control Unit If you want to install your Alarm Control Unit first, you can learn your smoke, heat and CO alarm into it by following the instructions in your alarm manual, using the... - Page 11 The Alarm Control Unit is provided with an anti-tamper feature, ensuring, where needed it cannot be removed from the wall To make use of this feature you will need to push out the two blanking plates on the top right-hand side of the bracket, using a small screwdriver, being careful to support the bracket fully whilst doing so...
-
Page 12: User Guide
USER GUIDE TESTING THE ALARM SYSTEM Press the Test / Silence ( ) button to confirm that the control unit is operating properly This will instigate a three minute test All networked alarms should sound To stop the test (earlier than 3 minutes), simply press the Test / Silence ( ) button again This test should be performed on a monthly basis... -
Page 13: Product Functionality
PRODUCT FUNCTIONALITY Function Description Test button: This allows you to test all wirelessly interlinked alarms from one centralised location Test / Silence button Silence button: This will silence all wirelessly interlinked smoke and heat alarms and reduce the system sensitivity for up to 10 minutes In an alarm event this will silence all wirelessly interlinked alarms Locate button except the initiating alarm which has sensed carbon monoxide / smoke... - Page 14 LOCATE BUTTON If the alarms are sounding and an alarm indicator is flashing, but there's no obvious hazard, pressing the 'Locate' button ( ) will silence all wirelessly interlinked alarms except for the initiating alarm which has sensed smoke / heat or carbon monoxide Within two minutes the system will return to normal operation and the alarms will continue to sound if smoke / heat or carbon monoxide is still present To make locating the alarm easier, the control unit can be removed from its bracket and carried around the property (providing the tamper proof function has not been engaged), allowing...
- Page 15 ) repeatedly until the source alarm is identified (fully compatible with the FireAngel Specification Smart RF smoke, heat and CO alarms) Please Note: Only the most recent alarm event will be visible If both a CO and smoke / heat alarm have previously been activated,...
-
Page 16: Reorganising A Network
Check all alarms are on their base plate and activated If all alarms are activated, clear the fault by pressing the locate button twice REORGANISING A NETWORK If you have un-learnt and replaced or removed any alarms, you can 'reorganise' in order to optimise the network performance To do this you will need to press and hold the 'Locate' button for 5 seconds The Alarm Control Unit will then enter 'Reorganisation Mode', during which time you will see a series of flashes from the LEDs The time taken for this process to complete will depend on the number of... -
Page 17: When An Alarm Sounds
not delete wanted units In case one of the working units is out of range for networking, please check the installation position of the units and adjust / install an additional unit to help with the routing of messages WHEN AN ALARM SOUNDS Never ignore an alarm If there is a fire evacuate the premises and call the fire brigade If the source of the alarm is not immediately apparent check which indicator is flashing on the control unit... -
Page 18: Led Indicators
LED INDICATORS Red Smoke / Red CO LED Amber Fault LED Status Action required Heat LED Please refer to the 'Wireless Flashing for 10 Flashing for 10 Flashing for 10 The Alarm Control Unit is Interlink' section to 'learn- seconds, every seconds, every seconds, every not part of a network... - Page 19 Red Smoke / Red CO LED Amber Fault LED Status Action required Heat LED To exit 'Reorganisation Mode' hold the 'Locate' This indicates that the button for 5 seconds, wait a All 3 LED's flash together ( ) 3 times, then a 'Reorganisation Mode' couple of minutes and then fourth flash (...
-
Page 20: Troubleshooting
Unit Tamper proof' section If you have any questions about the operation of your Alarm Control Unit, please visit the FireAngel website for FAQs: www.fireangeltech.com alternatively contact Technical Support via email: specification@fireangeltech.com or by calling: 0330 094 5830... - Page 21 WTSL Compatibility Chart WST-630 WST-630 ST-632 HT-630 SM-SN-1 HM-SN-1 NM-CO-10X Function (Prior to 2014 (2014 Model (+ W2-Module) (+ W2-Module) (+ W2-Module) (+ W2-Module) (+ W2-Module) Models) onwards) Test Silence Alarm Memory Locate Locate (SOS Fault Finding) Re-organisation...
-
Page 22: Maintenance
MAINTENANCE • Do not remove any screws or open the main casing of the control unit Any attempt This Alarm Control Unit will act as a remote to do so may cause malfunction and will interface between the alarms in your home when invalidate the warranty maintained properly To ensure the reliability of the control unit:... -
Page 23: Disposal
Provided product is sent back to FireAngel Safety Technology Limited with proof and date of... - Page 24 This warranty does not affect your statutory rights Except for death or personal injury, FireAngel Safety Technology Limited shall not be liable for any loss of use, damage, cost...
Need help?
Do you have a question about the FS1524W2-T and is the answer not in the manual?
Questions and answers