Table of Contents
Advertisement
Available languages
Available languages
Quick Links
Advertisement
Chapters
Table of Contents

Subscribe to Our Youtube Channel
Related Manuals for Atag VA5114MT


Summary of Contents for Atag VA5114MT
- Page 1 Gebruiksaanwijzing User Manual VA5114MT...
-
Page 2: Table Of Contents
INHOUDSOPGAVE Veiligheidsinformatie Dagelijks gebruik Veiligheidsvoorschriften Aanwijzingen en tips Productbeschrijving Onderhoud en reiniging Bedieningspaneel Probleemoplossing Programmakeuze Technische informatie Basisinstellingen Voordat u het apparaat voor de eerste keer gebruikt Wijzigingen voorbehouden. VEILIGHEIDSINFORMATIE Lees zorgvuldig de meegeleverde instructies voor installatie en gebruik van het apparaat. De fabrikant is niet verantwoordelijk voor verwondingen of schade die voortvloeit uit de onjuiste installatie of het onjuiste gebruik. - Page 3 Kinderen mogen zonder toezicht geen reinigings- en • onderhoudswerkzaamheden aan het apparaat uitvoeren. Algemene veiligheid Dit apparaat is bedoeld voor gebruik in huishoudelijke en • soortgelijke toepassingen, zoals: boerderijen; personeelskeukens in winkels, kantoren of – andere werkomgevingen; door gasten in hotels, motels, bed&breakfasts- en –...
-
Page 4: Veiligheidsvoorschriften
VEILIGHEIDSVOORSCHRIFTEN Installatie • Trek niet aan het netsnoer om het apparaat los te koppelen. Trek altijd WAARSCHUWING! Alleen een aan de stekker. erkende installatietechnicus • Dit apparaat is voorzien van een 13 A mag het apparaat installeren. stekker. Als de zekering van de stekker vervangen moet worden, moet een •... - Page 5 Gebruik apparaat. Gebruik uitsluitend originele reserveonderdelen. • Plaats geen ontvlambare producten of • Houd er rekening mee dat zelfreparatie items die vochtig zijn door ontvlambare of niet-professionele reparatie gevolgen producten in, bij of op het apparaat. kan hebben voor de veiligheid en de •...
-
Page 6: Productbeschrijving
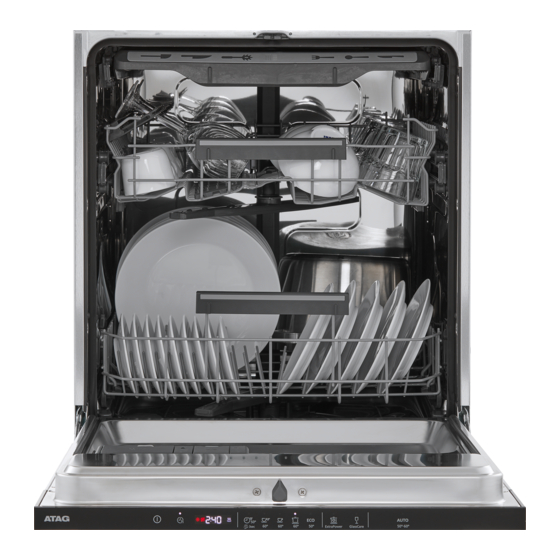
PRODUCTBESCHRIJVING De afbeeldingen hieronder geven alleen een algemeen productoverzicht. Raadpleeg voor meer gedetailleerde informatie andere hoofdstukken en/of documenten die bij het apparaat zijn meegeleverd. Plafondsproeiarm Glansmiddeldoseerbakje Bovenste sproeiarm Vaatwasmiddeldoseerbakje Onderste sproeiarm Onderste korf Filters Bovenste korf Typeplaatje Besteklade Zoutreservoir Ventilatie Beam-on-Floor •... -
Page 7: Bedieningspaneel
Als AirDry tijdens de droogfase wordt geactiveerd, is de projectie op de vloer mogelijk niet volledig zichtbaar. Controleer het bedieningspaneel om te zien of de cyclus beëindigd is. BEDIENINGSPANEEL Aan-uittoets / resetknop Optietoetsen Toets startuitstel programmatoets Display Programmatoetsen Display A. Indicatielampjes B. -
Page 8: Programmakeuze
Controle‐ Beschrijving lampje Machine Care -indicatielampje. Dit is aan als het apparaat interne reiniging nodig heeft met het programmaMachine Care. Raadpleeg "Onderhoud en reiniging". Indicatielampje droogfase. Dit is aan als een programma met droogfase is ge‐ kozen. Het gaat knipperen wanneer de droogfase loopt. Raadpleeg "Pro‐ grammaselectie". - Page 9 Programmaoverzicht Pro‐ Type lading Mate van Programmafasen Opties gramma vervuiling • Vaatwerk • Fris • Wassen 50 °C • • Bestek • Tussentijdse spoe‐ • ling • Laatste spoeling 45 °C • AirDry • Alle soor‐ • Alle vuil‐ • Voorspoelen Opties zijn niet ten vaat...
- Page 10 Pro‐ Type lading Mate van Programmafasen Opties gramma vervuiling • Vaatwerk Het program‐ • Voorspoelen Opties zijn niet • Bestek ma past zich • Wassen 50 - 60 °C van toepassing op • Potten aan aan de • Tussentijdse spoe‐ dit programma.
-
Page 11: Basisinstellingen
Raadpleeg voor andere vragen Aanwijzingen voor testinstituten betreffende uw vaatwasmachine het serviceboekje dat met uw apparaat is Om de nodige informatie te ontvangen meegeleverd. over het uitvoeren van prestatietesten (bijv. volgens EN60436) stuurt u een e- mail naar: info.test@dishwasher-production.com Vermeld in uw verzoek de productnummercode (PNC) dat u op het typeplaatje aantreft. - Page 12 De speciale letters zijn aangegeven in de Hoe hoger het gehalte van deze tabel. mineralen, des te harder is het water. De waterhardheid wordt gemeten in de De volgorde van de basisinstellingen die volgende gelijkwaardige schalen. in de tabel worden weergegeven, is dezelfde volgorde van de instellingen in De waterontharder moet worden afgesteld instellingenmodus.
- Page 13 Alle in deze paragraaf Wateronthard‐ Hoeveelheid wa‐ genoemde verbruikswaarden ingsniveau ter (l) worden bepaald volgens de huidige geldende norm in laboratoriumomstandigheden met waterhardheid 2,5 mmol/l volgens de verordening 2019/2022 (waterontharder: niveau 3). De druk en de temperatuur van het water en de variaties van de netvoeding kunnen de waarden veranderen.
- Page 14 het apparaat automatisch en blijft op een Als de laatste programmakeuze wordt kier staan. uitgeschakeld, wordt het standaard programma Setting mode Navigeren in de instellingenmodus U kunt met gebruik van de programmatoetsen in de instellingenmodus navigeren. AirDry wordt bij alle programma's behalve automatisch geactiveerd.
-
Page 15: Voordat U Het Apparaat Voor De Eerste
Het display toont de huidige • Het apparaat keert terug naar de instellingswaarde (een cijfer en de basisinstellingenlijst. speciale letter). 5. Druk tegelijkertijd op 2. Druk op OK om de instelling te houd ze ongeveer 3 seconden bevestigen. ingedrukt om de instellingsmodus te De huidige instelling knippert. -
Page 16: Dagelijks Gebruik
LET OP! Water en zout kunnen LET OP! Gebruik alleen uit het zoutreservoir stromen glansspoelmiddel voor als u het bijvult. Start na het vaatwassers. bijvullen van het zoutreservoir 1. Druk op de ontgrendelknop (D) om het onmiddellijk een programma deksel te openen (C). om corrosie te voorkomen. - Page 17 Een programma kiezen en 2. Sluit de deur van de afwasmachine om het programma te starten. starten Het apparaat neemt het type lading waar en past aan naar een geschikte 1. Houd ingedrukt om te selecteren wascyclus. Tijdens de cyclus werken de gedurende 3 seconden.
-
Page 18: Aanwijzingen En Tips
De deur openen als het apparaat De functie gaat automatisch aan: in werking is • Als het programma is voltooid. • Als er na 5 minuten nog geen Als u de deur opent terwijl een programma programma is gestart. loopt, stopt het apparaat. Dit kan het energieverbruik en de programmaduur Einde van het programma beïnvloeden. - Page 19 Wat moet u doen als u wilt – Volg de instructies in het hoofdstuk "Onderhoud en reiniging". stoppen met het gebruik van multitabletten Gebruik van zout, glansmiddel Volg de volgende stappen voordat u en vaatwasmiddel begint met het gebruiken van apart •...
-
Page 20: Onderhoud En Reiniging
De rekken uitruimen kromtrekken, verkleuren of putjes kunnen krijgen. 1. Laat de borden afkoelen voordat u • Reinig geen voorwerpen in het deze uit het apparaat neemt. Hete apparaat die water kunnen absorberen borden zijn gevoelig voor (sponzen, keukenhanddoeken). beschadigingen. •... - Page 21 • Gebruik geen schuurmiddelen, schuursponsjes, scherpe voorwerpen, sterke chemicaliën, pannensponsjes of oplosmiddelen. • Gebruik om de prestaties van uw apparaat te onderhouden minstens elke twee maanden een reinigingsproduct dat specifiek is ontwikkeld voor vaatwassers. Volg de instructies op de verpakking van de producten zorgvuldig op.
- Page 22 LET OP! Een onjuiste plaatsing van de filters kan leiden tot slechte wasresultaten en het apparaat beschadigen. De onderste sproeiarm schoonmaken We raden u aan om de onderste sproeiarm regelmatig schoon te maken om te voorkomen dat vuil de gaten verstopt.
- Page 23 Reinigen van de 2. Beweeg de bovenmand naar het plafondsproeiarm onderste niveau om beter bij de We raden u aan om de plafondsproeiarm sproeiarm te kunnen. regelmatig schoon te maken om te 3. Draai om de sproeiarm (C) van de voorkomen dat vuil de gaten verstopt.
-
Page 24: Probleemoplossing
PROBLEEMOPLOSSING zonder contact op te nemen met een WAARSCHUWING! Onjuiste erkend servicecentrum. reparatie van het apparaat kan Zie de onderstaande tabel voor informatie een gevaar voor de veiligheid over mogelijke problemen. van de gebruiker vormen. Alle reparaties moeten worden Bij sommige problemen wordt er op de uitgevoerd door bevoegd display een alarmcode weergegeven. - Page 25 Probleem en alarmcode Mogelijke oorzaak en oplossing Storing van de waspomp of • Schakel het apparaat uit en aan. de afvoerpomp. Het display toont i51 - i59 of i5A - i5F. De temperatuur van het wa‐ • Zorg ervoor dat de temperatuur van het inlaatwater niet ter in het apparaat is te hoog hoger is dan 60°...
- Page 26 Probleem en alarmcode Mogelijke oorzaak en oplossing Het apparaat maakt kortslui‐ • De stroomsterkte is onvoldoende om alle tegelijk werken‐ ting. de apparaten van stroom te voorzien. Controleer de stroomsterkte van het stopcontact en het vermogen op de meter, of zet één van de in gebruik zijnde apparaten uit. •...
- Page 27 Probleem Mogelijke oorzaak en oplossing Slechte droogresultaten. • Serviesgoed heeft te lang in het gesloten apparaat ge‐ staan. Activeer AirDry om het automatisch openen van de deur in te stellen en de droogprestatie te verbeteren. • Het glansspoelmiddel is op of de dosering van glans‐ spoelmiddel is niet voldoende.
-
Page 28: Technische Informatie
Probleem Mogelijke oorzaak en oplossing Geuren in het apparaat. • Raadpleeg "Reiniging binnenkant". • Start het programma Machine Care met een ontkalker of een reinigingsproduct bestemd voor vaatwassers. Kalkresten op het servies‐ • Het zoutniveau is laag, controleer de bijvulaanduiding. goed, op de kuip en aan de •... - Page 29 Stroomverbruik Modus aan laten (W) Uit-modus (W) 0.50 1) Zie het typeplaatje voor andere waarden. 2) Als het hete water door een alternatieve, milieuvriendelijkere energiebron geproduceerd wordt (bijv. zonnepa‐ nelen), gebruik dan een heetwatervoorziening om het energieverbruik te verminderen. Link naar de EU-EPREL- product in de EU-EPREL-databank te databank vinden via de link https://...
-
Page 30: Safety Information
CONTENTS Safety information Before first use Safety instructions Daily use Product description Hints and tips Control panel Care and cleaning Programme selection Troubleshooting Basic settings Technical information Subject to change without notice. SAFETY INFORMATION Before the installation and use of the appliance, carefully read the supplied instructions. -
Page 31: Safety Instructions
General Safety This appliance is intended to be used in household and • similar applications such as: farm houses; staff kitchen areas in shops, offices and – other working environments; by clients in hotels, motels, bed & breakfast and other –... - Page 32 • Do not install or use the appliance • The water inlet hose has a safety valve where the temperature is less than and a sheath with an inner mains 0 °C. cable. • Install the appliance in a safe and suitable place that meets installation requirements.
-
Page 33: Product Description
such as temperature, vibration, related to door assemblies, printed humidity, or are intended to signal circuit boards, electronic displays, information about the operational status pressure switches, thermostats and of the appliance. They are not intended sensors, software and firmware to be used in other applications and are including reset software. - Page 34 Ceiling spray arm Rinse aid dispenser Upper spray arm Detergent dispenser Lower spray arm Lower basket Filters Upper basket Rating plate Cutlery drawer Salt container Air vent Beam-on-Floor The Beam-on-Floor is off when the appliance is deactivated. The Beam-on-Floor is a light that is displayed on the floor below the appliance When AirDry is activated during door.
-
Page 35: Control Panel
CONTROL PANEL On/Off button / Reset button Option buttons Delay start button programme button Display Programme buttons Display A. Indicators B. Time indicator Indicators Indicator Description Rinse aid indicator. It is on when the rinse aid dispenser needs refilling. Refer to "Before first use". -
Page 36: Programme Selection
PROGRAMME SELECTION Programmes This is the standard programme for test institutes. Options You can adjust the programme selection to your needs by activating options. A. • This option improves the washing results is the shortest programme of the selected programme. It increases suitable for washing a load with the wash temperature and duration. - Page 37 Pro‐ Type of load Degree of Programme phases Options gramme soil • Crockery • Fresh • Wash 60 °C • • Cutlery • Lightly • Intermediate rinse • dried-on • Final rinse 50 °C • AirDry • Crockery • Normal •...
-
Page 38: Basic Settings
Water (l) Energy (kWh) Duration (min) 1) 2) Programme 4.1 - 5.0 0.01 - 0.04 10.4 - 12.7 0.83 - 0.96 10.3 - 12.6 0.96 - 1.09 9.8 - 12.0 1.05 - 1.18 10.5 / 10.5 0.832 / 0.848 / 240 8.7 - 12.0 0.75 - 1.18 120 - 170... - Page 39 Num‐ Settings Values Description End sound 1b (on) Activate or deactivate the acoustic signal for 0b (off) the end of a programme. Factory setting: 0b. Auto door 1o (on) Activate or deactivate the AirDry. open 0o (off) Factory setting: 1o. Key tones 1F (on) Activate or deactivate the sound of the but‐...
- Page 40 German de‐ French de‐ mmol/l Clarke de‐ Water softener grees (°dH) grees (°fH) grees level 19 - 22 33 - 39 3.3 - 3.9 23 - 27 15 - 18 26 - 32 2.6 - 3.2 18 - 22 11 - 14 19 - 25 1.9 - 2.5 13 - 17...
- Page 41 All the consumption values mentioned in this section are determined in accordance with the currently applicable standard in laboratory conditions with water hardness 2.5mmol/L according to the 2019/2022 regulation (water softener: level 3). The pressure and the temperature of water as well as the variations of the mains supply can change the values.
-
Page 42: Before First Use
Setting mode The lights related to the Previous, OK and Next are on. How to navigate in setting mode How to change a setting You can navigate in setting mode using Make sure the appliance is in setting programme buttons. mode. -
Page 43: Daily Use
How to fill the rinse aid How to fill the salt container dispenser 1. Turn the cap of the salt container counterclockwise and remove it. 2. Put 1 litre of water in the salt container (only for the first time). 3. - Page 44 Using the detergent 2. Press the button dedicated to the option you want to activate. • The light related to the button is on. • The display shows the updated programme duration. By default, options must be activated every time before you start a programme.
-
Page 45: Hints And Tips
The light related to the button is on. the energy consumption and the 3. Close the appliance door to start the programme duration. After closing the countdown. door, the appliance continues from the During the countdown, it is not possible to point of interruption. - Page 46 • Soak or slightly scour cookware with results in detergent residues on the firmly cooked-on or baked-on food dishes. Adjust the amount of detergent before washing it in the appliance. based on the water hardness. Refer to • Make sure that items in the baskets do the instructions on the detergent not touch or cover each other.
-
Page 47: Care And Cleaning
Loading the baskets • Put cutlery and small items in the cutlery drawer. • Always use the whole space of the • Make sure that the spray arms can baskets. move freely before you start a • Use the appliance to wash dishwasher- programme. - Page 48 • Do not use abrasive products, abrasive cleaning pads, sharp tools, strong chemicals, scourer or solvents. • To maintain the performance of your appliance, use a cleaning product designed specifically for dishwashers at least once every two months. Carefully follow the instructions on the packaging of the product.
- Page 49 CAUTION! An incorrect position of the filters can cause bad washing results and damage to the appliance. Cleaning the lower spray arm We recommend to clean the lower spray arm regularly to prevent soil from clogging the holes. Clogged holes can cause unsatisfactory washing results.
- Page 50 2. Move the upper basket to the lowest level to reach the spray arm more easily. 3. To detach the spray arm (C) from the delivery tube (A), turn the mounting element (B) counterclockwise and pull the spray arm downwards. 4.
-
Page 51: Troubleshooting
TROUBLESHOOTING to contact an Authorised Service WARNING! Improper repair of Centre. the appliance may pose a Refer to the below table for information on danger to the safety of the possible problems. user. Any repairs must be performed by qualified With some problems, the display shows personnel. - Page 52 Problem and alarm code Possible cause and solution The temperature of the wa‐ • Make sure that the temperature of the inlet water does not ter inside the appliance is exceed 60°C. too high or malfunction of • Switch the appliance off and on. the temperature sensor oc‐...
- Page 53 Once you have checked the appliance, The PNC can be found on the rating plate deactivate and activate the appliance. If on the appliance door. You can also check the problem occurs again, contact an the PNC on the control panel. Authorised Service Centre.
- Page 54 Problem Possible cause and solution There are stains and dry water • The released quantity of rinse aid is not sufficient. Adjust drops on glasses and dishes. the rinse aid level to a higher level. • The quality of the rinse aid can be the cause. The interior of the appliance is •...
-
Page 55: Technical Information
Refer to "Before first use", "Daily use", or "Hints and tips" for other possible causes. TECHNICAL INFORMATION Dimensions Width / height / depth (mm) 596 / 818 - 898 / 550 Voltage (V) 220 - 240 Electrical connection Frequency (Hz) Water supply pressure Min. - Page 56 Het toestel-identificatieplaatje bevindt zich aan de binnenzijde van het toestel. Houd, wanneer u contact opneemt met de serviceafdeling, het complete typenummer bij de hand. The appliance identification plate is located on the inside of the appliance. Please have the complete model number available when contacting the service department. Adressen en telefoonnummers van de serviceorganisatie vindt u op de garantiekaart.
Need help?
Do you have a question about the VA5114MT and is the answer not in the manual?
Questions and answers