Table of Contents
Advertisement
Available languages
Available languages
Quick Links
Advertisement
Chapters
Table of Contents

Related Manuals for Atag VA5113BT


Summary of Contents for Atag VA5113BT
- Page 1 Gebruiksaanwijzing Afwasautomaat User Manual Dishwasher VA5113BT...
-
Page 2: Table Of Contents
INHOUDSOPGAVE Veiligheidsinformatie Voor het eerste gebruik Veiligheidsvoorschriften Dagelijks gebruik Productbeschrijving Aanwijzingen en tips Bedieningspaneel Onderhoud en reiniging Programma’s Probleemoplossing Instellingen Technische informatie Wijzigingen voorbehouden. VEILIGHEIDSINFORMATIE Lees zorgvuldig de meegeleverde instructies voor installatie en gebruik van het apparaat. De fabrikant is niet verantwoordelijk voor verwondingen of schade die voortvloeit uit de onjuiste installatie of het onjuiste gebruik. -
Page 3: Veiligheidsvoorschriften
Algemene veiligheid Dit apparaat is bedoeld voor gebruik in huishoudelijke en • soortgelijke toepassingen, zoals: boerderijen; personeelskeukens in winkels, kantoren of – andere werkomgevingen; door gasten in hotels, motels, bed&breakfasts- en – andere woonomgevingen. De specificatie van dit apparaat niet wijzigen. •... - Page 4 • Volg de installatie-instructies die zijn er nieuwe apparaten zijn geplaatst meegeleverd met het apparaat. (watermeters, enz.), moet u, voordat de • Pas altijd op bij verplaatsing van het nieuwe buizen worden aangesloten, apparaat, want het is zwaar. Gebruik het water laten stromen tot het schoon altijd veiligheidshandschoenen en en helder is.
-
Page 5: Productbeschrijving
Binnenverlichting verwarmingselementen, inclusief warmtepompen, leidingen en WAARSCHUWING! Gevaar aanverwante apparatuur, waaronder voor letsel. slangen, kleppen, filters en aquastops, structurele en interne onderdelen met • Met betrekking tot de lamp(en) in dit betrekking tot deurconstructies, product en reservelampen die printplaten, elektronische displays, afzonderlijk worden verkocht: Deze drukschakelaars, thermostaten en lampen zijn bedoeld om bestand te zijn... -
Page 6: Bedieningspaneel
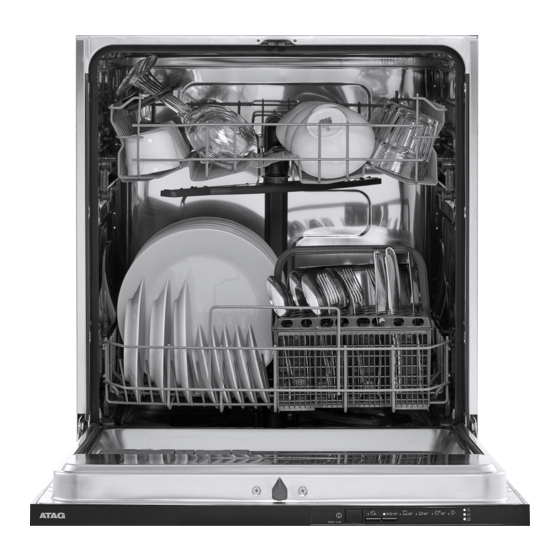
Bovenste sproeiarm Glansmiddeldoseerbakje Onderste sproeiarm Vaatwasmiddeldoseerbakje Filters Bestekkorf Typeplaatje Onderste korf Zoutreservoir Bovenste korf Ventilatie BEDIENINGSPANEEL Aan-/uittoets/Resettoets Programmatoets Programma-controlelampjes Toets startuitstel Controlelampjes... -
Page 7: Programma's
Indicatielampjes Indicatie‐ Beschrijving lampje Indicatielampje droogfase. Het is ingeschakeld wanneer u een programma selecteert met de droogfase. Het gaat knipperen wanneer de droogfase loopt. Zoutindicatielampje. Dit is aan als het zoutreservoir bijgevuld dient te worden. Dit indicatielampje is altijd uit als het programma in werking is. Glansmiddelindicatielampje. -
Page 8: Instellingen
Programma Type lading Mate van vervui‐ Programmafasen ling • Alle soorten • Alle vuilgraden • Voorspoelen vaat 1) Dit programma biedt het meest efficiënte water- en energieverbruik voor normaal vervuild serviesgoed en be‐ stek. Dit is het standaard programma voor testinstituten. Dit programma wordt gebruikt om de naleving van Ver‐ ordening (EU) 2019/2022 van de Commissie inzake ecologisch ontwerp te beoordelen. - Page 9 • Het niveau van de waterverzachter Gebruikersmodus ingaan afgestemd op de waterhardheid. • De activering of deactivering van de Zorg dat het apparaat in de aanduiding leeg glansmiddelreservoir. programmakeuzemodus staat. • De activering of de deactivering van het Houd om naar de gebruikersmodus te geluidsignaal voor het programma- gaan de programmaknop ingedrukt tot het einde.
- Page 10 Stel ongeacht het gebruikte soort programma met een korte droogfase. In wasmiddel het juiste dat geval verlengt de regeneratie de totale waterhardheidniveau in om de duur van een programma met nog eens 5 bijvulindicator voor zout geactiveerd te minuten. houden. Vervolgens kan het spoelen van de waterontharder wat 5 minuten duurt, Multivaatwastabletten die zout...
- Page 11 2. Druk herhaaldelijk op de 3. Druk op programmatoets om de programmatoets om de instelling te instelling te wijzigen. wijzigen. Telkens als u op de 4. Druk op de aan/uitknop om de programmaknop drukt, gaat het instelling te bevestigen. niveaunummer omhoog. Als u niveau Geluidssignalen 10 bereikt, begint het tellen opnieuw vanaf niveau 1.
-
Page 12: Voor Het Eerste Gebruik
Het deactiveren van AirDry Zorg dat het apparaat in de gebruikersmodus staat. 1. Druk drie keer op de programmatoets. Het controlelampje begint te knipperen. 2. Wacht tot het indicatielampje blijft knipperen en de overige programma- indicatielampjes uit zijn. Het indicatielampje geeft de huidige instelling aan: Tijdens de droogfase opent de... -
Page 13: Dagelijks Gebruik
Het zoutreservoir vullen Het vullen van het glansmiddeldoseerbakje 1. Draai de dop linksom om het zoutreservoir te openen. 2. Doe 1 liter water in het zoutreservoir (alleen de eerste keer). 3. Vul het zoutreservoir met 1 kg zout (totdat het vol is). LET OP! Gebruik alleen glansspoelmiddel voor vaatwassers. - Page 14 Vaatwasmiddel gebruiken 2. Druk op de toets startuitstel om de start van het afwasprogramma met drie uur uit te stellen. Het indicatielampje brandt. 3. Sluit de deur van het apparaat om het aftellen te starten. Tijdens het aftellen is het niet mogelijk het programma te wijzigen.
-
Page 15: Aanwijzingen En Tips
De functie gaat werken: Het programma annuleren • Als het wasprogramma is voltooid. • Als er na 5 minuten nog geen Druk gedurende 3 seconden op de aan/ programma is gestart. uit-knop totdat het apparaat in de programmakeuzemodus staat. Controleer of er vaatwasmiddel in het Einde van het programma afwasmiddeldoseerbakje aanwezig is Wanneer het programma is voltooid,... - Page 16 De korven inruimen voorkomen dat vaatwasmiddelresten op het servies achterblijven, raden we • Gebruik altijd de hele ruimte van de u aan om tabletten enkel bij lange mandjes. programma's te gebruiken. • Gebruik het apparaat uitsluitend om • Gebruik altijd de juiste hoeveelheid afwasmachinebestendige voorwerpen wasmiddel.
-
Page 17: Onderhoud En Reiniging
De rekken uitruimen Na voltooiing van het programma kan er zich aan de 1. Laat de borden afkoelen voordat u binnenkant van het apparaat deze uit het apparaat neemt. Hete nog water bevinden. borden zijn gevoelig voor beschadigingen. 2. Ruim eerst het onderrek en dan het bovenrek uit. - Page 18 LET OP! Een onjuiste plaatsing van de filters kan leiden tot slechte wasresultaten en het apparaat beschadigen. De onderste sproeiarm schoonmaken We raden u aan om de onderste sproeiarm regelmatig schoon te maken om te voorkomen dat vuil de gaten verstopt.
-
Page 19: Probleemoplossing
• Gebruik geen schuurmiddelen, schuursponsjes, scherpe voorwerpen, sterke chemicaliën, pannensponsjes of oplosmiddelen. • Het regelmatig gebruiken van korte programma´s kan ophoping van vet en kalk in het apparaat tot gevolg hebben. Draai minstens tweemaal per maand lange programma´s om deze ophoping te voorkomen. - Page 20 Probleem en alarmcode Mogelijke oorzaak en oplossing U kunt het apparaat niet activeren. • Controleer of de netstekker is aangesloten op het stopcontact. • Zorg dat er geen zekering in de zekeringenkast is doorgebrand. Het programma start niet. • Controleer of de deur van het apparaat gesloten •...
- Page 21 Probleem en alarmcode Mogelijke oorzaak en oplossing De temperatuur van het water in het • Zorg ervoor dat de temperatuur van het inlaat‐ apparaat is te hoog of er is een storing water niet hoger is dan 60° C. in de temperatuursensor opgetreden. •...
- Page 22 Raadpleeg "Voor het eerste WAARSCHUWING! We raden gebruik", "Dagelijks u aan het apparaat niet te gebruik", or "Hints en tips" gebruiken, totdat het probleem voor andere mogelijke volledig is opgelost. Haal de oorzaken. stekker uit het stopcontact en sluit het apparaat pas weer aan Schakel het apparaat na controle aan en als u zeker weet dat het correct uit.
- Page 23 Probleem Mogelijke oorzaak en oplossing De binnenkant van het appa‐ • Dit is geen fout van het apparaat. Het wordt veroorzaakt raat is nat. door de vochtigheid in de lucht die tegen de wanden condenseert. Opvallend veel schuim tijdens • Gebruik alleen wasmiddel voor afwasautomaten.
-
Page 24: Technische Informatie
TECHNISCHE INFORMATIE Afmetingen Breedte / hoogte / diepte 596 / 818 - 898 / 550 (mm) Voltage (V) 220 - 240 Elektrische aansluiting Frequentie (Hz) Watertoevoerdruk Min. / max. bar (MPa) 0.5 (0.05) / 8 (0.8) Watertoevoer Koud water of warm wa‐ max. -
Page 25: Safety Information
CONTENTS Safety information Before first use Safety instructions Daily use Product description Hints and tips Control panel Care and cleaning Programmes Troubleshooting Settings Technical information Subject to change without notice. SAFETY INFORMATION Before the installation and use of the appliance, carefully read the supplied instructions. -
Page 26: Safety Instructions
General Safety This appliance is intended to be used in household and • similar applications such as: farm houses; staff kitchen areas in shops, offices and – other working environments; by clients in hotels, motels, bed & breakfast and other –... - Page 27 • Do not install or use the appliance • The water inlet hose has a safety valve where the temperature is less than and a sheath with an inner mains 0 °C. cable. • Install the appliance in a safe and suitable place that meets installation requirements.
-
Page 28: Product Description
such as temperature, vibration, related to door assemblies, printed humidity, or are intended to signal circuit boards, electronic displays, information about the operational status pressure switches, thermostats and of the appliance. They are not intended sensors, software and firmware to be used in other applications and are including reset software. -
Page 29: Control Panel
Upper spray arm Rinse aid dispenser Lower spray arm Detergent dispenser Filters Cutlery basket Rating plate Lower basket Salt container Upper basket Air vent CONTROL PANEL On/off button / Reset button Programme button Programme indicators Delay button Indicators... -
Page 30: Programmes
Indicators Indicator Description Drying phase indicator. It is on when you select a programme with the drying phase. It flashes when the drying phase operates. Salt indicator. It is on when the salt container needs refilling. It is always off while the programme operates. -
Page 31: Settings
Consumption values Water Energy Duration 1) 2) Programme (kWh) (min) / 9.9 0.920 / 0.936 / 227 11.1 - 13.6 1.052 - 1.285 9.6 - 11.7 0.886 - 1.083 9.2 - 11.2 0.556 - 0.680 3.4 - 4.2 0.012 - 0.015 1) The pressure and the temperature of the water, the variations of the mains supply, the options and the quantity of dishes can change the values. - Page 32 Press and hold the on/off button until the negative effect on the washing results and appliance is in programme selection on the appliance. mode. The higher the content of these minerals, the harder your water is. Water hardness How to enter user mode is measured in equivalent scales.
- Page 33 between the final rinse and the All the consumption values programme end. mentioned in this section are determined in accordance with Water softener Amount of water the currently applicable level standard in laboratory conditions with water hardness 2.5mmol/L according to the 2019/2022 regulation (water softener: level 3).
- Page 34 notification to keep the rinse aid refill The indicator shows the current indicator active. setting: • is off = The acoustic signal is How to deactivate the rinse aid off. empty notification • is on = The acoustic signal is Make sure the appliance is in user mode.
-
Page 35: Before First Use
1. Press the programme button three • is off = AirDry is off. times. • is on = AirDry is on. The indicator starts to flash. 3. Press the programme button to 2. Wait until the indicator continues change the setting. to flash and the remaining programme 4. -
Page 36: Daily Use
How to fill the rinse aid 1. Press the release button (D) to open dispenser the lid (C). 2. Fill the dispenser (A) until the rinse aid reaches the marking ''MAX''. 3. Remove the spilled rinse aid with an absorbent cloth to prevent excessive foam formation. - Page 37 programme you want to select starts Cancelling the delay start flashing. 4. Close the appliance door to start the Press the on/off button for 3 seconds until programme. the appliance is in programme selection mode. When you cancel the delay start, you have Starting a programme with to set the programme again.
-
Page 38: Hints And Tips
HINTS AND TIPS General – Follow the instructions in the chapter "Care and cleaning". Follow the hints below to ensure optimal cleaning and drying results in daily use Using salt, rinse aid and and to protect the environment. detergent • Washing dishes in the dishwasher as •... -
Page 39: Care And Cleaning
2. Make sure that the salt and rinse aid • Put cutlery and small items in the containers are full. cutlery basket. 3. Start the shortest programme with a • Make sure that the spray arms can rinsing phase. Do not add detergent move freely before you start a and do put dishes in the baskets. - Page 40 5. Make sure that there are no residues of food or soil in or around the edge of 1. Turn the filter (B) counterclockwise the sump. and remove it. 6. Put back in place the flat filter (A). Make sure that it is correctly positioned under the 2 guides.
- Page 41 CAUTION! An incorrect position of the filters can cause bad washing results and damage to the appliance. Cleaning the lower spray arm We recommend to clean the lower spray arm regularly to prevent soil from clogging the holes. Clogged holes can cause unsatisfactory washing results.
-
Page 42: Troubleshooting
3. Reassemble the filters as instructed in CAUTION! If unable to this chapter. remove the objects, contact an Authorised Service Centre. TROUBLESHOOTING to contact an Authorised Service WARNING! Improper repair of Centre. the appliance may pose a Refer to the below table for information on danger to the safety of the possible problems. - Page 43 Problem and alarm code Possible cause and solution The anti-flood device is on. • Close the water tap. • Make sure that the appliance is correctly instal‐ • The indicator flashes 3 times in‐ led. termittently. • Make sure the baskets are loaded as instructed •...
- Page 44 Problem and alarm code Possible cause and solution Small leak from the appliance door. • The appliance is not levelled. Loosen or tighten the adjustable feet (if applicable). • The appliance door is not centred on the tub. Adjust the rear foot (if applicable). The appliance door is difficult to close.
- Page 45 Problem Possible cause and solution Poor drying results. • Tableware has been left for too long inside a closed ap‐ pliance. • There is no rinse aid or the dosage of rinse aid is not enough. Set the rinse aid dispenser to a higher level. •...
-
Page 46: Technical Information
Problem Possible cause and solution Limescale deposits on the ta‐ • The level of salt is low, check the refill indicator. bleware, on the tub and on the • The cap of the salt container is loose. inside of the door. •... - Page 47 and product number that you can find on For more detailed information about the the rating plate of the appliance. Refer to energy label, visit www.theenergylabel.eu. the chapter "Product description". ENVIRONMENTAL CONCERNS not dispose of appliances marked with the Recycle materials with the symbol .
- Page 48 Het toestel-identificatieplaatje bevindt zich aan de binnenzijde van het toestel. Houd, wanneer u contact opneemt met de serviceafdeling, het complete typenummer bij de hand. The appliance identification plate is located on the inside of the appliance. Please have the complete model number available when contacting the service department. Adressen en telefoonnummers van de serviceorganisatie vindt u op de garantiekaart.
Need help?
Do you have a question about the VA5113BT and is the answer not in the manual?
Questions and answers