
Related Manuals for HAMPTON BAY SW18030 BN


Summary of Contents for HAMPTON BAY SW18030 BN
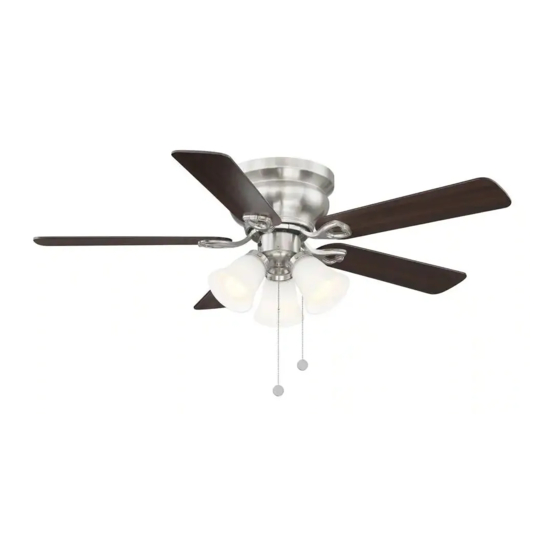
- Page 1 Item #XXXXXX Model #SW18030 BN USE AND CARE GUIDE CLARKSTON 44 INCH CEILING FAN 1-877-527-0313 HOMEDEPOT.COM...
-
Page 2: Table Of Contents
Table of Contents Assembly ............... Table of Contents ............2 Hanging the Fan ..............Safety Information ............2 Attaching the Fan Blades ............Warranty .................3 Installing the Light Kit ............Pre-installation .............. Operation ..............11 Specifications ................Care and Cleaning ............12 Tools Required ................. Troubleshooting ............ -
Page 3: Warranty
Warranty We warrant the fan motor to be free from defects in workmanship and material present at time of shipment from the factory for a period of 15 years after the date of purchase by the original purchaser. We also warrant that all other fan parts, excluding any glass or acrylic blades, to be free from defects in workmanship and material at the time of shipment from the factory for a period of one year after the date of purchase by the original purchaser. -
Page 4: Hardware Included
Pre-Installation (continued) HARDWARE INCLUDED NOTE: Hardware shown to actual size unless noted otherwise in the table below. Part Description Quantity Blade screw 15 + 1 spare Fiber washer 15 + 1 spare Blade bracket screw 10 + 1 spare Plastic wire nut Fan pull chain fob Light kit pull chain fob Mounting plate screw ( pre-assembled) -
Page 5: Package Contents
Pre-Installation (continued) PACKAGE CONTENTS Part Description Quantity Blade Blade bracket Mounting bracket Mounting plate (assembled with fan motor assembly) Fan motor assembly Switch house cover (pre-assembled) Fan housing Light kit assembly Glass shade 9W A19 LED Bulb HOMEDEPOT.COM Please contact 1-877-527-0313 for further assistance. -
Page 6: Installation
Installation MOUNTING OPTIONS WARNING: To reduce the risk of fire, electric shock, or personal injury, mount the fan to an outlet box marked acceptable for fan support using the screws provided with the outlet box. An outlet box commonly used for the support of lighting fixtures may not be acceptable for fan support and may need to be replaced. -
Page 7: Assembly
Assembly — Hanging the Fan Hanging the fan to the Installing the mounting bracket to mounting bracket the electrical box □ Lift the fan into position by hanging the mounting plate (D) WARNING: To reduce the risk of fire, electric shock or portion of the fan motor assembly (E) onto the hook from other personal injury, mount the fan only to an outlet box or the ceiling mounting bracket (C) allowing it to hang freely. - Page 8 Assembly — Hanging the Fan (continued) connect the ground wire from the mounting plate (D) to the ground wire from the mounting bracket (C)
- Page 9 Assembly — Hanging the Fan (continued) Attaching the fan motor assembly Finishing the fan installation to the mounting bracket □ □ Remove one of the four screws (GG) on the mounting Align the four large screwheads (HH) pre-locked on the fan bracket (C) and loosen, but do not remove, the other housing (G) to the key holes (1) of the mounting bracket (C).
-
Page 10: Attaching The Fan Blades
Assembly — Attaching the Fan Blades Fastening the blade assemblies to the motor □ Attach the fan blades (A) to the blade bracket (B) using the blade screws (AA) and fiber washers (BB). Tighten the screws (AA) and fiber washer (BB) securely. □... -
Page 11: Operation
Operation □ Attach the fan pull chain fob (EE) to the chain on the switch house of fan motor assembly (E), and attach the light kit pull chain fob (FF) to the chain on the light kit assembly (H). □ Turn on power and check the operation of your fan. -
Page 12: Care And Cleaning
Care and Cleaning Do not □ Check the support connections, brackets, and blade □ attachments Do not use water when cleaning. Water could damage the motor, or the wood, or possibly cause an electrical shock. twice a year. Ensure they are secure. Because of the fan’s natural movement, some connections may become loose over time. -
Page 13: Service Parts
Service Parts Part Description Part Description Blade screw Blade Fiber washer Blade bracket Blade bracket screw Mounting bracket Mounting plate Plastic wire nut Fan motor assembly Fan pull chain fob Switch house cover Light kit pull chain fob Fan housing Mounting plate screw Light kit assembly Fan housing screw... - Page 14 1-877-527-0313 HOMEDEPOT.COM Retain this manual for future use.