Table of Contents
Advertisement
Quick Links
Advertisement
Table of Contents

Related Manuals for Electrolux 61 B3A 02 AA


Summary of Contents for Electrolux 61 B3A 02 AA
- Page 1 LIT60336C User Manual...
-
Page 2: Table Of Contents
10. ENERGY EFFICIENCY.................. 19 WE’RE THINKING OF YOU Thank you for purchasing an Electrolux appliance. You’ve chosen a product that brings with it decades of professional experience and innovation. Ingenious and stylish, it has been designed with you in mind. So whenever you use it, you can be safe in the knowledge that you’ll get great results every time. - Page 3 ENGLISH instructions in a safe and accessible location for future reference. 1.1 Children and vulnerable people safety This appliance can be used by children aged from 8 • years and above and persons with reduced physical, sensory or mental capabilities or lack of experience and knowledge if they have been given supervision or instruction concerning the use of the appliance in a safe way and understand the hazards involved.
-
Page 4: Safety Instructions
CAUTION: The cooking process has to be supervised. • A short term cooking process has to be supervised continuously. WARNING: Danger of fire: Do not store items on the • cooking surfaces. Metallic objects such as knives, forks, spoons and lids •... - Page 5 ENGLISH appliance when the door or the • Make sure not to cause damage to window is opened. the mains plug (if applicable) or to the • Each appliance has cooling fans on mains cable. Contact our Authorised the bottom. Service Centre or an electrician to •...
-
Page 6: Installation
• Do not use the appliance as a work can cause scratches on the glass / surface or as a storage surface. glass ceramic. Always lift these • If the surface of the appliance is objects up when you have to move cracked, disconnect immediately the them on the cooking surface. - Page 7 ENGLISH The rating plate is on the bottom of the hob. Serial number ......3.2 Built-in hobs Only use the built-in hobs after you assemble the hob into correct built-in units and work surfaces that align to the standards. 3.3 Connection cable •...
-
Page 8: Product Description
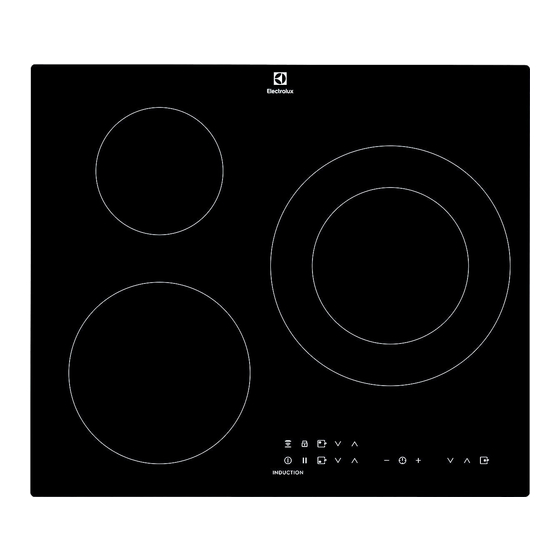
4. PRODUCT DESCRIPTION 4.1 Cooking surface layout Induction cooking zone Control panel 145 mm 180/280 210 mm 4.2 Control panel layout Use the sensor fields to operate the appliance. The displays, indicators and sounds tell which functions operate. Sen‐... - Page 9 ENGLISH Sen‐ Function Comment field Outer ring indicator To show that the outer ring is active. To select the cooking zone. To increase or decrease the time. To set a heat setting. PowerBoost To activate the function. 4.3 Heat setting displays Display Description The cooking zone is deactivated.
-
Page 10: Daily Use
4.4 OptiHeat Control (3 step The induction cooking zones produce the heat necessary for the cooking process Residual heat indicator) directly in the bottom of the cookware. The glass ceramic is heated by the heat WARNING! of the cookware. - Page 11 ENGLISH To deactivate the function: set the To deactivate the function: touch cooking zone with and touch . The 5.5 PowerBoost remaining time counts back to 00. The indicator of the cooking zone goes out. This function makes more power When the time comes to an available to the induction cooking zones.
- Page 12 Set the heat setting first. • The heat setting display of the reduced zones changes between two To activate the function: touch levels. comes on for 4 seconds. The Timer stays To deactivate the function: touch The previous heat setting comes on.
-
Page 13: Hints And Tips
ENGLISH When you finish cooking and Auto‐ Boil‐ deactivate the hob, the hood Frying matic fan may still operate for a light certain period of time. After that time the system Mode deactivates the fan speed 1 speed 1 automatically and prevents you from accidental Mode activation of the fan for the... - Page 14 Use the induction cooking Refer to "Technical data". zones with suitable cookware. 6.2 The noises during operation Cookware material If you can hear: • correct: cast iron, steel, enamelled steel, stainless steel, multi-layer • crack noise: cookware is made of...
- Page 15 Hob²Hood is on. Cooker hoods with the Hob²Hood function To find the full range of cooker hoods which work with this function refer to our consumer website. The Electrolux cooker hoods that work with this function must have the symbol...
-
Page 16: Care And Cleaning
7. CARE AND CLEANING otherwise, the dirt can cause damage WARNING! to the hob. Take care to avoid burns. Refer to Safety chapters. Use a special hob scraper on the glass surface at an acute angle and 7.1 General information move the blade on the surface. - Page 17 ENGLISH Problem Possible cause Remedy An acoustic signal sounds You put something on one Remove the object from and the hob deactivates. or more sensor fields. the sensor fields. An acoustic signal sounds when the hob is deactiva‐ ted. The hob deactivates. You put something on the Remove the object from the sensor field.
-
Page 18: Technical Data
(it is in the corner of the glass 9. TECHNICAL DATA 9.1 Rating plate Model LIT60336C PNC 949 492 360 00 Typ 61 B3A 02 AA 220 - 240 V / 400 V 2N 50 - 60 Hz Induction 7.35 kW Made in Romania Ser.Nr.... -
Page 19: Energy Efficiency
ENGLISH The power of the cooking zones can be For optimal cooking results use different in some small range from the cookware no larger than the diameter in data in the table. It changes with the the table. material and dimensions of the cookware. - Page 20 www.electrolux.com/shop...
Need help?
Do you have a question about the 61 B3A 02 AA and is the answer not in the manual?
Questions and answers