Advertisement
Available languages
Available languages
Quick Links
ASSEMBLY INSTRUCTIONS
ATTENTION: THIS PRODUCT IS NOT FOR COMMERCIAL USE
PARTS LIST
PART
MATERIAL CODE
NO.
1
RTS018M-CS01-3
2
RTS018M-CS01-2
3
62RUS0236I101
4
RTS018N-CS04-1
5
RTS018N-CS11-1
6
17C40A0710001YX
Attention:
Make sure that each bolt needed for all steps matches the
corresponding figure to ensure proper assembly.
Step 1:
Insert the right and the left arms (#1 and #2) into the cross
brace (#3) on both sides. Fasten them together by using
bolts (#6), washers (#10), and plastic nuts (#11). Keep the
bolts loose. See Figure 1.
Note:
The labels marked "L" and "R" on arms (#1 and #2)
should coincide with Figure 1 to ensure proper assembly.
Use the correct bolts as indicated. Do not tighten any of the bolts until the
!
Do not discard of any of the packaging until you have checked that you have all of the parts and fittings required.
!
Keep children away during assembly. This item contains small parts that can be swallowed by children.
!
Children should always be under direct adult supervision while using this product.
Retain these assembly instructions for future reference.
!
Quote the following FQC No. when contacting the service center.
!
V-3
INTENDED FOR RESIDENTIAL USE ONLY.
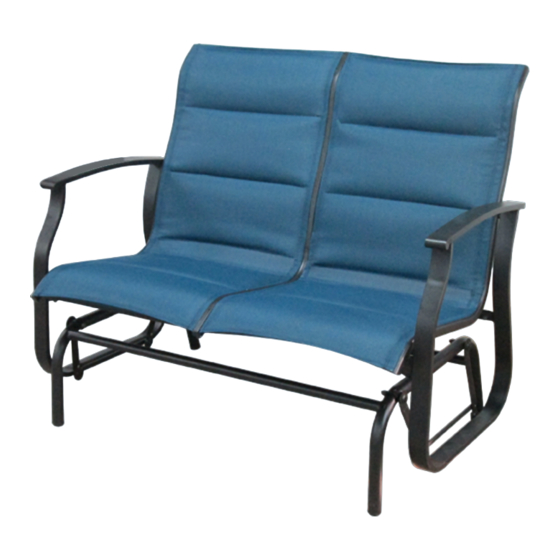
PART
RIGHT ARM
LEFT ARM
CROSS BRACE
BOTTOM FRAME
SEAT ASSEMBLY
BOLT M6*30
SERVICE CENTER TOLL FREE NO.
TEL: 1-877-539-7436
FAX: 1-877-539-7439
DO NOT RETURN TO THE STORE!
STOP
RTS018N
7
17C40A0712001YX
Q'TY
1
8
17C40A0705001YX
1
9
17C40A0719001YX
1
10
17FA05040301-YX
1
11
18000C23001
1
12
17KAA0101----Y4
2
13
17KAB1101----Y4
FIGURE 1
ARM
ASSEMBLY
1
PAGE 1 OF 3
BOLT M6*35
BOLT M6*15
BOLT M6*55
WASHER d6.5*D13*1.0
PLASTIC NUT M6*P1.0
HEX. KEY WRENCH 4MM
NUT WRENCH 10 & 13MM
R
1
3
2
3
30
#6 BOLT M6*30
is completely assembled.
glider
COURTYARD CREATIONS INC.
2
4
4
18
6
1
1
L
2
11
10
6
Advertisement

Related Manuals for Courtyard Creations RTS018N


Summary of Contents for Courtyard Creations RTS018N
- Page 1 Retain these assembly instructions for future reference. Quote the following FQC No. when contacting the service center. SERVICE CENTER TOLL FREE NO. TEL: 1-877-539-7436 FAX: 1-877-539-7439 DO NOT RETURN TO THE STORE! STOP PAGE 1 OF 3 COURTYARD CREATIONS INC.
- Page 2 FIGURE 2 FIGURE 3 FRONT HIGHER TUBE #9 BOLT M6*55 Step 2: Step 3: Place the arm assembly on to the bottom frame (#4). Make Fasten the swing bars of the arm assembly to the bottom sure that the higher tube on the bottom frame (#4) is facing frame (#4) by using bolts (#9), washers (#10), and plastic towards the front of the glider.
- Page 3 Warranty • This product is covered by Courtyard Creations Inc.’s 3 years limited warranty. • Proof of purchase (dated register receipt) is required for warranty claims. • It remains the customer’s responsibility for freight and packing charges to and from the service center.
-
Page 4: Instrucciones De Armado
Cuando se comunique con el centro de servicio, proporcione siempre el siguiente código de control de calidad (FQC, por sus siglas en inglés). NÚMERO GRATUITO DEL CENTRO DE SERVICIO TEL: 1-877-539-7436 FAX: 1-877-539-7439 ¡NO DEVUELVA ESTE PRODUCTO A LA TIENDA! ALTO PÁGINA 1 DE 3 COURTYARD CREATIONS INC. - Page 5 FIGURA 2 FIGURA 3 FRENTE TUBO SUPERIOR #9 TORNILLO M6*55 Paso 2: Paso 3: Coloque los brazos armados en el marco inferior (#4). Sujete las barras deslizadoras de los brazos armados al Asegúrese de que el tubo superior del marco inferior (#4) marco inferior (#4) con ayuda de los tornillos (#9), las dé...
- Page 6 Garantía • Este producto está cubierto por una garantía limitada de tres años con Courtyard Creations Inc. • Para cualquier reclamación de la garantía es necesario presentar el comprobante de compra (recibo de caja registradora con fecha).
Need help?
Do you have a question about the RTS018N and is the answer not in the manual?
Questions and answers