Table of Contents
Advertisement
Available languages
Available languages
Quick Links
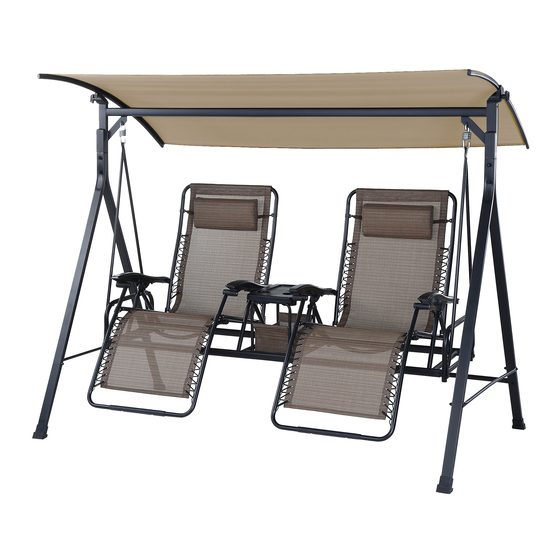
ASSEMBLY INSTRUCTIONS
ATTENTION: THIS PRODUCT IS NOT FOR COMMERCIAL USE
Use the correct bolts as indicated. Do not tighten any of the bolts until the swing is completely assembled.
!
Do not discard of any of the packaging until you have checked that you have all of the parts and
!
fittings required.
Keep children away during assembly. This item contains small parts that can be swallowed by
!
children. Children should always be under direct adult supervision while using this product.
Retain these assembly instructions for future reference.
!
Quote the following FQC No. when contacting the service center.
!
V-3
INTENDED FOR RESIDENTIAL USE ONLY.
RTS487G
SERVICE CENTER TOLL FREE NO.
TEL: 1-877-539-7436
FAX: 1-877-539-7439
DO NOT RETURN TO THE STORE!
STOP
PAGE 1 OF 8
COURTYARD CREATIONS INC.
Advertisement
Table of Contents

Related Manuals for Courtyard Creations RTS487G


Summary of Contents for Courtyard Creations RTS487G
- Page 1 Retain these assembly instructions for future reference. Quote the following FQC No. when contacting the service center. SERVICE CENTER TOLL FREE NO. TEL: 1-877-539-7436 FAX: 1-877-539-7439 DO NOT RETURN TO THE STORE! STOP COURTYARD CREATIONS INC. PAGE 1 OF 8...
- Page 2 C. Lay out all of the parts on a flat surface and identify them using the table below. PARTS LIST PART 17C40A0712001YX MATERIAL CODE PART Q'TY BOLT M6*35 RTS487G-CS09-8 17C40A0707001YX TOP CROSS BEAM W/ADJUSTABLE TEETH BOLT M6*18 62RUS487MN101 17FA08060601-YX FRONT UPRIGHT SUPPORT WASHER d8.5*D17*1.6...
-
Page 3: Table Of Contents
ASSEMBLY (Note: When fastening with nuts and bolts, always use a washer (#21 or #22) between the tube and the bolt or the tube and the nut.) Step 2 Step 1: Step 1 Fasten the front and the rear upright supports (#2 and #3) at the top by using bolts (#15), washers (#21), and plastic nuts (#24). - Page 4 Step 1 Step 6: Place the table top (#10) onto a non-abrasive surface, such as a carpet, with its underside facing upwards. Fasten the supports (#7) to the table top (#10) by using screws (#26). See Fig. B – Step 1. Step 2 Step 7: Fasten the supports (#7) to the bottom frame...
- Page 5 Step 8: Step 1 Insert the arms (#6) into the bottom frame (#8) by using bolts (#19), washers (#22), and plastic nuts (#25). See Fig. C – Step 1. Step 9: Open both of the seat assemblies (#9) and Step 2 secure them to the bottom frame (#8) by using bolts (#14 and #17), washers (#21, #22, #28, and #29), jam nuts (#23), and plastic nuts (#25).
-
Page 6: Step
Step 11: Hook the suspension spring (#13) into the top of both swing arm tubes (#11). Repeat the same procedure for both sides. See Fig. E. Fig. E Step 12: Hang the other side of the suspension spring (#13) into the hole located in the angled brace of the top cross beam w/adjustable teeth (#1). -
Page 7: Step
Warranty • This product is covered by Courtyard Creations Inc.’s one–year limited warranty. • Proof of purchase (dated register receipt) is required for warranty claims. • It remains the customer’s responsibility for freight and packing charges to and from the service center. - Page 8 Special Warnings 1. The user of this swing should always inspect it before each use. 2. It is essential to place this swing on level ground and not less than 6 feet away from any obstruction, such as fences, garages, houses, overhanging branches, laundry lines, or electrical wires. 3.
-
Page 9: Step
Cuando se comunique con el centro de servicio, proporcione siempre el siguiente código de control de calidad (FQC, por sus siglas en inglés). NÚMERO GRATUITO DEL CENTRO DE SERVICIO TEL: 1-877-539-7436 FAX: 1-877-539-7439 ¡NO DEVUELVA ESTE PRODUCTO A LA TIENDA! ALTO COURTYARD CREATIONS INC. PÁGINA 1 DE 8... -
Page 10: Step
C. Extienda todas las partes en una superficie plana e identifíquelas con ayuda de la siguiente tabla: LISTA DE PARTES No. DE No. DE CÓDIGO DE 17C40A0712001YX CANT. PARTE PARTE MATERIAL TORNILLO M6*35 RTS487G-CS09-8 17C40A0707001YX BARRA TRANSVERSAL SUPERIOR CON TORNILLO M6*18 DIENTES AJUSTABLES 62RUS487MN101 17FA08060601-YX SOPORTE VERTICAL DELANTERO RONDANA d8.5*D17*1.6 62RUS487MN102 17FA05050401-YX SOPORTE VERTICAL TRASERO RONDANA d6.5*D16*1.2... -
Page 11: Step
ENSAMBLADO (Nota: Al unir las tuercas con los tornillos, coloque siempre una rondana (#21 o #22) entre el tubo y el tornillo o entre el tubo y la tuerca.) Paso 2 Paso 1: Paso 1 Sujete los soportes verticales delantero y trasero (#2 y #3) en la parte superior con ayuda de los tornillos (#15), las rondanas (#21) y las tuercas de plástico (#24). -
Page 12: Step
Paso 1 Paso 6: Coloque la cubierta de la mesa (#10) sobre una superficie no abrasiva, como puede ser una alfombra, con la parte inferior hacia arriba. Sujete los soportes (#7) a la cubierta de la mesa (#10) con ayuda de los tornillos (#26). Consulte la figura B, paso 1. -
Page 13: Step
Paso 8: Paso 1 Inserte los brazos (#6) en el marco inferior (#8) con ayuda de los tornillos (#19), las rondanas (#22) y las tuercas de plástico (#25). Consulte la figura C, paso 1. Paso 9: Abra los dos asientos (#9) y fíjelos al marco Paso 2 inferior (#8) con ayuda de los tornillos (#14 y #17), las rondanas (#21, #22, #28 y #29), las... -
Page 14: Step
Paso 11: Enganche el resorte de suspensión (#13) en la parte superior de los tubos de los descansabrazos (#11). Repita el mismo procedimiento para ambos lados. Consulte la figura E. Fig. E Paso 12: Inserte el otro extremo del resorte de suspensión (#13) en el agujero del soporte diagonal de la barra transversal superior con dientes ajustables (#1). -
Page 15: Step
Garantía • Este producto está cubierto por una garantía limitada de un año con Courtyard Creations Inc. • Para cualquier reclamación de la garantía es necesario presentar el comprobante de compra (recibo de caja registradora con fecha). -
Page 16: Step
Advertencias especiales 1. Inspeccione siempre el columpio antes de usarlo. 2. Es esencial que coloque el columpio en una superficie plana dejando un margen de al menos de 6 pies (1.80m) respecto de cualquier obstrucción, como rejas, cocheras, casas, ramas bajas de árboles, tendederos o cables eléctricos.
Need help?
Do you have a question about the RTS487G and is the answer not in the manual?
Questions and answers