Table of Contents
Advertisement
Quick Links
Advertisement
Table of Contents

Subscribe to Our Youtube Channel
Related Manuals for Unique elite UGP-36E6 ON1


Summary of Contents for Unique elite UGP-36E6 ON1
- Page 1 PROFESSIONAL GAS RANGE UGP-36E6 ON1 OWNER’S GUIDE MAR18V1...
- Page 2 HOW TO OBTAIN SERVICE AND/OR PARTS When your range does not operate in accordance with the in- structions in the manual, you should contact the dealer in the immediate vicinity for service, or contact Unique Gas Appliances customer service at 1-877-427-2266. IMPORTANT TO THE OWNER OF THE RANGE: Retain this owner’s manual for...
-
Page 3: What To Do If You Smell Gas
WARNING If the information in this manual is not followed exactly, a fire or an explosion may result causing property damage, personal injury or even death. Do not store or use gasoline, liquid propane cylinders or other flammable vapors and liquids in the vicinity of this appliance. WHAT TO DO IF YOU SMELL GAS: •... - Page 4 TABLE OF CONTENTS Important safety instructions Parts diagram: 36” range Installation introduction Gas supply requirements Installation instructions for 36” range: dimensions & clearances Electric power requirements Electrical grounding Connecting range to gas supply First use of your new range & oven Cooktop use Oven use Care and cleaning...
-
Page 5: Important Safety Instructions
IMPORTANT SAFETY INSTRUCTIONS Pay attention to the safety alert symbols used in this manual as they are designed to indicate potential personal or property safety hazards. Obey all safety messages to avoid any property damage, personal injury or death. WARNING indicates a potentially hazard- WARN IN G ous situation, which if not avoided could result in serious injury or death. -
Page 6: Tipping Hazard
IMPORTANT SAFETY INSTRUCTIONS continued To reduce the risk of fire, electrical shock, personal injury or damage when using the appliance, follow the important safety instructions listed below: ELECTICAL SHOCK HAZARD Before removing a faulty oven light bulb, make sure you turn the power to the range off at the main fuse or circuit breaker panel. -
Page 7: Explosion Hazard
IMPORTANT SAFETY INSTRUCTIONS continued EXPLOSION HAZARD If you smell gas, do not use the appliance. Open a window or door to allow gas to escape, then follow the instructions on the second page (“WARNING”) of this manual. • Do not use water on grease fires. A violent explosion of steam may result. •... -
Page 8: Poisoning Hazard
IMPORTANT SAFETY INSTRUCTIONS continued POISONING HAZARD Never cover any slots, holes or passages in the oven bottom or cover an entire rack or the oven floor with materials such as aluminium foil. Doing so blocks airflow through the oven and may cause carbon monoxide poisoning. Aluminium foil linings may also trap excess heat, creating a fire hazard. -
Page 9: Proper Installation
IMPORTANT SAFETY INSTRUCTIONS continued FULLY READ ALL INSTRUCTIONS BEFORE USING THE APPLIANCE. ONLY USE THE APPLIANCE FOR ITS INTENDED PURPOSE AS DESCRIBED IN THESE INSTRUCTIONS. PROPER INSTALLATION Be sure your appliance is properly installed and grounded by a qualified technician in accordance with the National Fuel Gas Code ANSI Z223.1-latest edition, and the National Electrical Code ANSI/NFPA No. - Page 10 IMPORTANT SAFETY INSTRUCTIONS continued CA UTI ON Use care when opening the oven door when oven is in use - let hot air or steam escape before removing or replacing food. Keep the oven vent ducts unobstructed at all times. Always position the oven shelves in the desired location while the oven is cool (before preheating).
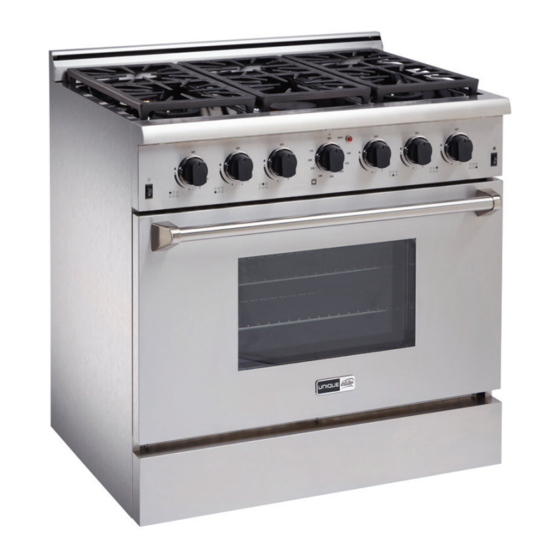
- Page 11 INTRODUCTION Unique Elite UGP-36E6 ON1 36” range - parts diagram Burner grates Backsplash 6 top burners Grease trap Oven indicator light Oven light switch Top burner knob Oven knob/Broil Oven fan switch Oven door gasket Oven lamp Oven lamp Oven fan cover...
-
Page 12: Installation Introduction
INSTALLATION INTRODUCTION CAU TIO N TO ENSURE SAFE OPERATION, READ ALL INSTRUCTIONS BEFORE USING THE APPLIANCE: • Install or locate the product only in accordance with the provided Installation Instructions. • Do not attempt to adjust, repair, service or replace any part of your appliance unless it is specifically recommended in this guide. -
Page 13: Gas Supply Requirements
GAS SUPPLY REQUIREMENTS CAU TION Installation of this range must conform with local codes, or in the absence of local codes, with the national Fuel Gas Code ANSIZ223.1 / NFPA 54. In Canada, installation must conform to the current Natural Gas Installation code, CAN 1-1.M81 and with local codes where applicable. - Page 14 INSTALLATION INSTRUCTIONS, 36” range dimensions & clearances...
- Page 15 INSTALLATION INSTRUCTIONS, 36” range dimensions & clearances Maximum depth The bottom of the hood should be a for cabinets above countertops 36” (91.4 cm) minimum of 36” above the counter top. This would typically result in the bottom of the hood being 66” to 72” Minimum 2”...
-
Page 16: Electric Power Requirements
ELECTRIC POWER REQUIREMENTS C AUTI ON Your range must be electrically grounded in accordance with local codes, or in the absence of local codes, in accordance with the National Electrical Code (ANSI/NFPA 70, latest edition). In Canada, electrical grounding must be in accordance with the current CSA C22.1 Canadian Electrical Code Part 1 and/or local codes. -
Page 17: Electrical Grounding
ELECTRICAL GROUNDING 1. The power cord is equipped with a three-prong (grounding) plug which mates with a standard three-prong grounding wall receptacle to minimize the possibility of electrical shock hazard from the range. 2. All cord connected appliances shall include instructions relative to location of the wall receptacle and a warning to the user to disconnect the electrical supply before serving the appliance. -
Page 18: Danger Of Explosion
CONNECTING RANGE TO GAS SUPPLY continued ! DANGER OF EXPLOSION ! NEVER USE AN OPEN FLAME TO LEAK TEST. EXTINGUISH CIGARETTES. STAY AWAY FROM ANY SOURCE OF IGNITION DURING THIS PROCESS. 6. Leak testing of the appliance should be conducted according to the manufacturer’s instructions. - Page 19 FIRST USE OF YOUR NEW RANGE & OVEN When using the appliance for the fi rst time, the oven and broiler burners should be turned on to burn off the manufacturing oils. Turn the oven on to 450˚F (230˚C) for 20 to 30 minutes. Then turn the oven control knob to “BROIL”...
- Page 20 FIRST USE OF YOUR NEW RANGE & OVEN continued Inserting the shelves: 1. Hold both sides of the shelf fi rmly to keep it horizontal, with the front edge of the shelf closest to you. 2. Insert the back edge of the shelf into the slots on the shelf racks. 3.
-
Page 21: Cooktop Use
COOKTOP USE 36” range 15,000 12,000 18,000... - Page 22 COOKTOP USE continued Guidelines for using the cooktop burners: • The dual burners feature a low turn-down setting (SIM) for gentle simmering (620 BTU/hr). Use the SIM setting for melting chocolate and butter, cooking rice and delicate sauces, simmering soups and stews, and keeping cooked food hot.
- Page 23 COOKTOP USE continued Surface burner ignition: • To light the top burners, push and turn the appropriate control knob counter- clockwise to the “5” position. You will hear a clicking noise - the sound of the electric spark igniting the burner. Once burner ignition has been achieved, turn the burner control knob to adjust the desired heat setting.
- Page 24 COOKTOP USE continued Flame size: • To select the flame size, watch the flame when you turn the control knob. 1 inch (2.5 cm) Any flame larger than the bottom of the cookware is wasted. The flame should be steady and blue in colour. Foreign material in the gas line may cause an orange flame during initial operation.
- Page 25 OVEN USE Oven Cooking Guidelines: Do not block the ducts on the rear of the range when using the oven. It is important that there is a continuous IM PO R TANT flow of hot air from the oven and fresh air into the oven burner.
- Page 26 OVEN USE continued Convection Mode: Heat is transferred from the bake burners in the bottom of the oven cavity to the oven cavity itself. The convection fan in the rear of the oven then circulates the hot air, providing even heat distribution throughout the oven. Convection cooking generally provides a more even temperature with faster baking times than the standard oven baking setting.
- Page 27 OVEN USE continued Notes about Convection Cooking: Convection cooking generally provides a more even temperature with faster baking times than the standard oven baking setting. When baking in Convection Mode, either reduce the temperature stated in the recipe and leave the baking time unchanged, or reduce the baking time by several minutes and leave the temperature unchanged.
- Page 28 OVEN USE continued Defrosting - Oven Function: To thaw uncooked frozen food, set the oven temperature to 100-150˚F. Once thawed, cook the food immediately and do not refreeze. Prevent drips and spills from thawing food by ensuring that defrosting food is tightly wrapped in foil or is placed in oven-proof cookware.
- Page 29 OVEN USE continued Broiler Operation - Preheating: Preheating is suggested when searing rare steaks. To preheat, turn the “OVEN” selector knob to the “BROIL” position. Wait for the broiler burner to become hot, approximately 2 minutes, and then place food beneath the broiler.
- Page 30 OVEN USE continued Broiler guidelines: 1. Choose a suitable shelf position. To ensure that meat is cooked through rather than just browned on the outside, broil thick pieces of meat and poultry on shelf positions 2 or 3. Use shelf position 4 for thinner items that need less cooking time like steaks, chops, or hamburger patties.
-
Page 31: Care And Cleaning
CARE AND CLEANING Cleaning guidelines: Read the “IMPORTANT SAFETY INSTRUCTIONS” and ‘CARE AND CLEANING” sections before you start cleaning your range. See the pages following for instructions on removing and replacing different parts of the range for cleaning and maintenance. To help you identify parts, see the range diagrams on pages 11/12. - Page 32 CARE AND CLEANING continued To avoid electrical shock or burns, turn off controls and ensure the cooktop is cool before cleaning. Burner Caps and Brass Flame Spreaders: Check that the burner is turned OFF and allow it to cool. Lift off the burner cap and brass flame spreader.
- Page 33 CARE AND CLEANING continued To avoid electrical shock or burns, turn off controls and ensure the cooktop is cool before cleaning. Bake and Broil Burners: Do not clean these parts. They self-clean during normal use. Porcelain Surfaces : • Clean the cooktop surface with a solution of mild detergent and warm water.
- Page 34 CARE AND CLEANING continued To avoid electrical shock or burns, turn off controls and ensure the range and oven are cool before cleaning. Removing and Replacing the Oven Door: Do not lift the oven door by its handle. Doing so may IM PO RTA NT damage the handle or the door.
- Page 35 CARE AND CLEANING continued To replace the oven door, proceed as follows: 1. Hold the door fi rmly in both hands. 2. Holding the oven door at approximately half-way open, insert the hinge tongues into the slots, making sure that the notches on both sides drop into place as shown.
- Page 36 CARE AND CLEANING continued To avoid electrical shock or burns, turn off controls and ensure the range and oven are cool before cleaning. Replacing the burner parts: When replacing the burners, make sure that the two locating pins on the bottom of the brass fl ame spreader are properly aligned with the locating pin holes on the top of the simmer ring.
-
Page 37: Troubleshooting
TROUBLESHOOTING Cooktop PROBLEM POSSIBLE CAUSES POSSIBLE SOLUTION Burners will not Burner parts or igniters • Check that the burner light may be wet, dirty or parts are clean, misaligned. dry and correctly Flames do not assembled. burn all around the burner cap •... - Page 38 TROUBLESHOOTING continued PROBLEM POSSIBLE CAUSES POSSIBLE SOLUTION Burner flame goes Low gas pressure. • Contact gas company. out at low setting Air intake holes • Remove obstruction from air around burners are intake holes. obstructed. The flames have A draft or spill has •...
- Page 39 TROUBLESHOOTING Oven PROBLEM POSSIBLE CAUSES POSSIBLE SOLUTION The oven doesn’t No power supply (oven • Check that the circuit work (no heating) light and elements do breaker hasn’t tripped not come on either) and there is no power outage in your area. No gas supply (gas If there is a power ovens)
- Page 40 TROUBLESHOOTING continued Oven PROBLEM POSSIBLE CAUSES POSSIBLE SOLUTION Steam coming Moisture from food • This is normal, from oven vents evaporating during especially if you at the back of the cooking. are cooking large range. quantities of food in the oven using the CONVECTION mode.
- Page 41 UGG-36E6 ON1 WIRING DIAGRAM...
- Page 42 UGP-36E6 ON1 PARTS DIAGRAM AND LIST * Visit our website for full schematics...
-
Page 43: Parts List
Thermostat Knob UGP-22.99.0040-A0 UGP-05.03.0017-A0 Door hinge receiver UGP-04.01.0560-A0 Oven Frame,Stainless Steel Gasket UGP-11.05.0014-A0 Kick Panel UGP-20.02.0081-A0 Door hinge, left UGP-05.03.0029-A0 Oven Window UGP-22.99.0006-A0 Door hinge, right UGP-05.03.0028-A0 Oven Window UGP-15.01.0002-A0 Door frame,outer UGP-20.02.0080-A0 Door Handle Suppor,Left UGP-12.02.0068-A0 Door Handle UGP-12.01.0017-A0 Door Handle Support,Right UGP-12.02.0069-A0 Unique Logo UGP-08.02.0009-A0 Burner Cap(18000BTU) UGP-10.01.0076-A0 Flame Ring(18000BTU) UGP-10.01.0077-A0 Flame Ring Base(18000BTU) UGP-10.01.0078-A0 Bottom Cup(18000BTU) UGP-10.01.0079-A0 Drip Pan UGP-04.06.0568-A0-5 Electrode UGP-07.99.0323-A1... - Page 44 PARTS LIST Item # Description Part # Electrode UGP-07.10.0115-A3 Drip Pan UGP-04.06.0423-A0 Electrode UGP-10.09.0072-A2 Oven ceiling UGP-20.01.0089-A0 Igniter hot surface,broiler burner UGP-07.01.0054-A0 Infrared Burner UGP-10.03.0017-A0 Broil Orifice Bracket UGP-05.05.0011-A0 Backsplash UGP-20.01.0357-A0 Back Panel UGP-04.04.0107-A1 Relay UGP-07.08.0010-A0 Igniter UGP-07.07.0049-A0 Plug UGP-07.06.0008-A0 Oven Back Panel UGP-20.06.0358-A0-5 Convection Fan UGP-07.03.0006-A0 Oven rack UGP-13.03.0010-A2 Oven Side Panel,Left UGP-04.06.0869-A0-5 Oven Rack Support UGP-13.03.0019-A0 Regulator UGP-09.03.0009-A0 Oven Floor UGP-20.06.0072-A0...
- Page 45 Unique Gas Products Ltd. and by the Seller. 2. Any part of this range returned to the Seller or Unique Gas Products Ltd, which upon examination is determined by them to have been defective in material or workmanship, will at their option be either repaired or replaced under this warranty.
-
Page 46: Appliance Information
APPLIANCE INFORMATION (manual copy - keep with your records) To make care and servicing of your range easy and efficient, please record the following information for future reference: Model: Serial Number: Purchased From: Date Purchased: Installed By: NOTES... - Page 47 © 2018 Unique Gas Products Ltd., 2245 Wyecroft Road #5, Oakville, Ontario, Canada, L6L 5L7 www.uniqueoffgrid.com...
Need help?
Do you have a question about the elite UGP-36E6 ON1 and is the answer not in the manual?
Questions and answers