Unique Classic Retro UGP-30CR W Owner's Manual
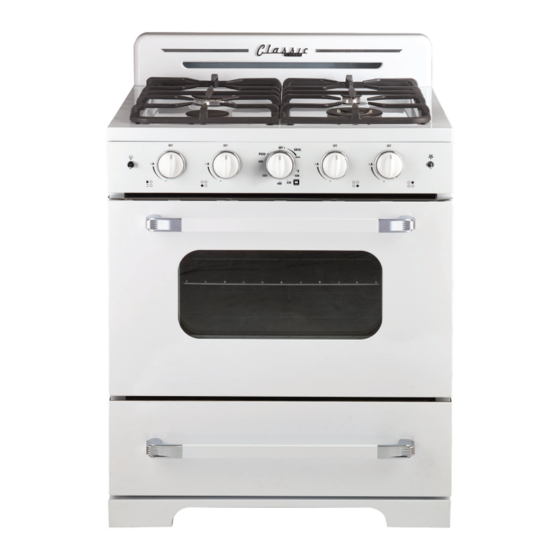
30” convection gas range
Hide thumbs
Also See for Classic Retro UGP-30CR W:
- Owner's manual (24 pages) ,
- Owner's manual (33 pages)

Related Manuals for Unique Classic Retro UGP-30CR W


Summary of Contents for Unique Classic Retro UGP-30CR W
- Page 1 CLASSIC RETRO BY UNIQUE 30” CONVECTION GAS RANGE MODEL NUMBERS: UGP-30CR W, UGP-30CR B, UGP-30CR RB, UGP-30CR LG, UGP-30CR T OWNER’S GUIDE serial number: DEC20V2 5010059...
- Page 2 CLASSIC RETRO BY UNIQUE 30” CONVECTION GAS RANGE GAS RANGE - NG & LPG CONVERTIBLE Installation & Owner’s Manual This manual contains information for: • Important Safeguards • Installation • Use and Care Certain ranges come equipped with special features. Determine from a study of your range which of the instructions given in this booklet pertain to your range.
- Page 3 MANUFACTURED & CERTIFIED BY Unique Appliances WARNING: If the information in this manual is not followed exactly, a fi re or explosion may result causing property damage, personal injury or death. – Do not store or use gasoline or other fl ammable vapors and liquids in the vicinity of this or any other appliance.
-
Page 4: Table Of Contents
TABLE OF CONTENTS IMPORTANT SAFEGUARDS ......7 CARBON MONOXIDE WARNING ..... . 13 ENERGY SAVING IDEAS . - Page 5 BEFORE USING YOUR GAS RANGE WARNING HAVE THIS RANGE INSTALLED BY A QUALIFIED INSTALLER. Improper installation, adjustment, alteration, services, or maintenance can cause injury or property damage. Consult a qualified installer, service agency, or the gas supplier. BEFORE USING YOUR GAS RANGE: •...
- Page 6 WELCOME & CONGRATULATIONS Congratulations on your purchase of a UNIQUE range! We are very proud of our product – and are completely committed to providing you with the best service possible. Your satisfaction is our #1 priority. Please read this manual very carefully. It contains valuable information on how to properly maintain your new Unique propane range.
-
Page 7: Important Safeguards
READ ALL IMPORTANT SAFEGUARDS AND ALL INSTRUCTIONS BEFORE USING THE APPLIANCE. IF YOU SMELL GAS: • Open windows • Don’t touch electrical switches • Extinguish any open flame • Immediately call your gas supplier FOR YOUR SAFETY: • Keep appliance area clear and free from combustible materials gasoline and other flammable vapors and liquids. - Page 8 Notice: Never keep pet birds in the kitchen. Birds have a very sensitive respiratory system. Fumes released from cooking oil, fat, margarine or overheated non-stick cookware may be harmful or fatal to birds. PROPER INSTALLATION: Be sure a qualified technician in accordance with the National Fuel Gas Code ANSI Z223.1/NFPA54 properly installs your appliance.
- Page 9 USER SERVICING: Do not repair or replace any part of the appliance unless specifically recommended in this owner’s guide. Only a qualified technician should do all other servicing. This will reduce the risk of personal injury and damage to the range. Storage in or on appliance: Flammable materials should not be stored in an oven, near surface burners or in the broiler section.
- Page 10 Do not use water or flour on grease fires. Smother the fire with a pan lid, baking soda or use a dry chemical or foam-type extinguisher. Operation of the Surface Burners. When the burners are operated for the first time, a small amount of smoke may be generated due to tape residue or manufacturing lubrication, this is not dangerous.
- Page 11 Cookware handles should be turned inward and not extend over adjacent surface burners. To reduce the risk of burns, ignition of flammable materials, and spillage due to unintentional contact with the cookware, the handle of a cookware should be positioned so that it is turned inward, and does not extend over adjacent surface burners.
- Page 12 Electrical installation should comply with national and local codes. REPLACEMENT PARTS Only authorized replacement parts may be used in performing service on the range. Replacement parts are available from factory authorized parts distributors. Contact the nearest Unique parts distributor in your area.
-
Page 13: Carbon Monoxide Warning
CARBON MONOXIDE WARNING Carbon Monoxide is a possible danger when using any gas powered appliance. All gas appliances MUST be installed by a licensed professional who is familiar with the Carbon Monoxide levels appropriate for each appliance. The American Gas Association publishes CO emissions for appliances and heating equipment through the ANSI Std. -
Page 14: Energy Saving Ideas
ENERGY-SAVING IDEAS Surface Cooking Use lids when surface cooking. A lid traps steam and uses it to speed up the cooking process. If you have a pressure cooker or vegetable steamer, use it. You’ll waste fewer vitamins, save time and cut energy costs. Use medium-weight, flat bottomed pans that match the flame size. -
Page 15: Installation Instructions
INSTALLATION INSTRUCTIONS Be sure appliance is properly installed and grounded by a qualified technician. It is the responsibility of the technician to make certain that your range is properly installed. Situations caused by improper installation are not covered under the warranty. -
Page 16: How To Install The Backsplash
HOW TO INSTALL THE BACKSPLASH 1. Align the backsplash to the rear part of the cooktop as shown in the diagram. 2. Secure the backsplash to the cooktop from the back using the 2 Phillips head screws provided as shown in the diagram. -
Page 17: Gas Connection
GAS CONNECTIONS (All Units) NOTICE TO MASSACHUSETTS APPLIANCE DEALERS: Be sure this document is included in all gas range appliances sold to consumers in the State of Massachusetts. NOTICE: Massachusetts law requires the following: • Appliances must be installed by a licensed plumber or gas fitter. •... - Page 18 GAS CONNECTIONS (continued) The appliance and its individual shut-off valve must be disconnected from the gas supply piping system during any pressure testing of that system at test pressures in excess of psig. The appliance must be isolated from the gas supply piping system by closing its individual manual shut-off valve during any pressure testing of the gas supply piping system at test pressures equal to or less than psig.
- Page 19 GAS CONNECTIONS (continued) When using this on LPG gas, conversion must be made by a qualified LPG installer before attempting to operate the range on that gas. For correct operation, the pressure of natural gas supplied to the regulator should be between 4”...
-
Page 20: Wall Clearances & Anti-Tip Location
WALL CLEARANCES & ANTI-TIP LOCATION All units must be installed in accordance to minimum rear and side wall clearance and clearances extended vertically above cooking top which are stated on the serial plate located at the back of the range. ANY OPENINGS IN THE WALL BEHIND THE UNIT AND IN THE FLOOR UNDER THE UNIT MUST BE SEALED. - Page 21 WALL CLEARANCES & ANTI-TIP LOCATION (continued) Anti-Tip Bracket Location...
-
Page 22: Ng Conversion Instructions
GAS RANGE CONVERSION To convert application and/or adjust from NG to LPG The range is set for use with Natural Gas (NG). The factory setting is indicated on the serial plate. When set for Natural Gas operation, the pressure regulator will regulate the gas to 4”... - Page 23 GAS RANGE CONVERSION (continued) ATTENTION: YOUR PRODUCT IS PRE-INSTALLED WITH NATURAL GAS INJECTORS AND REGULATOR. IF YOU ARE USING LP GAS, PLEASE REFER TO THE INSTALLATION INSTRUCTIONS INCLUDED WITH THE CONVERSION KIT. 30” MODEL Convertible Pressure Regulator ORIFICES The range is shipped to operate on NG. LPG orifices for adjusting the minimum flame are shipped with the unit in a separate envelope with the manual.
- Page 24 GAS RANGE CONVERSION (continued) 8. Remove all NG orifices, place in the bag and store in a safe place. 9. Take the LPG orifices provided and install them as shown below. See below for rating of orifice for this model Liquid Propane Gas Orifices 14,000 9,000...
-
Page 25: Checking For Manifold Gas Pressure
GAS RANGE CONVERSION (continued) CHECKING FOR MANIFOLD GAS PRESSURE To check the manifold gas pressure, remove the burner cap and connect a manometer (water gauge) or other pressure test device to the burner orifice. Use a rubber hose with inside diameter of approximately ¼” hold the end of the hose tight over the orifice. -
Page 26: Adjusting The Top Burner And Oven Flame
ADJUSTING THE TOP BURNER AND OVEN FLAME Keep appliance area clear and free from combustible materials, gasoline, and other flammable vapors and liquids. Do not obstruct the flow of air that is necessary for combustion and ventilation. Top Burner Valves The top burners have orifices that are dedicated to the type of fuel to be used. - Page 27 ADJUSTING THE TOP BURNER AND OVEN FLAME (continued) Cooktop Burner Operation The top burner flame size should be adjusted so that is does not extend beyond the edge of the cookware. As a matter of safety, it’s recommended that you comply with these instructions.
- Page 28 ADJUSTING THE TOP BURNER AND OVEN FLAME (continued) ADJUSTING THE OVEN BURNER FLAME 1) Light the burner by turning the thermostat to the 500ºF position, 2) Remove the knob by pulling straight out. 3) Remove the two (2) Phillips head screws that secure the bezel to the control panel. 4) Carefully lift the bezel away from the control panel to allow access to the access hole below the valve stem.
-
Page 29: Operation Of Range
OPERATION OF RANGE Lighting the Top Burners Push & rotate left to ignite oven PUSH 1. To obtain a flame more easily, light the burner before placing a cooking Burner position utensil on the burner grate. 2 Decide which burner you’re igniting Oven first using the screened diagram below the burner knob. - Page 30 OPERATION OF RANGE (continued) HOW TO USE THE GAS OVEN General features The gas oven is provided with two burners: The Oven burner, mounted on the lower part of the oven The Broil burner, mounted on the upper part of the oven Using the oven for the first time It is advised to follow these instructions: - Insert shelves and broiler grid and tray...
- Page 31 OPERATION OF RANGE (continued) OVEN THERMOSTAT - The numbers printed on the control panel indicate the increasing oven temperature value (°F). - To regulate the temperature, set the chosen number onto the control knob indicator. - The position BROIL serves only to turn on the broil burner. Note: When the range will not be used for long periods of time, set the gas knobs to their OFF positions and also close the gas shut-off valve placed on the main gas supply line.
- Page 32 OPERATION OF RANGE (continued) 3. Press the knob inward and hold to activate the electronic ignition. Note that you will hear a “clicking” noise. Hold the knob pressed inward until the oven burner is lit. Once the oven burner is lit, release the knob.
- Page 33 OPERATION OF RANGE (continued) CONVECTION MODE Heat is transferred from the bake burners in the bottom of the oven cavity to the oven cavity itself. The convection fan in the rear of the oven then circulates the hot air, providing even heat distribution throughout the oven. Convection cooking generally provides a more even temperature with faster baking times than the standard oven baking setting.
- Page 34 OPERATION OF RANGE (continued) CONVECTION ROASTING When convection roasting, it is important that you use a broiler pan for best convection roasting results. A broil/roast pan (with a rack) elevates the roast to allow the hot air to circulate around the meat, sealing in juices for a moist and tender roast with a richly browned exterior (similar to a rotisserie effect.) The pan is also used to catch any drippings from the roast, keeping the oven clean and reducing the chance of smoking or flare-ups.
-
Page 35: Broiling
OPERATION OF RANGE (continued) 4. When using the range for the fi rst time or after long period of non-usage, keep pressing the knob inward for approximately 10 – 15 seconds after the burner has lit to ensure the gas valve has been accurately primed. 5. -
Page 36: Cleaning The Range
CLEANING THE RANGE WARNING GENERAL RECOMMENDATION WARNING Electrical Shock Hazard Electrical Shock Hazard Plug into a grounded 3-prong outlet. • Plug into a grounded 3-prong outlet. Do not remove ground prong. Insure proper ground exists before Insure proper ground Do not use an adapter. exist before use using the range. - Page 37 CLEANING THE RANGE (continued) Grates, Main Tops, Surface Burners The grates are made of porcelain coated steel. These materials can be cleaned at the sink with detergent or soap-filled scouring pads. Do not be alarmed when the grate loses its shiny finish. The heat from the burners will cause the grates to lose their shiny finish.
- Page 38 CARE AND MAINTENANCE Cleaners and Cleaning Materials Do not use harsh cleaners or degreasers on or around functional parts (valves, controls, etc., or aluminum tubing). This will damage or drastically reduce the life of the part. Use only a mild solution of soap and water on backguards, aluminum control panels and painted surfaces.
- Page 39 CARE AND MAINTENANCE (continued) CORRECT REPLACEMENT OF THE BURNERS It is very important to check that the burner fl ame spreader “F” and the cap “C” have been correctly positioned. Failure to do so can cause serious problems. In appliances with electric ignition, check that the electrode “S”...
-
Page 40: Removing The Oven Door For Cleaning
CARE AND MAINTENANCE (continued) REMOVING THE OVEN DOOR FOR CLEANING To facilitate oven cleaning, it is possible to remove the door. Please follow the instructions carefully: The oven door can easily be removed as follows: • Open the door to fully. •... - Page 41 CARE AND MAINTENANCE (continued) REPLACING THE OVEN LIGHT • Let the oven cavity and broil burner cool down. • Switch off the electric supply. • Remove the protective cover. • Unscrew and replace the bulb with a new one suitable for high temperature (200°~ 500°F) having the same specifications: E14 120V 25W 300°C.
- Page 42 TROUBLESHOOTING PROBLEM POSSIBLE CAUSE POSSIBLE FIX Surface control has not been Push in and turn control to the ON completely turned to the ON position until burner ignites, then turn position. control to desired flame setting. Burner ports are clogged. Use a small gauge wire or needle to open ports.
-
Page 43: Troubleshooting Guide
TROUBLESHOOTING (continued) PROBLEM POSSIBLE CAUSE POSSIBLE FIX Oven capillary bulb not positioned Verify that capillary bulb is snapped in properly. clips straight and not touching sides or coated with oven cleaner or food. Temperature control not set properly. Make sure the temperature control knob is set at the desired temperature. -
Page 44: Wiring Diagram
WIRING DIAGRAM... -
Page 45: Parts Diagram And List
PARTS DIAGRAM AND LIST 16 17 18 19 20 21 Please visit our website www.uniqueappliances.com to view a PDF version of the schematics which will allow you to zoom in & out... - Page 46 PARTS DIAGRAM AND LIST (continued) Item Description Model # Back splash board CYJ00141 UGP-30CR W PSJ00049-W UGP-30CR B PSJ00049-B UGP-30CR LG PSJ00049-LG Backsplash board UGP-30CR T PSJ00049-T UGP-30CR LB PSJ00049-LB UGP-30CR R PSJ00049-R UGP-30CR RB PSJ00049-RB Left logo JSJ00006 Middle logo CY99109 Right logo JSJ00007...
- Page 47 PARTS DIAGRAM AND LIST (continued) Item Description Model # Oven Upper Burner DWWJ01335 Bottom burner flame spreader CY04248 Split Thermocouple and Terminal DXQJ9913 Igniter bracket CY14543 Burner Ignition Needle DXQJ9971 Oven Rack PSJ00045 Fan Cover PSJ00046 Oven floor PSJ00047 Oven Burner DWWJ01296 Igniter needle DXQJ9971-2...
- Page 48 PARTS DIAGRAM AND LIST (continued) Item Description Model # Power Cord DX0231 UGP-30CR W PSJ00005-W UGP-30CR B PSJ00005-B UGP-30CR LG PSJ00005-LG Handle UGP-30CR T PSJ00005-T UGP-30CR LB PSJ00005-LB UGP-30CR R PSJ00005-R UGP-30CR RB PSJ00005-RB Left/side handle base CY99112 UGP-30CR W PSJ00003-W UGP-30CR B PSJ00003-B...
- Page 49 APPLIANCE INFORMATION (manual copy - keep with your records) To make care and servicing of your range easy and efficient, please record the following information for future reference: Model: Serial Number: Purchased From: Date Purchased: Installed By: detatch along dotted line detatch along dotted line APPLIANCE INFORMATION (remote copy - keep with your appliance)
-
Page 50: Warranty
This UNIQUE appliance must be serviced regularly as outlined in the Owner’s Manual. In case of damage, the owner must provide proof of purchase, Model, and Serial Number to the selling dealer or Unique Appliances. This warranty is LIMITED STRICTLY to the terms indicated herein, and no other expressed warranties or remedies thereunder shall be binding on Unique. -
Page 51: Product Registration
Toll-free Website info@UniqueAppliances.com 1-877-427-2266 or 1-905-827-6154 www.UniqueAppliances.com available during regular business hours, 8:30 am to 4:30 pm, EST Please visit our website for more quality Unique products: www.UniqueAppliances.com Unique Appliances Ltd., 2245 Wyecroft Road #5, Oakville, Ontario, Canada, L6L 5L7... - Page 52 ©2020 Unique Appliances Ltd., 2245 Wyecroft Road #5, Oakville, Ontario, Canada, L6L 5L7 www.UniqueAppliances.com...
Need help?
Do you have a question about the Classic Retro UGP-30CR W and is the answer not in the manual?
Questions and answers
I have a Unique Classic 30 inch gas stove. The problem is that the oven will not stay on. Sometimes if turn the broiler on first and than later go to oven, it will work. Is this a common problem? Is it something I am doing wrong? If not; who should I call for repair? Thanks you in advance for your help. Tom Carberry
It is not stated whether it is common for the Unique Classic Retro UGP-30CR W gas stove oven to not stay on. For repair, contact Unique Appliances Ltd., as they provide warranty service for manufacturer defects.
This answer is automatically generated
I have a Unique Classic 30 inch gas stove. The problem is that the oven will not stay on. Sometimes if turn the broiler on first and than later go to oven, it will work. Is this a common problem? Is it something I am doing wrong? If not; who should I call for repair? Thanks you in advance for your help. Tom Carberry
It is not stated that the Unique Classic Retro UGP-30CR W gas stove oven commonly does not stay on. However, if the oven does not operate or stay on, possible causes include:
- The rocker switch may not be set to OVEN or BROIL.
- A household fuse may be blown or a circuit breaker tripped.
- The control knobs may not be set correctly.
- The oven thermostat may be defective.
For repair:
- Check that the rocker switch is set correctly.
- Reset the circuit breaker or replace the fuse if needed.
- Ensure control knobs are in the proper position.
- If problems continue, the thermostat may need inspection or replacement.
This answer is automatically generated
how do i remove the knobs