Advertisement
Quick Links
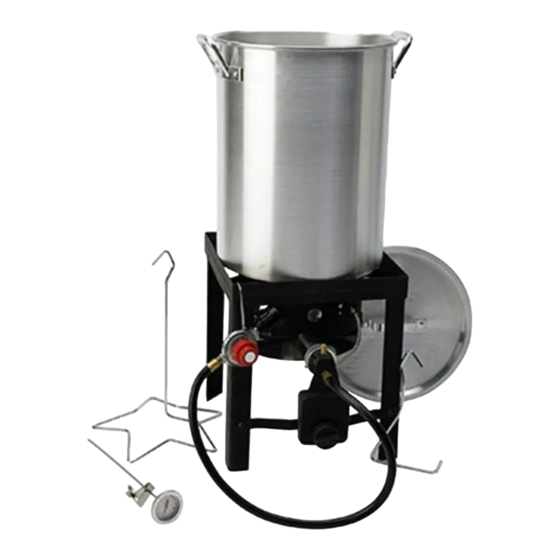
30 Quart Turkey Fryer Set
Assembly, Use and Care
Model: TF2005101-KK-00
Tools required:
Phillips screwdriver / Adjustable wrench
This instruction manual contains important information necessary for the proper assembly and
safe use of the appliance.
Read and follow all warnings and instructions before assembling and using the appliance.
Follow all warnings and instructions when using the appliance.
Keep this manual for future reference.
TF2005101-KK-00 English
For Outdoor Use Only
1
081516Ver1
Advertisement

Related Manuals for Rankam Kamp Kitchen TF2005101-KK-00


Summary of Contents for Rankam Kamp Kitchen TF2005101-KK-00
- Page 1 30 Quart Turkey Fryer Set Assembly, Use and Care For Outdoor Use Only Model: TF2005101-KK-00 Tools required: Phillips screwdriver / Adjustable wrench This instruction manual contains important information necessary for the proper assembly and safe use of the appliance. ...
- Page 2 DANGER If you smell gas: 1. Shut off gas to the appliance. 2. Extinguish any open flame. 3. If odor continues, keep away from the appliance and immediately call your fire department. Failure to follow these instructions could result in fire or explosion which could cause property damage, personal injury or death.
- Page 3 WARNING Never leave the appliance unattended. Keep children and pets away from the appliance at all times. The use of alcohol, prescription or non-prescription drugs may impair the consumer’s ability to properly assemble or safely operate the appliance. This appliance is for OUTDOOR USE ONLY. DO NOT use in building, garage or any other enclosed area. This appliance is not intended to be installed in or on a boat.
- Page 4 WARNING Never use a cooking vessel larger than 30 qts. Diameter greater than 11-3/4 inches and taller than 15-1/2 inches. Never fill pot above upper fill line. Oil can splatter causing staining or discoloration to ground surface. Never place empty cooking vessel on the appliance while in operation.
- Page 5 LP (Liquefied Petroleum Gas) LP gas is non toxic, odorless and colorless when produced. For your safety, LP gas has been given an odor (similar to rotten cabbage) so that it can be smelled. LP gas is highly flammable and may ignite unexpectedly when mixed with air. LP Tank Filling ...
- Page 6 Customer Service Center at 1 – 888 – 837 – 1380 or email at . Use only replacement parts specified by manufacturer. ustomerservice@rankam.com 6. Always close LP tank valve after performing tank leak test by turning OPD hand wheel clockwise.
- Page 7 Lighting Instructions Note: Do not lean over LP cooker while lighting. Step Procedure Illustration Read all instructions before lighting. Turn regulator control valve to OFF position. Fully turn timer control knob clockwise. Fully open LP tank valve. Light match and place it over burner. Tip: Wooden kitchen match works best.
- Page 8 After burner is lit, continue to HOLD the push button for 10 seconds and then release. Holding push HOLD the Push button of safety valve for less than 10 seconds will button of safety cause burner flame to go out. valve If ignition does not occur in 5 seconds, turn the regulator and LP tank valve off, wait 5 minutes, and repeat the lighting procedure.
- Page 9 Note: Spiders and small insects can spin webs and build nests inside the burner. This especially occurs in late summer and fall before frost when spiders are most active. These nests can obstruct gas flow and cause a fire in and around the burner and orifice.
-
Page 10: Product Diagram
Product Diagram Component List 1. Steel Stand 1 pc 2. Burner 1 pc 3. Timer Control Box 1 pc 4.Heat Shield 1 pc 1A. Support Bar 5. 30QT Aluminum Pot 1 pc 6. 30QT Pot Lid 1 pc 7. T-Star Stand 1 pc 8. - Page 11 Assembly Instructions: 1. Attach burner (2) to automatic shut off valve (A) in the timer control box (3) by turning the burner clockwise. Do not fully tighten burner to the valve, tighten until 3 threads remain visible on the valve. Attach Proper connection is thermocouple (D) to critical for correct...
- Page 12 Using Your Thermometer Check the thermometer before each use by inserting into a pot of boiling water and ensuring that it registers approximately 212°F +/- 20°F (100°C +/- 10°C). If it does not function properly, obtain a replacement thermometer specified by the manufacturer before using the appliance.
- Page 13 Fill the pot to the mark with peanut oil. Light the burner unit and heat the oil to 325°F. Never leave the fryer unattended at any time. Check the oil using a deep fry temperature gauge. If it has reached 325°F, you are ready to start deep frying.
-
Page 14: Troubleshooting
Trouble Shooting PROBLEM POSSIBLE CLAUSE CORRECTIVE ACTION The burner does not light up The connection between the regulator Check and make sure the regulator coupling nut is and LP Tank are not in good condition. tightened to the LP tank valve. The LP tank valve and regulator control The regulator control valve and LP tank valve is valve do no open. - Page 15 18/F., New Lee Wah Centre, 88 Tokwawan Road, Kowloon, Hong Kong (Made In China) For assistance, contact customer service at customerservice@rankam.com or at 1 – 888 – 837 – 1380, 8:00am – 5:00pm, Pacific Standard time, Monday to Friday TF2005101-KK-00 English...
Need help?
Do you have a question about the Kamp Kitchen TF2005101-KK-00 and is the answer not in the manual?
Questions and answers