Advertisement
Quick Links
Assembly Instructions and User's Manual
30QT Turkey Fryer Set
For Outdoor Use Only
Model: TF2005101-OG-01
FSOGBG4003
Tools required:
Phillips screwdriver / Adjustable wrench
Please keep this instruction manual for future reference
Customer Service: 1-888-837-1380, 8:00am to 5:00pm, Pacific Standard Time
Monday thru Friday,
(Made in China)
TF2005101-OG-01 ENG
20190618 V.2
Advertisement

Related Manuals for Rankam Outdoor Gourmet TF2005101-OG-01


Summary of Contents for Rankam Outdoor Gourmet TF2005101-OG-01
- Page 1 Assembly Instructions and User’s Manual 30QT Turkey Fryer Set For Outdoor Use Only Model: TF2005101-OG-01 FSOGBG4003 Tools required: Phillips screwdriver / Adjustable wrench Please keep this instruction manual for future reference Customer Service: 1-888-837-1380, 8:00am to 5:00pm, Pacific Standard Time Monday thru Friday, (Made in China) TF2005101-OG-01 ENG...
-
Page 2: Table Of Contents
Table of Content Warnings ------------------------------------------------------------------------------------------------ P.2-P.8 Tools Required (Not Included) --------------------------------------------------------------------- P.9 Product Diagram -------------------------------------------------------------------------------------- P.10 Parts List ------------------------------------------------------------------------------------------------ P.10-P.11 Hardware List ------------------------------------------------------------------------------------------ P.11 Assembly Instructions -------------------------------------------------------------------------------- P.11-P.12 Care Maintenance and Trouble Shooting ------------------------------------------------------- P.13-P.15 Warranty ------------------------------------------------------------------------------------------------- P.16 Page 1 of 17 TF2005101-OG-01 ENG 20190618 V.2... -
Page 3: Warnings
Warnings This instruction manual contains important information necessary for the proper assembly and safe use of the appliance. Read and follow all warnings and instructions before assembling and using the appliance. Follow all warnings and instructions when using the appliance. ... - Page 4 PROP 65 WARNING WARNING: This product can expose you to chemicals including benzene, which is known to the State of California to cause cancer and birth defects or other reproductive harm. For more information go to www.P65Warnings.ca.gov. WARNING This Appliance is not intended for commercial use. WARNING Never leave the appliance unattended.
- Page 5 WARNING Installation Safety Precautions. Use appliance only with LP (propane) gas and the regulator / valve assembly supplied. Installation must conform with local codes or, in the absence of local codes, with the National Fuel Gas Code, ANSI Z223.1/NFPA 54, Storage and Handling of Liquefied Petroleum Gases, ANSI/NFPA 58;...
- Page 6 LP Tank Removal, Transport and Storage Turn OFF all control knobs and LP tank valve. Turn coupling nut counterclockwise by hand only – do not use tools to disconnect. Place dust cap on cylinder valve outlet whenever the cylinder is not in use. Only install the type of dust cap on the cylinder valve outlet that is provided with the cylinder valve.
- Page 7 Order new parts by giving the serial number, model number and name of items needed to the Customer Service Center at 1-888-837-1380 or email at CustomerService@Rankam.com Use only replacement parts specified by manufacturer. 6. Always close LP tank valve after performing tank leak test by turning OPD hand wheel clockwise.
- Page 8 Lighting Instructions Do not lean over LP cooker while lighting. Step Procedure Illustration Read all instructions before lighting. Turn regulator control valve to OFF position. Fully turn timer control knob clockwise. Fully open LP tank valve. Light match and place it over burner. Tip: Wooden kitchen match works best.
- Page 9 After burner is lit, continue to HOLD the push button for 10 seconds and then release. Holding push HOLD the Push button of safety valve for less than 10 seconds will button of safety cause burner flame to go out. valve If ignition does not occur in 5 seconds, turn the regulator and LP tank valve off, wait 5 minutes, and repeat the lighting procedure.
-
Page 10: Tools Required (Not Included)
Steps for Cleaning the Burner: 1. Remove orifice/hose from the burner. 2. Look inside the burner tube for nests, webs, or mud. 3. To remove the above obstructions, use an accessory flexible venture brush or bend a small hook on one end of a long flexible wire such as the one in small picture. 4. -
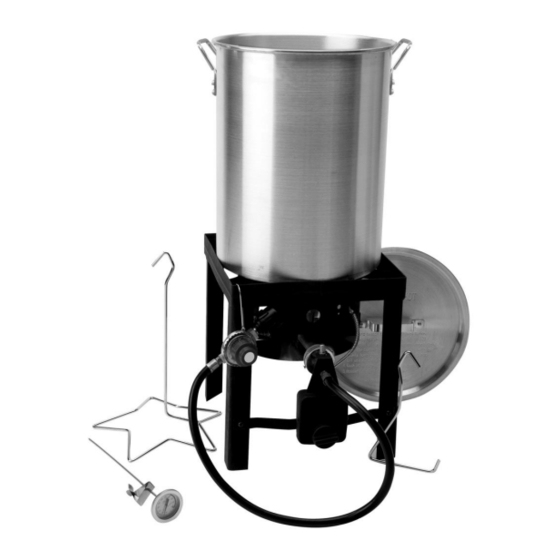
Page 11: Product Diagram
Product Diagram Part List Steel Stand Burner Timer Control Box Heat Shield 30QT Aluminum Pot Page 10 of 17 TF2005101-OG-01 ENG 20190618 V.2... -
Page 12: Assembly Instructions
Lid Handle T-Star Stand Lifter Thermometer Hanging Hook Timer Support Bar Hardware Bolt M6 x 12 Nut M6 Bolt M6 x 10 (Silver) Nut M6 (Silver) Assembly Instructions 1. Attach burner (2) to automatic shut off valve (A) in the timer control box (3) by turning the burner clockwise. - Page 13 2. Attach thermocouple (D) as per right drawing and tighten the nut (Y). 3. Insert burner through the bottom of the stand (1), in between wind shield (F) (side with rectangle lip) and burner support bar (G). 4. Unscrew the pre-assembled nut from the threaded pin of the burner (2).
- Page 14 Care and Maintenance The following safety measures are recommended when using your fry set. LOCATION MATTERS Select a safe place to fry your turkey. It should be in an open area, outside, and on a cement or brick surface. Place the liquid propane gas tank and fryer so that if any wind blows the heat from the fryer will blow away from the LP gas tank.
- Page 15 FRY WITH CARE Check your hose at both ends for proper connection. Also, place the LP tank and hose so that they are not located directly next to the fryer (see photo). Center the pot over the burner on the cooker. ...
- Page 16 Trouble Shooting PROBLEM POSSIBLE CAUSE CORRECTIVE ACTION The burner does not light up. The connection between the regulator Check and make sure the regulator coupling nut is and LP Tank are not in good condition. tightened to the LP tank valve. The LP tank valve and regulator control The regulator control valve and LP tank valve is valve do not open.
-
Page 17: Warranty
– – For assistance, please contact customer service toll free at 1 1380 or e-mail us at customerservice@rankam.com 8:00am to 5:00pm, Pacific Standard Time, Monday to Friday RANKAM (CHINA) MANUFACTURING COMPANY LIMITED 18/F., New Lee Wah Centre, 88 Tokwawan Road, Kowloon, Hong Kong Customer Service: –... - Page 18 Page 17 of 17 TF2005101-OG-01 ENG 20190618 V.2...
Need help?
Do you have a question about the Outdoor Gourmet TF2005101-OG-01 and is the answer not in the manual?
Questions and answers