Advertisement
Quick Links
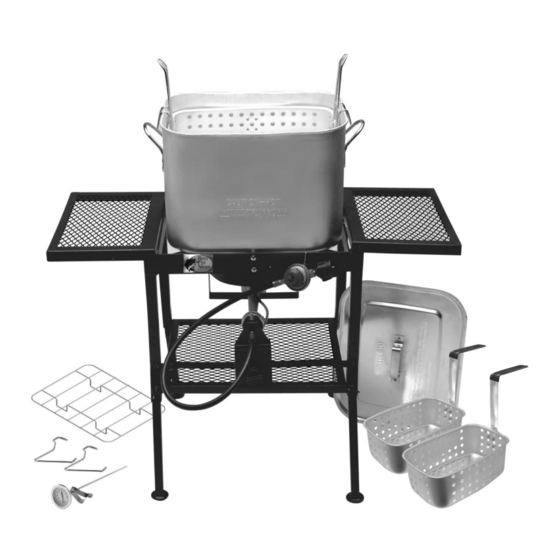
36 QT. Multi Purpose Fryer,
Steamer, Boiler
Model: TF1038-014515
Assembly, Use and Care Manual
Tools required:
Phillips screwdriver / Adjustable wrench
This instruction manual contains important information necessary for the proper assembly and
safe use of the appliance.
Read and follow all warnings and instructions before assembling and using the appliance.
Follow all warnings and instructions when using the appliance.
Keep this manual for future reference.
TF1038-014515 English
For Outdoor Use Only
1
20180510 V.1
Advertisement

Related Manuals for Rankam TF1038-014515


Summary of Contents for Rankam TF1038-014515
- Page 1 36 QT. Multi Purpose Fryer, Steamer, Boiler For Outdoor Use Only Model: TF1038-014515 Assembly, Use and Care Manual Tools required: Phillips screwdriver / Adjustable wrench This instruction manual contains important information necessary for the proper assembly and safe use of the appliance.
-
Page 2: Prop 65 Warning
DANGER DANGER: Indicates an imminently hazardous situation which, if not avoided, will result in death or serious injury. WARNING WARNING: Indicates a potentially hazardous situation which, if not avoided, will result in death or serious injury. TF1038-014515 English 20180510 V.1... - Page 3 16. Do not move the appliance when in use. Allow the cooking vessel to cool to 115°F (45°C) before moving or storing. 17. Do not leave the appliance unattended, keep children and pets away from the appliance at all times. 18. Please wear gloves while assembling the fryer. TF1038-014515 English 20180510 V.1...
- Page 4 Never drop food or accessories into hot cooking liquid. Lower food and accessories slowly into the cooking liquid in order to prevent splashing or overflow. When removing food from the appliance care should be taken to avoid burns from hot cooking liquids. TF1038-014515 English 20180510 V.1...
- Page 5 Dealer should NEVER fill LP tank more than 80% of LP tank volume. Volume of propane in tanks will vary by temperature. A frosty regulator indicates gas overfill. Immediately close LP tank valve and call LP gas dealer for assistance. TF1038-014515 English 20180510 V.1...
- Page 6 Tighten by hand only – do not use tools. NOTE: If you cannot complete connection, disconnect regulator and repeat step 5 and 6. If you are still unable to complete the connection, do not use this regulator! TF1038-014515 English 20180510 V.1...
- Page 7 Order new parts by giving the serial number, number and name of items needed to the Customer Service Center at 1 – 888 – 837 – 1380 or email at customerservice@rankam.com. 6. Use only replacement parts specified by manufacturer.
- Page 8 4. Inspect and clean the burner if needed. 5. Reattach orifice / hose to burner. TF1038-014515 English 20180510 V.1...
- Page 9 Burner: Wire brush loose corrosion from burner exterior. Clean clogged gas port holes with an opened paper clip. Replace corroded or damaged burners that would emit excess gas. Cooking surfaces, pots and pans: Clean the cooking surface with soapy water and a nylon cleaning pad. Product Diagram TF1038-014515 English 20180510 V.1...
- Page 10 K. Lid 1 pc 1 pc 1 pc 1 pc N. 15” Termometer O. Strainer Basket – M. Lifter P. Strainer Basket Small Handle 2 pcs 1 pc 2 pcs 2 pcs Q. Steam Rack 1 pc TF1038-014515 English 20180510 V.1...
- Page 11 1. Insert the Short Legs (E) to Stand long leg and tighten with Bolt (3). And also insert Long Leg (D) to Stand short leg and tighten with Bolt (3). 2. Assembly the Wind Shield (F) & Burner Bar (G) together, and tighten with Bolt (2) & Nut (4). TF1038-014515 English 20180510 V.1...
- Page 12 9. Align Burner (C) base to Burner Bar (G). Then tighten the Burner with the unscrewed nut onto bolt of Burner (C). 10. Align Timer Control Box (I) to the Timer Bar (H) and fix it with Bolt (2). TF1038-014515 English 20180510 V.1...
- Page 13 4. Turn counter-clockwise to “OPEN” the spigot. 5. The oil / water will flow out through the spigot. After vessel cleaning, the Cap End must be tightly screwed and turned clockwise to “Close” the spigot. Cap End TF1038-014515 English 20180510 V.1...
- Page 14 Completely pat dry the inside and outside surfaces of the turkey. This is very important as it reduces the splattering of oil. After patting the bird dry, add herb rubs or seasonings to the skin. TF1038-014515 English 20180510 V.1...
- Page 15 Using a meat thermometer, check for an internal meat temperature of 180°F. Remove turkey fry accessory and allow the turkey to “rest” for 15 minutes to allow the juices to settle into the turkey. Slice and serve! TF1038-014515 English 20180510 V.1...
- Page 16 18/F., New Lee Wah Centre, 88 Tokwawan Road, Kowloon, Hong Kong For assistance, contact customer service at customerservice@rankam.com or at 1 – 888 – 837 – 1380, 8:00am – 5:00pm, Pacific Standard time, Monday to Friday Manufactured for Bass Pro Shops 2500 E.
Need help?
Do you have a question about the TF1038-014515 and is the answer not in the manual?
Questions and answers