Advertisement
Quick Links
Attention:
Garden hose NOT included.
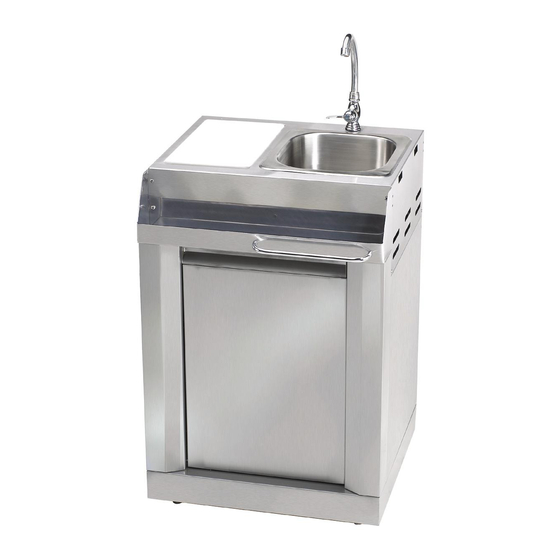
Sink & Preparation Centre
Assembly Manual
85-1140-8 (A01201)
Limited 3-Year Warranty
Read and save manual for future reference.
Assemble your grill immediately.
Missing or damaged parts should be
claimed within 15 days of purchase.
Call the Centro Hotline at 1-877-707-5463.
Manual Revision #:
120407
Advertisement

Related Manuals for Centro 120407


Summary of Contents for Centro 120407
- Page 1 Assembly Manual 85-1140-8 (A01201) Limited 3-Year Warranty Read and save manual for future reference. Assemble your grill immediately. Missing or damaged parts should be claimed within 15 days of purchase. Call the Centro Hotline at 1-877-707-5463. Manual Revision #: 120407...
- Page 2 H E A V Y A R T I C L E N E E D S 2 T O L I F T THIS MANUAL MUST REMAIN WITH THE PRODUCT AT ALL TIMES To ORDER non-warranty replacement parts or accessories, or to register your warranty, please visit us on the web at CAUTION Sharp edges.
-
Page 3: Assembly Instructions
ASSEMBLY INSTRUCTIONS TOOLS NEEDED FOR ASSEMBLY • #2 Phillips screwdriver (long and short) • ¼” Slotted screwdriver (long and short) • Adjustable wrench • Pliers • Rubber Mallot Before assembling the barbecue, read these instructions carefully. Assemble the barbecue on a flat, clean surface. Grill is heavy. -
Page 4: Parts List
PARTS LIST FOR 85-1140-8 (A01201) Item Quantity Description Main Cart Frame Assembly Sink Assembly Upper Back Panel Connector Faucet Cutting Board Sink Strainer Sink Hose Condiment Holder Cuisine Logo Towel Bar Front Brace Handle for Trash Basket Trash Basket Back Panel Left Side Panel, Cart Right Side Panel, Cart Pillar, Left... - Page 5 EXPLOADED DIAGRAM FOR 85-1140-8 (A01201) Manual Hardware Pack Safety & Care Manual...
- Page 6 ASSEMBLY INSTRUCTIONS Front view Separate the 2 different types of wheels, 2 locking wheels (O) and 2 regular wheels (P). Attach the locking wheels (O) to the back of the bottom shelf (N) and the regular wheels (P) to the front of the bottom shelf (N).
- Page 7 ASSEMBLY INSTRUCTIONS Front view Attach the left pillar (L1) and the right pillar (L2) to the side Back view panels (J & K) and to the bottom shelf (N), as shown in Figure A and B. Attach the back panel (I) to the rear of the left and right cart side panels (J &...
- Page 8 ASSEMBLY INSTRUCTIONS Back view From underneath the sink cart, attach the sink hose (E2) to the sink assembly (A2). Underside of the main cart frame. THIS STEP REQUIRES 2 OR MORE PEOPLE. DO NOT ATTEMPT ALONE. EXTREMELY HEAVY! a. Position the main cart frame (A) onto the cart assembly, as shown in Figure A.
- Page 9 ASSEMBLY INSTRUCTIONS Front view Attach the front brace (G) to the left and right pillars (L1 & L2). TIP: One person should align the left side, while the second person assembles the right side. #4 No.10-24UNC x10 Screw(X2) #5 ø 5 Lock Washer(X2) #6 ø...
- Page 10 ASSEMBLY INSTRUCTIONS Slide the trash basket (H2) down the rails that are located behind the door (M) as shown. Insert the handle for the trash basket (H1) into the back of the trash basket (H2).
- Page 11 ASSEMBLY INSTRUCTIONS Washer Adapter a. Remove washer and adaptor from faucet (C). b. Insert faucet (C) through the main cart frame (A). Tighten in position using the washer and adaptor removed. A garden hose is required for this step. To attach the garden hose to the unit: There are two pieces to the Connector (B).
- Page 12 NOW AVAILABLE! Centro Countertop Corner Leaf (# 85-1147-4/ A01301) o Extend your counter space o Arrange your Centro BBQ and Centro Cuisine outdoor appliances at a 45° angle o Connect your Centro BBQ and Centro Cuisine outdoor appliances for a seamless outdoor kitchen experience.
Need help?
Do you have a question about the 120407 and is the answer not in the manual?
Questions and answers