
Subscribe to Our Youtube Channel
Related Manuals for Nordmende CTG50LPGBK


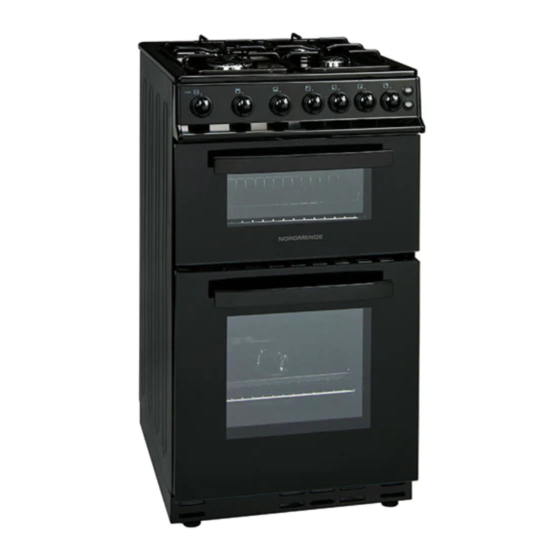
Summary of Contents for Nordmende CTG50LPGBK
- Page 1 CTG50LPGBK CTG50BK OPERATING AND INSTALLATION INSTRUCTIONS OF FREESTANDING GAS DOUBLE OVEN...
- Page 2 Dear Customer, Our goal is to offer you products with high quality that exceed your expectations. Your appliance is produced in modern facilities carefully and particularly tested for quality. This manual is prepared in order to help you use your appliance that is manufactured by the most recent technology, with confidence and maximum efficiency.
-
Page 3: Table Of Contents
CONTENTS: 1. Part : PRESENTATION AND SIZES OF PRODUCT 2. Part : WARNINGS 3. Part : INSTALLATION AND PREPARATIONS FOR USE 3.1 Environment where the appliance will be installed 3.2 Installation of oven 3.3 Adjustment of feet 3.4 Gas connection 3.5 Electric connection and security 3.6 General warnings and measures 3.7 Gas conversions... -
Page 4: Part : Presentation And Sizes Of Product
3- Oven Door Handle 4- Supply Leg 5- Oven Door MODEL SIZE (mm) 6- Oven Tray 7- Wire Grid CTG50LPGBK 50 * 60 * 90 8- Grill CTG50BK 9- Oven Lamp 10- Semi-Rapid Burner 11- Rapid Burner 12- Auxillary Burner... -
Page 5: Part : Warnings
2. Part : WARNINGS READ THESE INSTRUCTIONS CAREFULLY AND COMPLETELY BEFORE USING YOUR APPLIANCE, AND KEEP IT IN A CONVENIENT PLACE FOR REFERENCE WHEN NECESSARY. THIS MANUAL IS PREPARED FOR MORE THAN ONE MODEL IN COMMON. YOUR APPLIANCE MAY NOT HAVE SOME OF THE FEATURES THAT ARE EXPLAINED IN THIS MANUAL. PAY ATTENTION TO THE EXPRESSIONS THAT HAVE FIGURES, WHILE YOU ARE READING THE OPERATING MANUAL. - Page 6 2. Part : WARNINGS - WARNING: If the surface is cracked, switch off the appliance to avoid the possibility of electric shock. - For hobs incorporating a lid, any spillage should be removed from the lid before opening. And also the hob surface should be allowed to cool before closing the lid.
- Page 7 2. Part : WARNINGS - WARNING: Ensure that the appliance is switched off before replacing the lamp to avoid the possibility of electric shock. - CAUTION: Accessible parts may be hot when the cooking or grilling is in use. Young children should be kept away.
- Page 8 2. Part : WARNINGS During usage • When you first run your oven a certain smell will emanate from the insulation materials and the heater elements. For this reason, before using your oven, run it empty at maximum temperature for 45 minutes.
-
Page 9: Part : Installation And Preparations For Use
3. Part : INSTALLATION AND PREPARATIONS FOR USE This modern, functional and practical oven, that was manufactured with the parts and materials of highest quality, will meet your cooking needs in every aspect. You must surely read this manual so that you don't have any problem in future and to be able to have satisfactory results. -
Page 10: Installation Of Oven
3. Part : INSTALLATION AND PREPARATIONS FOR USE access to fresh air. This electric fan must have the capacity to change the air of the kitchen environment 4-5 times of its own volume of air per hour. Cooker hood flue Electrical ventilator Air inlet section Air inlet section... -
Page 11: Adjustment Of Feet
3. Part : INSTALLATION AND PREPARATIONS FOR USE • Pay attention not to place it near the refrigerator, there must be no flammable or inflammable materials such as curtain, waterproof cloth, etc. that will begin to burn quickly It is required that there must be least a 2cm blank space around the oven for •... - Page 12 3. Part : INSTALLATION AND PREPARATIONS FOR USE As gas is turned on, all connection parts and hose must be checked with soapy water or leakage fluids. Do not use naked flame to check gas leakage. All metal components used during gas connection must be clear of rust. Also check the expiry dates of components used.
-
Page 13: Electric Connection And Security
3. Part : INSTALLATION AND PREPARATIONS FOR USE 3.5 Electric connection and security During the electric connection, follow the instructions stated in the user manual The earthing cable must be connected to the earth terminal • You have to ensure the power cord with suitable insulation to be connected •... -
Page 14: General Warnings And Measures
3. Part : INSTALLATION AND PREPARATIONS FOR USE 3.6 General warnings and measures Your appliance is produced in accordance with the local and international • standards and regulations applicable. The maintenance and repair works must be made only by authorized service •... - Page 15 3. Part : INSTALLATION AND PREPARATIONS FOR USE Figure 8 Figure 9 Figure 10...
- Page 16 3. Part : INSTALLATION AND PREPARATIONS FOR USE Figure 11 Adjusting The Reduced Flame Position The flame length in the minimum position is adjusted with a flat screw located on the valve. For valves with FFD, the screw is located on the side of the valve spindle.
- Page 17 3. Part : INSTALLATION AND PREPARATIONS FOR USE Adjusting the reduced flame position The flame length in the minimum position is adjusted with a flat screw located on the valve. For valves with flame failure device, the screw is located on the side of the valve spindle(Figure 14).
-
Page 18: Part : Use Of Your Oven
4. Part : USE OF YOUR OVEN 4.1 Use of gas burners Ignition of the burners To determine which knob controls which burner, check the position symbol above the knob. Manual Ignition of the Gas Burners • If your appliance is not equipped with any ignition aid or in case there is a failure in the electricity network, follow the procedures listed below For Hob Burners: To ignite one of the burners, press and turn its knob counter-clockwise so that the knob is in max. -
Page 19: Control Of Hob Burners
4. Part : USE OF YOUR OVEN pressing the knob until you see a stable flame on the burner. Flame safety device: Hob Burners (If your hob is equipped with gas safety device) Hobs equipped with flame failure device provide security in case of accidentally extinguished flame. -
Page 20: Control Of Oven Burner
4. Part : USE OF YOUR OVEN Rapid Burner: 22-26cm Medium Burner: 14-22cm Auxiliary Burner: 12-18cm Make sure that the tips of the flames do not spread out of the outer circumference of the pan, as this may also harm the plastic accessories around the pan (handles etc.) Figure 12 When the burners are not in use for prolonged periods, always turn the main... - Page 21 4. Part : USE OF YOUR OVEN WRONG WRONG WRONG CORRECT pot bottom does not sit well pot bottom is round pot bottom is small Figure 9 Preheating When you need to preheat the oven, we recommend you do so for 10 minutes. For recipes needing high temperatures, e.g.
-
Page 22: Control Of Grill Burner
4. Part : USE OF YOUR OVEN MAIN OVEN MARK TEMPERATURE( C) These temperature settings may change slightly when both top and main ovens are operated together. 4.1.3 Control of the grill burner The grill burner can be operated with the oven door in two positions regarding your choice: completely open or partially open (30°... -
Page 23: Accessories Used In Oven
4. Part : USE OF YOUR OVEN 4.2 Accessories used in oven The oven already supplied with accessories. You can also use accessories you • purchase from the market, but they must be heat and flame resistant. You can also use glass dishes, cake moulds, special oven trays that are appropriate for use in oven. - Page 24 4. Part : USE OF YOUR OVEN Pan anti-tilting wire • To locate grid correctly in the cavity, put it to any rack and push the grid up to the end. • The pan anti-tilting wire must be placed inside of the cavity. Figure 13 Removal of catalytic panel Removal of wire shelf...
-
Page 25: Part : Cleaning And Maintenance
5. Part : CLEANING AND MAINTENANCE 5.1 Cleaning Be sure that all control switches are off and your appliance cooled before cleaning your oven. Plug off the appliance. Check whether they are appropriate and recommended by the manufacturer before using the cleaning materials on your oven. -
Page 26: Maintenance
5. Part : CLEANING AND MAINTENANCE Burner Caps: Periodically, enamelled pan support, enamelled covers, burner heads must be washed with soapy warm water rinsed and dried. After drying them thoroughly, replace them correctly. Enamelled Parts: In order to keep them a new, it is necessary to clean them frequently with mild warm soapy water and then dry with cloth. -
Page 27: Part : Service And Transport
6. Part : SERVICE AND TRANSPORT 6.1 Basic troubleshooting before contacting service If the oven does not operate : The oven may be plugged off, there has been a black out. • If the oven does not heat : The heat may be not adjusted with oven's heater control switch. •... - Page 28 INJECTOR TABLE Gas Category: II 2H3+ Destination:IE Class: 1 Total consumption: 28~30 mbar 11,9 Kw 865,27 g/h 28-30 mbar 20 mbar RAPID BURNER Injector Diameter ( 1/100mm Nominal Rating (kW) 285.7 lt/h 218.1 gr/h Consumption in 1h AUXILLARY BURNER Injector Diameter ( 1/100mm Nominal Rating (kW) 95.2 lt/h...
- Page 29 The symbol on the product or on its packaging indicates that this product may not be treated as household waste. Instead it shall be handed over to the applicable collection point for the recycling of electrical and electronic equipment. By ensuring this product is disposed of correctly, you will help prevent potential negative consequences for the environment and human health, which could otherwise be...
- Page 30 CTG50LPGBK CTG50BK BETRIEBS-UND INSTALLATIONSANLEITUNG VON FREISTEHENDEN GAS DOPPEL-BACKOFEN...
- Page 31 Werte Kunden, Unser Ziel ist es, Ihnen Produkte mit hoher Qualität anzubieten, die Ihre Erwartungen übertreffen. Ihr Gerät ist in modernen Einrichtungen sorgfältig und vor allem auf Qualität geprüft produziert. Dieses Handbuch wurde erstellt, um Ihnen bei der Verwendung Ihres Gerätes, das nach neuesten Technologien hergestellt wurde, zu helfen und Ihnen zu zeigen, wie Sie das Gerät möglichst vorteilhaft einsetzen.
- Page 32 INHALTSVERZEICHNIS: Abschnitt : VORSTELLUNG DES PRODUKTS / ABMESSUNGEN Abschnitt : WARNHINWEISE Abschnitt : INSTALLATION UND VORBEREITUNGEN FÜR DIE VERWENDUNG Die für die Aufstellung des Gerätes gewählte Umgebung INSTALLATION DES HERDS Einstellung der Standfüsse Gasanschluss Elektrischer Anschluss und Sicherheit Allgemeine Warnhinweise und Maßnahmen UMSTELLUNG AUF ANDERE GASTYPEN Abschnitt : VERWENDUNG IHRES HERDS Verwendung der Gasbrenner...
- Page 33 3 - Klappengriff 4 - Standfuß Backraumtür MODEL Breite (mm) 6 - Backblech 7 - Bratrost 50 * 60 * 90 CTG50LPGBK 8- Grill CTG50BK 9 - Beleuchtung 10 - Halbschnellkochplatte 11 - Schnellkochplatte 12 - Zusatzkochplatte 13 - Kochgitter...
- Page 34 2. SICHERHEITSHINWEISE LESEN SIE DIESE ANLEITUNG VOLLSTÄNDIG UND SORGFÄLTIG DURCH, BEVOR SIE IHR GERÄT IN BETRIEB NEHMEN, UND HALTEN SIE ES STETS ZUR VERFÜGUNG WENN NÖTIG. DIESES HANDBUCH WURDE FÜR VERSCHIEDENE MODELLE EINER REIHE VERFASST. ES KANN SEIN, DASS IHR GERÄT ÜBER EINIGE EIGENSCHAFTEN, DIE IN DIESEM HANDBUCH ERLÄUTERT WURDEN NICHT VERFÜGT.
- Page 35 WARNUNG: Brandgefahr: lagern Sie keine Gegenstände auf den Kochflächen. WARNUNG: Wenn die Oberfläche rissig ist, schalten Sie das Gerät aus, um die Gefahr eines elektrischen Schlages zu vermeiden. Für Kochfelder mit Abdeckung: Entfernen Sie vor dem Öffnen der Abdeckung alle Verunreinigungen darauf. Lassen Sie die Kochfelder stets abkühlen, bevor Sie die Abdeckung schließen.
- Page 36 um die Gefahr von elektrischen Schlägen zu vermeiden. VORSICHT: Die außen zugänglichen Teile können sehr heiß werden, wenn das Kochen oder Grillen in Verwendung ist. Halten Sie kleine Kinder fern von dem Gerät. hr Gerät wurde in Übereinstimmung mit den einschlägigen lokalen und internationalen Normen und Vorschriften hergestellt.
- Page 37 einer ähnlich qualifizierten Person ersetzt werden, um eine Gefährdung zu vermeiden. Lassen Sie Kinder niemals auf die Backraumtür klettern oder darauf sitzen, wenn diese offen ist. Warnhinweise zur Installation: Nehmen Sie das Gerät nicht in Betrieb, solange es nicht vollständig eingebaut ist. Das Gerät muss von einem autorisierten Techniker aufgestellt und in Betrieb genommen werden.
- Page 38 Achten Sie stets darauf, dass die Regler in der Position "0" (Stop), wenn der Herd nicht in Betrieb ist. Die Backbleche neigen sich, wenn sie herausgezogen wurden. Achten Sie darauf, dass Sie die heiße Flüssigkeit nicht verschütten. VORSICHT: Bei der Verwendung eines Gaskochgeräts kommt es zur Bildung von Hitze, Feuchtigkeit und Verbrennungsgasen in dem Raum, in dem das Gerät aufgestellt ist.
-
Page 39: Die Für Die Aufstellung Des Gerätes Gewählte Umgebung
Art : INSTALLATION UND VORBEREITUNGEN FÜR DIE VERWENDUNG Dieser moderne, zweckmäßige und praktische Herd wurde aus hochwertigen Teilen und Materialien gefertigt und wird all Ihren Ansprüchen in jeder Hinsicht gerecht werden. Damit Sie im Betrieb auf keine Probleme stoßen und Sie das Gerät erfolgreich verwenden können, müssen Sie dieses Handbuch unbedingt genau durchlesen. - Page 40 Art : INSTALLATION UND VORBEREITUNGEN FÜR DIE VERWENDUNG Dieser elektrische Ventilator muss so leistungsfähig sein, dass er das gesamte Luftvolumen der Küchenumgebung etwa 4-5 Mal pro Stunde umwälzen kann (Abb. 3-4). Dunstabzugshaube Elektrischer Ventilator Querschnitt des Querschnitt des Lufteinlasses mindestens Lufteinlasses mindestens 100 cm2.
-
Page 41: Einstellung Der Standfüsse
Art : INSTALLATION UND VORBEREITUNGEN FÜR DIE VERWENDUNG Stellen Sie den Backofennicht in der Nähe des Kühlschranks auf. Bei der Auswahl • des Aufstellungsortes für den Backofen müssen Sie darauf achten, dass sich keine brennbaren oder leicht entzündlichen Materialien wie Vorhänge, wasserdichte Textilien etc. - Page 42 Art : INSTALLATION UND VORBEREITUNGEN FÜR DIE VERWENDUNG Nachdem das Gas geöffnet ist, müssen alle Anschlussteile und Schlauch mit Seifenwasser oder Leckage Flüssigkeiten überprüft werden. Verwenden Sie zur Dichtheitsprüfung keine offenen Flammen! Alle Metallteile die während des Gasanschlusses verwendet werden, müssen rostfrei sein. Überprüfen Sie auch die Verfallsdaten von Komponenten die verwendet werden.
-
Page 43: Elektrischer Anschluss Und Sicherheit
Art : INSTALLATION UND VORBEREITUNGEN FÜR DIE VERWENDUNG Elektrischer Anschluss und Sicherheit Während der elektrischen Verbindung, folgen Sie den Anweisungen in der Bedienungsanleitung. Das Erdungskabel muss mit der Erdungsklemme verbunden werden. • • Sie müssen sicherstellen, dass das Kabel mit der Isolierung beim Anschluss des Kabels mit der Stromquelle verbunden wird. -
Page 44: Allgemeine Warnhinweise Und Maßnahmen
Art : INSTALLATION UND VORBEREITUNGEN FÜR DIE VERWENDUNG Allgemeine Warnhinweise und Maßnahmen Ihr Gerät wurde in Übereinstimmung mit den einschlägigen lokalen und • internationalen Normen und Vorschriften hergestellt. Die Wartungs-und Reparaturarbeiten dürfen nur von autorisierten Service- • Technikern vorgenommen werden. Installations- und Reparaturarbeiten ohne Einhaltung der folgenden Regeln können äußerst gefährlich werden. - Page 45 Art : INSTALLATION UND VORBEREITUNGEN FÜR DIE VERWENDUNG Austauschen der Brennerdüsen: Hob-Brenner: Schließen Sie die Hauptgasversorgung und trennen Sie das Gerät vom • Stromnetz. Entfernen Sie die Abdeckung und den Adapter. • Schrauben Sie die Düsen ab. Verwenden Sie dazu einen 7 mm-Schlüssel. •...
- Page 46 Art : INSTALLATION UND VORBEREITUNGEN FÜR DIE VERWENDUNG Abb. 11 Einstellen der reduzierten Flammenstellung: Die Flammhöhe wird mit der Flachkopfschraube auf dem Ventil auf minimal gestellt. Bei Ventilen mit Thermoelement befindet sich die Schraube auf der Seite der Ventilspindel. Bei Ventilen ohne Thermoelement befindet sich die Schraube im Ventilschaft.
- Page 47 Art : INSTALLATION UND VORBEREITUNGEN FÜR DIE VERWENDUNG Einstellen der reduzierten Flammenstellung: Die Flammhöhe wird mit der Flachkopfschraube auf dem Ventil auf minimal gestellt. Bei Ventilen mit Thermoelement befindet sich die Schraube auf der Seite der Ventilspindel (Abb. 14). Für eine einfachere reduzierte Flammeneinstellung, ist es ratsam, das Bedienfeld (und Mikroschalter, falls vorhanden) bei der Einstellung zu entfernen.
-
Page 48: Verwendung Der Gasbrenner
4. Art : VERWENDUNG IHRES HERDS Verwendung der Gasbrenner Zündung der Brenner Um festzustellen, welche Regler welchen Brenner kontrolliert, überprüfen Sie die Das Stellungssymbol oberhalb des Reglers. Manuelle Zündung der Gasbrenner • Ist Ihr Herd nicht mit elektrischer Zündung ausgestattet, oder bei einem Ausfall des Stromnetzes, gehen Sie wie folgt vor: Für Kochfeld-Brenner: Zum Zünden der Brenner, drücken und drehen Sie den Regler gegen den Uhrzeigersinn, so dass der Regler in maximaler Position ist, an ein... -
Page 49: Kontrolle Von Herd-Brennern
4. Art : VERWENDUNG IHRES HERDS Flammensicherheitsvorrichtung Hob-Brenner (Wenn Ihr Kochfeld mit einer Gas-Sicherheitsvorrichtung ausgestattet ist) Kochfelder, die mit Zündsicherung ausgestattet sind, bieten Sicherheit im Falle von versehentlich gelöschten Flammen. Wenn ein solcher Fall eintritt, wird das Gerät die Gasleitung des Brenners blockieren und jede Ansammlung von unverbranntem Gas vermeiden. -
Page 50: Kontrolle Von Ofen-Brennern
4. Art : VERWENDUNG IHRES HERDS Schnellkochbrenner: 22-26cm Medium-Brenner: 14-22cm Hilfsbrenner: 12-18cm Stellen Sie sicher, dass die Spitzen der Flammen sich nicht aus dem äußeren Umfang der Pfanne verbreiten, da dies dem Kunststoff-Zubehör rund um die Pfanne (Griffe etc.) auch schaden kann. Abb. - Page 51 4. Art : VERWENDUNG IHRES HERDS FALSCH FALSCH FALSCH RICHTIG Topfboden liegt nicht richtig auf Topfboden ist klein Topfboden ist klein Abb. 9 Vorheizen Wenn Sie den Backraum vorheizen müssen, sollten Sie dies etwa für 10 Minuten tun. Für Rezepte, die höhere Temperaturen benötigen, etwa Brot, Gebäck, Brötchen, Soufflés sollten Sie den Ofen zuerst vorheizen.
-
Page 52: Kontrolle Von Grill-Brennern
4. Art : VERWENDUNG IHRES HERDS HAUPTOFEN TEMPERATUR( C) MARKIERUNG Diese Temperatur-Einstellungen können sich etwas ändern, wenn beide Top-und Hauptöfen zusammen betrieben werden. 4.1.3 Kontrolle von Grill-Brennern Der Grill-Brenner kann mit der Backofentür in zwei Positionen bezüglich Ihrer Wahl betrieben werden: vollständig geöffnet oder teilweise geöffnet (30 ° Parkposition). Kochvorgang Der Grill-Brenner kann zwischen Maximum und Minimum-Positionen moduliert •... -
Page 53: Im Backraum Verwendetes Zubehör
4. Art : VERWENDUNG IHRES HERDS Im Backraum verwendetes Zubehör Es sind verschiedene Zubehörteile für den Backraum vorhanden. Sie können • auch handelsübliches Zubehör verwenden, aber dieses muss jedoch hitze- und feuerfest sein. Sie können auch handelsübliches Glasgeschirr, Kuchenformen, Backbleche etc. verwenden. Beachten Sie dabei stets die Angaben und Hinweise des Herstellers zur richtigen Verwendung. - Page 54 4. Art : VERWENDUNG IHRES HERDS Topfkippschutz • Um das Gitter korrekt in die Öffnung einzusetzen, schieben Sie es ganz bis zum Endanschlag in einen Einschub. • Der Topfkippschutz muss in die Mitte des Backofens platziert werden. Abb. 13 Entfernen der katalytischen Tafel Ausbau des Drahteinschubs Ziehen Sie den Drahteinschub in die...
-
Page 55: Reinigung
5. Art : REINIGUNG UND WARTUNG Reinigung Stellen Sie vor der Reinigung sicher, dass alle Regler abgedreht sind und das Gerät ausgekühlt ist. Trennen Sie das Gerät vom Netz. Überprüfen Sie vor der Verwendung spezieller Reiniger, ob diese für das Produkt geeignet sind oder vom Hersteller empfohlen werden. -
Page 56: Wartung
5. Art : REINIGUNG UND WARTUNG Brenneraufsätze: Emaillierte Pfannenträger, emaillierte Deckel, Brenner Köpfe müssen in regelmäßigen Abständen, mit warmem Seifenwasser abgespült und getrocknet werden. Nach dem Sie sie gründlich getrocknet haben, ersetzen Sie sie richtig. Emaillierte Teile: Um diesen ein neues Aussehen zu erhalten, müssen sie regelmäßig mit mildem warmem Seifenwasser gereinigt und dann mit einem weichen Tuch trockengerieben werden. -
Page 57: Grundlegenede Fehlerbehebung, Bevor Sie Den Service Kontaktieren
6. Art : WARTUNG UND TRANSPORT Grundlegenede Fehlerbehebung, bevor Sie den Service kontaktieren Wenn der Herd nicht funktioniert: Überprüfen Sie, ob der Herd ausgesteckt ist oder der Strom ausgefallen ist. • Wenn der Herd nicht heiß wird: Überprüfen Sie, ob die Temperatur mit dem Temperaturregler eingestellt •... - Page 58 TABELLE BRENNERDÜSEN Gas Category: II2H3+ Destination:IE Class: 1 Total consumption: 28~30 mbar 11,9 Kw 865,27 g/h 28-30 mbar 20 mbar SCHNELLBRENNER Düsendurchmesser (1/100mm) Nennleistung (kW) 285.7 lt/h 218.1 gr/h Verbrauch per h ZUSATZBRENNER Düsendurchmesser (1/100mm) Nennleistung (kW) 95.2 lt/h 72.7 gr/h Verbrauch per h MITTLERER BRENNER Düsendurchmesser (1/100mm)
- Page 59 Dieses Symbol auf dem Produkt oder der Verpackung weist darauf hin, dass dieses Produkt nicht als Haushaltsmüll entsorgt werden darf. Statt dessen muss es an einem entsprechenden Sammelpunkt für das Recycling von elektrischen und elektronischen Geräten abgegeben werden. Indem Sie sicherstellen, dass dieses Produkt richtig entsorgt wird, helfen Sie, mögliche schädliche Auswirkungen auf die Umwelt und Gesundheit zu vermeiden, die durch unsachgemäße Handhabung dieses Produktes entstehen...
Need help?
Do you have a question about the CTG50LPGBK and is the answer not in the manual?
Questions and answers