Table of Contents
Advertisement
Advertisement
Table of Contents

Subscribe to Our Youtube Channel
Related Manuals for Nordmende SO315BL


Summary of Contents for Nordmende SO315BL
- Page 1 Built-in Oven / User Manual SO315BL SO315IX...
- Page 2 Thank you for choosing this product. This User Manual contains important safety information and instructions on the operation and maintenance of your appliance. Please take the time to read this User Manual before using your appliance and keep this book for future reference. Icon Type Meaning...
-
Page 3: Table Of Contents
CONTENTS 1.SAFETY INSTRUCTIONS ....................4 1.1. General Safety Warnings ....................4 1.2. Installation Warnings .....................6 1.3. During Use........................7 1.4. During Cleaning and Maintenance ................8 2.INSTALLATION AND PREPARATION FOR USE ............10 2.1. Instructions for the Installer ..................10 2.2. Installation of the Oven ....................10 2.3. -
Page 4: Safety Instructions
1. SAFETY INSTRUCTIONS • Carefully read all instructions before using your appliance and keep them in a convenient place for reference when necessary. • This manual has been prepared for more than one model therefore your appliance may not have some of the features described within. - Page 5 the oven. • Handles may get hot after a short period during use. • Do not use harsh abrasive cleaners or scourers to clean the oven door glass and other surface. They can scratch the surfaces which may result in shattering of the door glass or damage to surfaces.
-
Page 6: Installation Warnings
heating a room. • Do not use the oven door handles to lift or move the appliance. • All possible measures have been taken to ensure your safety. Since the glass may break, care should be taken while cleaning to avoid scratching. Avoid hitting or knocking the glass with accessories. -
Page 7: During Use
of 100°C. 1.3. During Use • When you first use your oven you may notice a slight smell. This is perfectly normal and is caused by the insulation materials on the heater elements. We suggest that, before using your oven for the first time, you leave it empty and set it at maximum temperature for 45 minutes. -
Page 8: During Cleaning And Maintenance
door. • Do not place heavy or flammable items (e.g. nylon, plastic bag, paper, cloth, etc.) into the drawer. This includes cookware with plastic accessories (e.g. handles). • Do not hang towels, dishcloths or clothes from the appliance or its handles. 1.4. - Page 9 Disposal of your old machine This symbol on the product or on its packaging indicates that this product should not be treated as household waste. Instead it should be handed over to the applicable collection point for the recycling of electrical and electronic equipment.
-
Page 10: Installation And Preparation For Use
2. INSTALLATION AND do not use it and contact an authorised service person or qualified technician PREPARATION FOR USE immediately. WARNING : This appliance must be • Make sure that there are no flammable installed by an authorised service or combustible materials in the close person or qualified technician, according to vicinity, such as curtains, oil, cloth etc. -
Page 11: Electrical Connection And Safety
Installation in a wall unit 1. After making the electrical connections, hob and the top panel of the oven must be insert the oven into the cabinet by pushing a minimum of 10 mm for air circulation. it forward. Open the oven door and insert 2 screws in the holes located on the oven frame. - Page 12 damaged and needs to be replaced this should be done by a qualified personnel. • Do not use adaptors, multiple sockets and/or extension leads. • The supply cord should be kept away from hot parts of the appliance and must not be bent or compressed.
-
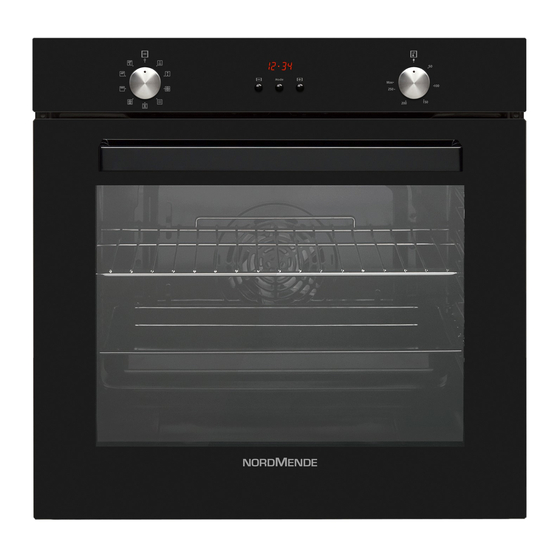
Page 13: Product Features
3. PRODUCT FEATURES Important: Specifications for the product vary and the appearance of your appliance may differ from that shown in the figures below. List of Components 1. Control Panel 2. Oven Door Handle 3. Oven Door Control Panel 4. Oven Function Control Knob 5. -
Page 14: Use Of Product
4. USE OF PRODUCT heating elements will start operating. The static cooking function emits heat, ensuring even cooking of food. This is ideal for 4.1. Oven Controls making pastries, cakes, baked pasta, Oven function control knob lasagne and pizza. Preheating the oven for 10 minutes is recommended and it is best Turn the knob to the corresponding symbol to use only one shelf at a time in this... -
Page 15: Use Of The Digital Timer
Faster Grilling 1. Press the “+” and “-” Function: The oven’s keys simultaneously. thermostat and Symbol will warning lights will appear, and the dot switch on, and the grill in the middle of the and upper heating screen will start to elements will start flash. - Page 16 (finishing time) 3. The symbol will This function automatically starts the oven remain illuminated, the so that cooking will finish at a set time. You time will be saved and can set an end time of up to 10 hours after the warning will be set.
-
Page 17: Accessorries
Sound Adjustment 3. Select the desired cooking time period To adjust the volume of the audible warning using the “+” and “-” sound, while the current time of day is keys. displayed, press and hold the “-” button for 1-2 seconds until an audible signal sounds. After this, each time the “-”... -
Page 18: Cleaning And Maintenance
are appropriate and recommended by the manufacturer before use on your appliance. • Use cream cleaners or liquid cleaners which do not contain particles. Do not use caustic (corrosive) creams, abrasive cleaning powders, rough wire wool or hard tools as they may damage the cooker surfaces. - Page 19 1. Open the oven door. them thoroughly with a dry cloth. Do not clean the stainless steel parts while they are still hot from cooking. Do not leave vinegar, coffee, milk, salt, water, lemon or tomato juice on the stainless steel for a long time. Removal of the Inner Glass You must remove the oven door glass before cleaning, as shown below.
-
Page 20: Maintenance
5.2. Maintenance WARNING: The maintenance of this appliance should be carried out by an authorised service person or qualified technician only. Changing the Oven Lamp WARNING: Switch off the appliance and allow it to cool before cleaning your appliance. • Remove the glass lens, then remove the bulb. -
Page 21: Troubleshooting&Transport
6. TROUBLESHOOTING&TRANSPORT 6.1. Troubleshooting If you still have a problem with your appliance after checking these basic troubleshooting steps, please contact an authorised service person or qualified technician. Problem Possible Cause Solution Check whether there is power supplied. Oven does not switch Power is switched off. -
Page 22: Technical Specifications
7. TECHNICAL SPECIFICATIONS 7.1. Energy Fiche Brand Model SO315BL SO315IX Type of Oven ELECTRIC Mass 38,2(+/-2) Energy Efficiency Index - conventional 112,8 Energy Efficiency Index - fan forced 106,0 Energy Class Energy consumption (electricity) - conventional kWh/cycle 0,99 Energy consumption (electricity) - fan forced... - Page 23 52237299...
Need help?
Do you have a question about the SO315BL and is the answer not in the manual?
Questions and answers