Table of Contents
Advertisement
Quick Links
Advertisement
Table of Contents

Subscribe to Our Youtube Channel
Related Manuals for Hoggi SHARKY


Summary of Contents for Hoggi SHARKY
- Page 1 SHARKY Service instructions...
-
Page 2: Table Of Contents
Servic instructions for toilet wheelchair SHARKY Model identification & basic configuration 1.1 Model identification (label)_____________________________________________________ 4 1.2 Basic configuration __________________________________________________________ 4 Overview SHARKY Overview __________________________________________________________________ 5 Common information 3.1 Preface ___________________________________________________________________ 6 3.2 Material information__________________________________________________________ 7 3.3 Application_________________________________________________________________ 7 3.4 Declaration of conformity______________________________________________________ 7 3.5 Terms of warranty ___________________________________________________________ 7... - Page 3 7.14 Toilet bucket ______________________________________________________________ 32 7.15 Bathtub subframe __________________________________________________________ 33 7.16 Toiletadapter ______________________________________________________________ 33 Exchange of wearing parts 8.1 wheels ___________________________________________________________________ 34 8.2 Seat- and back pads ________________________________________________________ 34 Operating life SHARKY operating life ______________________________________________________ 35 Specifications 10. SHARKY Specifications _____________________________________________________ 35...
-
Page 4: Model Identification (Label)
1 Model identification 1.1 Model identification (label) The SHARKY label is is mounted on the bottom right frame of the mobility base Colour code 3401-2000-022 Article number SHARKY size / Type Hoggi GmbH Gr. 1 Eulerstr. 27 56235 Ransbach-Baumbach Serial number MADE IN GERMANY max. -
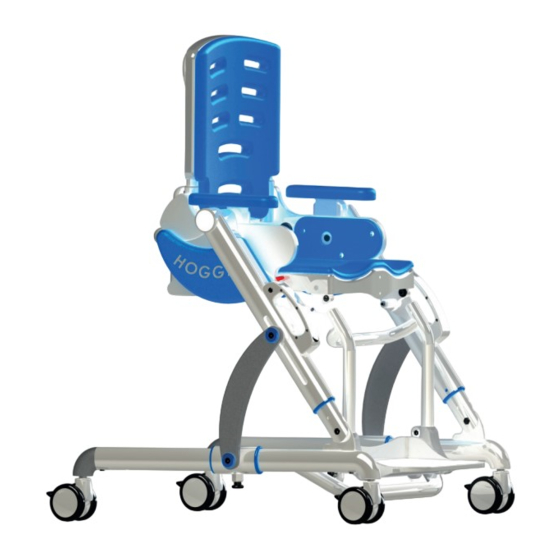
Page 5: Overview Sharky 2. Overview
2 SHARKY Overview 1. Back unit 2. Seat unit 3. Mobility base 4. Foot rest system 5. wheels... -
Page 6: Common Information
3 Common Information 3.1 Preface Thank you for selecting the SHARKY toilet wheelchair We have designed this high-quality product to make your life safer and easier, and we’ve included this manual to help you use and care for it. Please read the following instructions to make sure you use this product as recommended. If you have any further questions, or if you have any problems, please contact your healthcare provider. -
Page 7: Application
3.3 Application SHARKY toilet wheelchair for children is used for indoor and daily use in the wet area. It serves children and adolescents with a deficit in sitting and standing up for individual use in daily care/hygiene or toilet training. -
Page 8: Service And Repairs
Please refer to the last page for contact addresses and telephone numbers. 3.8 Packing and shipping instructions If SHARKY has to be sent back to the manufacturer for repair or exchange, the product must be thoroughly cleaned/disinfected beforehand and put in a hygienically safe condition. -
Page 9: Safety Instructions
Familiarize yourself with the functions of the product. If you are not familiar with the product, study the user manual before testing. If no user mauals are available, request them from us. You can also download documents from our homepage at: www.hoggi.de Attention! Study the service and maintenance instructions before starting work. -
Page 10: Required Tools And Maintenance Schedule
Required tools and maintenance schedule 5.1 Required tools The following list shows the tools and utilities required for service. Reversible ratchet and sockets Torque wrench Wrench size 8-24 Measuring ranges 5-50 Nm Size 6 - 24 Hexagon wrench Screwdriver Phillips screwdriver Gr. -
Page 11: Maintenance Schedule
5.2 Checklist Maintenance schedule Customer: SHARKY Maintenance schedule Toilet wheelchair .......... Pos. Area Check (Checklist to tick off Serial number: Function / setting Screw connections none (like manual) damage / defor- ........mation 1. Basic product Seat unit - Seat adjustments... - Page 12 Function / setting Screw none (like manual) damage / connections deformation 2. Accessories Pushbar - Wearing off - Fixation Foot rest system - Angle adjustment - Detaching / Attaching - Foot board angle- / Height adjustment Head rest system - Height adjustment - Angle adjustment - Pads Thoraxpelotten...
-
Page 13: Seat Height
6. Seat adjustments 6.1 Seat height The seat height of SHARKY is adjusted by means of the engaging leverson on the telescopic tubes. By sliding the tube up and down on the support strut, an adjustment range of 43-52 cm is achieved in 4 steps. -
Page 14: Seat Depth
Maximum +45° 6.3 Seat depth The seat depth of SHARKY is adjusted by loosening the 4 marked screw connections under the seat surface. The adjustment range is 27-37 cm. The M6 nuts are loosened briefly with a suitable socket or wrench. -
Page 15: Seat Width
6.4 Seat width The seat width of SHARKY is changed by replacing the side pads. There are 3 different sizes. Thus, the following seat widths can be realized with the different seat unit sizes: Size 1: 24, 27, 30 cm Size 2: 29, 32, 35 cm The side pads can be easily removed from the holder. -
Page 16: Back Angle Adjustment
Seat width 24 cm 6.5 Back angle adjustment SHARKY offers back angle adjustment from 72° to 120°. 8 positions of approx. 6° each can be individually adjusted The angle adjustment is triggered by a locking bolt cable on the rear side. -
Page 17: Detachable Foot Rest Hanger
Maximum angle ~ 120° 6.6 Detachable back Via the two snap buttons on the rear side, the back unit can be removed. Press in the pins with your thumbs. Remove the back unit upwards from the holder. To reinsert the back unit, simply push it back into the holder and let it snap into place. -
Page 18: Footrest System
6.7 Footrest system Lower leg leght: The lower leg length is adjusted by loosening the wing screws on the footrest bearing and then moving the footrest vertically on the frame. Adjustment for large lower leg lengths. Loosen the wing nut. Adjustment for short lower leg lengths. - Page 19 Footrest hanger The knee angle can be adjusted between 78° and 138° via a locking bolt under the front edge of the seat plate. Strongly angled Medium setting Straight angle Removing and attaching the footrest The smallest knee angle must not be preset for removing and attaching the footrest! It is recommended to tilt the seat to 45°...
-
Page 20: Folding With Seat Unit
6.8 Folding with seat unit SHARKY can also be folded easily with the seat unit integrated. The folding process should not be carried out in the lowest seat position, as this can lead to collisions and damage to the mobility... -
Page 21: Detaching Seat Unit
First swing up the footrest. Fold the seat unit negatively and either fold in or remove the back section. Pull out the right-hand lower pull catch and turn it 90°, so that the lock is activated. Pull out the pull catch on the left-hand side and let the sliders slowly slide backwards until the rear catch point in the frame is reached and the pull snaps engage there. - Page 22 The seat unit is secured with the orange catch hooks on the left and right of the respective mobility base. To remove the seat unit, press down the catch hooks on both sides with your thumbs. Hold the seat unit with your hands. First lift the seat unit at the front and tilt it.
-
Page 23: Detachable Arm Rest With Height Adjustment
Place the seat unit on the front locking shafts and finally lock it in place. 6.10 Removable armrests and height adjustment Armrests can be adjusted in the range from 14.5 cm to 20.5 cm and can also be removed. Lowest position (14.5 cm) Highest position (20.5 cm) Armrest removed Internal push button for height adjustment and removal. -
Page 24: Maintenance Schedule
7. Maintenance schedule 7.1 Seat unit Functional test: - Check for general damage - Checking the seat depth adjustment - Checking the seat cushion for good grip and cleanliness on the underside - Checking the left and right catch hooks. Can the seat be removed and replaced easily? - Inner structure of the seat plate cover with mechanics of the release unit... -
Page 25: Back Unit
7.2 Back unit Functional test: - Check for general damage - Checking the back padding for good grip and cleanliness on the back side - Checking the locking bolt for the backrest angle adjustment - Remove and reattach the backrest Checking the screw connections: - Screw connections of the back base to the side panels 7.3 PU side pads... - Page 26 - Can the ratchet handle be lifted with sufficient spring pressure? - Does the telescopic tube glide well over the support and does the locking mechanism lock neatly into place at all appropriate points? - Does the latching function of the right-hand tension catche work? - Does the slider move cleanly backwards and lock into place at the rear latch position? - Does the glider move cleanly forwards?
-
Page 27: Wheels
- Screw connections on the ratchet handles - Screw connections at the upper and lower end of the support lever - Screw connections of the support struts to the frame frame - Secure hold of the tension catches in the thread of the gliders - Screw connections of the tension catch heads (the thread of the tensi- on catch is secured with Loctide medium-strength, the heads with with high strength) -
Page 28: Footrest System
7.7 Footrest system Functional test: - Check for general damage - Removing and inserting the footrest - Height adjustment of the footrest - Angle adjustment of the knee angle and the footrest using locking pin hoists Bolt pull for knee angle adjustment Bolt pull for footrest angle adjustment Checking the screw connections: - Wing screw for height adjustment of the footrest holder... -
Page 29: Head Rest System
7.8 Headrest Functional test: - Check for general damage - Removing and inserting the headrest Checking the screw connections: - Clamping lever for height, angle and depth adjustment - Screw connections for fastening the cushion - Screw connections on the console 7.9 Thorax pads Functional test: - Check for general damage... -
Page 30: Belt Systems
7.10 Belt fixations Lap belt Functional test: - Check for general damage - Check of the fastener Chest-shoulder harness Functional test: - Check for general damage - Check of the fastener A2J pelvic retraction belt Functional test: - Check for general damage - Check of the fastener Ankle huger Functional test:... -
Page 31: Arm Rests
7.11 Armrests Functional test: - Check for general damage - Height adjustment via push button - Removal and installation - Cleanliness on the underside of the cushion Armrest low Armrest high Armrest removed Push button for height adjustment and removal of the armrest. 7.12 Therapy tray Functional test: - Check for general damage... -
Page 32: Abduktion Block
7.13 Abduction block and splash guard Functional test: - Check for general damage - Removal and engagement of the block - Hygiene Checking the screw connections: - Fastening of the locking hook to the seat surface - Function of the locking hook - Checking cleanliness/hygiene after removing the splash guard 7.14Toilet bucket Functional test:... -
Page 33: Bathtub Subframe
7.15 Bathtub subframe Functional test: - Check for general damage - Does the seat unit lock into place well? - Firm hold of the suction cups in the tub Check of the screw connections: - Screw connection of the respective suction cups - Tight fit of the locking shafts on the frame 7.16 Toiletadapter Functional test:... -
Page 34: Exchange Of Wearing Parts
8. Exchange of wearing parts 8.1 Wheels In the event of a defect or wear, the wheels must be replaced. To do this, loosen the screw connection with a 13 mm spanner and turn the wheel off. Tighten the new wheel in reverse order. Secure the screw connection with the appropriate washer and spring washer. -
Page 35: Sharky Operating Life
9. SHARKY operating life: The expected operating life of the SHARKY is 5 years, depending on the intensity of use, care as well as maintenance. We recommend an annual inspection by the authorized specialist dealer. In case of malfunctions or defects of the toilet wheelchair, it must be immediately handed over to the medical supply store or the specialist dealer. - Page 36 HOGGI GmbH Eulerstraße 27 • 56235 Ransbach-Baumbach • Deutschland Telefon: (+49) 2623 / 92 499-0 • Telefax: (+49) 2623 / 92 499-99 E-mail: info@hoggi.de • www.hoggi.de...
Need help?
Do you have a question about the SHARKY and is the answer not in the manual?
Questions and answers