
Related Manuals for Hoggi BINGO


Summary of Contents for Hoggi BINGO
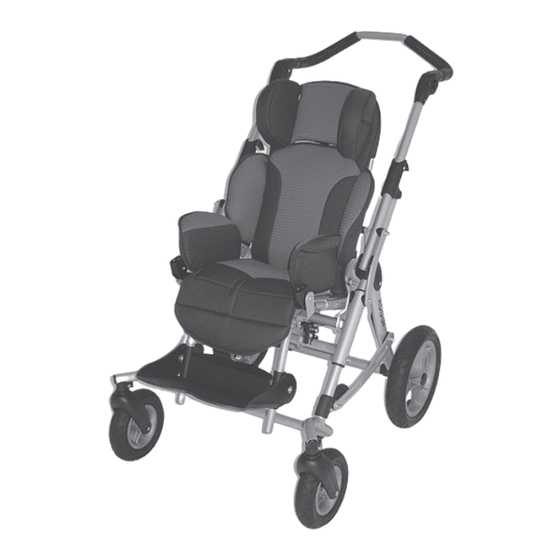
- Page 1 BINGO Rehab Pushchair user manual GB/US Pacific Rehab Inc PO Box 5406 Carefree AZ, 85377-5406 Telephone: 888.222.9040 Fax Orders / Inquiries: 480.575.7907 partnering together to mobilize kids...
-
Page 2: Table Of Contents
5.16 Rain Cape ________________________________________________________________ 26 5.17 Canopy __________________________________________________________________ 27 5.18 Attendant brake ____________________________________________________________ 27 5.19 Ankle huger _______________________________________________________________ 28 Transportation _________________________________________________________________ In the Trunk of a Car ________________________________________________________ Using BINGO Rehab Pushchair for Bus Transport _________________________________ Maintenance __________________________________________________________________ Technical Data _________________________________________________________________... -
Page 3: Common Information Preface
1.5 Service and Repairs Service and repairs on the BINGO should only be carried out by authorized HOGGI dealers. Should any problems arise, please contact the dealer who supplied your BINGO. Authorized dealers only fit original HOGGI spare parts. -
Page 4: Safety Instructions
HOGGI dealer. Strap your child at any time in the pushchair. HOGGI points out, that any use beside the typical use can be dangerous. The pushchair is not suitable for jogging, running, skating or similar activities. Swivelling front wheels tend to wobble at higher speed, which can cause a sudden stop and tip over of the pushchair. - Page 5 Pay particular attention when on slopes and inclines to prevent - the child from falling out of the pushchair; - the pushchair from tipping over; - the pushchair from rolling away. If you have to park on a slope, face the pushchair uphill with the brakes engaged and ensure that the seat is in the upright position.
- Page 6 Your BINGO Rehab Pushchair was successfully tested in accordance with ANSI/RESNA WC/19 and ISO 7176/19 (Crash Test). It is, however, possible to use your BINGO Rehab Pushchair as a seat in a motor vehicle, if our “Tie down Kit” (article 3201-7300) as well as appropriate restraint systems are used.
-
Page 7: Delivery And Preparing For Use
3 Delivery and Preparing for Use The original package contains the following components: • outdoor mobility base, folded; • seating unit, folded; • back insert • seat, back, hip and lateral padding; • instructions for use and list of tools required; •... - Page 8 fix it with the clamping lever • Put the back insert into the back base of the backrest and adjust to the desired height by tightening the clamping bolts. If your BINGO is delivered with a canopy accessory , put the adapter fittings on the tubes with the back insert in place.
- Page 9 • The Allen wrench (size 4 mm) for this and for most other adjustments you can find mounted in the joint slider of the backrest • In addition to the clamping bolts, the back insert is fixed and secured by two carriage bolts with knurled nuts, which also limit the maximum back height.
- Page 10 • Put the lateral upholsteries on the lateral brackets and connect the corresponding hook & loop straps. • Pull the back upholstery with the cap onto the back insert. • Connect the corresponding hook & loop straps to the back insert so that the shoulder belt slots line up with the upper edge (shoulder) of the back upholstery.
-
Page 11: Adjusting And Adaptation Possibilities
To fold the BINGO rehab pushchair proceed as follows: • Stand behind the push bar. Pull both folding guards and push the push bar forward. • After disengaging the folding guards hold the upper part of the push handle and fold it forward until it touches the front frame and the pushchair is lying on the floor... -
Page 12: Seat Depth And Seat Width
• The seat width by moving the hip pads in or out Whenever you change any settings on the BINGO rehab pushchair, make sure that you firmly tighten any screws that have been loosened. -
Page 13: Recline
4.6 Recline Stand behind the seat first and put the wheel lock on. Secure the back with one hand before you operate the clamping lever with the other hand. Adjust the back to the desired position and tighten the clamping lever firmly again. -
Page 14: Footrest Lock (Optional)
For easier transport handling you can dismantle your BINGO in two parts by detaching the seat unit easily from the streetframe. This is also of value, if you want to use the BINGO seat unit on an indoor mobility base. -
Page 15: Tilt In Space
Tighten the bolts firmly again. 4.13 Tilt in space The BINGO seat unit can be tilted up to 45° in driving direction and 40° against driving direction in steps of 8,5° degrees. • Put on the wheel lock and stand beside the pushchair •... -
Page 16: Detaching Wheels With Quickrelease
Ensure, that rear wheels (with perforated brake disc) get attached to rear axle! 4.15 Suspension The BINGO puschair is equipped with an adjustable suspension. By turning the set screw in, the suspension gets harder, by turning out softer. Make sure that the suspension is adjusted equally on both sides. -
Page 17: Accessories
After loosening the clamping screw the track can be adjusted with engaged swivel lock. 5.2 Storage bag The BINGO rehab pushchair can be equipped with a spacious storage bag, which folds with the pushchair. The maximum weight that can be carried in the storage bags is 5 kg (11 lb). -
Page 18: Headrest Pads
If the storage bag gets overloaded the snap fasteners will open but can be put together again easily. If the seat unit is mounted against driving direction, the storage bag also is mounted in reverse direction. 5.3 Headrest pads The headrest pads are mounted with carriage bolts and knurled nuts on the back insert. -
Page 19: Thorax Pads
For a rough adjustment of the headrest width the self adhesive foam pads are glued to the left and/or the right of the headrest brackets. The cover is put on. After loosening the knurled nuts the headrest pads can be moved in or out for a fine width adjustment. -
Page 20: Lap Belt
After reaching the desired position and tightening the wing nuts the back upholstery is pushed underneath the trunk pads. The angle of the trunk pad is fixed by tightening the clamping screw underneath the trunk pad cover. 5.5 Lap belt On each end of the lap belt you can find pre mounted triglides, which are passed by the belt only once. -
Page 21: Five-Point Harness
5.6 Five point harness The five point harness should be installed by authorized dealers or trained technicians. Take the seat upholstery off first. Loosen all the carriage bolts of the hip pads. Pull out the seat plate completely to get easy access to the set of rectangular slots in the seat plate underneath the hook strap. -
Page 22: Foot Straps
Mount the lap strap ends of the five point harness as decribed in 5.5. lap belt and preadjust them roughly. To take the five point harnesss off proceed as follows: • Press the red key on the buckle • Press the keys of the length adjusters and pull the strap out so that approx 5 cm (2 inches) of the strap end remains. -
Page 23: Frame Padding
5.8 Frame padding Fit the frame padding around the pushbar and close the hook & loop strap. Turn the hook & loop closure down and pull the frame padding down over the folding guard and front frame screw connection. Before folding the pushchair, lift the padding up until the folding guard is free. -
Page 24: Fixation Jacket
To put on the groin strap proceed as follows:: • Place your child into the pushchair on the groin strap. • The part of the thigh belt with the buckle attached should lie on the pelvic bone. • Insert the male part of the quick-release buckles located on the tensioning straps into the buckles on the thigh belts. -
Page 25: Chest-Shoulder Harness
• Hold the vest against the child’s chest and close the open quickrelease buckles. If required, re-tighten the individual fixation vest straps in the cam-lock buckles. • If required, re-tighten the individual fixation jacket straps in the cam-lock buckles. 5.11 Chest-shoulder harness To attach the chest-shoulder harness, rivet (from inside to outside) the four cam-lock buckles to the outside of the back plate. -
Page 26: Abduction Block
5.12 Abduction block Take off the seat upholstery to mount the clamping set. Insert the abduction block with its flat link through the slot in the front part of the seat upholstery into the designated rectangular slots (upper and lower!) in the very front of the seat plate. Clamp the abduction block by turning the wing nut of the clamping set. -
Page 27: Winter Warmer
Trays must not be loaded with objects heavier than 5 kg (11 lb). 5.15 Winter warmer Zippers allow the upper part of the winter warmer to be opened or removed. Place the winter warmer in the stroller and tie with the straps to the lower back section and tie the upper straps to the frame of the back insert. -
Page 28: Canopy
5.18 attendant brake The BINGO mobility base can be fitted with an attendant brake. The brake mechanism can be operated with a single lever and a cable switch or with two independent brake lever. -
Page 29: Ankle Huger
Adjustments: The attendant brake set is pre adjusted. Nevertheless, if adjustments become necessary just after installation or after a period of use there are following options: After loosening the counter nut at the brake cable switch the pre tension of both brake slings can be adjusted simultaneously by the setscrew. -
Page 30: Using Bingo Rehab Pushchair For Bus Transport
Visual inspection of wearing parts such as wheels and bearings Contamination on bearings Should any defects become obvious, please contact your authorized HOGGI dealer to eliminate them. We also recommend that you have your BINGO serviced by your authorized dealer every twelve months. -
Page 31: Technical Data
8 Technical data Dimensions cm (inches) and weight kg (lb) Size 1 Size 2 Mobility base 3201-1000 rigid fr. wheels 3203-1000 rigid fr. wheels 3202-1000 sw. fr. wheels 3204-1000 sw. fr. wheels Height push handle 77 -112 (30-44) 77 - 112 (30-44) Overall width 63 (25) 68 (26.5) - Page 32 Hersteller/Manufacturer: Hoggi GmbH Taunusstrasse 17 D - 56235 Ransbach-Baumbach Fon: (+49) 26 23 / 92 499-0 · Fax: (+49) 26 23 / 92 499-99 e-mail: info@hoggi.de · Internet: http://www.hoggi.de...
Need help?
Do you have a question about the BINGO and is the answer not in the manual?
Questions and answers