Table of Contents
Advertisement
Quick Links
Advertisement
Table of Contents

Subscribe to Our Youtube Channel
Related Manuals for Hoggi DURO


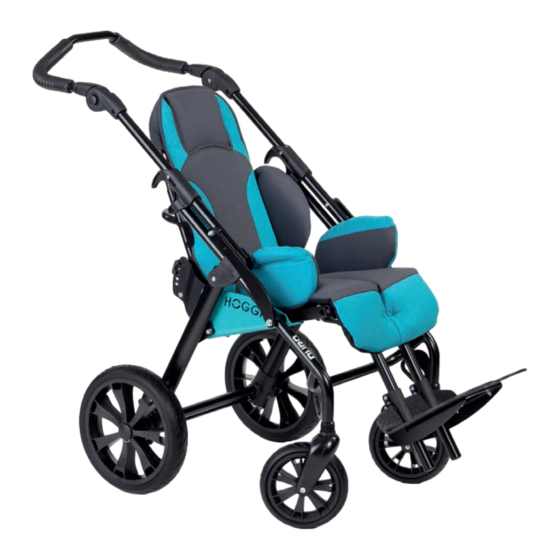
Summary of Contents for Hoggi DURO
- Page 1 Partnerschaft für mobile Kinder DURO / DURO Cross Service instructions...
-
Page 2: Table Of Contents
DURO / DURO Cross - Service and maintenance instructions Content page Model identification & basic configuration 1.1 Model identification (label)_____________________________________________________ 4 1.2 Basic configuration___________________________________________________________ 4 Overview DURO / DURO Cross ___________________________________________________5-6 Common information____________________________________________________________ 8 3.1 Preface ___________________________________________________________________ 8 3.2 Application_________________________________________________________________ 8 3.3 Declaration of conformity______________________________________________________ 8... - Page 3 7.11 Footrest hanger ____________________________________________________________ 23 7.12 Footrest holder __________________________________________________________23-24 7.13 Footrests _________________________________________________________________ 24 7.14 Front wheels ____________________________________________________________24-25 7.15 Swivel lock________________________________________________________________ 25 7.16 Rear wheels ______________________________________________________________ 25 7.17 Braking system __________________________________________________________25-27 7.18 Accessory bag_____________________________________________________________ 27 7.19 Tie down kit _______________________________________________________________ 27 7.20 Headrest pads ___________________________________________________________27-28 7.21 Thorax pads_ _____________________________________________________________ 28 7.22 Abduction block ____________________________________________________________ 28...
-
Page 4: Model Identification (Label)
1.2 Basic configuration - DURO // DURO Cross rehab pushchair - Front and rear wheels with air or PU tires - Drum brake wheels with PU tyres or pneumatic tyres (only for DURO Cross) - Padding (IUS) - Thigh supports... -
Page 5: Overview Duro / Duro Cross
2 Overview DURO 2.1 DURO... - Page 6 2.2 DURO Cross...
-
Page 8: Common Information
• Other diseases The DURO / DURO Cross rehab pushchair is able to be used indoor and outdoor as well as for further service. For further service the product has to be cleaned and sanitised efficiently. Afterwards the product has to be checked concerning condition, wearout and damage by an authorised technician. -
Page 9: Customer Service
You can reach us at: info@hoggi.de 3.7 Packing and shipping instructions If DURO / DURO Cross has to be sent back to the manufacturer for repair or exchange, the product must be thoroughly cleaned/disinfected beforehand and put in a hygienically safe condition. -
Page 10: Safety Instructions
Familiarize yourself with the functions of the product. If you are not familiar with the product, study the user manual before testing. If no user mauals are available, request them from us. You can also download documents from our homepage at: www.hoggi.de Attention! Study the service and maintenance instructions before starting work. -
Page 11: Required Tools And Maintenance Schedule
5 Required tools and maintenance schedule 5.1 Required tools The following list shows the tools and utilities required for service. Reversible ratchet and sockets Torque wrench Wrench Measuring ranges 5-50 Nm size 8-24 Size 6 - 24 Hexagon wrench Screwdriver Phillips screwdriver Blade width 2.5 3.5 and 5.5 Gr. -
Page 12: Maintenance Schedule
Customer: 5.2 Maintenance DURO / DURO Cross ..........Basic product schedule Check (Checklist to tick off Pos. Area Serial number: Function / Setting Screw connections none damage / defor- ........mation Basic product Front frame Rear frame and rear axle... - Page 13 Customer: 5.2 Maintenance DURO / DURO Cross ..........Accessories schedule Check (Checklist to tick off Pos. Area Serial number: Function / Setting Screw connections none damage / defor- ........mation Accessories Storage bag - Fold with Tie down kit...
-
Page 14: Seat Settings
6. Seat settings 6.1 Seat width The seat width of the DURO / DURO Cross can be adjusted by moving the thigh - or the hip supports. The following adjustment ranges result for the two sizes: Size 1: 23 - 34 cm Size 2: 28 - 39 cm The pad is secured to the seat panel by a screw connection. -
Page 15: Seat Depth
6.2 Seat depth Bingo Evolution offers an enormous ability to grow with the seat depth. The following adjustment ranges result for the two sizes: Size 1: 26 - 40 cm Size 2: 31 - 45 cm Measuring point front edge of seat panel to back tube In order to adjust the seat depth, a total of 4 screw connections must be loosened. -
Page 16: Back Height
Largest seat depth 6.3 Back height Depending on the size, DURO / DURP Cross offers different adjustable back heights. Size 1: 45 - 63 cm SIze 2: 61 - 83 cm By opening the indicated wing nut screws, the upper back section can be pulled out or pushed in opposite the base. -
Page 17: Seat Angle
Screw connection in the lower hole: 16° 6.5 Recline The back angle of the DURO / DURO Cross can be adjusted between 78° and 120° in 8 positions relative to the seat surface. The desired back angle can be set with the help of the locking bolt. -
Page 18: Thorax Width
By loosening the front screw connection the angle of the pad can be adjusted. 6.7 Width headrests DURO & DURO Cross can be equipped with the standard headrests, as well as with a low form Low form: Provides a total adjustment range of 2 cm by sliding in 1 cm slotted holes in the pad support. -
Page 19: Footrest Angle
Adjustment range of the slotted holes in the pad support. 3 foam inserts with self-adhesive film. If the inserts are glued to the inside of the pad support, the distance between the sides is reduced by 1 cm. This means that with a maximum of 6 inserts, the area can be additionally reduced by a total of 6 cm. -
Page 20: Maintenance Schedule
- Brake rod bearing and brake pedal retention - Checking the screw connections to the slider, rear axle tube and to the connector Rear frame DURO Cross - Check for general damage - Checking the screw connections to the slider and the clamp 7.3 Push bar... -
Page 21: Seat And Back Bearing
Check of the screw connections: - Lower screw connection of the lower part of the push bar to the slider - Fastening of the release button - Rivet connection of the ratchet joint 7.4 Seat and back bearing - Check for general damage - Seat depth adjustment - Back angle adjustment - Folding in and removing the back... -
Page 22: Thigh Supports
7.6 Thigh supports - Check for general damage - Depth and width adjustment of the pad support - Check of the screw connections to the seat panel 7.7 Hip supports - Check for general damage - Depth and width adjustment of the pad support - Check of the screw connections to the seat panel - Removing the hip support 7.8 Back base... -
Page 23: Back Insert
7.9 Back insert Size 1/2 - Check for general damage - Damage to the edge protection - Height adjustment / telescoping - Removal of the slide-in unit - Check of the screw connection for height adjustment 7.10 Individual upholstery system - Check for general damage or impurities - Wear of the upholstered surfaces 7.11 Footrest hanger... -
Page 24: Footrests
Check of the screw connections: - Screw connection to the footrest with correct angle adjustment - Screws for lower leg length adjustment - Screwing of the swivel mechanism 7.13 Footrest Footrest standard with heel edge Functional test: - Check for general damage - Screw connection to the footrest support 7.14 Front wheels - Plastic or aluminium fork... -
Page 25: Swivel Lock
- Checking the treads and tyre pressure (if pneumatic tyres) - Checking the quick release fastener 7.17 Braking system DURO / DURO Cross can be equipped with 3 brake variants! Parking brake: - Basic configuration - Not in combination with drum brake wheels... - Page 26 Brake for attendant - Check for general damage - Check of the brake levers - Check of the Bowden cable - Check of the screw connection of the brake levers to the push bar - Build-up of the brake pressure (readjustment of the adjusting screw) Wheel with aluminum brake disc - Check of the holes (knocked out, broken bars) - Impurities...
-
Page 27: Accessory Bag
Check of the drum brake wheel 7.18 Accessory bag - 3 kg loadable - Check for general damage - Fastening points ok - Can the bag be folded without problems Shown here is the large bag with a load capacity of up to 8 kg. 7.19 Tie down kit Front securing eyelets - Check for general damage (deformation, sharp edges). -
Page 28: Thorax Pads
Low version: - Check for general damage (Velcro fastening, seams, holes or strapped-through areas) - Check for impurities - Insertion pad - Function of the width adjustment via the pad support 7.21 Thorax pads - Check for general damage - Height and angle adjustment via wing nut on the rear side - Angle adjustment of the pelotte carrier from the front 7.22 Abduction block Functional test:... -
Page 29: Therapy Tray
7.25 Therapy tray Standard Functional test: - Check for general damage - Damage of angle adjustment and depth adjustment - Check of the tripod springs and the anchoring in the retainer for accessories Height adjustable Functional test: - Check for general damage - Damage of angle adjustment and depth adjustment - Height adjustment - Check of the tripod springs and the anchoring in the retainer for... -
Page 30: Winter Warmer
Five-point harness Functional test: - Check for general damage - Check of the fastener - Check of the screw connection of the brackets Groin strap Functional test: - Check for general damage - Check of the fastener - Check of the screw connection of the brackets Fixation jacket Functional test: - Check for general damage... -
Page 31: Canopy
7.28 Canopy Functional test: - Check for general damage - Folding and unfolding of the canopy - Removal via canopy adapter - Checking the screw connections of the adapter to the back bar... -
Page 32: Operating Life
8. DURO & DURO Cross operating life:: The expected operating life of the DURO & DURO Cross is 5 years, depending on the intensity of use, care as well as maintenance. We recommend an annual inspection by the authorized specialist dealer. - Page 33 HOGGI GmbH Eulerstraße 27 • 56235 Ransbach-Baumbach • Deutschland Telefon: (+49) 2623 / 92 499-0 • Telefax: (+49) 2623 / 92 499-99 E-mail: info@hoggi.de • www.hoggi.de...
Need help?
Do you have a question about the DURO and is the answer not in the manual?
Questions and answers