Table of Contents
Advertisement
Quick Links
Advertisement
Table of Contents

Subscribe to Our Youtube Channel
Related Manuals for Timeguard TG77


Summary of Contents for Timeguard TG77
- Page 1 24Hour/7Day Electronic Timeswitch Model: TG77...
-
Page 2: General Information
1. General Information These instructions should be read carefully and retained for further reference and maintenance. 2. Safety • Do not plug in any appliance that exceeds the capacity of the Timer. • Always ensure the plug of any appliance is fully inserted into the timer outlet. -
Page 3: Technical Specifications
3. Technical Specifications • 230V AC 50 Hz • Switch Rating: 13A Resistive (3kW) 400W Filament Lighting 100W Fluorescent Lighting 60W LED lighting • 24 hour and 7 day programming • 20 ON/OFF programmes operating over a wide choice of day groups and individual days. •... - Page 4 4 seconds initiates reinstates programmes time and stop time of clock set mode every programme Output Returns TG77 to Decreases hours, Increases hours, ON light operating mode minutes, days/day minutes, days/day with clock time...
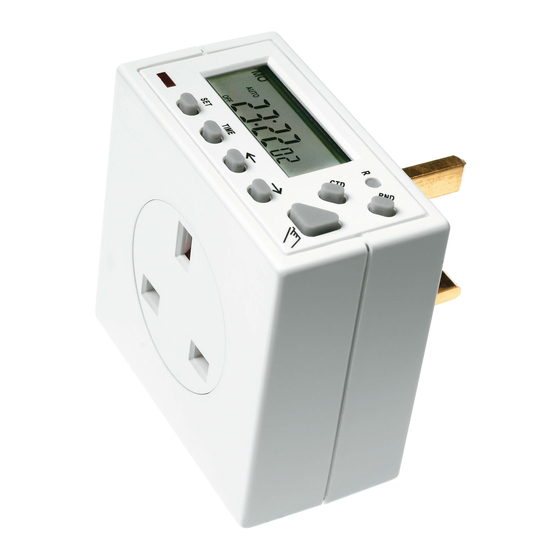
- Page 5 4. Charging Battery and Resetting • Plug the TG77 into a live socket for 4 hours to fully charge the battery, in order to bring the display ON (if blank). • Press reset button, marked ‘R’ on diagram A, using a pointed object (e.g.
- Page 6 The minute digit will start to flash. • Press the right arrow button ‘→’ to select the minutes and press the ‘SET’ button to save. • The TG77 is now in operation mode with the time display and colon flashing.
- Page 7 Changing from 24 hour to AM/PM format Note: The default time format will be 24 hour. Changing format will affect both the time display and the ON/OFF times you programme. • Press and hold the ‘TIME’ button for around 3 seconds until the time has changed from 24 hour to AM/PM format, then release the button.
- Page 8 You are able to programme ON/OFF times to operate over the following days/day groups (shown in order of presentation on the TG77 programming screen); MO TU WE TH FR SA SU (24 hour operation) MO THROUGH TO SU (individual days)
- Page 9 • Press the right arrow button ’→’ to access the programme menu. The display will show the following with ‘Prog 1 ON’ flashing. • Press the ‘SET’ button to select ‘Prog 1 ON’ and the days/day groups will start flashing. •...
- Page 10 • Press the right arrow button ’→’ to select the minutes (in this case 10). Press the ‘SET’ button to save, and ‘Prog 1 ON’ will start to flash. • Press the right arrow button ’→’ to change the ‘Prog 1 ON’ to ‘Prog 1 OFF’. Press the ‘SET’ button to save, and the days/day groups will start to flash.
- Page 11 • Press the right arrow button ’→’ to select the minutes (in this case 5). Press the ‘SET’ button to save, and ‘Prog 1 OFF’ will start to flash. • At this stage your first programme is now saved into the memory. You are now able to use the right arrow button ’→’...
- Page 12 • Press the ‘TIME’ button at any stage to save and return to normal operating mode. Suspending a programme Note: ON and OFF times from the same programme have to be suspended separately. • To suspend a programme from normal operating mode, repeatedly press the right arrow button ’→’...
- Page 13 AUTO and either ON (if the programme should be ON now) or OFF (if the programme is due to turn ON later). • The TG77 will now run all programs stored on a continuous basis. • To advance or override the unit at any time, press the triangle hand button ‘...
-
Page 14: Random Switching Mode
’ until either ON or OFF (as appropriate) is on the display without the AUTO symbol. • The TG77 will now run continuously ON or OFF. 8. Random switching mode The Random switching mode allows a delay for both start and finish times of an ON period. The random... -
Page 15: Countdown Mode
9. Countdown mode You are able to use the TG77 as a simple count down time switch, initiated from a manual start. The programmed countdown period can be from 1 second to 24 hours. The example countdown period used here is 1 hour 10 minutes and 30 seconds. - Page 16 • Press the ‘CTD’ button to start the countdown procedure. The output light will turn ON and the appliance plugged into the TG77 will be energized until the countdown period has expired. Note: Once you have finished setting the countdown period, if the ‘CTD’...
-
Page 17: Summer/Winter Change Over
10. Summer/Winter change over • You are able to instantly increase the current time by one hour by pressing the ‘TIME’ button and the left arrow button ‘ → ’ simultaneously. A plus 1 hour symbol ‘insert symbol’ will appear on the display, and the time will adv. -
Page 18: Year Guarantee
020 8450 0515. Note: A proof of purchase is required in all cases. For all eligible replacements (where agreed by Timeguard) the customer is responsible for all shipping/postage charges outside of the UK. All shipping costs are to be paid in advance... - Page 20 If you experience problems, do not immediately return the unit to the store. Telephone the Timeguard Customer Helpline; HELPLINE 020 8450 0515 or email helpline @ timeguard.com Qualified Customer Support Co-ordinators will be on-line to assist in resolving your query.
Need help?
Do you have a question about the TG77 and is the answer not in the manual?
Questions and answers