Table of Contents

Related Manuals for StarTech.com SECTBLTPOS2


Summary of Contents for StarTech.com SECTBLTPOS2
- Page 1 10.2” to 10.5” Secure iPad® Enclosure with Surface Mount *Actual product may vary from photos User Manual SKU: SECTBLTPOS2 For the latest information and specifications visit www.StarTech.com/SECTBLTPOS2 Manual Revision: 01/10/2022...
- Page 2 This manual may make reference to trademarks, registered trademarks, and other protected names and/or symbols of third-party companies not related in any way to StarTech.com. Where they occur these references are for illustrative purposes only and do not represent an endorsement of a product or service by StarTech.com, or an endorsement of the product(s) to which this manual...
-
Page 3: Safety Statements
Säkerhetsåtgärder • Installation och/eller montering får endast göras av behöriga yrkespersoner och enligt gällande lokala förordningar för säkerhet och byggnormer. To view manuals, videos, drivers, downloads, technical drawings, and more visit www.startech.com/support... -
Page 4: Warning Statements
• Gevaar voor beknelling! Houd uw vingers weg van de bewegende onderdelen als u. 注意 • 必ず取扱説明書に従って本製品の組み立てを行って下さい。 • 最初に取扱説明書を最後まで読み、 本製品の組み立て方をすべて理解して から組み立て作業を始めて下さい。 • 本製品は、 室内での使用を想定しています。 戸外では使用しないで下さい。 To view manuals, videos, drivers, downloads, technical drawings, and more visit www.startech.com/support... - Page 5 • Quando montar este produto, não aperte demasiado os parafusos. Se encontrar resistência enquanto aperta os parafusos, pare de apertar. • Risco de dedos trilhados! Mantenha os dedos afastados dos componentes em movimento. To view manuals, videos, drivers, downloads, technical drawings, and more visit www.startech.com/support...
- Page 6 • Achten Sie bei der Montage des Produkts darauf, die Schrauben nicht zu fest anzuziehen. Sobald Sie beim Anziehen der Schrauben auf Widerstand stoßen, stellen Sie das Anziehen ein. • Einklemmgefahr! Halten Sie Ihre Finger fern von beweglichen Teilen. To view manuals, videos, drivers, downloads, technical drawings, and more visit www.startech.com/support...
-
Page 7: Table Of Contents
Add the Foam Blocks to the Rear Plate ..................... 7 Insert the iPad into the Tablet Enclosure Assembly ..............8 Mounting the Angled Bracket ......................9 Mounting Option #1 - Tabletop- Fixed ....................9 To view manuals, videos, drivers, downloads, technical drawings, and more visit www.startech.com/support... - Page 8 Mounting Option #2 - Tabletop - Rotating ..................10 Mounting Option #3 - Wall Mount ...................... 11 Attach the Tablet Enclosure Assembly to the Angled Bracket ..........12 Warranty ....................13 To view manuals, videos, drivers, downloads, technical drawings, and more visit www.startech.com/support...
-
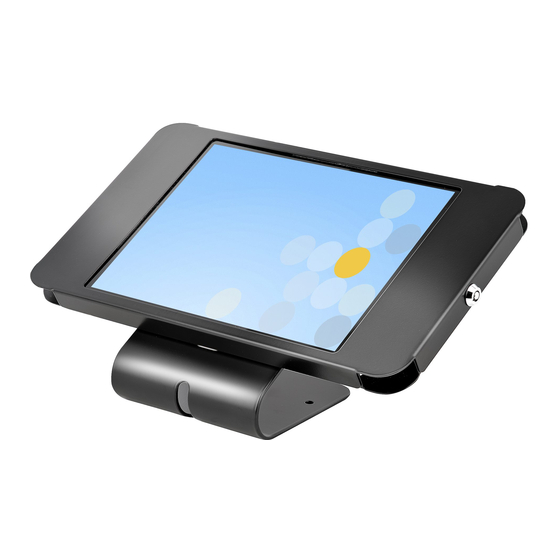
Page 9: Product Diagram
Product Diagram Front View Tablet Enclosure Assembly Lock Angled Bracket To view manuals, videos, drivers, downloads, technical drawings, and more visit www.startech.com/support... -
Page 10: Product Dimensions
Product Dimensions Note: All measurements are in millimeters. Front View Rear View Bottom View Edge View To view manuals, videos, drivers, downloads, technical drawings, and more visit www.startech.com/support... -
Page 11: Side View
Side View Product Information Requirements For the latest manuals, product information, technical specifications, and Declarations of Conformance, please visit: www.StarTech.com/SECTBLTPOS2 Phillips Head Screwdriver • Electric Drill • Pencil • To view manuals, videos, drivers, downloads, technical drawings, and more visit www.startech.com/support... -
Page 12: Package Contents
Qty: 2 100 x 15 x 12 mm M4 x 8 mm Rubber Pads M2.5 Hex Key Foam Blocks Screws Qty: 4 Qty: 1 To view manuals, videos, drivers, downloads, technical drawings, and more visit www.startech.com/support Qty: 2 Qty: 4... - Page 13 User Manual Large Washers 5 x 20 mm Self Small Washers Tapping Screws Qty: 1 Qty: 2 Qty: 3 Qty: 3 To view manuals, videos, drivers, downloads, technical drawings, and more visit www.startech.com/support...
-
Page 14: Installation
Tablet Enclosure Assembly, and turn counterclockwise to unlock. (Figure 1) Remove the Front Plate from the Rear Plate. To view manuals, videos, drivers, downloads, technical drawings, and more visit www.startech.com/support To view manuals, videos, drivers, downloads, technical drawings, and more visit www.startech.com/support... -
Page 15: Add The Felt Tape To The Front Plate
Remove the Adhesive Backing from the 20 x 15 x 3 mm EVA Pads (x 4) and affix to the inside edge of the Tabs (x 4), located on the inside of the Rear Plate. (Figure 3) To view manuals, videos, drivers, downloads, technical drawings, and more visit www.startech.com/support... -
Page 16: Insert The Ipad Into The Tablet Enclosure Assembly
Power/Data Cable around the EVA Pads. Ensure the Power/Data Cable is routed without any sharp bends. Attach the Front Plate to the Rear Plate and Lock the Tablet Enclosure Assembly, using the Key. (Figure 6) To view manuals, videos, drivers, downloads, technical drawings, and more visit www.startech.com/support... -
Page 17: Mounting The Angled Bracket
Mark the location of the Screw Holes (x 3), using a Pencil. Remove the Angled Bracket and drill appropriately sized Pilot Holes (x 3) to an appropriate depth in the Tabletop, using an Electric Drill. To view manuals, videos, drivers, downloads, technical drawings, and more visit www.startech.com/support... -
Page 18: Mounting Option #2 - Tabletop - Rotating
Remove the Angled Bracket and drill an appropriately sized Pilot Hole in the Tabletop, using an Electric Drill. Thread a Small Washer over a 5 x 20 mm Self Tapping Screw to complete the Screw Assembly. To view manuals, videos, drivers, downloads, technical drawings, and more visit www.startech.com/support... -
Page 19: Mounting Option #3 - Wall Mount
Mark the location of the Screw Holes (x 3), using a Pencil. Remove the Angled Bracket and drill appropriately sized Pilot Holes (x 3) in the Wall, using an Electric Drill. To view manuals, videos, drivers, downloads, technical drawings, and more visit www.startech.com/support... -
Page 20: Attach The Tablet Enclosure Assembly To The Angled Bracket
Insert the M4 x 8 mm Screws (x 4) through the Angled Bracket and into the rear of the Tablet Enclosure Assembly and tighten, using the M2.5 Hex Key. Attach the Power/Data Cable to an available Power Source. To view manuals, videos, drivers, downloads, technical drawings, and more visit www.startech.com/support... -
Page 21: Warranty
Limitation of Liability In no event shall the liability of StarTech.com Ltd. and StarTech.com USA LLP (or their officers, directors, employees or agents) for any damages (whether direct or indirect, special, punitive, incidental, consequential, or otherwise), loss of profits, loss of business, or any pecuniary loss, arising out of or related to the use of the product exceed the actual price paid for the product. - Page 22 Hard-to-find made easy. At StarTech.com, that isn’t a slogan. It’s a promise. StarTech.com is your one-stop source for every connectivity part you need. From the latest technology to legacy products — and all the parts that bridge the old and new — we can help you find the parts that connect your solutions.
Need help?
Do you have a question about the SECTBLTPOS2 and is the answer not in the manual?
Questions and answers