Table of Contents
Advertisement
Quick Links
Advertisement
Table of Contents

Related Manuals for FLYSURFER CONNECT2


Summary of Contents for FLYSURFER CONNECT2
- Page 1 USER MANUAL CONNECT2...
- Page 2 CONNECT2 Control Bar User Manual ENGLISH 02-2022 Änderungen vorbehalten / data subject to change © FLYSURFER Kiteboarding 2022, www.flysurfer.com...
-
Page 3: Table Of Contents
Extend the B-Safe Line ...........................12 Convert to the Front Line Safety System ....................12 10.01 Convert the CONNECT2 Control Bar from the 5-line B-Safe System to a 4-line Front Line Safety System ..12 Shorten your flying lines ........................14 11.01 Shorten your flying lines with 5-lines B-Safe System ..................14 11.02 Shorten your flying lines with 4-line Front Line Safety System ................14... -
Page 4: Release Of Liability
FLYSURFER Product and any of its components. To release Skywalk GmbH & Co. KG and all related parties from any and all liability for any loss, damage, injury or expense that you or any users of your FLYSURFER product may suffer, or that your next of kin may suffer, as a result of the use of the FLYSURFER product, due to any cause whatsoever, including negligence or breach of contract on the part of Skywalk GmbH &... -
Page 5: Safety Notes
Every user should be qualified/ trained by a FLYSURFER kiteschool or a FLYSURFER dealer. 02. The user carries the sole responsibility for themselves and third parties when using this product. The user must check their equipment for wear, especially on wearable parts, before each kite session. -
Page 6: Overview Of The Control Bar
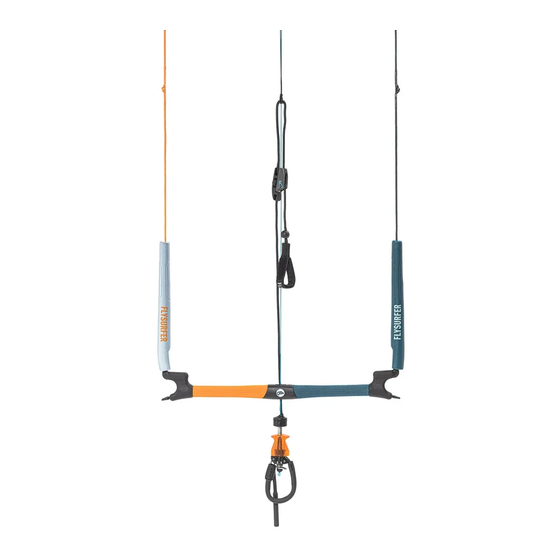
03 OvERvIEW OF ThE CONTROL BAR 03.01 CONNECT2 Control Bar with Front Line Safety 03.02 CONNECT2 Control Bar with B-Safe System SIMPLE QUICK RELEASE LIGhT BAR STICK The compact and reliable SIMPLE Quick Release fulfills the The 0.34 kg light Barholm is color-coded with orange (left) and French standard (AFNOR) in terms of safety and release forces in petrol (right). - Page 7 ADJUST TO ThE GIvEN CONDITIONS B-SAFE SySTEM READy Use the adjustment options of the flying lines to adapt the CON- The CONNECT Control Bar has been specially configured for NECT Control Bar to the weather conditions or your driving style. products with the B-Safe system.
-
Page 8: Safety System
This will open the chicken-loop and the FLYSURFER control bar will slide to the kite on the safety line. The kite falls and blows Auslösen des Standard Safety Modus Auslösen des Standard Safety Modus... -
Page 9: Unwinding And Sorting Of The Flying Lines
Front Lay the front and steering lines fanned to the ground. At t ach a 5-line c ontrol bar on a f oil k ite Pay attention to the color coding when connecting the control bar with your FLYSURFER kite. -
Page 10: Assembly Of The B-Safe System
08.01 Conversion of the CONNECT2 Control Bar from 4 lines Frontline Safety to 5 lines B-Safe System The CONNECT2 is delivered as a 4-line control bar with FLS (Frontline Safety System). Take the B-Safe line set out of the CONNECT2 bar bag. -
Page 11: Instalment Of The B-Safe Top Lines On The Peak5
Attention: the B-Safe Pigtail with the double loop knot should of the PEAK5. not slip through the ring! The CONNECT2 Control Bar is now B-Safe System ready and ope- rates on 5 flying lines. 08.02 Instalment of the B-Safe Top Lines on the... -
Page 12: Extend The B-Safe Line
5-line B-Safe System to a 4-line Front Line Safety nection Line) and connect the B-Safe Top Line with a Lark‘s Head knot. System Take the cardboard winder out of the CONNECT2 bar bag and put it aside. Disconnect both B-Safe Top Lines (B-Safe Main) from the PEAK. - Page 13 Open the connection of the Front Connection Line and the first Front Line. Pull out the Front Line. The CONNECT2 Control Bar is now Front Line Safety System ready and operates on 4 flying lines. Reconnect these lines with just one loop.
-
Page 14: Shorten Your Flying Lines
11 ShORTEN yOUR FLyING LINES Remove the 7 m B-Safe Line attached to the 14 m B-Safe Line. 11.01 Shorten your flying lines with 5-lines B-Safe System Disconnect both B-Safe Top Lines (B-Safe Main) from the PEAK. Wind all extension lines on the cardboard wrapper or stow Open the connection between the B-Safe Top Lines (PEAK) and the B-Safe Line (5th line). -
Page 15: Installation Of The Brake Line
Attach each pigtail to the shortened flying lines (14 m). Re- Pass the Brake line behind the clam cleat adjust. The Brake peat this process on the other three flying lines. line has to pass freely on the backside of the adjuster line. Wind all extension lines on the cardboard winder or stow them in a bag. -
Page 16: Control Bar Care
14 MAINTENANCE Each control bar must be checked regularly and properly. Main- The main parts to check for wear on a FLYSURFER Control Bar are tenance and care support the error-free function of all safety- all lines, all elastics, pulleys, pigtails and the grip. Depending on relevant components. -
Page 17: Extend A Steering Line
Take the front lines in one hand and the steering lines in the Open the lark‘s head knot. other hand and thread a pen (or screwdriver) through the end of each line (pigtails). Move the knot to the by one or two knots. Tighten the con- nection. - Page 18 Open the knot and take off the Stopper Ball and the Safety Thread the Safety Line through the eyelet of the bar stick. Ring. Thread the Safety Line through the Quick Release. Store them in the bag or put them next to you. Don‘t lose the Stopper Ball and the Safety Ring! Take the B-Safe Pigtail and open the connection to the Sa- fety Line.
-
Page 19: Repair & Spare Parts
15 REPAIR & SPARE PARTS Repairs can be done at either our workshop in the head office, or by a Flysurfer sales partner who offers a repair service. High quality original spare parts for all our Flysurfer products can be... - Page 20 FLYSURFER Kiteboarding Brand of Skywalk GmbH & Co. KG Windeckstr. 4 83250 Marquartstein, GERMANY WEBSITE: www.flysurfer.com EMAIL: support@flysurfer.com PhONE: +49 (0) 86 41 69 48 0...
Need help?
Do you have a question about the CONNECT2 and is the answer not in the manual?
Questions and answers