Table of Contents
Advertisement
Available languages
Available languages
Advertisement
Chapters
Table of Contents

Related Manuals for FLYSURFER Infinity 2.0 Bar


Summary of Contents for FLYSURFER Infinity 2.0 Bar
- Page 1 GEAR GUIDE...
- Page 2 Infinity 2.0 Bar Manual V12-01 DEUTSCH Änderungen vorbehalten / data subject to change ENGLISH © FLYSURFER Kiteboarding 2012 FRANÇAIS www.flysurfer.com ITALIANO...
-
Page 3: Table Of Contents
Willkommen in der Welt von Flysurfer Kiteboarding! 01.01 Features ..........................6 Vorab möchten wir uns herzlich 01.02 Kompabilität ........................7 für den Kauf der Infinity 2.0 Bar bedanken und freuen uns, dich in Handling ....................8 der Flysurfer Family zu begrüßen. 02.01 Abwickeln ........................8... -
Page 4: Kompabilität
Winder vereist ist. Integriert ist die leichtgäng- ige Ausdrehfunktion, die beliebig viele Die Winder der Infinity 2.0 Bar bieten Rotationen in beide Richtungen erlaubt. nicht nur genug Platz zum Aufwickeln der Flugleinen. Die integrierte Größen- Infinity 2.0 Chickenloop... -
Page 5: Abwickeln
Kite verbunden ist, vom Kite zur Bar hin. 02.03 Einhängen Achte beim Einhängen der Bar dar- auf, dass das Quick Release stets richtig herum platziert, also der Flysurfer Schriftzug am Auslösegriff zu lesen ist. Es dürfen keine Leinen oder ähnliches um Schiebe die Schlaufe am Ende des das Quick Release gewickelt sein, damit Schlauches über den Metallstift. -
Page 6: Aufwickeln
Die Depower- 02.08 Ausdrehen eigenschaften sind somit beschränkt. Nutze den Die Infinity 2.0 Bar entdreht die Flug- Stopper nur als geübter Benutze zum Sichern entweder die leinen selbstständig, was die Safety- Kiter und niemals in Strand-... -
Page 7: Auslösen
Drehe nach einer Rotation Nach sehr vielen Rotationen in Schiebe den roten Auslösegriff Sollte es notwendig sein, ist es oder einem Kiteloop die Bar, bis eine Richtung kann es notwendig in Richtung Kite. möglich, sich ganz vom Schirm zu tren- die Backlines frei laufen. -
Page 8: Trimm Und Modifikationen
Ziehe den Auslösegriff mit einer Öffne das Quick Release. Hand nach oben. Größenverstellung Die Infinity 2.0 Bar bietet eine Grö- ßenverstellung um wahlweise fünf oder zehn Zentimeter. Dies gibt die Möglichkeit, die Steuerwege zu ver- ändern oder die Bar auf verschie- dene Kitegrößen anzupassen. -
Page 9: Pflege
Lebensdau- Frontlines mit der Zeit verkürzen. An ben wieder gut festzuziehen. weg um zum Beispiel fünf Zentimeter er der Infinity 2.0 Bar und ihrer der schwarzen Leine über dem Adjus- verkürzt, muss die schwarze Leine um Verschleißteile verlängern. - Page 10 Depowerleine Führe beide Enden nun durch den Lege zunächst die Flugleinen Oberhalb des Adjuster ist eine Stopperball und das kurze Schlauch- sauber sortiert aus. Schlaufe den dünne weiße Leine festgeknotet. stück am unteren Ende des Adjuster. Stahlring der Endleine aus. Nutze diese, um die Endleine durch Achtung: Wechsle die De- den Führungsblock zu ziehen.
-
Page 11: Knoten
Schlaufe den Stahlring in Zum Wechseln der Steuerleinen Ziehe die Vorleine wieder durch Bring das Gummi leicht unter die neue Endleine ein. empfiehlt es sich, zuerst die Vorleinen den Floater und befestige sie an der Spannung und verknote es. abzuknüpfen. Schiebe erst die Stopper- kleinen Leine am Winder. -
Page 12: Nicht Fliegen Mit Kites
Ziehe den Palstek fest. Achterknoten Der Achterknoten ist im Gegensatz zum einfachen Knoten dicker und Dieses Handbuch ist auch als Download unter www.flysurfer.com erhältlich. lässt sich nach Belastung etwas leichter wieder lösen. Im Gegensatz 04.01 Nicht fliegen mit Kites zu einem normalen Knoten wird die Leine in einer Acht gelegt. -
Page 13: Free-Repair
05 SERVICE 04.02 10 Gebote für mehr Der Kunde steht bei Flysurfer an Der Service gilt nicht für Kites, die Sicherheit beim Kiten oberster Stelle! Nicht nur vor der gewerblich genutzt werden (z.B. Schu- Kaufentscheidung soll durch eine lung, Verleih etc.) sowie für Schäden,... -
Page 14: Handling
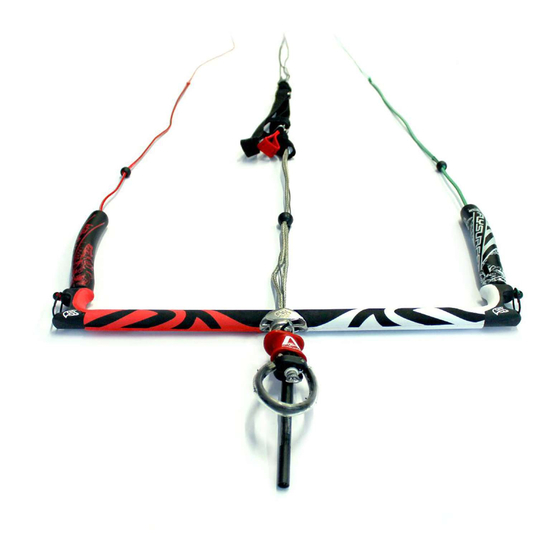
Biniasch 02.02 Attaching the Safety Leash ................30 Thomas Gunnar We – the whole Flysurfer team – will 02.03 Hooking in ........................31 do our best to make sure that you are, 02.04 Winding .........................32 and remain, a happy customer and fan 02.05 Control ..........................32... -
Page 15: Compatibility
Winders when it is full of sand or frozen. Also integrated is the smooth un-spinning The winders on the Infinity 2.0 Bar function that allows for an infinite do not only offer enough room to amount of spins in both directions. -
Page 16: Unwinding
02.03 Hooking in When hooking in, make sure that the Quick Release is the right way up, with the Flysurfer logo visible on the release handle. Push the metal pin through To function properly, no lines should be the loop at the end of the tube. -
Page 17: Winding
02.08 Untwisting you let it go. The depower range will be limited by this. The Infinity 2.0 Bar untwists all Only use the Stopper Ball if flying lines automatically which you are an experienced kiter,... -
Page 18: Activating The Quick Release
Spin the bar after a rotation or kite- After many rotations it may be ne- Push the red release handle If necessary, it is possible to comple- loop until the Steering Lines are free. cessary to untwist the Endline. There- towards the kite. -
Page 19: Trim And Modification
Clip the Safety Leash to the Suicide Loop as well as the ring of the endline. Suicide Loop The Infinity 2.0 Bar has the option to be used with the Suicide Loop which allows the kite to be ridden in suicide... -
Page 20: Care
(the bar should be fully powered). be purchased from every All lines should be the exact same Move the bowline knot under the Flysurfer dealer or directly length when under high tension. Adjuster until the desired length of from Flysurfer. - Page 21 Depower Line Thread both ends through the Sort and lay out your flying lines. There is a thin white line attached Stopper Ball and the short piece of Unloop the steel ring from the Endline. above the Adjuster. Use this to thread tubing on the bottom of the adjuster.
-
Page 22: Knots
Loop the steel ring onto the Endline. To change the Steering Lines you Thread the Leader Line back through Lightly tension the bungie should first disconnect the leader lines. the floater and reattach it to the knot and tie a knot on the end. Push the floater and stopper ball up. -
Page 23: Do Not Fly With Kites
The product may only be used with original spare parts, and may not be modified. Every user must be qualified by a Flysurfer kiteschool or a Flysurfer dealer. Pull the loop tightly shut. Thread the end of the line through the eye from below. -
Page 24: Commandments For More Safety When Kiting
Repairs can be done at either our work- international test events. The friendly shop in the head office, or by a Flysurfer 6. Only kite if you are sure you are physically atmosphere and the open, helpful spirit sales partner who offers a repair ser- fit to do so. - Page 25 éDIToRIAL CoNTENU Barre Infinity 2.0 ................50 Bienvenue dans le monde de Flysurfer Kiteboarding! 01.01 Caractéristiques ......................50 Tout d‘abord merci d‘avoir acheté 01.02 Compatibilité ....................... 51 une Infinity 2.0-Bar et nous som- mes heureux de vous accueil- Utilisation .....................52 lir dans la famille flysurfer.
-
Page 26: Caractéristiques
La barre Infinity 2.0 peut être uti- lisée pour de nombreuses ailes C‘est l‘extrémité de la ligne de sécurité Flysurfer et adaptée sur de nom- à laquelle on attache le leash d‘aile. breux modèles d‘ailes à boudin. Consultez votre revendeur. -
Page 27: Dérouler Les Lignes
02.03 S‘accrocher à la voile En connectant le Chickenloop à la boucle de harnais, assurez vous que le logo Flysurfer visible sur le largueur est face à vous. Passez la tige métallique dans la boucle au bout du tube. -
Page 28: Ranger La Barre
02.04 Ranger la barre 02.05 Contrôle Pour plus de puissance tirez La Stopper Ball est située sous le sur la sangle noire. trim. Vous pouvez la faire coulisser Aile posée et sécurisée, verticalement avec la main afin de La barre Infinity 2.0 permet border la barre à... -
Page 29: Activer Le Largueur
Faites tourner la barre pour ne Au bout d‘un grand nombre de ro- Poussez la partie rouge Si c‘est nécessaire, vous pouvez plus avoir les lignes croisées. tations dans le même sens, il peut du Chickenloop. larguer votre leash d‘aile. Ne faites être nécessaire de démêler la ligne cela qu‘en cas d‘extrême nécessi- té, cela peut être dangereux pour... -
Page 30: Réglages
03 MAINTENANCE 03.01 Réglages Soulevez la partie rouge Ouvrez le largueur. du largueur à une main. Modifier la longueur La barre Infinity 2.0 vous permet de modifier sa longueur de 5 à 10 cm et de l‘adapter à des voiles de tailles différentes. -
Page 31: Précautions
Vérifiez que le trim est en position des pièces de rechanges puissance maxi. Attrapez la barre et La longueur du bout de border choquer Flysurfer. Ces pièces ont mettez les lignes en tension, barre en peut être adaptée à vos préférences. été testées et sélection- position bordée à... - Page 32 Bout de border choquer Passez les deux extrémités Déroulez et démêlez vos lignes. Une petite ligne blanche vous dans la Stopper Ball puis dans le Retirez l‘anneau de l‘extrémité de permet de refaire passer la nouvelle petit tube situé sous le trim. la ligne de sécurité.
-
Page 33: Noeuds
Remontez l‘anneau sur la Pour changer une ligne arrière, Remettez le flotteur sur la préligne Faites un noeud entre les boucle de la ligne de sécurité. poussez le flotteur. et reconnectez la sur l‘embout de barre. deux extrémités de l‘élastique. Déconnectez la préligne et retirez le flotteur. -
Page 34: Ne Volez Pas Avec Un Kite
Serrez. Noeud plus facile à ouvrir. Ce manuel peut être téléchargé sur le site www.flysurfer.com 04.01 Ne volez pas avec un kite Une voile de kite n‘est pas conçue, testée et homologuée pour voler, Tête d‘allouette contrairement à... -
Page 35: Service
05 SERVICE 04.02 10 conseils pour être Pour flysurfer le client est roi! En plus La free repair n‘est pas valable pour plus en sécurité d‘être conseillé vers le produit qui lui les voiles utilisées commercialement correspond le client doit être 100% (école, location ...) ou dont les dégats... - Page 36 Benvenuti nel mondo di Flysurfer Kiteboarding! 01.01 Caratteristiche ......................72 Prima di tutto vogliamo ringraziarvi 01.02 Compatibilità.......................73 per l‘acquisto della Infinity 2.0 Bar e siamo lieti di darvi il benvenuto Utilizzo ....................74 nella Flysurfer Family. 02.01 Svolgere i cavi ......................74...
-
Page 37: Caratteristiche
Front Lines 01.02 Compatibilità Steering Lines La Infinity 2.0 Bar può essere uti- lizzata su numerosi kite Flysurfer Safety Endline e anche su kite di altre aziende. Chidete al vostro rivenditore. -
Page 38: Svolgere I Cavi
02.03 Agganciarsi Connettendo il Chicken Loop al Passate il fermo metallico gancio del trapezio assicuratevi che il nel loop alla fien del cavo. logo Flysurfer sia rivolto verso di voi. Nessun cavo deve passare intorno al Quick Release. -
Page 39: Arrotolare I Cavi
02.07 Stopper Ball 02.08 Rotazione dei cavi La Infinity 2.0 Bar permette di far La Stopper Ball serve a di- minuire la corsa della barra ruotare i cavi su se stessi e mettere in chiaro le linee automaticamente. -
Page 40: Attivare Il Quick Release
(vedete il manuale del kite). La Infinity 2.0 Bar rimetterà auto- maticamente i cavi depower a posto trazionando la barra verso voi. Il kite rimane agganciato con Spingete l‘asola del loop... -
Page 41: Modifiche E Trimmaggio
Aprite il Quick Release. l‘alto con una mano. Cambiare la lunghezza La nostra Infinity 2.0 Bar vi permette di cambiare la sua lunghezza tra 5 e 10 cm per adattarsi a vele di taglie diverse. Aprite i nodi delle prelinee sotto i galleggianti. -
Page 42: Precauzioni D'uso
Importante: Utilizzate solo nuire l‘efficacia del depower pezzi di ricambio originali diminuendo la sicurezza. Flysurfer che garantiscono Aggiustare il depower le prestazioni ottimali e possono essere acquistati Aprite il trim completamente. La corsa del depower può... - Page 43 Cavo del depower Infilate le due estremità attraverso Svolgete i cavi e liberate Utilizzate la sottile linea bian- la Stopper Ball. l‘anello di metallo dalla parte ca sopra il trim per ripassare la terminale della endline. end line nel pezzo metallico. Attenzione: Sostituitelo appena dimostra segni d‘usura.
-
Page 44: Nodi
Rimettete l‘anello metallico. Alzate i galleggianti. Bastoncino del Chicken Loop Verifcate che il bastoncino pos- sa muoversi regolarmente. Per rimpiazzare l‘elastico passa- te quello nuovo nel ponte dipalstica nella parte bassa del Quick Release. Sganciate la linea dalla prelinea. 03.04 Nodi Cavi principali (Front Lines) Gassa I cavi principali devono essere so-... -
Page 45: Non Volate Con Il Vostro Kite
I prodotti non devono essere modificati e devono essere utilizzate solo parti di ricambio originali. Assicuratevi di saper utilizzare questo prodotto. Potete ottenere informa- zioni e istruzione qualificata presso una scuola o un rivenditore Flysurfer. Stringete il nodo. Nodo savoia Questo manuale deve essere letto attentamente prima di utilizzare il pro- E il nodo più... -
Page 46: Servizio
05 SERVIZIo 04.02 10 consigli per aumentare Per Flysurfer il cliente riveste un ruolo Il servizio non vale per kite utilizzati la sicurezza centrale. Il cliente deve essere assistito a scopo commerciale (insegnamen- e consigliato nella scelta del modello più... - Page 47 FLySURFER Kiteboarding Brand of skywalk GmbH & Co KG Bahnhofstraße 110 83224 GRASSAU, GERMANY website: www.flysurfer.com email: info@flysurfer.com phone: +49 (0) 86 41 69 48 - 30...
Need help?
Do you have a question about the Infinity 2.0 Bar and is the answer not in the manual?
Questions and answers