Advertisement
Thank you for purchasing the min-max thermometer Model MIN-MAX TypeⅠ.
- This instrument is designed to measure temperature and humidity being mounted on a wall
Do not use it for other purposes.
- Be sure to read this manual thoroughly before using the min-max thermometer. Keep this manual in
a safety place for future references.
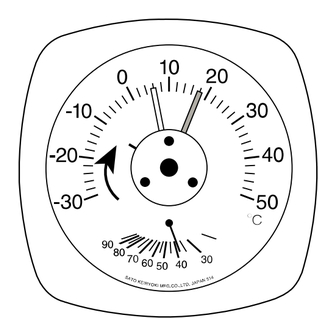
Name of section
blue pointer
(min. temperature)
setting needle
How to use
1. Settings (before use)
- Overlap the red pointer (max. temperature) on the black pointer (current
temperature) by turning the nut counterclockwise.
(refer to A)
- Turn the nut clockwise to overlap the blue pointer (min. temperature) on
the black pointer (current temperature). (refer to B)
- When three pointers are overlapped, settings will be completed.
After completed, be sure to set back the setting needle just under
by turning the nut. (refer to C)
2. How to read min. and max. temperatures
- The value that red pointer indicates is the maximum
temperature and the blue pointer indicates the minimum
temperature during the measurement (from just after the
settings are completed).
INSTRUCTION MANUAL
Min-Max Thermometer with Hygrometer
Model MIN-MAX TypeⅠ
Front view
black pointer
(current temperature)
red pointer
(max. temperature)
nut
nut
Setting needle
Blue pointer
1
A
B
C
black pointer
red pointer
D
Advertisement
Table of Contents

Subscribe to Our Youtube Channel
Related Manuals for SATO KEIRYOKI MIN-MAX Type I


Summary of Contents for SATO KEIRYOKI MIN-MAX Type I
- Page 1 INSTRUCTION MANUAL Min-Max Thermometer with Hygrometer Model MIN-MAX TypeⅠ Thank you for purchasing the min-max thermometer Model MIN-MAX TypeⅠ. - This instrument is designed to measure temperature and humidity being mounted on a wall Do not use it for other purposes. - Be sure to read this manual thoroughly before using the min-max thermometer.
- Page 2 3. Installation Rear view Use the hooking hole shown on the rear of the case to hole for hook mount the unit perpendicularly on a wall. Cautions in Installation - Mount the unit at your eye level on a perpendicular wall that is free from vibrations. - Do not mount the unit subject to direct air flow from an air conditioner or a heater.
Need help?
Do you have a question about the MIN-MAX Type I and is the answer not in the manual?
Questions and answers