Table of Contents
Advertisement
Quick Links
Advertisement
Table of Contents

Subscribe to Our Youtube Channel
Related Manuals for AXIOMTEK P712


Summary of Contents for AXIOMTEK P712
- Page 1 P712 12.1” XGA TFT Railway Monitor User’s Manual...
-
Page 2: Disclaimers
Axiomtek does not make any commitment to update the information in this manual. Axiomtek reserves the right to change or revise this document and/or product at any time without notice. No part of this document may be reproduced, stored in a retrieval system, or transmitted, in any form or by any means, electronic, mechanical, photocopying, recording, or otherwise, without the prior written permission of Axiomtek Co., Ltd. -
Page 3: Safety Precautions
Most electronic components are sensitive to static electrical charge. Disconnect the power cords from the P712 Series before making any installation. Be sure both the system and the external devices are turned OFF. Sudden surge of power could damage sensitive components. -
Page 4: Table Of Contents
Table of Contents Disclaimers ...................... i Safety Precautions ..................iii Chapter 1 Introduction ..........1 General Description ................1 Features ....................2 Specifications ..................2 Dimensions and Outlines ..............3 I/O Outlets .................... 4 Packing List ..................5 Chapter 2 System Setup .......... -
Page 5: Chapter 1 Introduction
Package List General Description The P712 is an industrial and rail grade 12.1 inches viewing area LCD monitor with slim, lightweight, and reliable design to replace traditional bulky CRT in the transportation market. Its unique and flat design fit for panel mounting and VESA mounting. The display interface offers DVI-D, HDMI and VGA for different image input sources from computer or multimedia system. -
Page 6: Features
P712 User’s Manual Features ⚫ High contrast 12.1” XGA TFT LCD display supports resolution up to 1024x768 ⚫ Auto-dimming for changing environmental conditions adaption ⚫ Flat design with front frame IP65-compliant ⚫ Reliable resistive touch ⚫ High Brightness and ultra-wide viewing angle with anti-glare feature ⚫... -
Page 7: Dimensions And Outlines
P712 User’s Manual Dimensions and Outlines The following diagram show the dimensions and outlines of the P712. The following diagram show the VESA mounting and cut-out dimension of P712 Introduction... -
Page 8: I/O Outlets
P712 User’s Manual I/O Outlets The following pictures show the I/O outlets of the P712. Function Function Menu (Enter function) M12 A-coded Male 5 pin DC power input SEL+ Multi-function of T/S & remote control SEL- Exit HDMI Power LED... -
Page 9: Packing List
⚫ RS-232 cable x1 (for resisitve touch) ⚫ HDMI bracket x1 ⚫ Cable tie x1 ⚫ Cable clamp x1 ⚫ Screw M3*5L x2 If you cannot find the package or any items are missing, please contact Axiomtek distributors immediately. Introduction... - Page 10 P712 User’s Manual This page is intentionally left blank. Introduction...
-
Page 11: Chapter 2 System Setup
P712 User’s Manual Chapter 2 System Setup This chapter details the system parts and components with figures. Sections include: ⚫ System Configuration ⚫ Panel Mounting ⚫ VESA Mounting ⚫ I/O Pin Assignment ◼ M12 A-coded Male 5 pin DC power input ◼... -
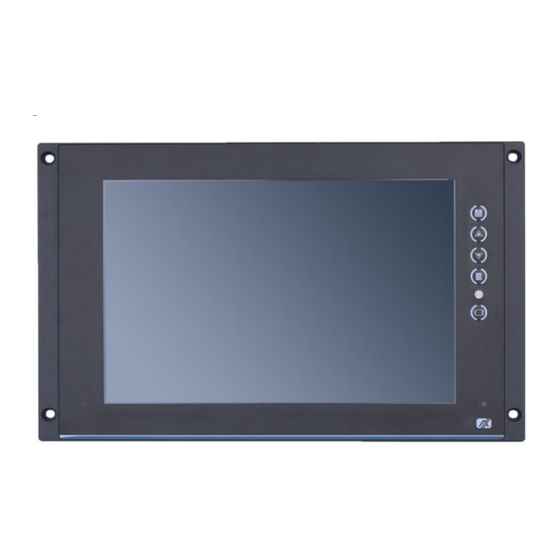
Page 12: System Configuration
P712 User’s Manual System Configuration The figure below shows the OSD on the side of the monitor. Menu: a. Press to turn on/off the OSD (on-screen display) main menu. b. Press to execute selected items. SEL+: a. Press to scroll up the menu. -
Page 13: Panel Mounting
P712 User’s Manual Panel Mounting The P712 supports panel mounting. To mount the P712, the standard holes are on the front side of the P712. System Setup... -
Page 14: Vesa Mounting
P712 User’s Manual VESA Mounting The P712 is VESA compliant. Tighten the four screws firmly to fix the kit on the back chassis. System Setup... -
Page 15: I/O Pin Assignment
P712 User’s Manual I/O Pin Assignment The P712 supports M12 A-coded Male 5 pin power input connector, Multi-function of T/S & remote control, VGA, HDMI, DVI-D, and Line-in. The diagrams below show the detailed pin assignment. 2.4.1 DC power connector M12 A-coded Male 5 pin power input:24~110Vdc... -
Page 16: Hdmi Bracket & Cable Clamp Installation
P712 User’s Manual HDMI bracket & Cable clamp installation 2.5.1 HDMI bracket installation Step 1 Align the hole on the bracket with the hole on the chassis, insert the M3 screw and fasten the screw tightly to the bracket, as the pictures shown below. -
Page 17: Y Cable For T/S And Remote Control
P712 User’s Manual Y cable for T/S and remote control (optional) Y cable for resistive touch and remote control is optional, also available for self-made by referring to the following correspondence: Wiring Table Connector Type DB9-male DB9-female DB9-female System P710... - Page 18 P712 User’s Manual This page is intentionally left blank. System Setup...
-
Page 19: Appendix A Supported Input Timing Modes
P712 User’s Manual Appendix A Supported Input Timing Modes HDMI DVI-D Resolution Refresh Resolution Refresh Resolution Refresh rate rate rate 640 x 480 60 Hz 640 x 480 60 Hz 640 x 480 60 Hz 640 x 480 72 Hz... - Page 20 P712 User’s Manual This page is intentionally left blank. Supported Input Timing Modes...
-
Page 21: Appendix Bosd Operation
P712 User’s Manual Appendix B OSD Operation Function Description of OSD Menu ※ The OSD layout and format are constructed as below. Level 0 Level 1 Level 2 Value Brightness Picture 0-100 Contrast 0-100 Sharpness Ambient Off/Indoor/Outdoor Off (default) Sense... - Page 22 P712 User’s Manual Menu Time 10-60 (seconds) OSD H 0-100 Position OSD V 0-100 Position Language English English (default) Spanish France German Italy Portugal Russia Chinese Transparency 0-255 OSD Rotate 0°/90°/180°/270° 0° (default) Power On On/Off/User On (default) Status Information Input Source...
- Page 23 P712 User’s Manual This page is intentionally left blank. OSD Operation...
-
Page 24: Appendix C Remote Control Utility
P712 User’s Manual Appendix C Remote Control Utility Files: ADS_Client.exe: main application ADS_RS-232_x32.dll / ADS_RS-232_x64.dll: library for application reference. The files must be manually copied to System Disk (C:):\Windows\System32 or installed with ADS_Client.exe ◼ The remote control utility is for adjusting the system setting via multi-function port. - Page 25 P712 User’s Manual ⚫ Application UI and functions ◼ When you start the system, it will auto scan all the serial port to find out correct port you connect to. ◼ Control items Brightness ⚫ Control: scroll bar ⚫ Range: 0 ~ 100 ⚫...
- Page 26 P712 User’s Manual Color Temp.: ⚫ Control: drop-down list ⚫ Range: 6500, 7500 and 9300 Remark: if the getting or setting fails, the application will show “Color ⚫ Temp. - Failed” Power: ⚫ Control: button ⚫ Way: set only, ON and OFF Remark: if the setting fails, the application will show “Power - Failed”...
- Page 27 P712 User’s Manual Rescanning all Status ⚫ Control: button ⚫ Remark: getting all status Input Source ⚫ Control: Text box ⚫ Remark: showing which one is input source (DVI/VGA/HDMI/DP) AD Board Management System...
- Page 28 P712 User’s Manual This page is intentionally left blank. AD Board Management System...
Need help?
Do you have a question about the P712 and is the answer not in the manual?
Questions and answers