
Related Manuals for AT&T DLP73290


Summary of Contents for AT&T DLP73290
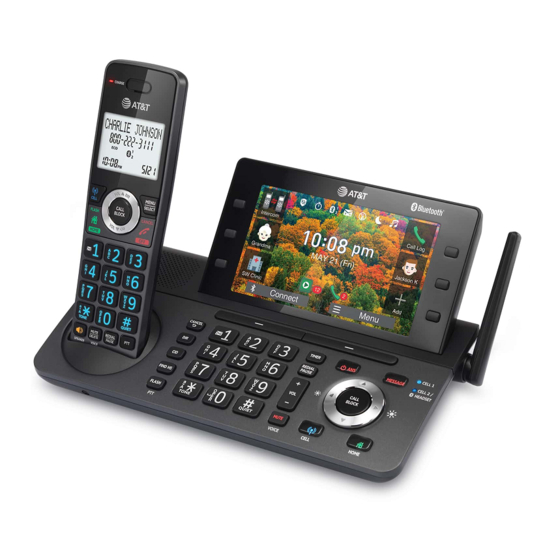
- Page 1 Complete user’s manual DLP73290/DLP73390/DLP73490/ DLP73590 DECT 6.0 cordless telephone/ answering system with BLUETOOTH® wireless technology...
- Page 2 This telephone system is compatible with certain AT&T DECT 6.0 cordless headsets. https://telephones.att.com/accessories Visit for a list of compatible cordless headsets. Model number: DLP73290 (two-handset system) DLP73390 (three-handset system) DLP73490 (four-handset system) DLP73590 (five-handset system) Type: DECT 6.0 cordless telephone/answering system with BLUETOOTH®...
- Page 3 GP1621 Cordless handset Battery for cordless Battery Charger for cordless handset compartment cover handset with power (2 for DLP73290) adapter installed (3 for DLP73390) (2 for DLP73290) (2 for DLP73290) (4 for DLP73490) (3 for DLP73390) (3 for DLP73390) (1 for DLP73290)
-
Page 4: Table Of Contents
Complete user’s manual DLP73290/DLP73390/DLP73490/ DLP73590 DECT 6.0 cordless telephone/ answering system with BLUETOOTH® wireless technology Table of contents Getting started Edit a speed dial number ....24 Edit an emergency number ...24 Important safety information ....1 Delete a speed dial number ... 25 Safety information ........ - Page 5 Set date and time .........44 Options while on calls ......68 Set speed dial voicemail Handset speakerphone ....68 number ............46 Volume control ........68 Voicemail (visual message Mute ...............68 waiting) indicator ........46 Temporary tone dialing ....69 Clear voicemail indicator/ Chain dialing ..........70 indication ............
- Page 6 Dial, delete and edit a directory Screen robocalls ........143 entry ..............97 Option while on a call ......144 Dial a directory entry ......97 Answering system Edit a directory entry ......98 Answering system settings ....145 Delete a directory entry ....99 Announcement ........145 Delete all directory entries ..
- Page 7 Screen icons, indicator lights and alert tones ..........166 Screen icons ...........166 Handset indicator lights ....166 Telephone base indicator lights ............167 Handset alert tones ......167 Telephone base alert tones ..167 Screen messages ........168 Troubleshooting.........170 Maintenance ..........180 For C-UL compliance ....... 181 Mesures de sécurité...
-
Page 8: Getting Started
Getting started Important safety information This symbol is to alert you to important operating or servicing instructions that may appear in this user’s manual. Always follow basic safety precautions when using this product to reduce the risk of injury, fire, or electric shock. Safety information Read and understand all instructions in the user’s manual. -
Page 9: Especially About Cordless Telephones
Getting started Important safety information Disposal of a battery into fire or a hot oven, or mechanically crushing or cutting of a battery, that can result in an explosion. Leaving a battery in an extremely high temperature surrounding environment that can result in an explosion or the leakage of flammable liquid or gas. -
Page 10: Precautions For Users Of Implanted Cardiac Pacemakers
Getting started Important safety information Precautions for users of implanted cardiac pacemakers Cardiac pacemakers (applies only to digital cordless telephones): Wireless Technology Research, LLC (WTR), an independent research entity, led a multidisciplinary evaluation of the interference between portable wireless telephones and implanted cardiac pacemakers. -
Page 11: Installation
Getting started Installation You must install and charge See pages 17-19 for easy the battery before using the instructions. cordless handset. Install the telephone base close to a telephone jack and a power outlet not controlled by a wall switch. The telephone base can be placed on a flat surface or vertically mounted on the wall (page 15). -
Page 12: Quick Reference Guide - Telephone
Getting started Quick reference guide - telephone base Telephone base While in a menu, press to cancel an operation, back up to the Ì previous menu, or exit the menu display; or press and hold this button to exit to idle mode. Press to show directory entries when the telephone is not in Ì... - Page 13 Getting started Quick reference guide - telephone base Press and hold to set and turn on the QUIET mode, or turn Ì it off. Press to enter # key during a call. Ì Press repeatedly to show other dialing options when Ì...
- Page 14 Getting started Quick reference guide - telephone base Adjust LCD display brightness. Ì Press left to dim, and press right to increase the LCD Ì brightness. Press to navigate in the menu options. Ì CELL 1 Flash when searching and pairing the bluetooth device (s). Ì...
- Page 15 Getting started Quick reference guide - telephone base Jason Ke Intercom Grandma Clinic Connect Menu Telephone base display Connect Connect Bluetooth device. Menu Option(s) displays above a softkey. Smart call blocker is on. Timer is set and counting down. Flashes when the countdown reaches. Bluetooth device is paired and active.
- Page 16 Getting started Quick reference guide - telephone base Main menu The selected menu item is highlighted. Jason Ke Feature menu Intercom Grandma Answering system (page 145) Directory (page 89) Clinic Caller ID log (page 101) Connect Menu Smart call blocker (page 114) Block list (page 119) Menu Intercom (page 77)
-
Page 17: Quick Reference Guide - Handset
Getting started Quick reference guide - handset Handset CHARGE light On when the handset is charging in the telephone base or charger. Ì VOL p DIR p DIR Press to show directory entries when the handset is not in use. Ì... - Page 18 Getting started Quick reference guide - handset While reviewing a caller ID log entry, press repeatedly to add or Ì remove 1 in front of the telephone number before dialing or saving it in the directory. Press and hold to set or to dial your voicemail number. Ì...
- Page 19 Getting started Quick reference guide - handset CALL BLOCK Press to block the incoming call when the telephone is ringing. Ì When on a call, press to block the call. Ì When the handset is not in use, press to show the call block menu. Ì...
- Page 20 Getting started Quick reference guide - handset HANDSET 1 ANS ON MSG # 10:30 10/16 Handset display The battery icon flashes when the battery is low and needs charging. The battery icon animates when the battery is charging. The battery icon becomes solid when the battery is fully charged. There are new voicemail received from the telephone service provider.
- Page 21 Getting started Quick reference guide - handset Main menu The selected menu Play messages item is highlighted. ANS ON Feature menu Play messages (page 157) Answering sys (page 145) SCB screening (page 114) SCB settings (page 119) Menu Block list (page 119) Directory (page 89) Caller ID log (page 101) Intercom (page 77)
-
Page 22: Telephone Base And Charger Installation
Getting started Telephone base and charger installation Install the telephone base and charger, as shown below. The telephone base is ready for tabletop use. If you want to mount your telephone on a wall, use the wall-mount bracket (model W20901, sold separately) to attach to a standard dual-stud telephone wall-mounting plate. -
Page 23: Charger Installation
Getting started Telephone base and charger installation Charger installation Plug the large end of the charger’s power adapter into an electrical outlet not controlled by a wall switch. Ensure the small end of the charger’s power adapter is plugged into the power jack on the bottom of the charger. -
Page 24: Battery Installation And Charging
Getting started Battery installation and charging Install the battery, as shown below. Once you have installed the battery, the screen indicates the battery status (see the following table). If necessary, place the handset in the telephone base or charger to charge the battery. For best performance, keep the handset in the telephone base or charger when not in use. - Page 25 Getting started Battery installation and charging 2. Align the cover flat against the battery compartment, then slide it upwards until it clicks into place. 3. Charge the handset by placing it face forward in the telephone base or charger. The CHARGE light on the top of the handset is on during charging.
- Page 26 Getting started Battery installation and charging After you install your telephone or power returns following Date: MM/DD/YY a power outage, the handset and telephone base will prompt you to set the date and time. For instructions, see Set date/time on page 44. To skip setting the date /CANCEL on the handset or press and time, press on the telephone base.
-
Page 27: Smart Keys
Smart keys Smart keys On the telephone base, there are six Smart keys ( ) along the left and right of the LCD screen. Smart keys allow you to access the speed dial number, emergency number and other menu options quickly. You can reset the Smart keys anytime you want. Add a speed dial number + Add 1. -
Page 28: Add A Speed Dial Number Via Directory
Smart keys Smart keys 7. Press to save. Set as Smart Key 1? Mike Smith Save Add a speed dial number via Directory + Add 1. Press to add a Smart key function. Speed dial 2. Press SMART KEY 1 SETTING Speed dial Which function would you like... - Page 29 Smart keys Smart keys 4. Press smart key next to your desired entry. Enter A-Z to search Select Chris 800-225-1445 Mike 800-595-9511 Nancy 800-696-2523 5. Press to save. Set as Smart Key 1? Mike Smith Save Note: The Smart key speed dial number copies from the Directory at the time. It does not auto-update/synchronize, even if the entries in the Directory have changed since then.
-
Page 30: Add An Emergency Number
Smart keys Smart keys Add an emergency number + Add 1. Press to add a Smart key function. Emergency call 2. Press 3. Enter the emergency number, and then press Save Add a menu option 1. Press + Add to add a Smart key function. Menu option 2. -
Page 31: Edit A Speed Dial Number
Smart keys Smart keys 4. Press to confirm changing. 5. Then, select your desired Smart key function. Follow the steps in Add a speed dial number (page 20), Add an emergency number (page 23), or Add a menu option (page 23) sections to change. -
Page 32: Delete A Speed Dial Number
Smart keys Smart keys 3. Press the emergency number you want to change. It will then ask you whether you want to change. Change function of Smart Key 3? Emergency Edit Save Edit 4. Press Save 5. Edit the number if needed, and then press to confirm and save. -
Page 33: Delete An Emergency Number
Smart keys Smart keys Delete an emergency number Menu 1. Press softkey on the telephone base. 2. Press to scroll to the Smart key , and then press its smart key to enter. 3. Press the emergency number you want to delete. Change function of Smart Key 3? Emergency Edit... -
Page 34: Bluetooth
Bluetooth Bluetooth Introducing Bluetooth Your new AT&T DLP73290/DLP73390/DLP73490/DLP73590 telephone system with Bluetooth wireless technology has the following features: Pair up to two Bluetooth enabled devices (two cell phones, or one cell phone and one headset) with the telephone base. Connect a maximum of two Bluetooth enabled devices to make and receive cell calls. - Page 35 Refer to the Bluetooth setup section (pages 31-39) to learn how to set up your Bluetooth device. Refer to the Telephone operation section (pages 64-75) on how to operate your Bluetooth devices with your new DLP73290/DLP73390/DLP73490/DLP73590 AT&T telephone system with Bluetooth wireless technology. Refer to the Troubleshooting section (pages 170-179) if you experience difficulty when using the telephone system.
-
Page 36: Connect To Cell Tm Application
Bluetooth Introducing Bluetooth Connect to Cell application If you are using Bluetooth-enabled cell phones with Android® OS 2.3 or above, you can further extend the flexibility of your telephone system with use of the free Connect to Cell application. Connect to Cell comprises Caller ID manager and Alerts manager that help integrate your cell phone with the AT&T telephone system. -
Page 37: Glossary Of Terms
Bluetooth cell phone - refers to a mobile Bluetooth enabled cellular telephone. CELL line - the telephone line associated with your cell phone service. On your DLP73290/DLP73390/DLP73490/DLP73590, press CELL on the handset or telephone base to use the cell line. -
Page 38: Bluetooth Setup
To use a Bluetooth enabled cellular phone or headset with your telephone, you must first pair and connect your Bluetooth cellular phone or headset with the telephone base. Then, the DLP73290/DLP73390/DLP73490/DLP73590 can be used to make or answer calls on the cell phone line. - Page 39 Bluetooth Bluetooth setup 5. Follow the on-screen instructions and press Next ADD CELLULAR ADD CELLULAR ADD CELLULAR STEP 1: STEP 2: If your cell phone is connected to Place cell phone next to a BT device, please disconnect it. the base. Next Next 6.
-
Page 40: Add A Headset
The steps for the pairing process may vary for different cell phones. If this happens, follow the prompts on your cell phone and your DLP73290/DLP73390/DLP73490/DLP73590 to complete the pairing process. Refer to the user’s manual of your cell phone on how to search for or add a new Bluetooth device. - Page 41 10:30 11/20 Menu If you have trouble pairing your headset, it may not be compatible with your DLP73290/DLP73390/DLP73490/DLP73590. Check the Bluetooth https://telephones.att.com/bluetooth compatibility list at Notes: The pairing process may take up to one minute. If the pairing process fails, try again.
-
Page 42: Disconnect/Reconnect Your
Bluetooth Bluetooth setup Disconnect/reconnect your Bluetooth device MENU 1. Press on the telephone base in idle mode to enter the main menu. Bluetooth 2. Press to scroll to the next page, and then press the smart key to enter. Connect/Disconnect 3. -
Page 43: Auto Connection
Bluetooth Bluetooth setup Auto connection When an active device moves within Bluetooth range of the telephone base, or is turned on within range, the telephone base tries to connect to the device. When the device moves out of range, it is disconnected. Your device might make a connect or disconnect sound. -
Page 44: Download Directory
Download directory You can download cell phone directory (phonebook) entries to your DLP73290/DLP73390/DLP73490/DLP73590 telephone system via Bluetooth wireless technology. Each downloaded cell phone directory entry are stored in the telephone directory with up to 30 digits for each phone number and 15 characters for each name. -
Page 45: Remote Voice Control
Bluetooth Remote voice control If you have connected a cell phone to the DLP73290/DLP73390/DLP73490/ DLP73590 telephone system, you can activate the voice-controlled application (voice app) of the cell phone, such as Siri®, Google Now or S Voice®, using your handset. -
Page 46: Activate Remote Voice Control
Bluetooth Remote voice control Activate remote voice control Using the cordless handset: 1. Press MUTE/DELETE/VOICE. If you have connected two cell phones to the telephone, the telephone shows Select a device:. Press to highlight the desired device, /SELECT. then press MENU If the activation fails, the telephone displays Not available. - Page 47 Bluetooth Remote voice control Notes: Once you have activated the remote voice control feature, you are using your cell phone’s voice app to operate your cell phone. Please check the cell phone user’s manual and the voice app’s help topics to find out what commands you can use and any limitations of the voice app.
-
Page 48: Telephone Settings
Telephone settings Handset settings Use the menu to change the cordless handset or telephone base settings. 1. Press MENU/ on the handset when it is not in use to enter the main SELECT menu. 2. Press to scroll to the feature to be changed. When scrolling through the menu, the selected menu item is highlighted. -
Page 49: Ringer Volume
Telephone settings Handset settings Ringer volume You can select the ringer volume for incoming home and cell Ringers calls. A ringer off icon shows when the volume is set to off. To set the ringer volume on home line: 1. Press MENU/ in idle mode. -
Page 50: Ringer Tone
Telephone settings Handset settings Ringer tone You can select the ringer tones for incoming home and cell calls. To set the ringer tone on home line: Ringers 1. Press MENU/ in idle mode. SELECT to highlight Ringers, then press 2. Press /SELECT. -
Page 51: Lcd Language
Telephone settings Handset settings LCD language You can select English, French, or Spanish to be used for all screen displays. To select the LCD language: LCD language 1. Press MENU/ in idle mode. SELECT to highlight Settings, then press 2. Press /SELECT. - Page 52 Telephone settings Handset settings Caller ID announce The caller ID announce feature lets you know who’s calling without having to look at the display. When you have an incoming call, the handset and/or base speaks “Call from...” and the name of the caller based on the directory or caller ID information.
-
Page 53: Set Speed Dial Voicemail Number
Telephone settings Handset settings Set speed dial voicemail number This feature lets you save your voicemail number for quick access when you 1 key. press and hold the To set your voicemail number: 1. Press MENU/ in idle mode. SELECT Voicemail # to highlight Settings, then press 2. -
Page 54: Clear Voicemail Indicator
Telephone settings Handset settings Clear voicemail indicator/indication Use this feature when the telephone indicates there is new voicemail but there is none. For example, when you have accessed your voicemail while away from home. This feature only turns off the displayed New voicemail and the icon;... -
Page 55: Home Area Code
Telephone settings Handset settings Home area code If you dial seven digits to make a local call (no area code required), enter your area code into the telephone as the home area code. When you receive a call from within your home area code, the caller ID log only displays the seven digits of the telephone number. -
Page 56: Dial Mode
Telephone settings Handset settings Dial mode The dial mode is preset to tone dialing. If you have pulse (rotary) service, you must change the dial mode to pulse dialing before using the telephone. To set the dial mode: 1. Press MENU/ in idle mode. -
Page 57: Quiet Mode
Telephone settings Handset settings QUIET mode When QUIET mode is turned on, the telephone silences all sounds during the set period of time (1-12 hours). However, the handset locator paging tone and any sound-generating operations initiated by users, such as making calls using the speakerphone or setting ringer volume, will sound as normal. -
Page 58: Telephone Base Settings
Telephone settings Telephone base settings Use the menu to change the telephone settings. Menu 1. Press the soft key ( ) on the telephone base when it is not in use to enter the main menu. 2. Press to scroll through the menu items. Press the respective Smart key to select. -
Page 59: Ringer Volume
Telephone settings Telephone base settings Ringer volume You can set the ringer volume level or turn the ringer off for incoming home or cell calls. When the ringer is off, appears on the screen. To set the ringer volume on home line or cell lines: 1. -
Page 60: Ringer Tone
Telephone settings Telephone base settings Ringer tone You can choose one of ten ringer tones. To set the ringer tone on home line or cell lines: MENU 1. Press on the telephone base in idle mode to enter the main menu. 2. -
Page 61: Set Date/Time
Telephone settings Telephone base settings Set date/time The answering system announces the day and time of each message prior to playing it. Before using the answering system, set the date and time as follows. If you subscribe to caller ID service, the day, month and time are set automatically with each incoming call. -
Page 62: Lcd Language
Telephone settings Telephone base settings LCD language You can select English, French, or Spanish to be used for all screen displays. 1. Press MENU on the telephone base in idle mode to enter the main menu. 2. Press to scroll to the next page, and then press the Settings smart key to enter. -
Page 63: Caller Id Announce
Telephone settings Telephone base settings Caller ID announce The caller ID announce feature lets you know who’s calling without having to look at the display. When you have an incoming call, the handset and/or base speaks “Call from...” and the name of the caller based on the directory or caller ID information. -
Page 64: Set Speed Dial Voicemail
Telephone settings Telephone base settings Set speed dial voicemail number This feature lets you save your voicemail number for easy access when you 1 key on the handset. press and hold the To save your voicemail number: MENU 1. Press on the telephone base in idle mode to enter the main menu. -
Page 65: Clear Voicemail Indication
Telephone settings Telephone base settings Clear voicemail indication Use this feature when the telephone indicates there is new voicemail but there is none. For example, when you have accessed your voicemail while away from home. This feature only turns off the displayed icon;... -
Page 66: Key Tone
Telephone settings Telephone base settings Key tone The telephone base is set to beep with each key press. You can adjust the key tone volume or turn it off. If you turn off the key tone, there are no beeps when you press keys. -
Page 67: Dial Mode
Telephone settings Telephone base settings Dial mode The dial mode is preset to tone dialing. If you have pulse (rotary) service, you must change the dial mode to pulse dialing before using the telephone. To set the dial mode: 1. Press MENU on the telephone base in idle mode to enter the main menu. -
Page 68: Dim Mode
Telephone settings Telephone base settings Dim mode You can set the base’s LCD screen to be dimmed after selected period of time. MENU 1. Press on the telephone base in idle mode to enter the main menu. Settings 2. Press to scroll to the next page, and then press the smart key to enter. -
Page 69: Wallpaper
Telephone settings Telephone base settings Wallpaper You can change the mood of the base’s LCD screen by changing its background with a range of wallpaper. 1. Press MENU on the telephone base in idle mode to enter the main menu. 2. -
Page 70: Countdown Timer
Telephone settings Telephone base settings Countdown timer You can use the timer as your kitchen timer for cooking, meeting timer, exercise timer, study timer, and etc. It assists you to be multitasking while working from home, so that you can better manage your time. This feature is only available on the telephone base. -
Page 71: Telephone Operation
Telephone operation Telephone operation Telephone operation Make, answer or end a home call To make a home call: The screen displays the HOME/ /SPEAKER on the handset, Press FLASH elapsed time as you talk then enter the telephone number. (in hours, minutes and -OR- seconds). -
Page 72: Make, Answer Or End A Cell Call
Telephone operation Telephone operation Make, answer or end a cell call The DLP73290/DLP73390/DLP73490/DLP73590 can be used to make or answer calls on the cell line. You can connect a maximum of two Bluetooth enabled cell phones to the telephone base. -
Page 73: Silence The Ringer
Telephone operation Telephone operation To answer a cell call: CELL or /SPEAKER on the handset. Press -OR- /CELL on the telephone base. Press To end a cell call: OFF/ Press , or put the handset in the telephone base or charger. CANCEL -OR- Press... -
Page 74: Call Waiting On The Home Line
Telephone operation Telephone operation Call waiting on the home line If you subscribe to call waiting service from your telephone service provider, and someone calls while you are already on a call on the home line, you hear two beeps. If you subscribe to call waiting service from your telephone service provider, and someone calls while you are already on a call on the home line, the screen flashes... -
Page 75: Options While On Calls
If it is a cell call and the volume is too loud, too quiet or drops out, try changing the volume on your cell phone. On some cell phones, changing the volume on the cell phone affects your cell call volume on the DLP73290/DLP73390/ DLP73490/DLP73590 handsets. -
Page 76: Temporary Tone Dialing
Telephone operation Options while on calls Temporary tone dialing If you have pulse (rotary) service only, you can switch from pulse to touch-tone dialing temporarily during a call. This is useful if you need to send touch-tone signals to access your telephone banking or long distance services. During a call: 1. -
Page 77: Chain Dialing
Telephone operation Options while on calls Chain dialing Use this feature to initiate a dialing sequence from numbers Home 0:01:30 stored in the directory, caller ID log or redial list while you are 888-722-7702 on a call. Chain dialing is useful if you wish to access other numbers 10:30 11/20 (such as bank account numbers or access codes) from the... - Page 78 Telephone operation Options while on calls To access the redial list with a handset while on a call: 1. Press REDIAL /PAUSE Redial 6/10 2. Press , or REDIAL/ until the desired 888-722-7702 PAUSE number displays. /SELECT to dial the displayed number. 3.
-
Page 79: Redial
Telephone operation Redial Last number redial Each handset stores the last 10 dialed numbers (up to 30 digits each) in the redial list. The list of dialed numbers include both dialed home calls and cell calls. To view the 10 most recently dialed Redial 1/7 888-722-7702 numbers with the handset:... - Page 80 Telephone operation Redial 4. The screen displays Enter number. Use the dialing keys to edit the number, if necessary. Press to move the cursor to the left or right. Press /DELETE on the handset to erase a digit. MUTE /DELETE on the handset to erase all digits. Press and hold MUTE /PAUSE to insert a three-second dialing pause...
-
Page 81: Delete A Redial Entry
Multiple handset use Redial Press TONE to change the next letter to upper or lower case. Press to return to previous page. Next to proceed to selecting Profile Picture. 7. Press 8. Press / / / to select the desired picture, and press Select to confirm. -
Page 82: Handset Locator
Telephone operation Handset locator This feature helps you find a misplaced handset. To start paging: Press FIND HS on the telephone base when it is not in use. All idle handsets ring and display ** Paging ** . The base LCD displays Paging all devices. -
Page 83: Multiple Handset Use
Multiple handset use Join a call in progress Another handset or the telephone base can join you on home call. The call continues until all parties hang up. You can share an outside call with up to two system devices. When a handset or telephone base is already on a call, press HOME/ FLASH... -
Page 84: Intercom
Multiple handset use Intercom Use the intercom feature for conversations between two devices. You can buy additional expansion handsets (AT&T model DLP70090, sold separately) and cordless headsets for this telephone system. You can register up to five handsets or cordless headsets to the telephone base. Initiate an intercom call Using the cordless handset: Intercom... -
Page 85: Answer An Incoming Call During An Intercom Call
Multiple handset use Intercom To end an intercom call with the telephone base: Press Notes: For cordless headsets, refer to the corresponding user’s manual on how to answer and end an intercom call. If the destination device does not answer the intercom call within 100 seconds, or if the device is in use, on a call, or out of range, the initiating telephone base displays No answer. - Page 86 Multiple handset use Intercom To answer a home call during an intercom call using the telephone base: /HOME to answer the home call and the intercom call ends Press automatically. Press to end the intercom call. The telephone continues to ring. /HOME.
-
Page 87: Call Transfer Using Intercom
Multiple handset use Call transfer using intercom While on an outside call, you can use the intercom feature to transfer the call from one device to another. To transfer an outside call using intercom: Home 0:01:30 Using a cordless handset: 1. - Page 88 Multiple handset use Call transfer using intercom Using the telephone base: Intercom 1. When on an outside call, press 2. The call is automatically put on hold. Press / / / to select a device. The screen shows Intercom and Calling Handset X (X represents the handset number).
-
Page 89: Push-To-Talk (Ptt)
Multiple handset use Push-to-talk (PTT) You can directly broadcast messages to the speakerphone of any device. Press and hold PTT on a handset or /PTT on the telephone base to begin FLASH two-way communication. Only one device can talk at a time. While talking to another device, press and hold PTT on the handset /PTT on the telephone base. -
Page 90: Ptt Call To A Single Device
Multiple handset use Push-to-talk (PTT) PTT call to a single device Using a cordless handset: 1. There are a few ways to begin a PTT call to a single device. >PTT to BASE 0 When the handset is not in use: If you have one handset, press and hold PTT. - Page 91 Multiple handset use Push-to-talk (PTT) Using the telephone base: 1. To begin a PTT call to a single handset: Press /PTT. FLASH If you only have one handset, the base screen displays to Handset 1 and Connecting..If you have more than one handset, press / / / to choose a handset, or use the dialing keys to enter the destination handset...
-
Page 92: Ptt Call To Multiple Devices
Multiple handset use Push-to-talk (PTT) PTT call to multiple devices When there are multiple handsets registered to the phone system, PTT supports one-to-group calls. PTT supports a maximum of one-to-five calls when one to five handsets are registered. To call multiple devices: Using a cordless handset: 1. -
Page 93: Answer A Ptt Call
Multiple handset use Push-to-talk (PTT) Answer a PTT call You can respond to a PTT call, as described below. 1. When your device receives a PTT call, it beeps and shows Press and hold [PTT] key to talk on the telephone base, or Press [PTT] Talk on the handset. -
Page 94: Change A One-To-One Ptt Call To An Intercom Call
Multiple handset use Push-to-talk (PTT) Change a one-to-one PTT call to an intercom call You can convert a one-to-one PTT session to an intercom call. Using a cordless handset: 1. When your device shows Press [PTT] Talk, press /SELECT. The screen MENU shows Intercom. -
Page 95: Ptt Call
Multiple handset use Push-to-talk (PTT) To leave the PTT call without answering the incoming call, press OFF/ on your handset or on your telephone base. The CANCEL telephone continues to ring. Make an outgoing call during PTT call During a one-to-one PTT call, press HOME/ on your handset or FLASH... -
Page 96: Directory
Directory Directory About the directory The directory stores up to 1,200 entries with up to 30 digits for each phone number and 15 characters for each name. Directory entries are stored at the telephone base and Charlie Johnson shared by all system handsets. Any changes made on one 888-883-2445 handset apply to all. -
Page 97: Create And Review Entries
Directory Directory Create and review entries Create a new directory entry Using a cordless handset: 1. Press MENU/ on the handset or telephone base in idle mode. SELECT to highlight Directory, then press /SELECT . 2. Press MENU 3. Press /SELECT on the handset again to choose Add MENU Enter number... - Page 98 Directory Create and review entries Using the telephone base: Menu 1. Press and then on the telephone base if you have added Directory as Smart key (See Add a speed dial number via Directory on page 21). -OR- Press the directory smart key Directory -OR- Press DIR on the telephone base.
- Page 99 Directory Create and review entries 6. Use the dialing keys to enter a name (up to 15 characters). Press a key repeatedly until the desired character shows on the screen (see Character chart on page 93). Press to move the cursor to the left or right. Press 0 to add a space.
- Page 100 Directory Create and review entries Character chart: Characters by number of key presses Dialing keys & Space Note: When entering a name in the directory, the first letter of each word is automatically capitalized.
-
Page 101: Add A Predialed Telephone Number To The Directory
Directory Create and review entries Add a predialed telephone number to the directory You can save a predialed telephone number to the directory. Using a cordless handset: 888-722-7702 1. While the telephone is not in use, use the dialing keys to enter the telephone number (up to 30 digits). -
Page 102: Review The Directory
Directory Create and review entries Review the directory Using a cordless handset: 1. Press DIR when in idle mode. The screen shows the first entry in the directory. List empty appears if there are no directory entries. 2. Press CID or DIR to browse through the directory or use the dialing keys to start a name search (page 96). -
Page 103: Search By Name
Directory Create and review entries Search by name 1. Press DIR on the handset or press DIR on the telephone Charlie Johnson base when the telephone is in idle mode. 888-883-2445 2. When an entry appears, use the dialing keys (0-9) to start a name search (alphabetical search). -
Page 104: Dial, Delete And Edit A Directory
Directory Dial, delete and edit a directory entry Dial a directory entry You can dial a directory entry on either a home or cell line. Using a cordless handset: Home 0:01:30 888-360-4121 1. Search for the desired entry in the directory (see Review the directory on page 95 and Search by name on page 96). -
Page 105: Edit A Directory Entry
Directory Dial, delete and edit a directory entry Edit a directory entry Using a cordless handset: 1. While reviewing a directory entry, press /SELECT. The MENU Enter number screen shows Enter number with the current number of the 360-4121_ entry. 2. -
Page 106: Delete A Directory Entry
Directory Dial, delete and edit a directory entry /PAUSE to insert a three-second dialing pause Press and hold REDIAL (a P appears). -OR- Press REDIAL/ to copy a number from the redial list. Press , or PAUSE press REDIAL/ repeatedly to locate the desired number. PAUSE 5. -
Page 107: Delete All Directory Entries
Directory Dial, delete and edit a directory entry Delete all directory entries Using a cordless handset: Delete all 1. Press MENU/ when in idle mode. SELECT 2. Press CID or DIR to scroll to Directory, then press /SELECT. MENU 3. Press CID or DIR to scroll to Delete all, then press /SELECT. -
Page 108: Caller Id
Caller ID About caller ID This product supports caller ID services offered by most telephone service providers. Caller ID allows you to see the name, number, date and time of calls. The available caller ID information will appear after the first or second ring. Information about caller ID with call waiting Caller ID with call waiting lets you see the name and telephone number of the caller before answering the... -
Page 109: Caller Id Operation
Caller ID Caller ID operation Missed (new) call indicator Intercom When there are new or missed calls, the handset screen Intercom 16 missed calls shows XX Missed calls and the telephone base screen shows is the number of missed calls). Menu All new and missed entries are counted as missed calls. -
Page 110: Review The Caller Id Log
Caller ID Caller ID operation Review the caller ID log Review the caller ID log to find out who called, to return the call or to copy the caller’s name and number into your directory. Using a cordless handset: 1. When the telephone is in idle mode, press CID on the handset to view the caller ID log in reverse chronological order starting with the most recent call. -
Page 111: View Dialing Options
Caller ID Caller ID operation View dialing options Although the caller ID log entries may contain 10 digits (the area code plus the 7-digit number), in some areas, you may need to dial only the seven digits, or 1 plus the seven digits, or 1 plus the area code plus the seven digits. You can change the number of digits that you dial from the caller ID log or store to the directory. -
Page 112: Save A Caller Id Log Entry To The Directory
Caller ID Caller ID operation Save a caller ID log entry to the directory Using a cordless handset: 1. While reviewing the caller ID log, press CID or DIR to To Directory browse through the caller ID log. /SELECT. 2. When the desired entry displays, press MENU /SELECT again to choose To Directory on the 3. - Page 113 Caller ID Caller ID operation 4. On the entry page, press Directory #1/3 JUL 25 12:00a m Save to Directory? Delete Star Name Walter Smith 800-595-9512_ 800-595-9512 Block Directory Edit List view Dial 5. Press to save the telephone number to the Directory. You can also edit the number if needed.
- Page 114 Caller ID Caller ID operation Notes: The screen shows Number repeated if the number is already in the directory. You cannot save the same number more than once. If you try to save a caller ID log entry to the directory without a number, the handset sounds an error tone. If the telephone number has more than 15 digits, only the last 15 digits appear in the caller ID log.
- Page 115 Caller ID Caller ID operation Save a caller ID log entry to the block list Using a cordless handset: 1. Select a desired entry in the caller ID log (see Review the caller ID log on page 103). /SELECT . . 2.
- Page 116 Caller ID Caller ID operation 4. On the entry page, press Block . #1/3 JUL 25 12:00a m Delete Star Name Walter Smith 800-595-9512 Block Directory Dial List view 5. Press to save the telephone number to the Block list. You can also edit the number if needed.
- Page 117 Caller ID Caller ID operation Save a caller ID log entry to the star name list Using a cordless handset: To Star name 1. Select a desired entry in the caller ID log (see Review the caller ID log on page 103). /SELECT.
-
Page 118: Delete Caller Id Log Entries
Caller ID Caller ID operation Select 5. Press / / / to select the preferred color, and press 6. Press Save to confirm. Delete caller ID log entries Using a cordless handset: To delete an entry: 1. Search for the desired entry in the caller ID log (see Review the caller ID log on page 103). - Page 119 Caller ID Caller ID operation To delete all entries: 1. Press MENU/ on the handset in idle mode. SELECT Caller ID log to highlight Caller ID log, then press 2. Press /SELECT. MENU 3. Press to highlight Delete all on the handset, /SELECT.
-
Page 120: Reasons For Missing Caller Id Information
Caller ID Reasons for missing caller ID information There are occasions when other information or no information shows for various reasons: On-screen message Reason The caller prefers not to show the name. PRIVATE NAME The caller prefers not to show the phone number. PRIVATE NUMBER The caller prefers not to show the phone number and name. -
Page 121: Smart Call Blocker
Smart call blocker About Smart call blocker* If you have subscribed to caller ID service, then you can use Smart call blocker to screen incoming calls. Smart call blocker is an effective call screening tool, which allows your phone system to screen ALL home calls. The screening feature of Smart call blocker is applicable to home calls only. -
Page 122: Overview
Smart call blocker About Smart call blocker Overview Robocalls and telemarketers Unknown callers Family and friends Schools and pharmacies Smart call blocker Search and screen based on caller ID Welcome calls Unwelcome calls Unknown calls (for home calls only) Robocalls and telemarketing Family and friends with calls: numbers:... -
Page 123: Call Categories
Smart call blocker About Smart call blocker Call categories Calls are classified into four categories: Welcome calls Welcome calls are calls with telephone numbers saved in your Directory, and not in your block list. Welcome calls also include calls with caller names saved in your star name list. -
Page 124: Call Handling
Smart call blocker About Smart call blocker Call handling Call screening mode is set to off and to allow all incoming calls by default. When call screening mode is on, the first ring of all incoming home calls will be muted. If both QUIET mode and call screening mode is on, all screened home calls will be sent to the answering system after screening. - Page 125 Smart call blocker About Smart call blocker Call category Screening profile options Unknown calls Calls without You can set Smart call blocker to one (for home of the following five profile options for numbers handling all unknown home calls. calls only) Numbers that are −...
-
Page 126: Call Block Settings
Smart call blocker Call block settings Block list Add numbers that you want to prevent their calls from ringing through. The block list stores up to 1,000 entries. Note: Home or cell calls with numbers that have been added to your block list will be blocked. Add a block entry: Using a cordless handset: 1. - Page 127 Smart call blocker Call block settings Using the telephone base: 1. Press Menu and then Block list Smart key. Block numbers 2. Press . If you need to add prefix to the block number, press Prefix of block numbers Next 3.
- Page 128 Smart call blocker Call block settings Review block list: Using a cordless handset: 1. Press CALL BLOCK. 2. Press CID or DIR to scroll to Block list, and then press /SELECT. MENU /SELECT to choose Review. 3. Press MENU 4. Press CID or DIR to browse through the block entries. Using the telephone base: Menu and then Block list...
- Page 129 Smart call blocker Call block settings Edit a block entry: Using a cordless handset: 1. Search for the desired entry in the block list (see Review block list on page 121). 2. When the desired entry displays, press /SELECT. The screen displays MENU Enter number along with the phone number to be edited.
- Page 130 Smart call blocker Call block settings /PAUSE to insert a three-second dialing pause Press and hold REDIAL (a P appears). Save 4. Edit the existing name, then press Press to move the cursor to the left or right. Press 0 to add a space. Backspace Press to erase a digit.
-
Page 131: Star Name List
Smart call blocker Call block settings Using the telephone base: Menu Block list 1. Press soft key, and then press Block number 2. Press Unblock all 3. Press Star name list There are many organizations like schools, medical offices, and pharmacies that use robocalls to communicate important information to you. - Page 132 Smart call blocker Call block settings Using the telephone base: Menu Smart call blocker 1. Press soft key, and then press 2. Press Star name list smart key. Enter A-Z to search Total: 5 1 Chris K 2 Wal green MA 3 School distr Remove all 3.
- Page 133 Smart call blocker Call block settings Save a caller ID log entry to star name list: Using a cordless handset: 1. Search for the desired caller ID log entry (see Review the caller ID log on page 103). 2. When the desired entry displays, press /SELECT.
- Page 134 Smart call blocker Call block settings /DELETE to erase all characters. Press and hold MUTE Press TONE to change the next letter to upper or lower case. 4. Press /SELECT to save the entry. You hear a confirmation tone. MENU Using the telephone base: 1.
- Page 135 Smart call blocker Call block settings Delete all star name entries: Using a cordless handset: 1. Press CALL BLOCK when the telephone is not in use. to scroll to Star name list, and then press /SELECT. 2. Press q or p MENU 3.
-
Page 136: Set Call Screening Mode On/Off
Smart call blocker Call block settings Set call screening mode on/off The Smart call blocker feature is set to No screening by default. If you wish to use the screen unknown home calls, make sure you have set up your lists of welcome callers and unwelcome callers by adding their telephone numbers to the Directory (page 90), Star name list (page 124) and Block list (page 119). - Page 137 Smart call blocker Call block settings Using the telephone base: Menu Smart call blocker 1. Press softkey, and choose SCB screening 1. Press 2. Press to select Screen unknown Screen all unknown calls displays and confirms. next to the selected option. SCB SCREENING Screen screening...
-
Page 138: Screening Announcements
Smart call blocker Call block settings Screening announcements If you have set profile to screen all unknown home calls (Unknown caller) or screen robocalls (Robocalls only), the callers of the following incoming call categories will hear a screening announcement. Home calls that are “out of area“ or with numbers set to “Private“. Home calls with numbers that are not on your directory or block list, or with absent caller ID number. - Page 139 Smart call blocker Call block settings Play your current screening announcement: Using a cordless handset: 1. Press CALL BLOCK when the telephone is not in use. 2. Press q or p to scroll to Screening annc, then press /SELECT. MENU /SELECT to select SCB annc type.
- Page 140 Smart call blocker Call block settings Annc Type Unknown caller 3. Press to choose between Robocalls only UNKNOWN CALLER ANNC ROBOCALLS ONLY ANNC Record Record Default Default Annc Type Play Annc Type Play 4. Press Record to record your announcement. The system announces, “Record after the tone.
-
Page 141: Set Scb Screening Profile
Smart call blocker Call block settings Default 4. Press their respective to reset your announcement. Your name will be deleted from all the screening announcements, and the telephone will use the default screening announcements described on page 131. Set SCB screening profile There are five profile options, which allows you to quickly set up Smart call blocker with your handset and base. - Page 142 Smart call blocker Call block settings Set profile Steps Screen robot Using a cordless handset: Screen robocalls Press CALL BLOCK. Press /SELECT to choose SCB screening. MENU to scroll to Screen unknown, Press or p /SELECT. then press MENU To set screening announcement, press to scroll to Screen annc, then press /SELECT.
- Page 143 Smart call blocker Call block settings Set profile Steps UnknownToAns.S Using a cordless handset: Forward all Press CALL BLOCK. unknown home /SELECT to choose SCB screening. Press MENU calls to the Press or p to choose UnknownToAns.S, answering system then press /SELECT.
-
Page 144: Voice Guide To Set Smart Call
Smart call blocker Call block settings Voice guide to set Smart call blocker This feature is an easy and alternative way for you to do the basic setup of Smart call blocker. You can follow the voice guide to set your telephone system to allow or to screen all incoming home calls, or to screen home calls that do not display a phone number. -
Page 145: Allowed Calls
Smart call blocker Allowed calls If Smart call blocker is on, the following types of incoming calls can get through to you and ring on your telephone system: Home calls with numbers saved in your directory, but not on your block list. Home calls with caller ID names saved in your star name list. -
Page 146: Blocked Calls
Smart call blocker Blocked calls If call screening mode is on, incoming home or cell calls with Blocking call... numbers saved in your block list will not ring. The telephone plays the block announcement “Calls to this number are being screened by Smart call blocker. The number you are calling is not accepting your call. -
Page 147: Screen Unknown Callers
Smart call blocker Screen unknown callers If call screening mode is on, and you have set profile to Home screening... screen unknown callers, the telephone plays a screening announcement to the caller when receiving the following incoming home calls. It asks the caller to respond before putting the call through to you. - Page 148 Smart call blocker Screen unknown callers If Smart call blocker is on and you receive a call waiting home call: - Smart call blocker will not screen a call waiting home call without number while on a call. You can press HOME/ /SPEAKER to take the new call.
-
Page 149: Screened Call Options
Smart call blocker Screen unknown callers Screened call options After the telephone screen a home call and starts ringing, the handset screen displays Screened call. Press HOME/ /SPEAKER to pick up the call. FLASH After you picked up the call, the telephone announces “Call from...” and the caller’s name, and then announces, “To answer the call, press 1. -
Page 150: Screen Robocalls
Smart call blocker Screen robocalls If call screening mode is on, and you have set profile to screen robocalls, the telephone plays a screening announcement to the caller when receiving the following incoming home calls. It asks the caller to press the pound key (#) before putting the call through to you. -
Page 151: Option While On A Call
Smart call blocker Option while on a call When you are on a home or cell call and speaking to the caller, and you do not want to continue the call, you can press CALL BLOCK to end the call. The telephone plays the block announcement “The number you are calling is not accepting your call. -
Page 152: Answering System
Answering system Answering system settings Use the answering system menu to set up the announcement message, turn on or off the answering system or message alert tone, activate call screening, or change the number of rings, remote access code or message recording time. Announcement Your outgoing announcement plays when calls are answered by the answering system. - Page 153 Answering system Answering system settings 3. Press Record to record your announcement. The system announces, “Record after the tone. Press 5 when you are done.” OUTGOING ANNOUNCEMENT Record Default Play 4. After the tone, speak towards the base microphone. Press 5 on the base to end the recording.
-
Page 154: Answer On/Off
Answering system Answering system settings Answer on/off If you turn the answering system on, it answers calls and records messages only on the home line. If your paired cell phone has voicemail, callers can leave messages with that voicemail service. If your answering system is turned off and you change any of its settings, the answering system automatically turns on again. -
Page 155: Voice Guide To Set Up Answering System
Answering system Answering system settings Voice guide to set up answering system This feature is an alternative way for you to do the basic setup of the answering system. You can follow the voice guide to record your own announcement, set the number of rings, and set the message alert tone. -
Page 156: Call Screening
Answering system Answering system settings Call screening Use this feature to choose whether incoming messages can be heard over the telephone base when they are being recorded. If you turn call screening on, you hear the incoming message. To turn on or off the call screening feature: Using a cordless handset: Call screening MENU/... -
Page 157: Number Of Rings
Answering system Answering system settings Number of rings You can set the answering system to answer an incoming call after two, three, four, five, or six rings. You can also select toll saver, which is explained below. By default, the answering system answers an incoming call after four rings. To set the number of rings: Using a cordless handset: # of rings... -
Page 158: Remote Access Code
Answering system Answering system settings Remote access code To access your answering system remotely from any touch-tone phone, you need to enter a two-digit number (00-99). By default, the remote access code is 19. See Answering system remote access on page 161. To change the remote access code: Using a cordless handset: Remote code... -
Page 159: Message Alert Tone
Answering system Answering system settings Message alert tone When the message alert tone is set to On, and there is at least one new message, the telephone base beeps every 10 Msg alert tone seconds. The tone stops when all new messages have been reviewed. -
Page 160: Message Recording Time
Answering system Answering system settings Message recording time You can set the recording time allowed for incoming messages. The message length is three minutes by default. To change the setting: Using the telephone base: Menu Answering system 1. Press softkey, and choose 2. -
Page 161: About The Answering System
Answering system About the answering system Answering system and voicemail Your telephone has separate indicators for two different types of voice messages: those recorded on its built-in digital answering system and those recorded in your telephone service provider’s voicemail (fees may apply). Your telephone’s built-in digital answering system messages and voicemail messages are separate. -
Page 162: Message Capacity
Answering system About the answering system Message capacity The answering system can record and store up to 99 messages. Each message can be up to 3 minutes in length. The total storage capacity for the announcement, messages and memos is approximately 41 minutes. The actual recording time depends on individual message characteristics. -
Page 163: Call Screening
Answering system About the answering system Call screening To screen calls at the telephone base: If the answering system and call screening are on, the announcement and the incoming message broadcast at the telephone base when a call is answered by the answering system. -
Page 164: Message Playback
Answering system Message playback You can listen to messages at the telephone base or on a cordless handset. When playback begins, the total number of messages is announced. Before each message, you hear the day and time of the recording. After the last message, you hear, “End of messages.”... -
Page 165: Options During Playback
Answering system Message playback Options during playback When a message is playing, you can adjust the playback volume, skip, repeat, pause or delete the message. When messages are playing on the telephone base: Press VOL + or VOL - to adjust the message playback volume. Press Skip to skip to the next message. -
Page 166: Delete All Old Messages
Answering system Message playback Delete all old messages Using the telephone base: Menu Answering system 1. Press softkey, and choose Delete all old 2. Press Using a cordless handset: MENU/ 1. Press in idle mode. SELECT Delete all old 2. Press to highlight Answering sys, then press /SELECT MENU... -
Page 167: Record And Play Memos
Answering system Record and play memos Memos are your own recorded messages used as reminders for yourself or others using the same answering system. You can record your own memos using a system handset or the telephone base. Play and delete them the same way as incoming messages. -
Page 168: Remote Access
Answering system Remote access You can reach your answering system remotely by dialing your home telephone number from any touch-tone telephone. To remotely access the answering system 1. Dial your telephone number from any touch-tone telephone. 2. Once the system plays your announcement, enter the two-digit remote access code (19 is the default code, see page 151 to change it). - Page 169 Answering system Remote access Cut and carry the remote access wallet card at the back of this user’s manual for quick reference. Notes: If you do not enter a valid remote access code, the system answers the call automatically. Once the messages have played, the telephone announces the help menu options. If you do not press any key with 20 seconds, the remote access call ends automatically.
-
Page 170: Appendix
Appendix Add and register handsets/headsets Your telephone can support up to five DECT 6.0 cordless handsets (AT&T model DLP70090, sold separately) and cordless headsets (sold separately). Visit https://telephones.att.com/accessories for a list of compatible DECT 6.0 cordless headsets. Each new handset or headset must be registered to the telephone base before use. - Page 171 Appendix Add and register handsets/headsets If registration fails, the system will automatically try to register again. If registration fails after the third try, Registration failed appears on the handset screen. The handset shows To register HS... and ...see manual, and the telephone base returns to idle mode.
-
Page 172: Deregister Handsets
Appendix Deregister handsets You may need to deregister your handsets if: You have five registered handsets and need to replace a handset. -OR- You wish to change the designated handset number of your registered handsets. You must first deregister ALL handsets, and then register each handset you wish to use again, one at a time. -
Page 173: Screen Icons, Indicator Lights And Alert Tones
Appendix Screen icons, indicator lights and alert tones Screen icons The battery icon flashes when the battery is low and needs charging. The battery icon animates when the battery is charging. The battery icon becomes solid when the battery HANDSET 1 is fully charged. -
Page 174: Telephone Base Indicator
Appendix Screen icons, indicator lights and alert tones Telephone base indicator lights CELL 1/CELL 2/ HEADSET light On when the telephone base is paired and connected with a Bluetooth device. Flash alternately while pairing a Bluetooth device. Handset alert tones 1 short beep A key is pressed. -
Page 175: Screen Messages
Appendix Screen messages Blocked call An incoming call is blocked. Calling HS X (For models with two or The handset is calling another handset (for intercom calls). more handsets only) Ended You have just ended a call. Home screening... The telephone is screening an incoming home call. HS X is calling (For models with two or Another handset is calling. - Page 176 Appendix Screen messages The battery is very low. The handset should be placed in the Put in charger telephone base or charger. Quiet mode off The quiet mode is turned off. Quiet mode on The quiet mode is turned on. Rec mem low The answering system has less than 3 minutes to record.
-
Page 177: Troubleshooting
Canada, dial I cannot pair my cell phone to the telephone base. Make sure you have cellular coverage. Make sure your cell phone is compatible with your DLP73290/DLP73390/ DLP73490/DLP73590. Check the Bluetooth compatibility list at https://telephones.att.com/bluetooth. Make sure the Bluetooth function of your cell phone is turned on. See the user’s manual of your cell phone for more information. - Page 178 Make sure that your Bluetooth headset is not connected to any other Bluetooth device. Make sure that your headset is on the active devices list. I cannot download contacts from my cell phone to my DLP73290/ DLP73390/DLP73490/DLP73590. Make sure that your cell phone is paired and connected to the base.
- Page 179 Appendix Troubleshooting My phone doesn’t work at all. Make sure the power cord is securely plugged in. Make sure that the battery connector is securely plugged into the handset. Make sure the telephone line cord is securely and firmly plugged into the telephone base and the telephone wall jack.
- Page 180 Appendix Troubleshooting Once you have activated the remote voice control feature, you are using your cell phone’s voice app to operate your cell phone. If the voice commands do not work, please check the cell phone user’s manual and the voice app’s help topics to find out what commands you can use and any limitations of the voice app.
- Page 181 If changing the telephone line cord does not help, the wall jack (or the wiring to this wall jack) may be defective. Try using a different wall jack in your home to connect your DLP73290/DLP73390/DLP73490/DLP73590 telephone, or contact your telephone service provider (charges may apply).
- Page 182 Appendix Troubleshooting My handset isn’t performing normally. Make sure the power cord is securely plugged into the telephone base. Plug the power adapter into a different working electrical outlet not controlled by a wall switch. Move the handset closer to the telephone base. You might have moved out of range.
- Page 183 Appendix Troubleshooting Do not install this phone near a microwave oven or on the same electrical outlet. You may experience decreased performance while the microwave oven is operating. If your phone is plugged in with a modem or a surge protector, plug the phone (or modem/surge protector) into a different location.
- Page 184 Appendix Troubleshooting System screens all my incoming home calls. You may have set your telephone to screen all unknown home calls (see page 114). The telephone asks callers to announce their names or press the pound key (#). We recommend that you add the phone numbers of your family members and friends, and desired businesses to your Directory (see page 89), or add their names to the Star name list (see page 124).
- Page 185 Appendix Troubleshooting Forwarding all unknown calls to the answering system. If you want to forward all unknown calls without numbers and calls with numbers or names that are not in your directory or star name list to the answering system, select the UnknownToAns.S profile setting. See Set SCB screening profile on page 134.
- Page 186 Appendix Troubleshooting The answering system does not record messages. Make sure the answering system is on. Make sure the memory of the answering system is not full. When the answering machine memory is full, it does not record new messages until some old messages are deleted.
-
Page 187: Maintenance
Appendix Maintenance Taking care of your telephone Your cordless telephone contains sophisticated electronic parts, so it must be treated with care. Avoid rough treatment. Place the handset down gently. Save the original packing materials to protect your telephone if you ever need to ship it. -
Page 188: For C-Ul Compliance
Appendix For C-UL compliance In compliance with the bilingual requirements for safety, caution, and war nin g marki ngs o f Canadian Federal and Provincial/Territorial statutes and regulations, the French version of Important safety information is included. Mesures de sécurité importantes Ce symbole vous alertera d’informations importantes ou d’instructions d’entretien pouvant apparaître dans ce guide d’utilisation. - Page 189 Appendix For C-UL compliance MISES EN GARDE: N’utilisez que les adaptateurs inclus avec ce produit. Pour obtenir une pièce de rechange, visitez https://telephones.att.com notre site Web au ou composez le 1-800-222-3111 1-866-288-4268 . Au Canada, composez le ATTENTION: Afin de prévenir les risques d’incendie ou d’explosion de la pile, replacez la pile avec une pile du même type.
- Page 190 Appendix For C-UL compliance Piles rechargeables à l’hydrure métallique de nickel : Jetez ces piles de manière sécuritaire. N’incinérez pas et ne peercez pas les piles. Comme pour les autres piles du même type, si elles sont brûlées ou percées, des matières corrosives peuvent s’en échapper, ce qui risque de causer des brûlures ou autres blessures corporelles.
-
Page 191: Fcc Part 68 And Acta
Appendix FCC Part 68 and ACTA This equipment complies with Part 68 of the FCC rules and with technical requirements adopted by the Administrative Council for Terminal Attachments (ACTA). The label on the back or bottom of this equipment contains, among other things, a product identifier in the format US:AAAEQ##TXXXX. This identifier must be provided to your telephone service provider upon request. - Page 192 Appendix FCC Part 68 and ACTA Industry Canada This device contains licence-exempt transmitter(s)/receiver(s) that comply with Innovation, Science and Economic Development Canada’s licence-exempt RSS(s). Operation is subject to the following two conditions: (1) This device may not cause interference. (2) This device must accept any interference, including interference that may cause undesired operation of the device.
-
Page 193: Fcc Part 15
Appendix FCC Part 15 NOTE: This equipment has been tested and found to comply with the requirements for a Class B digital device under Part 15 of the Federal Communications Commission (FCC) rules. These requirements are intended to provide reasonable protection against harmful interference in a residential installation. -
Page 194: California Energy Commission Battery Charging Testing
Appendix California Energy Commission battery charging testing instructions This telephone is set up to comply with the energy-conserving standards right out of the box. These instructions are intended for California Energy Commission (CEC) compliance testing only. When the CEC battery charging testing mode is activated, all telephone functions, except handset battery charging, will be disabled. -
Page 195: Limited Warranty
Appendix Limited warranty The AT&T brands are used under license. This product is covered by a one-year limited warranty. Any replacement or warranty service, and all questions about this product, should be directed to https://telephones.att.com 1 (800) 222-3111 our website at or call . - Page 196 Appendix Limited warranty Charges for installation or set up, adjustment of customer controls, and installation or repair of systems outside the unit. 5. How do you get warranty service? To obtain warranty service in the United States of America, visit https://telephones.att.com 1 (800) 222-3111 or call...
-
Page 197: Technical Specifications
Appendix Technical specifications RF frequency band 1921.536MHz — 1928.448MHz Channels Telephone base voltage (AC voltage, 60Hz) 96 — 129 Vrm Handset battery 2.4 VDC, AAA x 2, Ni-MH Telephone base voltage 6VDC @0.6A (DC adapter output) Max. of PS1 or LPS Charger voltage 6VDC @0.4A Max. - Page 198 Index Index review entries 103 Caller ID manager 29 Active devices 36 Calls without numbers 116 Add a Bluetooth headset 33 Cell call 65 Add a cell phone 31 Cell phone download directory 37 Add a handset 163 Charger installation 16 Alerts manager 29 Charging 17–18 Alert tones 167...
- Page 199 Index Index Phonebook (directory) 89 Predial a cell call 65 Find handset 75 Predial a home call 64 Flash (switch hook flash) 67 Pulse dialing 49 Push-to-talk 82–88 Handset lights 166 Handset locator 75 Quick reference guide 5–14 Headset 33, 64 Quiet mode 50 Important safety information 1–3 Receive a cell call 66...
- Page 200 Index Index Smart call blocker 114–144 allowed calls 138 Uncategorized calls 116 blocked calls 139 Unwelcome calls 116 block list 119–124 Use a Bluetooth headset 64 call categories 116 call handling 117–118 Voice control 38–40 calls without numbers 116 Voice guide 137, 148 option while on a call 144 Voicemail 154 screening announcements 131–134...
- Page 201 Skip the message ....... 6 Record announcement... *7 Turn system on or off ....0 End remote access call ... 8 (or hang up) DLP73290/DLP73390/DLP73490/DLP73590 DECT 6.0 cordless telephone/answering system with BLUETOOTH® wireless technology © 2021 Advanced American Telephones. All Rights Reserved.
- Page 202 https://telephones.att.com Company: Advanced American Telephones Address: 9020 SW Washington Square Road - Ste 555 Tigard, OR 97223, United States. Phone: 1 (800) 222-3111 in the U.S. or 1 (866) 288-4268 in Canada The Bluetooth® word mark and logos are owned by Bluetooth SIG, Inc. and any use of such marks by Advanced American Telephones and its parent, VTech Holdings Limited, is under license.
Need help?
Do you have a question about the DLP73290 and is the answer not in the manual?
Questions and answers
How do I check voice mail as provided by my carrier and not on the device itself when it shows I have a voice mail. I don't have the built-in answering machine turned on.
To check voicemail on the AT&T DLP73290 without using the built-in answering machine, dial the access number provided by your telephone service provider and enter your security code or PIN.
This answer is automatically generated
Set machine to give message but no incoming recording
To set the AT&T DLP73290 to give a message without recording incoming calls, you need to turn off the answering system while keeping the announcement active. Follow these steps:
1. Press `*7` to record an announcement if you haven't already.
2. Press `0` to turn the system off, which prevents it from recording messages while still playing your announcement.
This setup allows callers to hear your message without leaving a voicemail.
This answer is automatically generated
On model # DLP73390 we have 2 phone lines but only one operates can 2 lines operate on this phone?
removal of read messages