Table of Contents
Advertisement
Quick Links
EZSⅡ
OPERATING MANUAL
Thank you for purchasing an Oriental Motor product.
This Operating Manual describes product handling procedures.
・Please read this Operating Manual and the separate manual entitled BEFORE USING THE PRODUCT thoroughly to
ensure safe operation.
・Always keep the manual where it is readily available.
Series Slides
Table of contents
1 Introduction .................................................2
1.1 Compliance with the EC Directives....................2
1.2 Names of parts ...................................................3
2 Installation ...................................................4
2.1 Installing from the table surface .........................4
2.2 Installing from the base surface .........................4
2.4 Installing a load ..................................................5
3 Connection ..................................................6
3.2 Connection of motor cable .................................6
HL-17010-2
Advertisement
Table of Contents

Subscribe to Our Youtube Channel
Related Manuals for Oriental motor EZS II Series


Summary of Contents for Oriental motor EZS II Series
- Page 1 HL-17010-2 EZSⅡ Series Slides OPERATING MANUAL Thank you for purchasing an Oriental Motor product. This Operating Manual describes product handling procedures. ・Please read this Operating Manual and the separate manual entitled BEFORE USING THE PRODUCT thoroughly to ensure safe operation.
- Page 2 1 Introduction 1 Introduction 1.1 Compliance with the EC Directives The CE Mark indicating their compliance with the Low Voltage/EMC Directives. • Installation condition EZS K EZS A, EZS C Overvoltage category Ⅰ Ⅱ Pollution degree Protection against ClassⅢequipment ClassⅠequipment electric shock Degree of protection IP20...
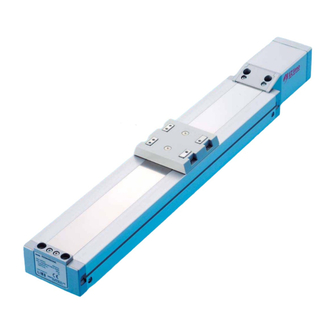
- Page 3 1 Introduction 1.2 Names of parts Viewed from the table surface Power unit (Motor built-in) Mounting holes End plate Table Mounting holes Shielded plate mounting holes Load mounting holes Positioning pin holes Viewed from the base surface Mounting reference surfaces Base Mounting holes Mounting reference...
- Page 4 2 Installation 2 Installation 2.1 Installing from the table surface Mounting plate Flatness EZS3 0.05 mm (0.0020 in.) or less [per 200 mm (7.87 in.)] EZS4, EZS6 0.06 mm (0.0024 in.) or less [per 200 mm (7.87 in.)] Mounting holes [Ø5.5 mm (Ø0.217 in.) Plate thickness : four locations]...
- Page 5 2 Installation 2.3 How to use the mounting reference surfaces To ensure positional repeatability after removing and reinstalling the motorized linear slides, use the reference mounting surfaces on the motorized linear slides base. Crosswise mounting reference surface on bracket side EZS3 EZS4 6 Crosswise mounting reference...
- Page 6 3 Connection 3 Connection Connect one end of the motor cable (sold separately) to the motorized linear slides, and connect the other end to the motor connectors on the controller. Controller Motor cable (sold separately) Motorized linear slides 3.1 Confirmation of controller key designation Be sure to confirm that the motorized linear slides model shown on the controller key is the same as the model of the motorized linear slides connected to the controller.
- Page 7 3 Connection Loosen the screws affixing the cable clamp, and remove the cable clamp. Connect the protective earth conductor only when the controller is an ESMC-A, ESMC-C. Bare crimp terminal (round) Tightening torque: 1.0 to 1.3 N·m (142 to 184.6 oz-in) Ø4.1 mm (0.16 in.) or more Protective earth wire Protective...
- Page 8 • Unauthorized reproduction or copying of all or part of this Operating Manual is prohibited. If a new copy is required to replace an original manual that has been damaged or lost, please contact your nearest Oriental Motor branch or sales office.
Need help?
Do you have a question about the EZS II Series and is the answer not in the manual?
Questions and answers