Johnson Controls SABROE HeatPAC Operating Manual
Hide thumbs
Also See for SABROE HeatPAC:
- Installation and operation manual (34 pages) ,
- Installation manual (9 pages) ,
- Installation manual (8 pages)
Table of Contents
Advertisement
Advertisement
Table of Contents

Related Manuals for Johnson Controls SABROE HeatPAC


Summary of Contents for Johnson Controls SABROE HeatPAC
- Page 1 Operating manual HeatPAC with reciprocating compressor...
- Page 3 Manual for HeatPAC Unit type HeatPAC with reciprocating compressor Compressor type Designation Compressor no. R717 Refrigerant Oil type Other _____________ PAO 100 Approval PED (2014/68/EU) Other _____________ Motor 3 x _________ V/ _________ Hz Supply voltage Control 1 x _________ V / _________ Hz IP55 IP23 Δ...
- Page 4 Vessel data Design pressure External surface Type [bar] Condenser Float housing Evaporator Liquid separator Oil separator Oil cooler Safety valve: Data for calculation of down- Receiver stream line according to EN 13136 Economiser Desuperheater Subcooler Other Pressure loss, if any, from safety valve to customer connection (based on design pressure) [bar] _____________ Safety valve type: Back-pressure dependent...
-
Page 5: Table Of Contents
Contents Introduction ...................8 Amendments to the manual ............8 Definition of safety precautions used in this manual ...... 10 Requirements for competent persons .......... 10 Safety ....................11 Areas of application ..............11 2.1.1 Application of the heat pump ..........11 2.1.2 Application of combustion engines ........ - Page 6 3.2.8 High-pressure regulation system (electrical) ......30 3.2.9 Automatic oil recovery system from evaporator ..... 30 3.2.10 Automatic oil return from oil separator ........32 3.2.11 By-pass function during start-up ........... 33 3.2.12 WHC circulation system ............33 Installation information ............... 35 Installation .................
- Page 7 Maintenance instructions ..............46 Maintenance of heat pump units ..........46 Selecting lubricating oil for heat pump units ........47 R717 charge ................47 Final disposal ..................48 Safety precautions ..............48 Waste disposal ................48 Appendices ..................49 Monitoring of operation ............... 49 Spare parts list for CVUA 1201 oil recovery pot ......
-
Page 8: Introduction
It is important that the operating personnel familiarise themselves with the contents of this man- ual in order to ensure a proper and efficient operation. Johnson Controls Denmark is not liable for damage occurring during the warranty period where this is attributable to incorrect operation. - Page 9 Copyright © Johnson Controls Denmark This manual must not be copied without the written permission of Johnson Controls Denmark and the contents must not be imparted to a third party nor be used for any unauthorised purposes. Contravention will be prosecuted.
-
Page 10: Definition Of Safety Precautions Used In This Manual
Introduction Definition of safety precautions used in this manual Danger! Indicates an imminently hazardous situation which, if not avoided, will result in death or serious injury. Warning! Indicates a potentially hazardous situation or practice which, if not avoided, will result in death or serious injury. -
Page 11: Safety
Warning! Johnson Controls Denmark is not liable for injuries to personnel or damage to equipment resulting from using the equipment for other purposes than the ones stated above. -
Page 12: Identification
Safety Identification 2.2.1 Identification of equipment All equipment from Johnson Controls Denmark can be identified by one or several name plates posi- tioned as illustrated in the following drawings: Fig. 1 Designation Pos. no. Compressor name plate Vessel name plate... -
Page 13: Compressor Name Plates
Test pressure bar g Test pressure bar g Fig. 2: Name plate for standard compressor Fig. 3: Name plate for ATEX compressor Johnson Controls Denmark ApS 2516-347 Christian X's Vej 201 8270 Højbjerg, Denmark www.sabroe.com Year Compressor Type... - Page 14 Safety The compressor name plate is positioned on the compressor and contains this information: Identification no. (serial no). Compressor no. Year of manufacturing. Year Type Manufacturer's type designation. Allowable refrigerant or refrigerants for the compressor. Refrigerant (The actual refrigerant for the unit is stated on the unit name plate). Specific rotational speed.
-
Page 15: Vessel Name Plate
Safety 2.2.3 Vessel name plate Johnson Controls D e n m ar k ApS Johnson Controls Denmark ApS Christian X 's V e j 201 Christian X's Vej 201 2516-331 8 270 Højbj e rg, D e n m ark 8270 Højbjerg, Denmark... -
Page 16: Unit/Pipe System Name Plate
Safety 2.2.4 Unit/pipe system name plate Johnson Controls Denmark ApS 2516-343 Johnson Controls Denmark ApS 2516-342 Christian X's Vej 201 Christian X's Vej 201 8270 Højbjerg, Denmark 8270 Højbjerg, Denmark www.sabroe.com www.sabroe.com Refrigeration unit Year Refrigeration unit Year Type Type... - Page 17 Safety The unit name plate is positioned on the frame and contains this information: Refrigeration unit No. Identification no. (serial no.) Year of manufacturing. Year Type Manufacturer's type designation. For EC PED/EAC approval: ‘Unit & Piping’ means that the CE/EAC mark applies to the complete unit including the piping system.
-
Page 18: Signs
Safety 2.2.5 Signs All signs which may be found on your equipment are shown below. The number of signs, however, may vary from one product to another. High surface High voltage/ The compressor may be top- temperature Risk of electric shock High pressure heavy (about 70°C) -
Page 19: Safety Precautions
Safety Safety precautions 2.3.1 General precautions These precautions should be used as a supplement to the safety precautions and warnings included in: • All other manuals pertaining to the compressor/unit • Local, plant and shop safety rules and codes • National safety rules and regulations. -
Page 20: Water System
Use the prescribed tools, and check that they are properly maintained and in good working con- dition. In explosion-proof areas, use tools suited for this specific purpose. • Use only Johnson Controls Denmark original spare parts; other parts may impair the safety of the compressor/unit. •... -
Page 21: Lubricating Oils
Safety • When the cause of the shutdown has been removed, the motor may restart. This can be danger- ous for machines and installations, and it is therefore important that the user takes adequate precautions against restarting if the motor makes an unscheduled stop. •... - Page 22 Safety Note: The occurrence of air is usually an indication of poor maintenance or lack of thoroughness at installation. Note: R717 systems should be purged on a regular basis to avoid atmospheric air and other non-con- densable gases. Operating manual - HeatPAC with reciprocating compressor 22/62 009332 en 2021.07...
-
Page 23: First Aid For Accidents With Ammonia
Safety 2.3.10 First aid for accidents with ammonia (Chemical formula: NH , refrigerant no.: R717) General Ammonia is not a cumulative poison. It has a distinctive, pungent odour that even at very low, harmless concentrations is detectable by most people. As ammonia is self-alarming, it serves as its own warning agent so that no person stays voluntarily in hazardous concentrations. -
Page 24: Protecting The Operator As Well As The Environment
Safety 2.3.11 Protecting the operator as well as the environment Industrialisation affects our environment, and it is therefore essential that we do what we can to minimise the harmful effect on nature. Many countries have passed legislation in an effort to reduce pollution and preserve the environment. This legislation applies to all fields of industry, including refrigeration, and must be complied with. -
Page 25: Emergency Stop
Safety 2.3.12 Emergency stop In case of an accident, push the emergency stop button on the UniSAB III controller. Emergency stop Fig. 11: UniSAB III built into the electrical panel Emergency stop Fig. 12: UniSAB III as a separate device For resetting and further information, please see the UniSAB III manual. -
Page 26: Design And Function
HeatPAC is delivered with adjustable anti-vibration machine feet for installation on solid concrete floor. For installation on decks, special vibration dampers are often required. HeatPAC is controlled by Johnson Controls Denmark’s UniSAB III control and capacity regulating system. For specific dimensions and size of connections, see PI diagram and GA drawing. -
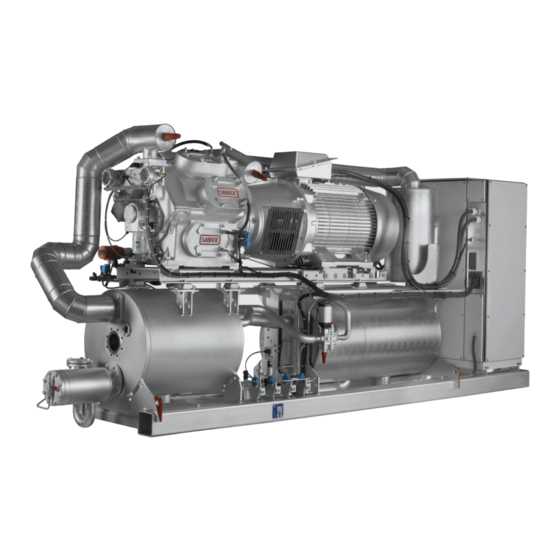
Page 27: Heatpac Description
Design and function 3.1.2 HeatPAC description Fig. 13 Pos. no. Description Evaporator/Liquid separator Oil separator Condenser Receiver Brine inlet evaporator Brine outlet evaporator Water inlet condenser Water outlet condenser Expansion valve Compressor Motor UniSAB III controller and emergency stop (built into the electric panel is optional) Electric panel Oil recovery system (from evaporator) R717 charge valve... -
Page 28: Main Components
Design and function Main components 3.2.1 Compressor The compressor is a Johnson Controls Denmark standard compressor, complete with stop valves, mo- tor, oil separator etc. For further information, see compressor operating manual. 3.2.2 Control system HeatPAC is delivered with UniSAB III monitoring, safety and capacity regulating system. -
Page 29: Air Purge Valve
Design and function The receiver is equipped with two sight glasses, pos. 1, a purge valve, pos. 2, an electronic level trans- mitter, pos. 3, and a drain valve, pos. 4. The outlet pipe, pos. 5, comes from the bottom of the receiver. The receiver is available in two sizes: DN150 and DN200. -
Page 30: High-Pressure Regulation System (Electrical)
Design and function 3.2.8 High-pressure regulation system (electrical) The HeatPAC unit has an electrical expansion system. The system is connected to the condenser outlet and regulates the liquid level in the receiver and controls the expansion between the high and low pres- sure sides of the refrigeration plant. - Page 31 Design and function Fig. 17: System for reciprocating compressor Pos. no. Component Compressor Evaporator Level float switch Stop valve Stop valve Stop valve Solenoid valve combined with filter and stop function Solenoid valve combined with filter and stop function Oil recovery pot Discharge gas line When the oil level in the recovery pot, Fig.
-
Page 32: Automatic Oil Return From Oil Separator
Design and function Discharge gas Oil / R-717 Fig. 18: Oil recovery pot The placement of the solenoid valve for operating the oil recovery system is shown in pos. 1 and 2, in Fig. 19. 3.2.10 Automatic oil return from oil separator The oil collected in the oil separator is returned to the compressor by a timer-operated solenoid valve pos. -
Page 33: By-Pass Function During Start-Up
Design and function 3.2.11 By-pass function during start-up The R717 charge on HeatPAC is very low. HeatPAC is therefore equipped with a by-pass from the bot- tom of the oil separator to the evaporator. R717 condensed in the oil separator during standstill is lead to the evaporator through a timer-operated solenoid valve, pos. - Page 34 Design and function Fig. 20 Water circuit The pump (, pos. 2) is running constantly, and it circulates the cooling water on the side and top covers of the compressor both during standstill and operation. During standstill and operation, the heating ele- ment (, pos.
-
Page 35: Installation Information
Installation information 4. Installation information Installation 4.1.1 General information For assistance or information about installation, please contact your local Johnson Controls product representative. 4.1.2 First start-up procedure Installation in terms of mechanical work (refrigeration system and piping), electrical work and installation of safety equipment must be performed in accordance with local codes/rules and/or according to EN 378-3 and EN 378-4 as a minimum requirement. -
Page 36: Sound And Vibrations
Such machine feet are designed for minimum 70% vertical isolation (100% capacity). For installation on decks, special dampers are often required. Please consult a vibration expert or a Johnson Controls Denmark representative for further information. Operating manual - HeatPAC with reciprocating compressor 36/62... -
Page 37: Heatpac With Variable Speed Drive
Installation information To ensure optimum effect of each individual anti-vibration machine foot, the load on the feet must result in roughly the same deflection of all machine feet, see Fig. 21. Deflection of a machine foot can be ad- justed by increasing or reducing the load compared to the other supports by turning the adjusting rod. U n loa d e d s t a te Lo a d e d s t a te L o ck n u t... -
Page 38: Cleaning In Place
It is therefore important to keep brine and water under observation for both evaporator and condenser. Consult a water treatment expert concerning additives to the system. The liability of Johnson Controls Denmark does not include any damage that may occur due to harmful impurities in the system. -
Page 39: Operating Instructions
Operating instructions 5. Operating instructions Personnel qualification requirements Note: Read chapter 2. Safety carefully before operating the unit. Before operating the heat pump unit, all personnel must have studied the unit manuals carefully. The operator must be confident operating a UniSAB III controller. Prior to start-up and running of the heat pump, the pre-start check must be accomplished. -
Page 40: Normal Start-Up Procedure
Operating instructions Top bar Content area Info bar F-key area Fig. 22: UniSAB III front 5.3.2 Normal start-up procedure Confirm that the system conditions permit the heat pump to start. Press the start button on UniSAB III. Allow the compressor to start up and stabilise. Check the following on the heat pump: Mechanical tightness of the external piping, bolts and valves. -
Page 41: Valve Positions During Operation
Operating instructions 5.3.3 Valve positions during operation Designation Position during operation Pos. no. Compressor suction stop valve Open Compressor discharge stop valve Open Stop valve for oil recovery/oil return Open Purging valve Closed Stop valve for liquid by-pass (start-up) Open Stop valve for oil recovery, discharge gas Open Stop valve for oil drain, oil separator... -
Page 42: Restarting The Heat Pump After Power Interruption
Operating instructions 5.3.4 Restarting the heat pump after power interruption When the power supply returns after a short power interruption, restarting depends on the UniSAB III settings. If UniSAB III is set in AUTO running mode, the heat pump will normally start up when needed by the au- tomatic control and when the relevant timer/delay has expired. -
Page 43: Shutting Down For A Long Standstill Period
Operating instructions Leave all valves in their “in-operation positions” unless servicing or repair work is to be performed. Do not turn off power to the heat pump unit as the oil heater must be connected to keep the correct oil temperature. - Page 44 Operating instructions A 1°K lower condensing temperature results in a 1% higher cooling performance and 3% lower power consumption. Too low evaporating temperature Cause Solution Fouling in the evaporator Clean the evaporator. Oil in the evaporator Inspect the oil recovery system. Check liquid level in evaporator.
-
Page 45: Testing Of Heatpac Units
See compressor manual for more information. 5.6.3 Testing of HeatPAC units HeatPAC units supplied by Johnson Controls Denmark have, as far as possible, been function and per- formance tested. A performance test consists of simultaneous measurements of cooling or heating capacity, power con- sumption and condenser capacity. -
Page 46: Maintenance Instructions
Maintenance instructions 6. Maintenance instructions Maintenance of heat pump units Read chapter 2. Safety carefully before performing any maintenance on the heat pump unit. To ensure that the heat pump unit operates without problems throughout a long service life, the system of maintenance presented in the following instructions must be followed. -
Page 47: Selecting Lubricating Oil For Heat Pump Units
PAO oil is a synthetic oil with low vapour pressure. Usually, the heat pump is charged with oil from factory. Do not switch to a different oil type or brand with- out first consulting Johnson Controls Denmark. Oil changes are described in detail in the compressor manual. -
Page 48: Final Disposal
Final disposal 7. Final disposal Safety precautions Danger! Before dismantling the plant, read the safety precautions carefully. Dismantling a refrigeration unit to be scrapped must be carried out safely. Only competent refrigeration personnel must perform the dismantling as fundamental knowledge of re- frigeration systems and the risks involved are required. -
Page 49: Appendices
Appendices 8. Appendices Monitoring of operation To ensure satisfactory operation, it is required that you enter certain routines in a logbook on a regular basis. You can use the items listed in the Start-up log, which is page 2 of the Checklist illustrated in Fig. -
Page 50: Spare Parts List For Cvua 1201 Oil Recovery Pot
Appendices Spare parts list for CVUA 1201 oil recovery pot NO: 3247--128 Fig. 25: Oil recovery pot Pos. Pcs. Part no. Description 3247.128 Complete pot 3445.508 Float switch 1331.433 Seal ring 3413.038 Piston 3411.009 Oil reservoir 2144.049 Spring 3411.039 Cover 1331.571 O-ring 1425.018... -
Page 51: High-Pressure Float Valve For Cascade Evaporator
Appendices High-pressure float valve for cascade evaporator The high-pressure float valve, pos. 1 in Fig. 26, is mounted directly on the condensing side of the cas- cade evaporator to obtain a compact design and the lowest charge possible. The outlet (expansion line) goes out the bottom and into a u-turn pipe. -
Page 52: Declaration Of Conformity
Appendices Declaration of conformity Johnson Controls Denmark declares on the signed declaration of conformity that the unit is manufac- tured and CE-marked in conformity with relevant directives and standards. The printed version of this operating manual, which is delivered with the unit, contains a translated ver- sion of the declaration, however not filled in with the specific data for your unit. -
Page 53: Set-Up Guide - Aks 4100 280 Mm For Ammonia Heat Pump Application
Appendices Set-up guide — AKS 4100 280 mm for ammonia heat pump application Set-up guide for AKS 4100 280 mm Set-up and calibration of the AKS 4100 280 mm level sensor must be performed by competent person- nel only. The guide is in English only. Warning! Incorrect set-up may cause the compressor to break down. - Page 54 Appendices Open the tightening screw (pos. 1) on the meta glass connector and the fixing screw (pos. 2), see Fig. 27. Fit it carefully on the process connector. The loose screw (pos. 1) gives way for the trapped air so the signal converter can be installed. It should be pressed down carefully, yet with some force, to fit over the o-ring.
- Page 55 Appendices Check the settings You can check your settings by pressing twice. AKS 4100 COAX D22 280 mm (0%) 4 mA 210 mm 060 mm (100%) 20 mA Press to return to default screen. After running the quick set-up, go to the supervisor menu and change the following parameters: •...
- Page 56 Appendices Press Arrow up (no. 4) once to change the digit to 2. Press Arrow right (no. 1) again → passcode required → press the buttons: 1-2-3-4-1-2, see Fig. 31. Fig. 31 Example: how to change a parameter in the supervisor menu Change of gas constant 2.5.3 to value according to the list in Fig.
- Page 57 Appendices • Press Arrow up (no. 4) until 1 has turned to 3, see Fig. 34. Fig. 34 Change the gas constant: • Press Arrow right (no. 1) – the bottom line is marked. • Change the digit to wanted number by pressing Arrow right (no. 1), Arrow down (no. 3) and Arrow up (no.
- Page 58 Appendices Fig. 37 Change to ‘STORE YES’ with Arrow down (no. 3) or Arrow up (no. 4) and Confirm (no. 2). You will then return to the standard display and the AKS 4100 is now running with optimised parameters. Note: After changing the parameters, do NOT run a quick set-up. If you do so, you will need to fill in the parameters again.
- Page 59 Appendices Set point z on e Fig. 38: AKS 4100-280 mm installed in a DN150 receiver. Operating manual - HeatPAC with reciprocating compressor 009332 en 2021.07 59/62...
- Page 60 Appendices Extended list – Gas constant for ammonia heat pump application Fig. 39 Operating manual - HeatPAC with reciprocating compressor 60/62 009332 en 2021.07...
-
Page 61: Index
Index Amendments to the manual ......................8 Ammonia accidents - first aid ......................23 Automatic oil recovery ........................30 Batteries............................48 Brine ............................38 Cleaning in place .......................... 38 Combustion engines - application....................11 Competent persons - requirements....................10 Compressor name plates....................... 13 CVUA 1201 oil recovery pot ...................... - Page 62 Safety during maintenance and service................... 20 Safety signs..........................18 Sound and noise data........................36 Spare parts list..........................50 Starting procedures........................39 Stopping for a brief period......................42 Testing ............................45 Unit/pipe system name plate ......................16 Vessel name plate......................... 15 Water ............................
- Page 64 Johnson Controls Denmark ApS Sabroe Factory Christian X's Vej 201 ∙ 8270 Højbjerg Denmark Phone +45 87 36 70 00 www.sabroe.com Version 6...
Need help?
Do you have a question about the SABROE HeatPAC and is the answer not in the manual?
Questions and answers