Table of Contents
Advertisement
Quick Links
Advertisement
Table of Contents

Related Manuals for Snom M55 SIP DECT Handset


Summary of Contents for Snom M55 SIP DECT Handset
- Page 1 SIP DECT Handset Quick Installation Guide...
-
Page 2: Important Safety Information
Important Safety Information This symbol is to alert you to important operating or servicing instructions that may appear on the product or in this user’s manual. Always follow basic safety precautions when using this product to reduce the risk of injury, fire, or electric shock. Important Safety Instructions When using your telephone equipment, basic safety precautions should always be followed to reduce the risk of fire, electric shock and injury, including the... - Page 3 12. To reduce the risk of electric shock, do not disassemble this product, but take it to an authorized service facility. Opening or removing parts of the handset other than specified access doors may expose you to dangerous voltages or other risks. Incorrect reassembling can cause electric shock when the product is subsequently used.
- Page 4 19. Use only the power cord indicated in this manual. 20. For pluggable equipment, the socket-outlet shall be installed near the equipment and shall be easily accessible. 21. In wall mounting position, make sure to mount the telephone base on the wall by aligning the eyelets with the mounting studs of the wall plate.
- Page 5 For cUL compliance only Mesures de sécurité importantes Ce symbole vous alertera d’informations importantes ou d’instructions d’entretien pouvant apparaître dans ce guide d’utilisation. Respectez toujours les mesures de sécurité et de sécurité de base lorsque vous utilisez ce produit, afin de réduire les risques de blessures, d’incendie, ou d’électrocution.
- Page 6 14. Débranchez cet appareil de la prise de courant et communiquez avec le département de service à la clientèle de Snom dans les cas suivants: A. Lorsque le cordon d’alimentation est endommagé ou écorché.
- Page 7 adéquate. Une étincelle dans ces endroits pourrait provoquer un incendie ou une explosion. Ces environnements pourraient être l’utilisation médicale de l’oxygène sans ventilation adéquate; le gaz industriel (dissolvants, vapeurs d’essence, etc.); une fuite de gaz naturel, etc. 17. Placez uniquement le combiné de votre appareil près de votre oreille lorsqu’il est en mode de conversation normal.
- Page 8 • Le remplacement d’une pile d’un type incorrect peut entraîner une explosion ou la fuite d’un liquide ou d’un gaz inflammable. • Évitez de jeter une pile dans le feu ou dans un four chaud, ou d’écraser ou de couper mécaniquement une pile, car cela peut provoquer une explosion. •...
- Page 9 Should you experience trouble with this equipment, please contact Snom Technology GmbH 1 (339) 227-6160 (select option 2) for repair or warranty information. If the equipment is causing harm to the telephone network, the telephone company may request that you disconnect the equipment until the problem is resolved.
- Page 10 Compliance h. Connection to party line service is subject to state tariffs. Contact the state public utility commission, public service commission or corporation commission for information. NOTICE: If you have specially wired alarm equipment connected to the telephone line, ensure the installation of this product does not disable your alarm equipment.
-
Page 11: About This Guide
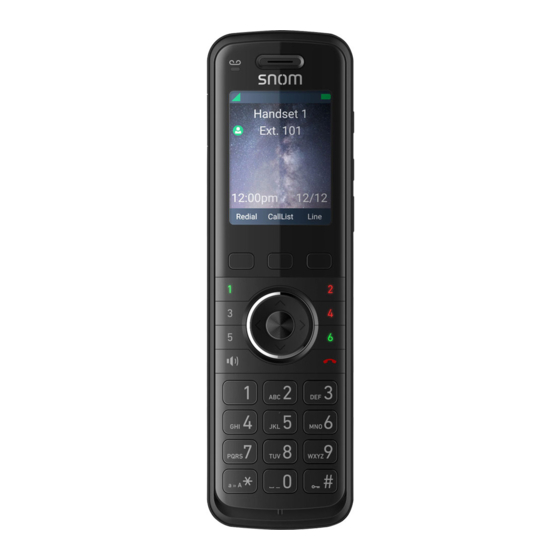
This quick installation guide provides a reference for the external features of the M55 SIP DECT Handset and installation instructions. The M55 SIP DECT Handset is for use with the M500 Multi-cell SIP DECT Base Station. Please refer to the M55 SIP DECT Handset User Manual for complete operation instructions. - Page 12 Quick Reference Guide 1 Earpiece SPEAKER key 2 MESSAGE LED Alphanumeric keypad 3 Color screen Microphone 10 - VOLUME + key 4 Soft keys 5 Line 1-6 programmable 11 Programmable key feature keys 12 OFF/Cancel key ¡ MENU/Confirm key and 13 Belt clip navigation keys 14 Speaker...
-
Page 13: Handset Installation
Handset Installation This section assumes that your network infrastructure is established and that your IP PBX phone service has been ordered and configured for your location. Handset installation involves both the handset and the handset charger. The handset charger is powered using the supplied power adapter. The handset chargercan be placed on a flat surface or mounted on a wall. - Page 14 Installing the charger Install the charger as shown below. Plug the power adapter into an electrical outlet not controlled by a wall switch.
- Page 15 IMPORTANT INFORMATION Use only the power adapter supplied with this product. To order a replacement power adapter, visit our website at www.snomamericas.com 2. The power adapter is intended to be correctly oriented in a vertical or floor mount position. The prongs are not designed to hold the plug in place if it is plugged into a ceiling, under-the-table or cabinet outlet.
- Page 16 Rechargable Li-ion battery MODEL: 503860AR1500 Battery Capacity: 1500mAh 3.7V Energy: 5.55Wh Date:2021.04 Manufacturer: Y CAUTION - Using the wrong type of battery has a risk of explosion - Please recycle used batteries according to local government regulations Made in China Rechargable Li-ion battery MODEL: 503860AR1500 Battery Capacity: 1500mAh 3.7V...
- Page 17 4. Charge the handset by placing it face forward in the charger. The battery icon indicates the charge status as the battery charges. Very low battery. Charging less than 30 minutes. Charging less than 30 minutes. Charging 30 to 80 minutes. Charging 80 minutes to 7 hours.
- Page 18 Wall mounting the charger The charger is ready for tabletop use. If you want to mount the charger on a wall, use two 10 mm (3/8 inch) screws and wall anchors to hold the charger in place. Screws and wall anchors are not provided, but are available for purchase at hardware retailers.
- Page 19 Registering the handset to the base station The handset must be registered to the base station in order to make and receive calls. There are three methods of registration: • Auto registration • Manual registation (triggered via Web UI). • Manual registation (triggered via LINK button on base).
- Page 20 Registering the handset - Manual registration (triggered via Web UI) Make sure the base station is connected to power and the network. 2. Press the MENU/Confirm key. The User Settings screen appears. 3. Press to scroll down to Registration and press OK. The Registration screen appears.
- Page 21 Registering the handset - Manual registration (triggered via LINK button on base) Make sure the base station is connected to power and the network. 2. Press the MENU/Confirm key. The User Settings screen appears. 3. Press to scroll down to Registration and press OK. The Registration screen appears.
-
Page 22: Screen Icons
Deregistering the handset Before using the handset with a different base station, you must deregister the handset from the base station to which it is currently registered. To deregister the handset: Press the MENU/Confirm key. The User Settings screen appears. 2. -
Page 23: Maintenance
Maintenance Taking care of your telephone • Your base station and cordless handset contain sophisticated electronic parts, so you must treat them with care. • Avoid rough treatment. • Place the handset down gently. • Save the original packing materials to protect your products if you ever need to ship them. - Page 24 VTECH COMMUNICATIONS, INC. Tigard, Oregon 97223, USA. Copyright © 2022 Snom Technology GmbH. All Rights Reserved. v20220525 Version 2, 05/22...
Need help?
Do you have a question about the M55 SIP DECT Handset and is the answer not in the manual?
Questions and answers