
Related Manuals for MedaCure LINCOLN LX-BARI-S


Summary of Contents for MedaCure LINCOLN LX-BARI-S
- Page 1 U S E R M A N U A L L I N C O L N EXPANDABLE BARIATRIC WITH BUILT-IN SCALE 5 FUNCTION ELECTRIC BED WIDTH EXPANDS FROM 36” – 42” – 48” MODEL # LX-BARI-S © 2021 MADE IN CHINA...
-
Page 2: Table Of Contents
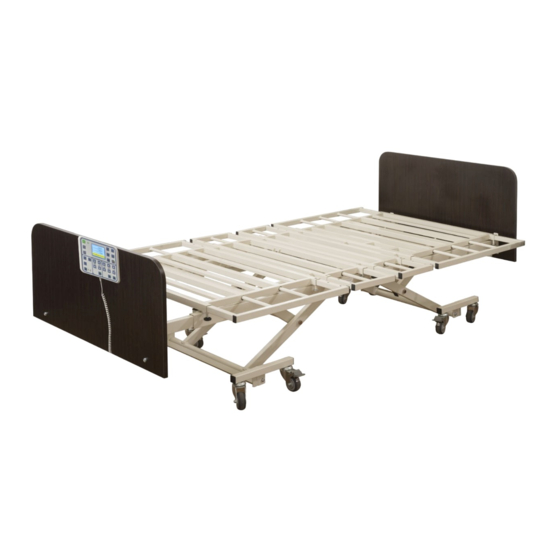
TABLE OF CONTENTS PAGE 2 INRODUCTION & PRODUCT FEATURES PAGE 3 PARTS LIST AND DESCRIPTION PAGE 4 INSTALLLING THE LIFTING FRAME & HEIGHT ADJUSTMENT MOTOR PAGE 5 INSTALLING THE LENGTH EXTENSION FRAME PAGE 6 INSTALLING BED BOARDS PAGE 7 INSTALLING BED BOARDS PAGE 8 CASTERS PAGE 8... - Page 3 The MedaCure Lincoln Expandable Bed with Built-in Scale System is a fully electric, versatile and multi-functional bed for Long Term Care, Hospital & Home Care settings. It expands in both the width (from 36” to 48”) and length (from 80” to 88”) which makes it ideal for standard, bariatric and tall patients. It has a low position of 14.9”...
-
Page 4: Parts List And Description
PARTS LIST & DESCRIPTION IMPORTANT: Read this manual completely before setting up or operating this system and keep in a safe place for future reference. To avoid injury and for maximum safety, this system should only be installed by an authorized technician or dealer representative. Electric bed installation parts listed below as per Figure # 1 Bed frame Extension frame (right) -
Page 5: Installling The Lifting Frame
1. Installing the lifting frame Remove theφ13.5 bolt from the lifting frame (1). Place aφ14 plastic washer between the lifting frame (1) and lifting frame (2), matching the bolt holes on both lifting frames. Fasten with a φ 13.5 bolt with cotter pin as per Figure # 2. Use 4 bolts to connect the lifting frames. φ13.5 Bolt φ14 Plastic washer... -
Page 6: Installing The Length Extension Frame
Installing the length extension frame 3.1. Insert extension frame (left) & extension frame (right) into the 60 x 30 mm rectangular bed frame tube. See Figure # 4 The extension frame tubes should face upward. Insert the extension frame, tighten the bolt to lock the extension frame, and then fix the plastic head bolt. -
Page 7: Installing Bed Boards
4. Installing the bed boards 4.1 Press the M8 × 18 plate nut into the bed board holes, as per Figure # 6. Figure # 6 4.2 Match the bed head board with the bed frame installation holes. Fasten by M8 X 20 cup head bolt with φ... - Page 8 4.3 Match the bed foot board with the extension frame installation holes. Fasten by M8 X 20 cup head bolt with φ 8 flat washer. Bed foot board can be installed in both the high and low level position. See Figure # 8 & Figure # 9. Figure # 8 Bed foot board in low-level installation position Figure # 9 Bed foot board in high-level installation position 4.4 Install the bed head board to the bed head frame, and bed foot board to the bed foot frame,...
-
Page 9: Casters
5. Casters There are 4 pcs. locking casters and 4 pcs. swivel casters per set. Step on the locking pedal (lower) to activate the locking position and step on the unlocking pedal (upper) to deactivate the locking system. See Figure # 12 & 13. Step on the pedal to lock the caster in place Figure # 12 Locked position... - Page 10 6.2 IMPORTANT NOTE: There are 3 location holes on each extension frame for 3 width adjustment settings - 36”, 42” and 48” widths. There are 4 separate extension frames on each side of the main frame. Repeat the above method in 6.1 to achieve the desired width and then tighten the “Locking Bolt”...
-
Page 11: Side Rail Installation
Side rail installation & use 8.1 Loosen the screw on the side rail mounting base. Clip the mounting base with the 60 x 30mm rectangular bed frame tube and tighten the screw when you finish adjusting the position. See Figure # 17 Screw Pulling button Figure # 17... - Page 12 Patient Remote Handset, Scale and Nurse Control 9.1 Patient remote handset operates as illustrated below - Figure # 19 Raise bed head part Lower bed head part Raise bed foot part Lower bed foot part Raise both bed head Lower both bed head and foot part and foot part Lower the entire bed...
- Page 13 SCALE AND NURSE CONTROL FUNCTIONS ANGLE RESET KEY (OPTIONAL) LED INDICATOR CALIBRATION KEY POWER ON LIGHT WEIGHT RESET KEY LED MONITOR WEIGHT DISPLAY/HISTORY KEY ON/OFF BUTTON KG./LB. SELECT KEY STOP KEY CPR KEY OFF BED ALARM WARNING KEY LANGUAGE SELECT KEY HEAD/FOOT CONTROL ZONE NIGHT LIGHT KEY LOCK KEY FOR HEAD FUNCTION...
- Page 14 9.2 Scale and Nurse Control Connect the power cable to the control box. Remotely control all 5 bed functions as per figure # 20. Figure # 20 Scale and Nurse Control 9.3 Operation of Nurse Control and Scale Function When the power is on, the default screen shows the movement and tilting degree (optional) information (this model bed does not have a tilting degree function).
- Page 15 On / Off Button: When the power is on, the On/Off button indicator lights up. The Nurse Control operates all 5 bed functions. If the nurse control does not operate for longer than 1 minute, the On/Off indicator light will turn off and all functions will operate except for the CPR and STOP key. When the On/Off button light is off, press the On/Off button and all functions will resume working.
- Page 16 (this model bed does not have an angle Angle Degree Display Select Key (optional) degree function): Night Light Key: When the On/Off button is activated, press the Night Light key to turn on the light. The night light is located on the control box located under the frame and underneath the nurse control handset. Both lights turn on and off at the same time.
- Page 17 Lock Key: Turn the lock key on and off by pressing the lock key. IMPORTANT NOTE: When the light on the lock key is on, this means it is unlocked and the high/low motor and all function keys are ready for use. When the light on the lock key is off, this means all functions are restricted.
- Page 18 Under normal circumstances and if the scale has not been tampered with it is not necessary to calibrate the scale. For more information regarding re-calibrating this system, please contact an authorized distributor or Medacure direct. Off Bed Alarm Warning Key: Press this key to activate the off bed alarm warning function.
-
Page 19: Battery Backup
10. BATTERY BACKUP The scale system is powered by AC power. The scale system also comes with a backup rechargeable battery. Backup battery with power level that is greater than 9V illustrated as below: FULL TWO BARS ONE BAR ZERO Backup battery with power level that is less than 18V shows 0 bars: (1)... - Page 20 Fuse location. Replace when it is damaged. Figure 23 11. Lifting pole and IV pole are optional There are two (2) lifting pole sockets and two (2) IV pole sockets on the head part of the bed frame. © 2021 MADE IN CHINA 19 | P a g e...
Need help?
Do you have a question about the LINCOLN LX-BARI-S and is the answer not in the manual?
Questions and answers