Bticino 374000 User And Installation Manual
Hide thumbs
Also See for 374000:
- User and installation manual (70 pages) ,
- Manual (10 pages) ,
- User and installation manual (72 pages)

Related Manuals for Bticino 374000


Summary of Contents for Bticino 374000
- Page 1 Entrance Panel 10" 374000/02 User and installation manual RA00188AA-01/22-PC www.bticino.com...
- Page 2 Entrance Panel 10" User and installation manual...
-
Page 3: Table Of Contents
Entrance Panel 10" User and installation manual Contents General information Warnings and recommendations Warnings and consumer rights Fundamental concepts Naming of the devices Community Call addressing procedures Call using the address in the Community Call using the Alias (alphanumeric code) Call using the Phonebook Lift control function Fire linkage... -
Page 4: General Information
Entrance Panel 10" User and installation manual General information Warnings and recommendations It is important to read this manual carefully before proceeding with the installation. The warranty becomes automatically void in case of negligence, improper use, tampering by unauthorised personnel. The Entrance Panel must not be exposed to water drops or splashes;... -
Page 5: Fundamental Concepts
Entrance Panel 10" User and installation manual Fundamental concepts Naming of the devices In this manual, for easy reading, the abbreviated device name is used as in the list: – IU: Indoor Unit – EP: Entrance Panel – GS: Guard Station –... -
Page 6: Call Addressing Procedures
Entrance Panel 10" User and installation manual Call addressing procedures On the basis of data recorded in the AB and the Community structure the calls can be made using various methods: – call using the address in the Community; call using the Alias (alphanumeric code);... -
Page 7: Call Using The Alias (Alphanumeric Code)
The Lift control function allows a command to be sent to the lift control centre to simulate a lift call. The lift action depends on the functions of the lift control unit (BTicino cannot define these functions. They depend on the lift manufacturers). -
Page 8: Front And Rear View
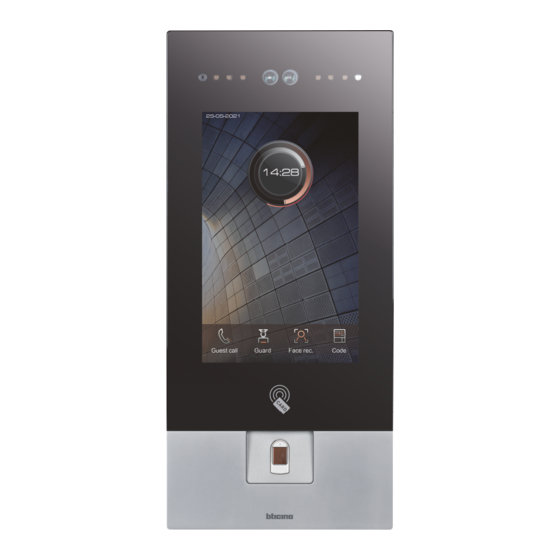
Front and rear view 1. Microphone 2. LED for the shooting field lighting 3. Camera 4. Light sensor 5. Display 10" (touch screen) 6. Badge reader for door lock opening 7. Loudspeaker 8. Finger print reader (only 374000) 9. Locking screws... - Page 9 Entrance Panel 10" User and installation manual 10. Tamper switch 11. SD card 12. Connection clamp 13. Not used 14. Not used 15. Mounting bracket 16. USB Connector (not used) 17. RJ45 Connector (*) 18. Reset setting password and local access code (*) This device does not support standard POE power supplies, but only POE power supplies identified with item no.
- Page 10 Entrance Panel 10" User and installation manual Connection clamps local door lock release LOCK+ Door OPEN – GND electric door lock connection and pushbutton connection control (12V - 4A impulsive on 3 local door lock release Ohm maximum) LOCK- FIRE Linkage – GND pushbutton connection for firealarm system door lock status signal input (dry...
-
Page 11: Dimensional Data And Installation Heights
User and installation manual Dimensional data and installation heights 58 mm 12 mm 195 mm 195 mm 374000 374002 To ensure proper operation, the Fingerprint Reader must be installed in a location protected from rain. 53 ° 80 ° 50 cm 50 cm (*) Recommended height, unless different regulations are specified. -
Page 12: Installation
Entrance Panel 10" User and installation manual Installation 375007 Attention: the RJ45 cable must be at least 200 mm long... - Page 13 Entrance Panel 10" User and installation manual...
- Page 14 Entrance Panel 10" User and installation manual 58 mm 2 mm...
- Page 15 Entrance Panel 10" User and installation manual (*) Adjust the tamper screw so that it presses the tamper switch of the device and activates the anti-theft function in case of removal sending an alarm to the GS.
-
Page 16: Uninstall
Entrance Panel 10" User and installation manual Uninstall... -
Page 17: Example Diagrams
Copper cables 2 x Copper cables It is possible to use two different types of connection according to installation situation: A - Diagram with power supply by BTicino PoE Switch B - Diagram with local power supply 374000 100 – 240 Vac... -
Page 18: Ethernet Connection
Entrance Panel 10" User and installation manual Ethernet connection LAN PoE Standard LAN PoE BTicino LAN Ethernet Copper cables 2 x Copper cables CABLES LEGEND FLOOR 3 APARTMENT 5 374004 APARTMENT 1 APARTMENT 2 APARTMENT 3 RJ45 373001 RJ45 373001... -
Page 19: Fiber Optic Riser Connection (Case Of Higher Bandwidth Demand)
Entrance Panel 10" User and installation manual Fiber optic riser connection (case of higher bandwidth demand) LAN PoE Standard LAN PoE BTicino LAN Ethernet Optical fiber Copper cables 2 x Copper cables CABLES LEGEND FLOOR 3 APARTMENT 5 374004 APARTMENT 1... -
Page 20: Lift Control 1 - Lift Control, 1 Riser, 1 Entrance Panel
Entrance Panel 10" User and installation manual Lift control 1 - Lift control, 1 riser, 1 entrance panel CABLES LEGEND LAN PoE BTicino LAN Ethernet Copper cables 2 x Copper cables FLOOR 3 APARTMENT APARTMENT APARTMENT APARTMENT 373001 373001 373001... -
Page 21: Lift Control 2 - Lift Control, Multi Riser, 1 Entrance Panel
Entrance Panel 10" User and installation manual Lift control 2 - Lift control, multi riser, 1 entrance panel CABLES LEGEND LAN PoE BTicino LAN Ethernet Copper cables 2 x Copper cables RISER 1 RISER 2 FLOOR 3 FLOOR 3 APARTMENT... -
Page 22: Lift Control 3 - Lift Control, 1 Riser, Multi Entrance Panel
Entrance Panel 10" User and installation manual Lift control 3 - Lift control, 1 riser, multi entrance panel CABLES LEGEND LAN PoE BTicino LAN Ethernet Copper cables 2 x Copper cables FLOOR 3 APARTMENT APARTMENT APARTMENT APARTMENT 373001 373001 373001... -
Page 23: Available Functions
Entrance Panel 10" User and installation manual Available functions CABLES LEGEND LAN PoE BTicino LAN Ethernet Copper cables 2 x Copper cables Fire-fighting system Door open 9 – 24 Vdc 375010 Central Unit Lift Control Access Control Lift Control Door... -
Page 24: Use Of The Device
Entrance Panel 10" User and installation manual Use of the device Introduction After the installation and connection of the device, it is necessary to configure it and create the Community structure. For details see Server DES Software manual. Step Community VLAN network creation Step Community structure definition Step... -
Page 25: Use Of The Device
Entrance Panel 10" User and installation manual Use of the device Home page This page may show different content according to the configuration and systems connected to the device. The Home Page, with all the functions enabled, is shown below. A Current date Current time C Status icons:... -
Page 26: Functions
Entrance Panel 10" User and installation manual Functions Call a IU It is possible to call an IU in different ways: Call using the address in the Community; – – Call using the Alias (alphanumeric code); – Call using the Phonebook The call mode depends on how the community has been configured using the SW. - Page 27 Entrance Panel 10" User and installation manual Call using the address in the Call using the Alias Community (alphanumeric code) A Delete typing Change the type of keypad (numbers/letters) C Send a call 2. Enter the address in the IU Community, 2.
- Page 28 Entrance Panel 10" User and installation manual Call using the Phonebook JHONSMITH JHONBLACK JIMMYWHITE JJHONSMITH JJADONTHOMPSON JJESSEWRIGHT JJACKWHITE JJALENTAYLOR 2. Enter the Alias saved in the AB (e.g. JOHNSMITH) directly. In this mode autocompletion is active 3. Touch the suggested contact to send the call 4.
- Page 29 Entrance Panel 10" User and installation manual A Call duration Address in the IU Community* messages and advertising C Display zone (the home page display is software enabled) *Note: the caller display depends on how the community has been configured using the software. For details see Fundamental concepts When the IU answers, the audio signal bar appears 6.
- Page 30 Entrance Panel 10" User and installation manual When the IU does not answer a message can be recorded (see Answering machine) A message indicates that the call is ended...
-
Page 31: Answering Machine
Entrance Panel 10" User and installation manual Answering machine If the IU does not answer within 30 seconds, it is possible to leave a photo with a voicemail. 1. Touch to record a photo message 2. You have 30 seconds to leave a message. The IU will receive your image and the voice messages 3. -
Page 32: Messages And Advertising
Entrance Panel 10" User and installation manual Messages and advertising When messages are sent to the community via SW, the device displays them in two ways: – during a call (before the IU answers) – when the screen saver is activated. Community message messages coming from the Facility manager about the Community messages coming from the Facility manager showing advertising... -
Page 33: Call A Gs
Entrance Panel 10" User and installation manual Call a GS This function allows to call the reference GS set in the Settings/Guard station section 1. Touch to select the function A GS address* *Note: the caller display depends on how the community has been configured using the software. For details see Fundamental concepts When the GS answers, the audio signal bar appears 2. -
Page 34: Accesses
Access by fingerprint recognition. Need to record the fingerprint Finger print using SW (only for item 374000) *Correct operation requires the configuration of the code from the IU and a resident associated with the apartment in the SW (see SW Community/Person profile management) -
Page 35: Access Using Access Code
Entrance Panel 10" User and installation manual Access using Access Code Using this function it is possible to access the building by typing an Access code. The Access Code is set in the Installation\Access code\local section 1. Touch to select the function 2. - Page 36 Entrance Panel 10" User and installation manual Beeps and visual warnings will confirm that the code has been recognised and the door lock will open.
-
Page 37: Access Using Badge Or Card
Entrance Panel 10" User and installation manual Access using badge or card Using this function you can access the building using a badge or a card. To use this function, the badge or card must be saved in the system via SW. 1. -
Page 38: Access Using Face Recognition
Entrance Panel 10" User and installation manual Access using Face recognition Using this function, the EP camera will recognise your face and you can enter the building automatically without entering a code. To use this function, your face must be saved in the system via SW. If the proximity sensor is active the function will activate automatically, otherwise:... -
Page 39: Access Using Finger Print
Entrance Panel 10" User and installation manual Access using Finger print Using this function, the fingerprint reader will recognise your fingerprint and you can enter the building automatically without entering a code. To use this function, your fingerprint must be saved in the system via SW. 1. -
Page 40: Configurations Using The Device (Settings)
Entrance Panel 10" User and installation manual Configurations using the device (Settings) In this section, it is possible to perform a wide range of configurations that will enable you to make the most of your EP. Access to this section is protected by a password which can be set by the SW 1. - Page 41 Entrance Panel 10" User and installation manual 5. Scroll to display all the functions 6. Touch the icon for the desired configuration, choosing among: It displays various device parameters and performs the reset Address command Setting It enables different functions Date and time It sets the date and time It sets the access code in the Setting menu and the local access...
- Page 42 Entrance Panel 10" User and installation manual Display & Volume It sets some display parameters and the ringtone volume Lift control It sets the Lift control system parameters Ringtone It displays the ringtones Information It displays information about messages in progress management Face settings It sets the parameters for the Face Recognition...
-
Page 43: Address
Entrance Panel 10" User and installation manual Address In this section, it is possible to display the different device parameters. It is also possible to restore the factory settings of the device. 1. Touch to reset the device 2. Touch to confirm Warning: after confirmation, all customisations will be deleted and the parameters will be restored to factory values... -
Page 44: Setting
Entrance Panel 10" User and installation manual Setting In this section it is possible to enable different types of functions. 1. Touch to enable the function 2. Touch to save the setting Fire linkage It enables the Fire-fighting function Lift control enable It enables the Lift control Screen saver enable It enables the screen saver... -
Page 45: Date And Time
Entrance Panel 10" User and installation manual Date and time As default all the devices on the system have date and time aligned with those of the SD. However, it is possible to set the date and time of the single device in this section Note: you can change the date&time only temporarily. -
Page 46: Access Code
Entrance Panel 10" User and installation manual Access code In this section it is possible to set the access code in the Setting menu and the access code to enter the building Settings 1. Enter the old code 2. Enter the new code 3. -
Page 47: Guard Station
Entrance Panel 10" User and installation manual Guard station In this section it is possible to set the EP reference GS. The reference GS intercepts and manages the calls to the IU or anyone called directly by pressing the pushbutton on the Home page (see the Call a GS section) A Address of the current reference GS... -
Page 48: Door Lock
Entrance Panel 10" User and installation manual Door lock In this section it is possible to set different parameters of the EP door lock A A It restores the factory settings 1. Door Status The Door Status function allows to receive door status notifications, and therefore a warning when the door is left open. -
Page 49: Background
Entrance Panel 10" User and installation manual Background In this section it is possible to set the interface background 1. Select the background 2. Touch to save the setting Note: it is possible to select other backgrounds or create new ones using the SW... -
Page 50: Information
Entrance Panel 10" User and installation manual Information In this section it is possible to display different information on the device A Device address Item code C Versions of the different device components... -
Page 51: Language
Entrance Panel 10" User and installation manual Language In this section it is possible to set the interface language 1. Touch to open the language selection panel 2. Select the language 3. Touch to save the setting... -
Page 52: User Guide
Entrance Panel 10" User and installation manual User guide In this section it is possible to download this manual using the QR code 1. Using a smartphone, scan the QR Code 2. Search for the 374000 374002 code 3. Download the manual... -
Page 53: Display & Volume
Entrance Panel 10" User and installation manual Display & Volume In this section it is possible to set some display parameters and adjust the ringtone volume A It adjusts the brightness (backlighting) It adjusts the ringtone volume C It adjusts the call volume D It adjusts the tone volume when a key is pressed It adjusts the screen saver activation time It restores the factory settings... -
Page 54: Lift Control
Entrance Panel 10" User and installation manual Lift control In this section it is possible to set some Lift Control system parameters Master mode 1. Select if the EP is Master (9600 or 115200), i.e. directly connected with the lift interface via RS485 (for interface 375010 select 9600) 2. - Page 55 Entrance Panel 10" User and installation manual Slave mode 1. Select if the EP is Slave, i.e. not directly connected with the lift interface via RS485 but uses another EP as gateway. 2. Enter the IP address of the Master EP (only if EP is slave)
-
Page 56: Ringtone
Entrance Panel 10" User and installation manual Ringtone In this section it is possible to listen to the tones associated to the different types of ringtones or other. A Alarm tone Call in progress tone (ringback) C Confirmation key tone D Ringtone not used (future use) 1. -
Page 57: Info Management
Entrance Panel 10" User and installation manual Info management In this section it is possible to display the information about messages in progress A Message availability time (expiration date) Time of message appearance C Type of message (title) D Number of the message (ID) -
Page 58: Face Settings
Entrance Panel 10" User and installation manual Face settings In this section it is possible to set some Face Recognition parameters A Camera operating modes: 2D - in this mode, the depth of the image is not checked, and so showing a photograph opens the EP lock 3D - in this mode, the depth of the image is checked, so recognition is only confirmed if someone is in front of the EP (DEFAULT) Colour - in this mode, the face is only checked by the colour camera (DAY) - Page 59 Entrance Panel 10" User and installation manual Enter the distance from the proximity to activate the recognition function Enter the time from when the Home Page appears to when the Face recognition function starts During the face recognition, any other operation is inhibited, even the call. This time is important if the Face recognition is unsuccessful.
- Page 60 BTicino SpA Viale Borri, 231 21100 Varese www.bticino.com BTicino SpA reserves the right to change at any time the content of this manual, and to communicate the changes made in any form, and in any way, deemed appropriate.
Need help?
Do you have a question about the 374000 and is the answer not in the manual?
Questions and answers