Table of Contents
Advertisement
Quick Links
INSTALLATION INSTRUCTIONS
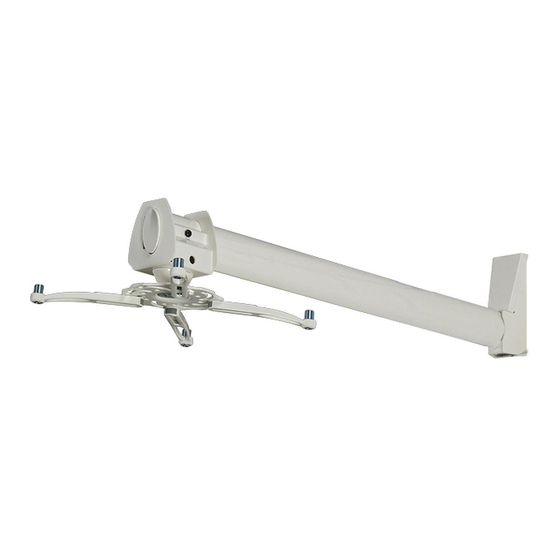
Single-Stud Short-Throw Projector Wall Mount
Model: EST150
NORTH AMERICA
EUROPE
3130 East Miraloma Avenue
Unit 3, The Moorings Business Park, Channel Way
Anaheim, CA 92806 USA
Longford, Coventry, CV6 6RH, UK
USA and Canada
Phone: +44 (0)24 7664 4105
Phone: 1-800-368-9700
Fax: +44 (0)24 7664 4165
Fax: 1-800-832-4888
Other Locations
Phone: (001) 714-632-7100
Fax: (001) 714-632-1044
9530-011-021-01
Advertisement
Table of Contents

Related Manuals for Premier Mounts EST150


Summary of Contents for Premier Mounts EST150
-
Page 1: Heading
INSTALLATION INSTRUCTIONS Single-Stud Short-Throw Projector Wall Mount Model: EST150 NORTH AMERICA EUROPE 3130 East Miraloma Avenue Unit 3, The Moorings Business Park, Channel Way Anaheim, CA 92806 USA Longford, Coventry, CV6 6RH, UK USA and Canada Phone: +44 (0)24 7664 4105... -
Page 2: Table Of Contents
THESE INSTALLATION INSTRUCTIONS IN AN EASILY ACCESSIBLE LOCATION FOR FUTURE REFERENCE. PREMIER MOUNTS DOES NOT WARRANT AGAINST DAMAGE CAUSED BY THE USE OF ANY PREMIER MOUNTS PRODUCT FOR PURPOSES OTHER THAN THOSE FOR WHICH IT WAS DESIGNED OR DAMAGE CAUSED BY UNAUTHORIZED ATTACHMENTS OR... -
Page 3: Installation Tools
The following tools may be required depending upon your particular installation. They are not included. Parts List Make sure your Premier Mounts product has the following hardware and components before beginning installation. If there are parts missing and/or damaged, stop the installation and call Premier Mounts at (800) 368-9700. -
Page 4: Features
Features The Single-Stud Short-Throw Projector Wall Mount (EST150) is a simple and elegant tool for mounting a wide variety of short-throw projectors. Its design allows you to use the same mount even if you need to replace the projector with a different model. -
Page 5: Determining The Installation Height
This measurement will be listed in the Users Manual. Center of the lens to the top of the projector bracket. If single-stud EST150, add 5.14˝ to the calculated total. This total distance will be the location for the lower mounting point. -
Page 6: Wood Stud Installation
2) Place the projector arm’s second mounting hole over the first mounting point mark, then use a pencil to mark the upper mounting point. Two (2) mounting points must be used. Page 6 Visit the Premier Mounts website at http://www.premiermounts.com Stud finder Projector Installation Instructions EST150... - Page 7 Use two (2) M5 x 10mm security screws to attach the projector arm cover plate to the projector arm. Go to the “Throw Distance Calculation” section on page 10. Installation Instructions Visit the Premier Mounts website at http://www.premiermounts.com Drill #14 x 2” Wood Screw Projector Wood stud not shown...
-
Page 8: Throw Distance Calculation
Locate the mounting points on the bottom of the projector (see arrows). Proceed to the “Attaching the Mount Carriage” section. Page 8 Visit the Premier Mounts website at http://www.premiermounts.com Calculations X = Manufacturers recommended throw distance Z = Distance from wall to face of... -
Page 9: Attaching The Mount Carriage
If your projector has a single mounting point, skip to the “Single Mounting Point Installation” section on page 14. Installation Instructions Visit the Premier Mounts website at http://www.premiermounts.com Small Straw or Toothpick Small Straw Depth Plus 1/8” Allowance Small Straw... -
Page 10: Multiple Mounting Point Installation
3) When the desired position is achieved, tighten the mounting screws to the projector and then tighten the hex head leg screws with the M5 Allen wrench. Page 10 Visit the Premier Mounts website at http://www.premiermounts.com EST150 Mount carriage not shown. Screws shown for illustration purposes only. - Page 11 If the M6 square nut is not aligned with any slot, you can use any thin implement, such as a toothpick, to nudge it into alignment. Installation Instructions Visit the Premier Mounts website at http://www.premiermounts.com Side-to-Side Center of Gravity Front-to-Back...
-
Page 12: Single Mounting Point Installation
Do not overtighten the ¼-20 x Proceed to the “Attaching the Mount Carriage to the Projector Arm” section on page 15. Page 12 Visit the Premier Mounts website at http://www.premiermounts.com screw. ″ EST150 Installation Instructions... -
Page 13: Attaching The Mount Carriage To The Projector Arm
(1) M5 x 10mm security screw to tighten the mount carriage in place. Proceed to the “Cable Routing (Optional)” section on page 16. Installation Instructions Visit the Premier Mounts website at http://www.premiermounts.com Shown with optional EST-WP dual stud plate M5 x 10mm Security Screw... -
Page 14: Cable Routing (Optional)
Securing the Projector (Optional) Your EST150 includes one (1) Security Barrel which can provide additional theft deterrence for your projector. Shown below are two examples of how you can use the security barrel to make your projector installation more secure: the PCB-CSL1 Security Cable (sold separately) or padlock (combination or keyed;... -
Page 15: Mount Adjustment
2) Tighten both M5 set screws using the M5 Allen wrench. Technical Specifications All measurements are in inches(mm). 3.25 8.59 Installation Instructions Visit the Premier Mounts website at http://www.premiermounts.com 49.42 1255 1.81 Ø1 3.79 M5 Set Screw 6.37 2.00... -
Page 16: Warranty
At the sole option of Premier Mounts, Premier Mounts will repair or replace any product or product part that is defective. If Premier Mounts chooses to replace a defective product or part, a replacement product or part will be shipped to you at no charge, but you must pay any labor costs.
Need help?
Do you have a question about the EST150 and is the answer not in the manual?
Questions and answers