Table of Contents
Advertisement
Quick Links
Automatic Multi-Satellite TV Antenna
Installation Manual
Model SK2SWM3
Trav'ler
Pro DIRECTV
Antenna
®
®
To download the manual in color and for up-to-date product
and warranty information, visit winegard.com/travler
For Technical Services:
Email help@winegard.com or call 1-800-788-4417
For receivers and programming:
Call 1-866-609-9374
Product registration:
Create an account to register your product at
winegard.com/register
2452460 REV 5-21
Advertisement
Table of Contents

Related Manuals for Winegard Trav'ler Pro SK2SWM3


Summary of Contents for Winegard Trav'ler Pro SK2SWM3
- Page 1 Trav'ler Pro DIRECTV Antenna ® ® To download the manual in color and for up-to-date product and warranty information, visit winegard.com/travler For Technical Services: Email help@winegard.com or call 1-800-788-4417 For receivers and programming: Call 1-866-609-9374 Product registration: Create an account to register your product at winegard.com/register...
-
Page 2: Specifications
Before Installing the Antenna You have selected the Winegard Trav'ler Pro automatic multi-satellite TV antenna, with a low travel height (under ten inches). The ® ® Trav'ler Pro antenna will deliver the ability to view multiple satellites at the same time with unmatched signal strength, maximum HD capabilities, and easy-to-use functionality—just like you get at home. -
Page 3: Tools Needed
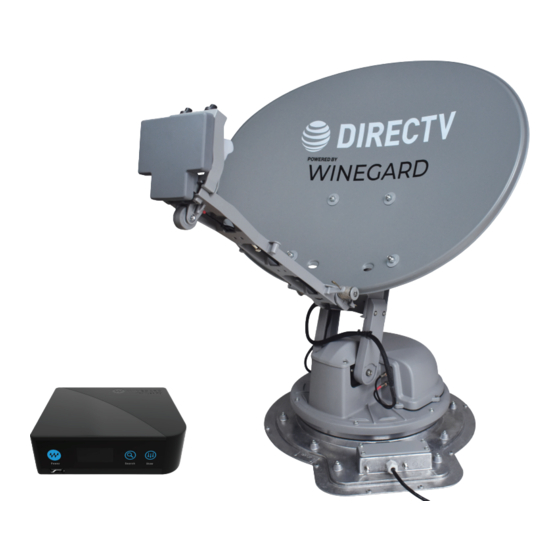
Parts Mount base with 30' power/control cable Reflector Preinstalled on transition plate Interface box (IDU) Interface box 21 V SWM power supply power inserter Mounting Reflector Reflector Painted Cable entry Splitter 24” AC power cord 30’ Black coax cable screw (20) bolt (4) nut (4) washer (4) -
Page 4: Clearance Requirements
Make sure cables are long enough to reach their destination points inside the vehicle. For power/control cable runs longer than 30', an extension may be purchased. Winegard recommends using Model CL-SK26 25' extension cable. Do not exceed 55' of cable! -
Page 5: Install The Antenna
(see figure 6). When installing the antenna on a rubber roof, Winegard recommends using a model SKA-004 roller plate, which is designed to create a solid SKA-004 landing area for the roller. If not using this plate,... - Page 6 Overall Setup 1. Drill a 1" hole in the roof, and push the power/control cable (and 3. Connect the power supply to the "48 VDC" port of the IDU. coax cable for OPTION 1) through the hole. (For OPTION 2, if 4.
- Page 7 Install the Reflector (New Install) When the sealant around the transition plate and cable entry plate has begun to cure, check that there is nothing above the unit that might prevent the antenna from raising. Then follow the instructions to raise the antenna for reflector installation. 1.
- Page 8 Upgrade Installation Upgrade to Trav'ler Pro Raise the Antenna. 6. Press SELECT to the move the asterisk to "Yes" and press 1. Power on the IDU by pressing and holding the Power button ENTER. You will need to repeat the "Raise Antenna" process for three seconds, then press and hold the Enter button to enter the USER MENU.
- Page 9 Disconnect the Cables Remove the Reflector (optional) 1. Remove the four 5/16" screws from the cable cover, and Once the IDU has been powered off and the power/control remove the cable cover (figure 11). cable and power cord have been disconnected you will need to get on top of the coach.
- Page 10 Install the New Turret Replace IDU and Power Supply 1. If the base seal or gasket is on the transition plate 1. At this point replace the original IDU and power supply with make sure to remove both (see Figure 15). the Trav'ler Pro IDU and power supply.
- Page 11 Upgrade Reflector Installation cont. 7. Line up the four holes on the reflector with the four holes on Bolts are inserted from the back of the the mounting bracket. Insert a reflector bolt through one of reflector. Washers and nuts are threaded the four holes on the back of the reflector.
- Page 12 If a defect in material or workmanship is discovered, Customer may take the product to an authorized Winegard dealer for service. Customer must provide proof of purchase to verify the product is under warranty. If the product is brought to an authorized Winegard dealer for service prior to expiration of year one (1) of the warranty period and a defect in material or workmanship is verified by Winegard Technical Services, Winegard Company will cover the Winegard dealer’s labor charges for warranty service.
Need help?
Do you have a question about the Trav'ler Pro SK2SWM3 and is the answer not in the manual?
Questions and answers